Center Panel Removal/Installation
- Remove the following parts:
- Front scuff plate inner (See
FRONT SCUFF PLATE REMOVAL/INSTALLATION .)
- Front side trim (See
FRONT SIDE TRIM REMOVAL/INSTALLATION .)
- Console panel (See
CONSOLE PANEL REMOVAL/INSTALLATION .)
- Console (See
CONSOLE REMOVAL/INSTALLATION .)
- Hood release lever (See
HOOD LATCH AND RELEASE LEVER REMOVAL/INSTALLATION
).
- Lower panel (See
LOWER PANEL REMOVAL/INSTALLATION .)
- Insert a tape-wrapped flathead screwdriver into the service hole and slide it in the direction of arrow (1).
- After sliding the flathead screwdriver, insert it in the direction of arrow (2) and remove clip A.
CAUTION:
- Insert a flathead screwdriver until clip A can be removed while being careful not to allow the climate control unit to be damaged.
- Remove clip A on the opposite side in the same procedure.
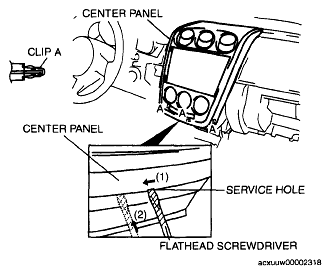 Courtesy of MAZDA MOTORS CORP.
- Insert a tape-wrapped flathead screwdriver into the service hole and lift up the center panel with clips B pressed in, then remove clips B.
- Pull the center panel outward and detach clips C.
- Remove the center panel.
- Install in the reverse order of removal.
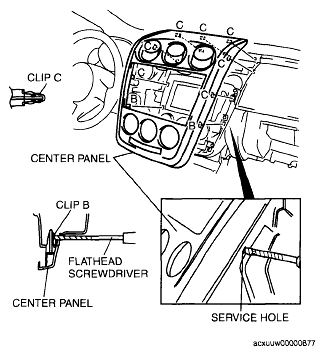 Courtesy of MAZDA MOTORS CORP.