B280F With EZ115K System
- Check the ground connections from ignition ECU and power stage to inlet manifold ground to ensure proper connection. If ground connections are good, disconnect one spark plug wire from a spark plug. Attach a test spark plug to the disconnected spark plug wire and ground spark plug, crank engine and monitor spark.
- A strong Blue-White spark indicates an engine or fuel system malfunction. If no spark or a weak spark is present, reconnect spark plug wire to spark plug. Disconnect coil wire from distributor cap and install test spark plug. Crank engine and monitor spark. If no spark or weak spark is present, the coil or ignition system primary circuit is defective.
- If a strong Blue-White spark is present, check ignition rotor, distributor housing and spark plug wires. Replace components as necessary. If all the previous steps show no defective components, proceed to next step.
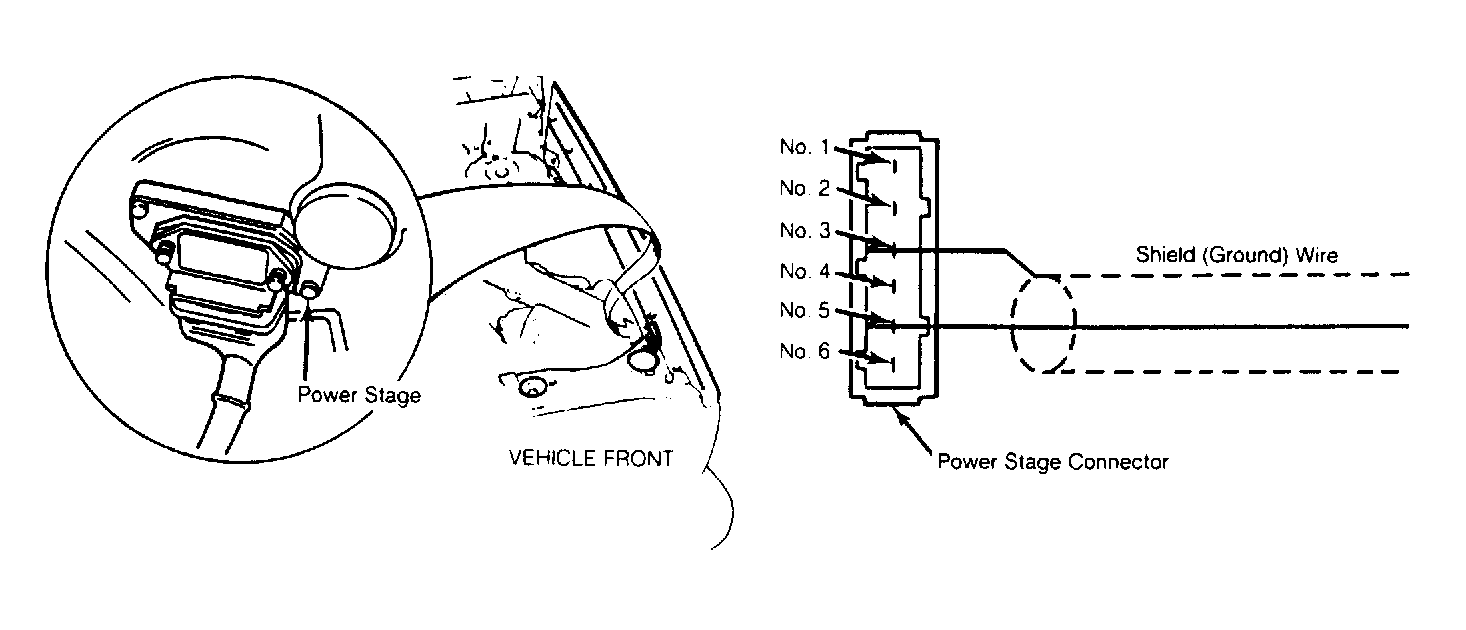
- Remove air cleaner assembly. Ensure ignition is off and disconnect power stage connector. Remove connector dust cover. See Fig 1. Attach multimeter negative (-) lead to ground and positive (+) lead to connector pin No. 4. Turn ignition on and note voltage reading. Voltage should be approximately 12 volts.
 Courtesy of VOLVO CARS OF NORTH AMERICA.
- Leave multimeter attached and crank starter motor. Voltage should be approximately 12 volts. If voltage is too low, check battery and charging system. If voltage is not present, check Black wire from ignition ECU to ignition coil and power stage. Repair or replace as necessary.
- Check power stage ground resistance with multimeter attached between power stage connector pin No. 2 and ground. Resistance should be zero ohm. Check ignition coil resistance with multimeter attached between power stage connector pin No. 1 and No. 4. Resistance should be 0.6-1.0 ohm. If resistance is below 0.6 ohm, check wires for short circuit.
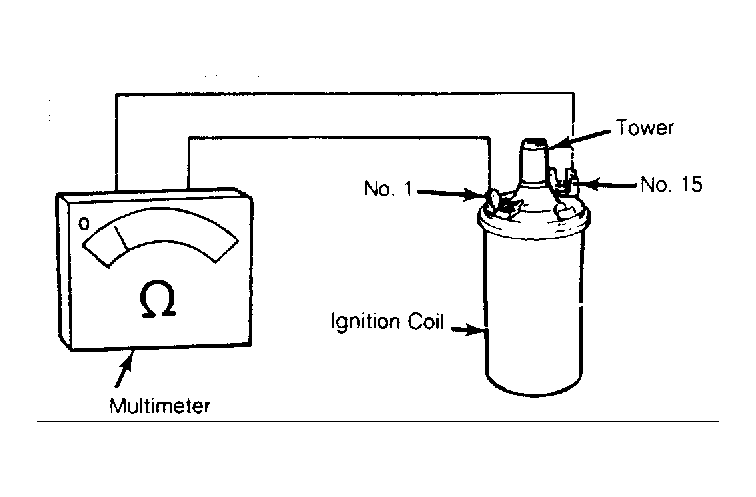
- If wires are okay but resistance is still below 0.6 or above 1.0 ohm, attach multimeter between ignition coil terminal No. 1 and No. 15. See Fig 2. If resistance is below 0.6 or above 1.0 ohm install a new ignition coil. If resistance is 0.6-1.0 ohm, check continuity of wires between ignition coil and power stage connector pin No. 1 and No. 4. Repair or replace as necessary.
 Courtesy of VOLVO CARS OF NORTH AMERICA.
- Check shield wire (ground) between ignition ECU and power stage. See Fig 1. Shield wire should be connected to power stage connector pin No. 3. Repair if necessary. Check that power stage receives ignition ECU signal by disconnecting wires from ignition coil terminal No. 1. Attach positive (+) lead of multimeter to power stage connector pin No. 5 and negative (-) lead to ground.
- Crank starter motor and monitor voltage reading. Voltage should be 0-2 volts. If voltage is within specifications, install a new power stage and recheck circuit. If a very low voltage is present or voltage continuously fluctuates, check wiring between ignition ECU and crankshaft position sensor. Repair or replace as necessary.
- Turn ignition off. Reconnect disconnected components. Ensure all connectors are secure and properly connected. With ignition off, remove panel from lower left dashboard and disconnect ignition ECU connector. Remove dust cover from connector. Visually inspect that all pin connection sleeves are at the same height.
 Courtesy of VOLVO CARS OF NORTH AMERICA.
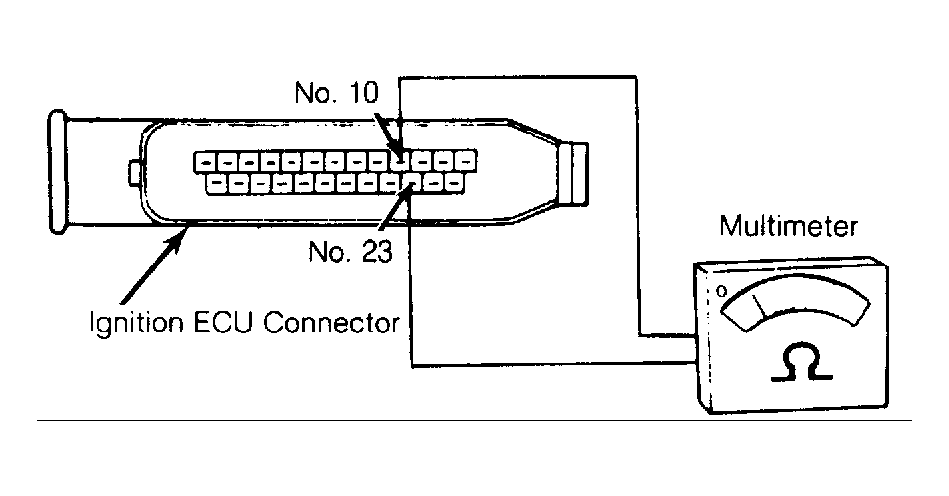
- Attach multimeter positive (+) lead to ignition ECU connector pin No. 6 and negative (-) lead to ground. Turn ignition on. Voltage should be approximately 12 volts. Check resistance of engine RPM position sensor by attaching multimeter leads between ignition ECU connector pin No. 10 and No. 23. See Fig 3. Resistance should be 500-600 ohms. Check and ensure shield wire (ground) is connected to ECU connector pin No. 11.
- Turn ignition off. If no defects are found after performing all previous steps, or if engine still malfunctions after repairs, install a new ignition ECU. Recheck system as necessary.