- Raise and support the vehicle. See RAISE VEHICLE - 2 STANDS
.
- Remove the rear underhood apron. See UNDERHOOD TRIM - REAR APRON ASSEMBLY - REMOVE AND REPLACE
.
- Unlock the gateway. See GATEWAY UNLOCK
.
- Touch Service Mode > Thermal > Refrigerant System > Start Thermal Fill Drain (Coolant + Refrigerant)
on the touchscreen to start the routine and allow the routine to complete.
- Disconnect the LV power. See LV BATTERY - LI-ION - DISCONNECT AND CONNECT
.
- Remove the 2nd row lower seat cushion. See 2ND ROW SEAT ASSEMBLIES - 2ND ROW SEAT CUSHION - REMOVE AND REPLACE
.
- Perform Vehicle HV Disablement Procedure. See VEHICLE HV DISABLEMENT PROCEDURE
.
- Remove the LH and RH wheels. See WHEEL ASSEMBLY - REMOVE AND INSTALL
.
- Remove the rear aero shield panel. See REAR UNDERTRAY AND DIFFUSER - MODEL 3/Y, REAR AERO SHIELD - REMOVE AND REPLACE
.
- Remove the LH and RH rear suspension covers. See REAR UNDERTRAY AND DIFFUSER - LH REAR SUSPENSION COVER - REMOVE AND REPLACE
.
- Remove the rear fascia. See BUMPER AND FASCIA - REAR BUMPER FASCIA - REAR FASCIA - REMOVE AND INSTALL
.
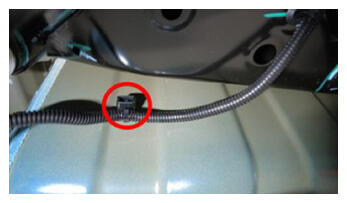
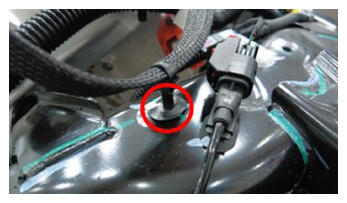
- Disconnect the RH subframe harness electrical connector.
 Courtesy of TESLA, INC. Courtesy of TESLA, INC.
|
- Use a clip prytool to release the clip that attaches the RH subframe harness to the body.
 Courtesy of TESLA, INC. Courtesy of TESLA, INC.
|
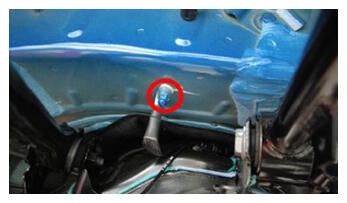
- Remove the nut that attaches the rear drive unit ground strap to the body.
 Courtesy of TESLA, INC. Courtesy of TESLA, INC.
|
- Remove the stabilizer bar. See REAR STABILIZER BAR AND LINKS - REAR STABILIZER BAR ASSEMBLY - REMOVE AND REPLACE
.
- Remove the rear HV battery skid plate. See HIGH VOLTAGE BATTERY ASSEMBLY - SKID PLATE, REAR, ECOAT, ENCLOSURE - REMOVE AND REPLACE
.
- Remove the rear drive unit inlet hose. See HOSES - TUBE (PT), RDU INVERTER INLET - REMOVE AND REPLACE
.
- Remove the HV battery to the rear drive unit harness. See HV HARNESSES - ASSEMBLY, HV HARNESS, RDU - REMOVE AND REPLACE
.
- Position the rear subframe lifting tool beneath the rear subframe.
- Attach an air hose to the rear subframe lifting tool.
- With an assistant, raise the rear subframe lifting tool to support the rear subframe.
- Loop the straps over the rear subframe, hook the ends of the straps to the metal rings, and then pull the straps tight to restrain the subframe to the rear subframe lifting tool.
NOTE:
Lower the vehicle to give more slack to connect the straps to the rings, if necessary.
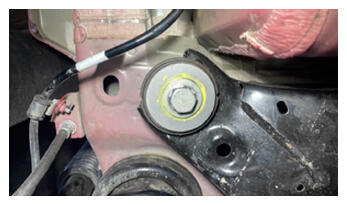
- Mark the LH and RH rear subframe bolts for realignment during installation.
NOTE:
LH shown; RH similar
 Courtesy of TESLA, INC. Courtesy of TESLA, INC.
|
- Remove the LH and RH rear subframe front shear plates. See REAR SUBFRAME - FRONT LEFT, REAR SUBFRAME SHEAR PLATE - REMOVE AND REPLACE
.
- Remove and discard the LH and RH bolts that attach the rear subframe to the body.
NOTE:
LH shown; RH similar
 Courtesy of TESLA, INC. Courtesy of TESLA, INC.
|
- With an assistant, slowly lower the rear subframe and rear drive unit about 3.25 in (8.25 cm) from the vehicle.
- Tilt the subframe fixture forward to access the breather.
- Support the center of the rear drive unit with rubber or wood blocks.
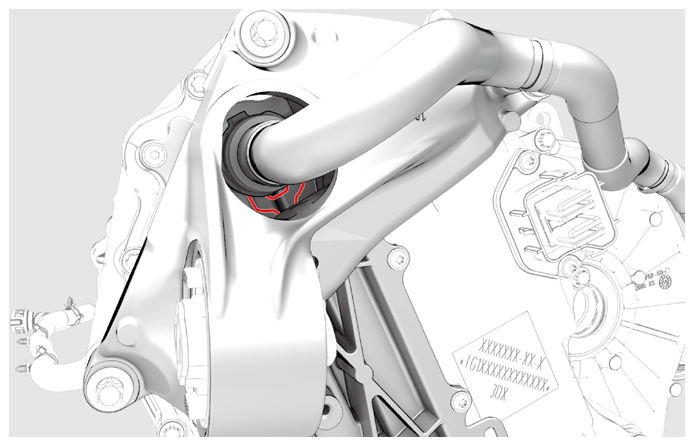
- Use a clip pry tool to release the clip that attaches the rear drive unit ground strap to the rear subframe.
 Courtesy of TESLA, INC. Courtesy of TESLA, INC.
|
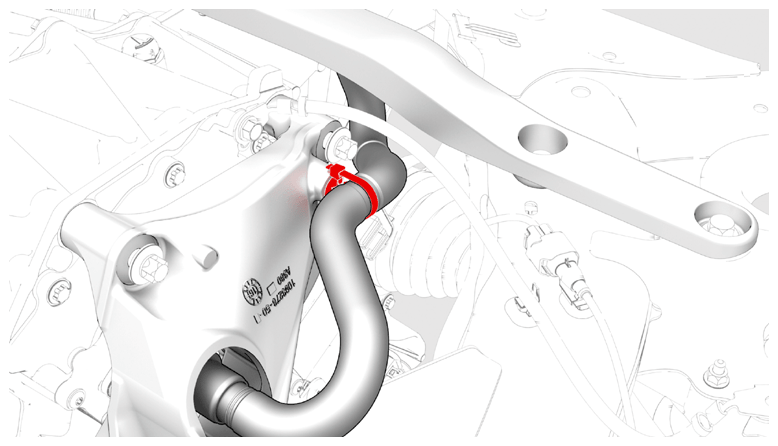
- Release the clip that attaches the inverter to oil cooler hose to the LH mount.
 Courtesy of TESLA, INC. Courtesy of TESLA, INC.
|
- Release the clip that attaches the inverter to oil cooler hose to the inverter fitting, and remove the hose from the inverter.
 Courtesy of TESLA, INC. Courtesy of TESLA, INC.
|
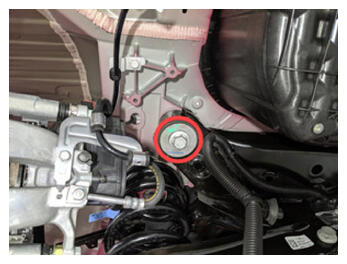
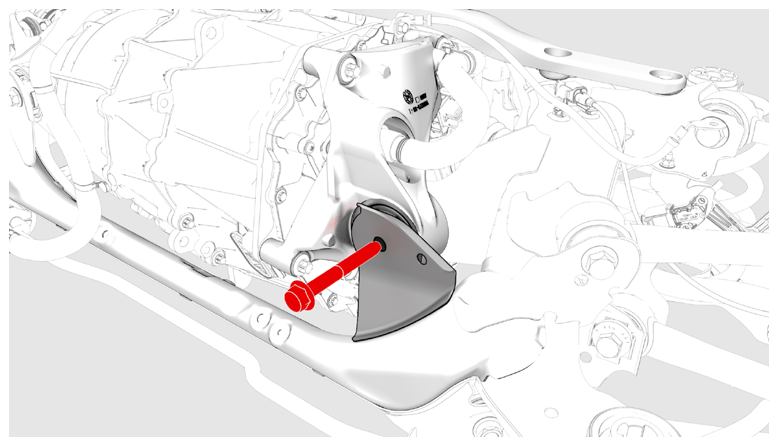
- Remove and discard the bolt that attach the LH mount to the subframe.
 Courtesy of TESLA, INC. Courtesy of TESLA, INC.
|
- Remove the bolts (x3) that attach the LH mount to the rear drive unit, and remove the mount from the rear drive unit.
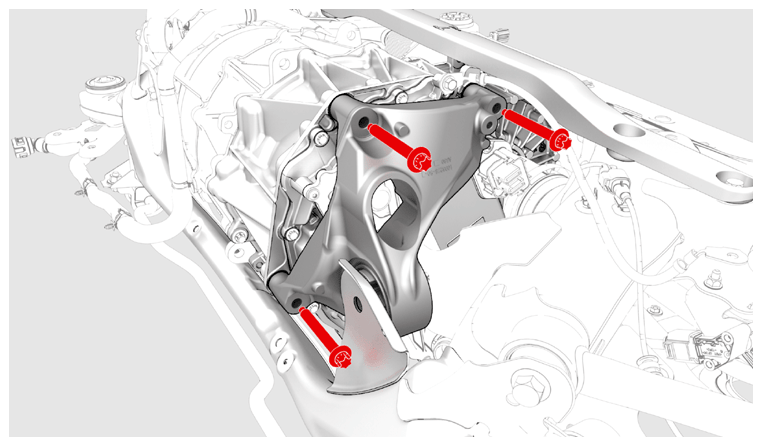 Courtesy of TESLA, INC. Courtesy of TESLA, INC.
|