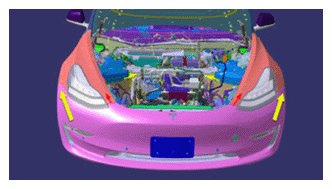
- Vehicle preparation
NOTE:
Ensure vehicle is not charging before the repair
- Open all four doors
NOTE:
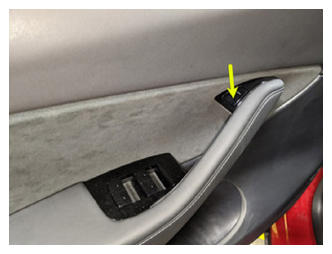
Open LH front door
- Lower LH front window
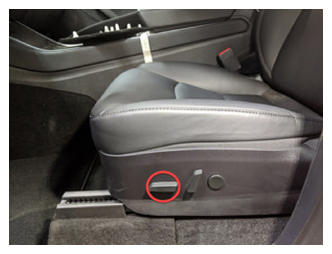
- Move LH front seat forward
- Move RH front seat forward
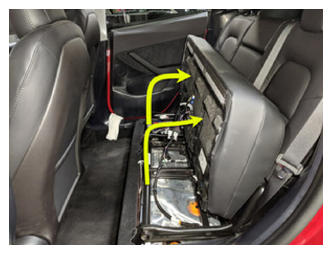
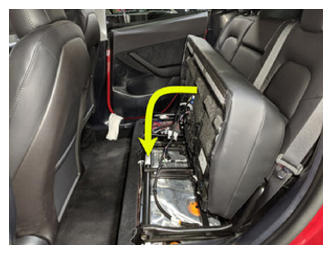
- Release 2nd row seat cushion
NOTE:
Lift front edge of seat cushion upward to release foam from frame, Pull towards front of vehicle then tilt bench against 40/60 back
 Courtesy of TESLA, INC. Courtesy of TESLA, INC.
|
- Move LH front seat backward
 Courtesy of TESLA, INC. Courtesy of TESLA, INC.
|
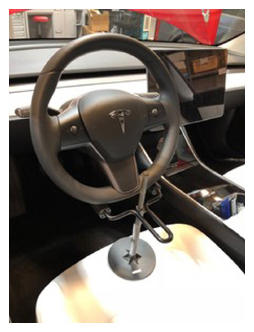
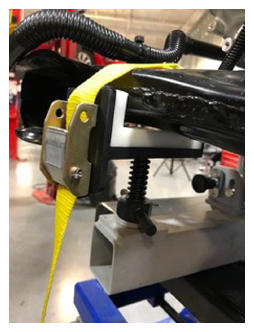
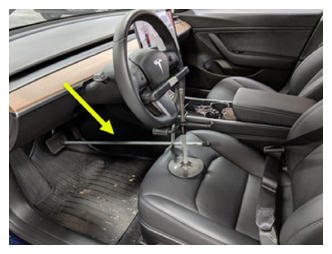
- Set steering wheel straight ahead
- Lock steering wheel into position
NOTE:
Protect seat from damage
 Courtesy of TESLA, INC. Courtesy of TESLA, INC.
|
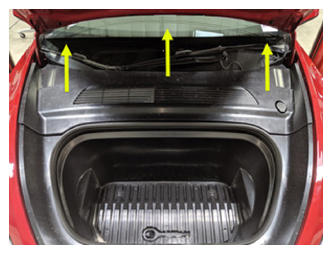
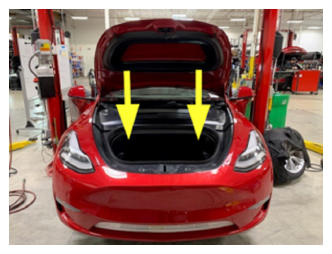
- Open hood
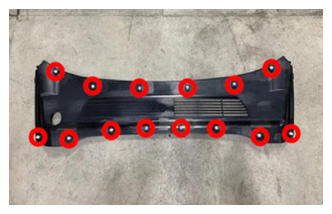
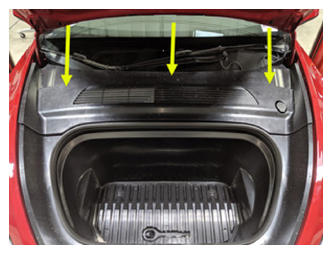
- Remove rear apron
NOTE:
14x clips
 Courtesy of TESLA, INC. Courtesy of TESLA, INC.
|
 Courtesy of TESLA, INC. Courtesy of TESLA, INC.
|
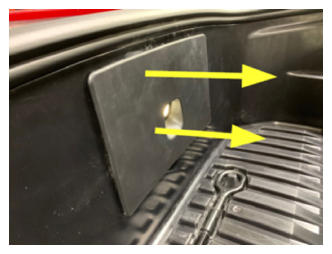
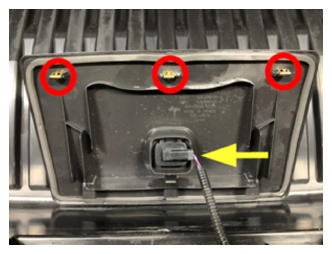
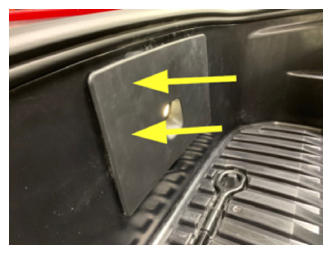
- Remove access panel
NOTE:
3x clips, 1x connector
 Courtesy of TESLA, INC. Courtesy of TESLA, INC.
|
 Courtesy of TESLA, INC. Courtesy of TESLA, INC.
|
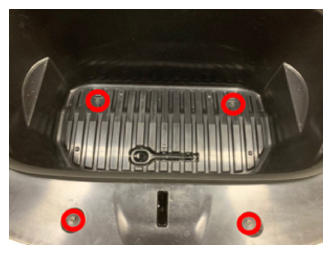
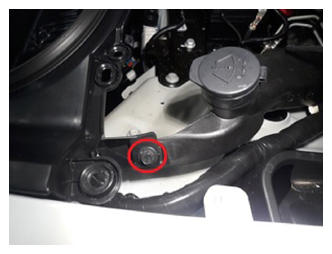
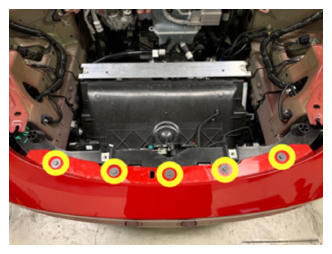
- Remove fasteners securing the frunk assembly
NOTE:
5x bolts, 10 mm, 5 N.m, Newer vehicles may be equipped with 1x push clip securing frunk to reservoir neck
 Courtesy of TESLA, INC. Courtesy of TESLA, INC.
|
 Courtesy of TESLA, INC. Courtesy of TESLA, INC.
|
- Remove frunk assembly from vehicle
NOTE:
6x clips, Replace any clips if broken or missing
 Courtesy of TESLA, INC. Courtesy of TESLA, INC.
|
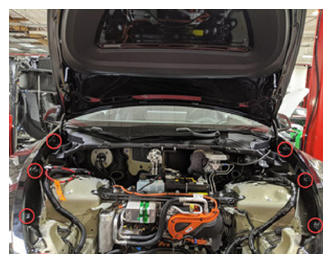
- Remove fasteners holding upper portion of front fascia to vehicle
NOTE:
5x bolts, 10 mm, 4 N.m
 Courtesy of TESLA, INC. Courtesy of TESLA, INC.
|
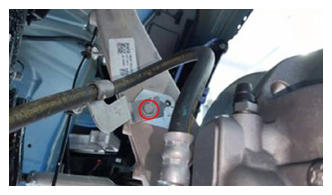
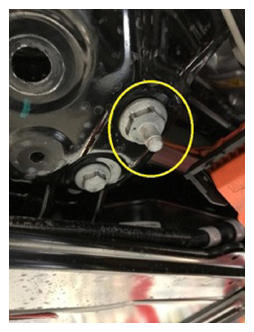
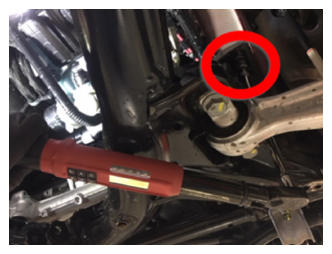
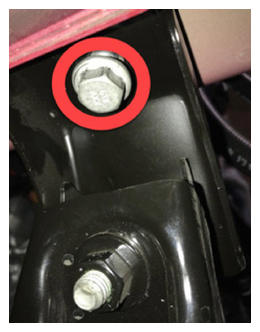
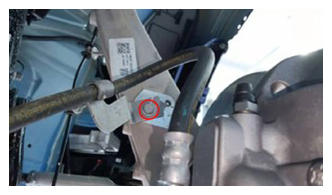
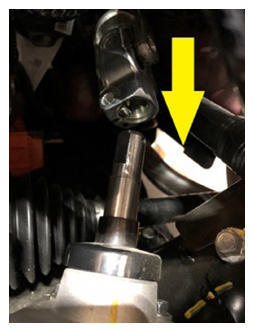
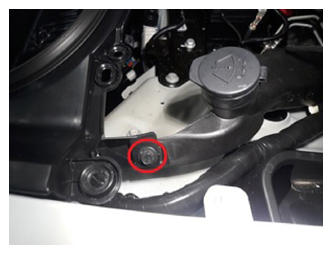
- Remove bolt securing the steering gear assembly to intermediate shaft assembly
NOTE:
1x bolt, 13 mm, 18 N.m
 Courtesy of TESLA, INC. Courtesy of TESLA, INC.
|
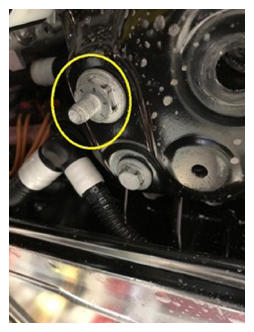
- Slide the electric steering column upward to remove it from the steering gear assembly
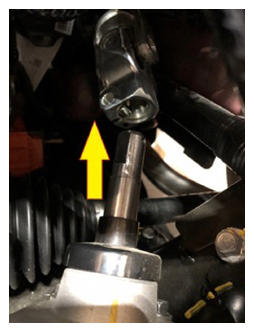 Courtesy of TESLA, INC. Courtesy of TESLA, INC.
|
- Power off vehicle from center display
NOTE:
Via Controls > Safety & Security > Vehicle Power > Power Off
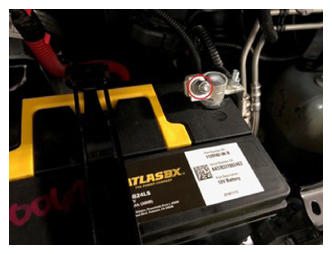
- Disconnect 12V negative terminal and first responders loop
NOTE:
1x nut, 10 mm, 6 N.m, 1x connector. Ensure vehicle is in park, climate control system is off, and vehicle is not charging before disconnecting 12V. Negative terminal should be disconnected before FRL. Allow 2 minutes for all electrical circuits to fully discharge
 Courtesy of TESLA, INC. Courtesy of TESLA, INC.
|
 Courtesy of TESLA, INC. Courtesy of TESLA, INC.
|
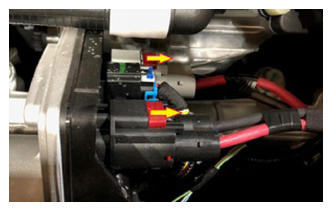
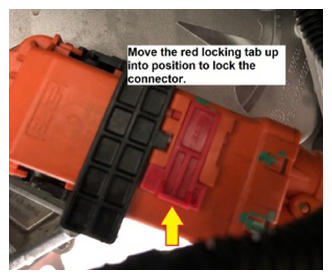
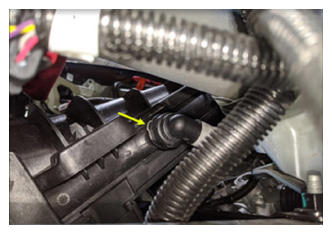
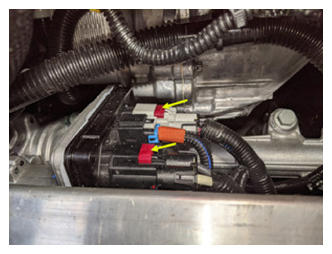
- Disconnect the steering gear assembly connectors
NOTE:
2x connectors. Two stage connectors. Slide red locking tab to unlock, then depress the connector release to disconnect
 Courtesy of TESLA, INC. Courtesy of TESLA, INC.
|
- Remove all items from pockets and ensure not wearing metal items
 Courtesy of TESLA, INC. Courtesy of TESLA, INC.
|
 Courtesy of TESLA, INC. Courtesy of TESLA, INC.
|
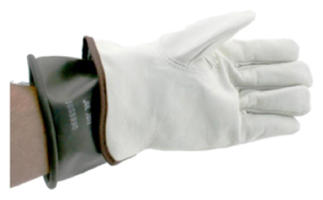
- Inspect HV insulating gloves
NOTE:
Check gloves for damage prior to use. Refer to Tech Note TN-15-92-003
, "High Voltage Awareness Care Points" for information on inspecting HV gloves.
 Courtesy of TESLA, INC. Courtesy of TESLA, INC.
|
- Put on HV insulating gloves and leather over gloves
NOTE:
Make sure to wear Electrical Protective Gloves any time Hioki tester is used
 Courtesy of TESLA, INC. Courtesy of TESLA, INC.
|
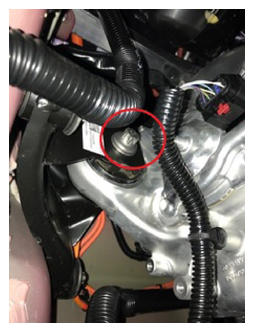
- Remove the bolts securing penthouse probe lid cover to penthouse cover
NOTE:
2x bolts, EP10 5-Lobe, 6 N.m. Discard after removal
 Courtesy of TESLA, INC. Courtesy of TESLA, INC.
|
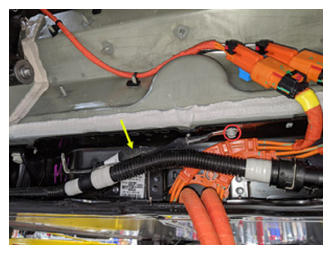
- Remove the penthouse probe lid cover from the penthouse cover
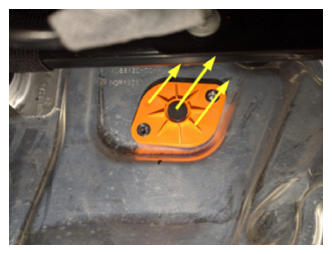 Courtesy of TESLA, INC. Courtesy of TESLA, INC.
|
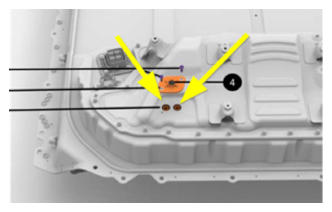
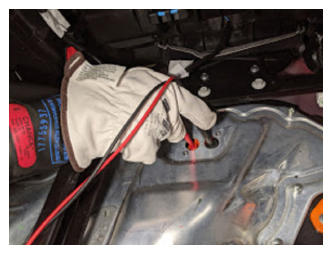
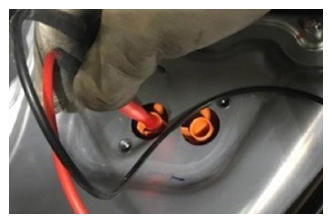
- Verify no high voltage
NOTE:
Make sure to wear PPE (HV gloves, safety glasses) when working on high voltage component. Measure B+ to Ground. B- to Ground. B+ to B-. If voltage is greater than 10V. Pack contactors are not open or welded. Stop work and reach out to Service Engineering
 Courtesy of TESLA, INC. Courtesy of TESLA, INC.
|
 Courtesy of TESLA, INC. Courtesy of TESLA, INC.
|
 Courtesy of TESLA, INC. Courtesy of TESLA, INC.
|
 Courtesy of TESLA, INC. Courtesy of TESLA, INC.
|
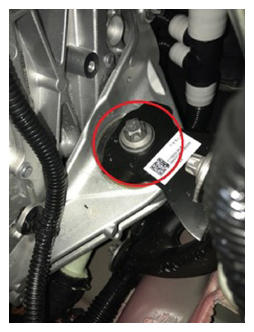
- Position the penthouse probe lid cover to the penthouse cover
NOTE:
Inspect gasket to confirm it has no visual damage
 Courtesy of TESLA, INC. Courtesy of TESLA, INC.
|
 Courtesy of TESLA, INC. Courtesy of TESLA, INC.
|
- Install the bolts securing penthouse probe lid cover to penthouse cover
NOTE:
2x bolts. EP10 5-Lobe, 6 N.m, Install new rubber washer bolts
 Courtesy of TESLA, INC. Courtesy of TESLA, INC.
|
- Remove HV insulating gloves
- Raise vehicle fully and lower lift onto locks
NOTE:
Set vehicle to comfortable working height. Make sure there's an audible click of the locks on both sides before lowering, otherwise vehicle may tilt to the side
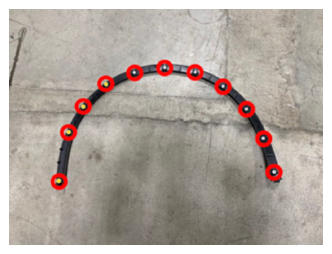
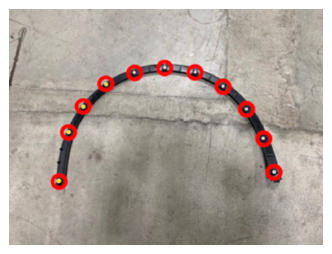
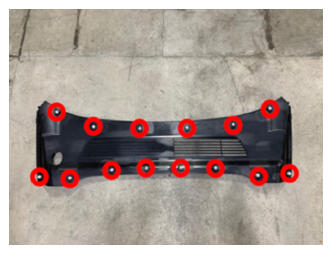
- Remove outer fasteners from front aero shield
NOTE:
7x bolts, 10 mm, 5 N.m
 Courtesy of TESLA, INC. Courtesy of TESLA, INC.
|
- Remove remaining nuts and remove front aero shield from vehicle
NOTE:
2x nuts, 15 mm, 5 N.m
 Courtesy of TESLA, INC. Courtesy of TESLA, INC.
|
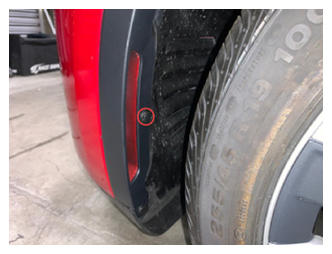
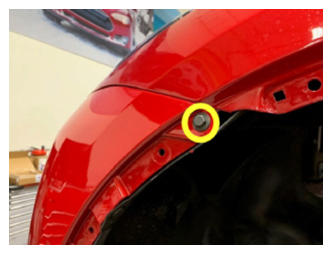
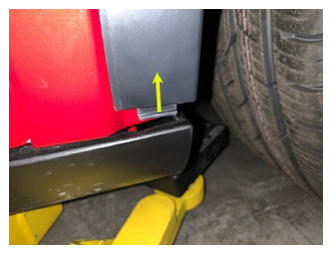
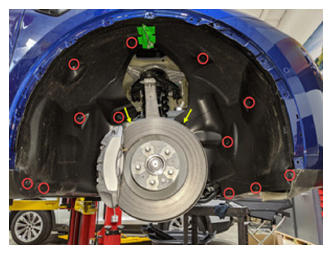
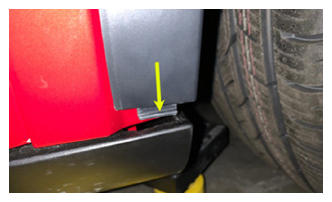
- Release LH front wheel liner from HV battery
NOTE:
1x clip, 1x bolt, 10 mm, 5 N.m
 Courtesy of TESLA, INC. Courtesy of TESLA, INC.
|
- Release RH front wheel liner from HV battery
NOTE:
1x clip, 1x bolt, 10 mm, 5 N.m
 Courtesy of TESLA, INC. Courtesy of TESLA, INC.
|
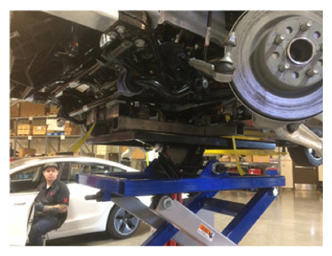
- Lower vehicle partially and set lift onto locks
NOTE:
Raise lift off locks, then hold lock release lever to keep locks free while vehicle is lowered. Set vehicle to comfortable working height
- Remove LH front wheel
NOTE:
5x nuts, 21 mm, 175 N.m
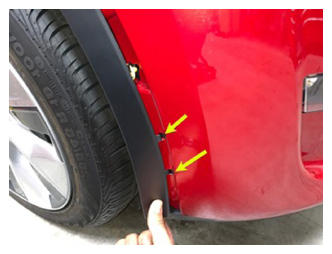
- Remove LH front fender garnish
NOTE:
11x clips, 1x push clip, 3x tabs. Release from center of garnish and work your way outward towards both ends. Be cautious not to bend front tabs going into front fascia
 Courtesy of TESLA, INC. Courtesy of TESLA, INC.
|
 Courtesy of TESLA, INC. Courtesy of TESLA, INC.
|
 Courtesy of TESLA, INC. Courtesy of TESLA, INC.
|
 Courtesy of TESLA, INC. Courtesy of TESLA, INC.
|
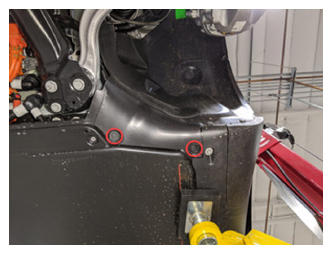
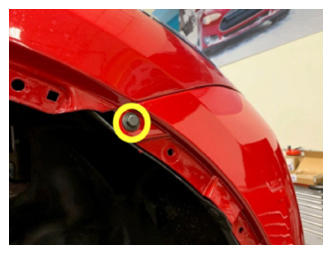
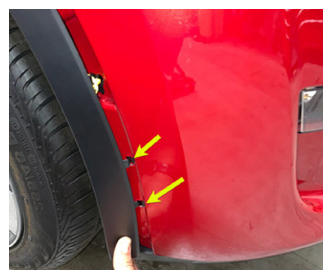
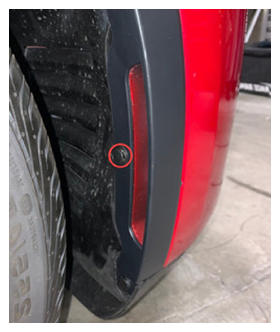
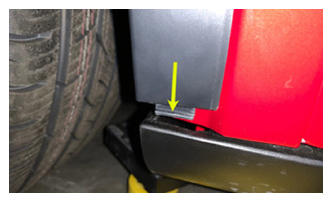
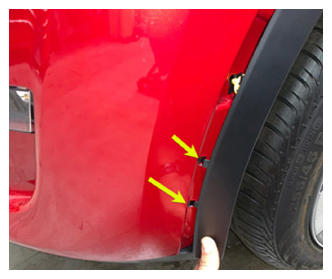
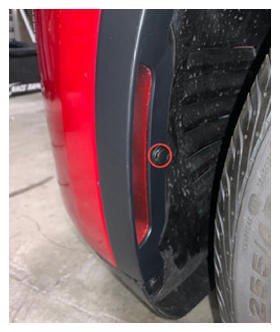
- Remove bolt securing LH side of fascia to fender
NOTE:
1x bolt, 10 mm, 4 N.m
 Courtesy of TESLA, INC. Courtesy of TESLA, INC.
|
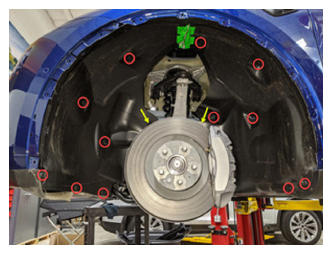
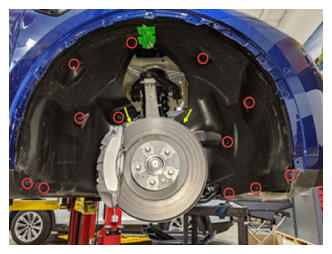
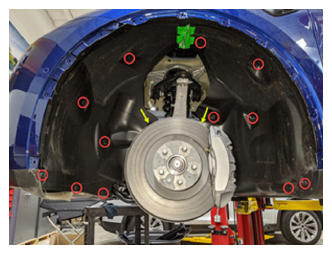
- Remove clips securing LH front wheel liner to vehicle
NOTE:
14x clips
 Courtesy of TESLA, INC. Courtesy of TESLA, INC.
|
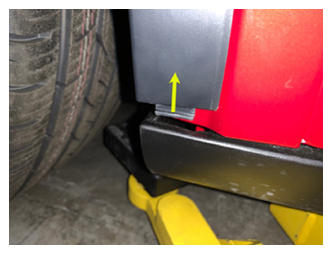
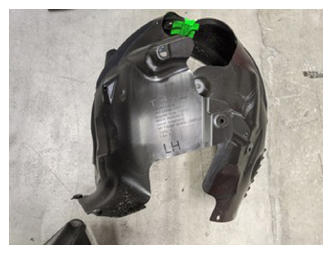
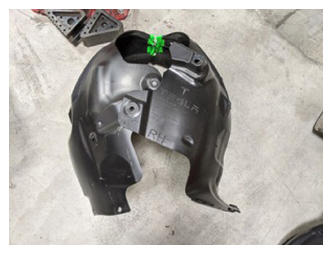
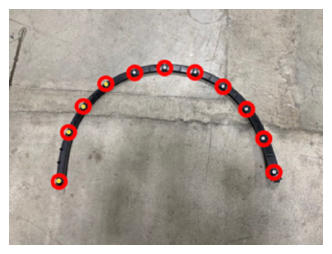
- Remove LH front wheel liner from vehicle
 Courtesy of TESLA, INC. Courtesy of TESLA, INC.
|
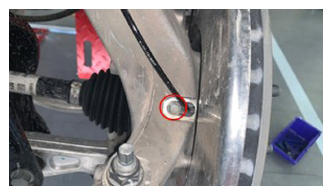
- Remove bolt securing LH front wheel speed sensor to knuckle
NOTE:
1x bolt, 10 mm, 5 N.m. Discard fastener after removal
 Courtesy of TESLA, INC. Courtesy of TESLA, INC.
|
- Remove LH front wheel speed sensor harness from knuckle and move aside
NOTE:
2x harness clips
 Courtesy of TESLA, INC. Courtesy of TESLA, INC.
|
 Courtesy of TESLA, INC. Courtesy of TESLA, INC.
|
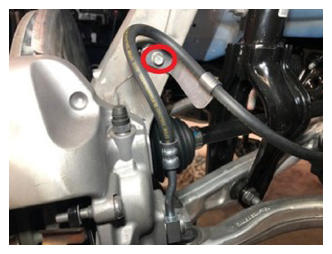
- Remove bolt securing LH front brake caliper hose to knuckle
NOTE:
1x bolt, 10 mm, 5 N.m
 Courtesy of TESLA, INC. Courtesy of TESLA, INC.
|
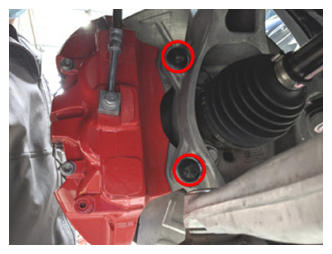
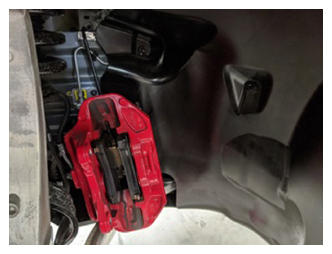
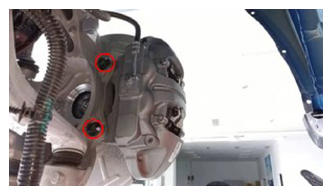
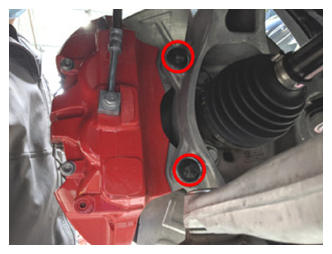
- Remove LH front brake caliper from LH front knuckle
NOTE:
2x bolts, E18, 94 N.m. Discard bolts after removal. Hang caliper off to the side with S-hook
 Courtesy of TESLA, INC. Courtesy of TESLA, INC.
|
 Courtesy of TESLA, INC. Courtesy of TESLA, INC.
|
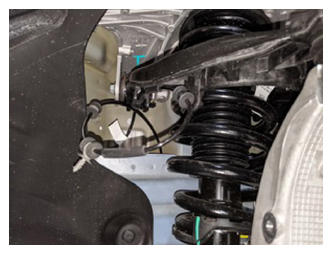
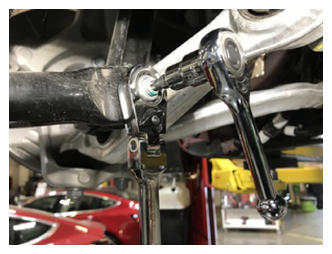
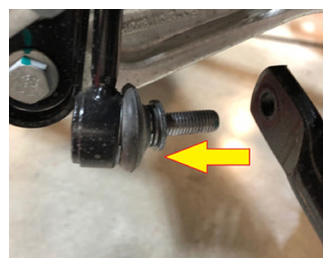
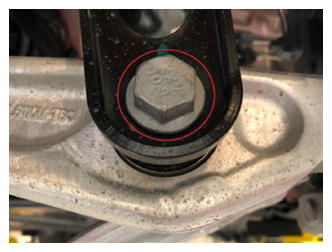
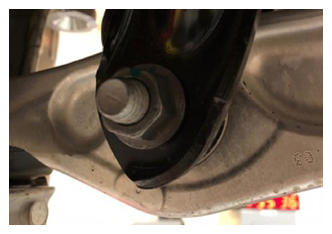
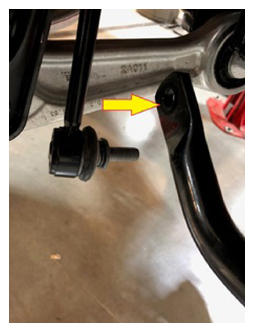
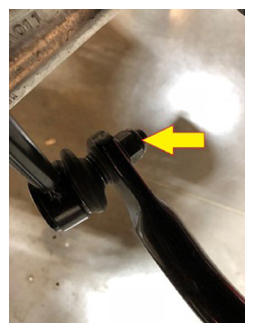
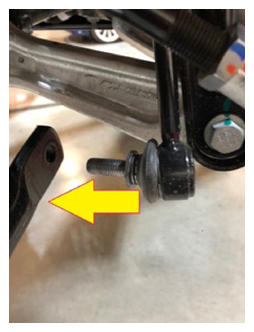
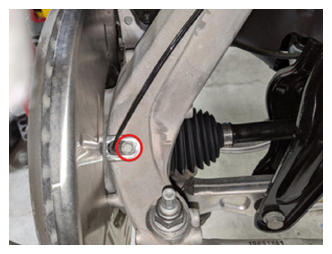
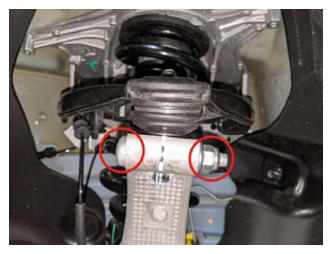
- Remove bolt and nut securing LH front upper control arm to knuckle
NOTE:
1x bolt, T47IP, 1x nyloc nut, 15 mm, 56 N.m. Recommend assistance. Compress joint to remove bolt. Discard nut after removal
 Courtesy of TESLA, INC. Courtesy of TESLA, INC.
|
 Courtesy of TESLA, INC. Courtesy of TESLA, INC.
|
- Remove RH front wheel
NOTE:
5x nuts, 21 mm, 175 N.m
- Remove RH front fender garnish
NOTE:
11x clips, 1x push clip, 3x tabs. Release from center of garnish and work your way outward towards both ends. Be cautious not to bend front tabs going into front fascia
 Courtesy of TESLA, INC. Courtesy of TESLA, INC.
|
 Courtesy of TESLA, INC. Courtesy of TESLA, INC.
|
 Courtesy of TESLA, INC. Courtesy of TESLA, INC.
|
 Courtesy of TESLA, INC. Courtesy of TESLA, INC.
|
- Remove bolt securing RH side of fascia to fender
NOTE:
1x bolt, 10 mm, 4 N.m
 Courtesy of TESLA, INC. Courtesy of TESLA, INC.
|
- Remove clips securing RH front wheel liner to vehicle
NOTE:
14x clips
 Courtesy of TESLA, INC. Courtesy of TESLA, INC.
|
- Remove RH front wheel liner from vehicle
 Courtesy of TESLA, INC. Courtesy of TESLA, INC.
|
- Remove bolt securing RH front wheel speed sensor to knuckle
NOTE:
1x bolt, 10 mm, 5 N.m
 Courtesy of TESLA, INC. Courtesy of TESLA, INC.
|
- Remove RH front wheel speed sensor harness from knuckle and move aside
NOTE:
2x harness clips
 Courtesy of TESLA, INC. Courtesy of TESLA, INC.
|
 Courtesy of TESLA, INC. Courtesy of TESLA, INC.
|
- Remove bolt securing RH front brake caliper hose to knuckle
NOTE:
1x bolt, 10 mm, 5 N.m
 Courtesy of TESLA, INC. Courtesy of TESLA, INC.
|
- Remove RH front brake caliper from RH front knuckle
NOTE:
2x bolts, E18, 94 N.m, Discard bolts after removal. Hang caliper off to the side with S-hook
 Courtesy of TESLA, INC. Courtesy of TESLA, INC.
|
 Courtesy of TESLA, INC. Courtesy of TESLA, INC.
|
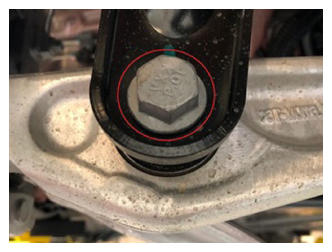
- Remove bolt and nut securing RH front upper control arm to knuckle
NOTE:
1x bolt, T47IP, 1x nyloc nut, 15 mm, 56 N.m. Compress joint to remove bolt, Discard after removal
 Courtesy of TESLA, INC. Courtesy of TESLA, INC.
|
 Courtesy of TESLA, INC. Courtesy of TESLA, INC.
|
- Disconnect 12V harness for front fascia
NOTE:
1x locking connector, Release the locking tab by sliding it away from the connector, Then depress the grey lock to release the connector
 Courtesy of TESLA, INC. Courtesy of TESLA, INC.
|
 Courtesy of TESLA, INC. Courtesy of TESLA, INC.
|
- Release pedestrian warning harness
NOTE:
1x connector, 1x clip, Pull tab to disengage lock. Pull again release from connector. Speaker is located behind RH wheel liner
 Courtesy of TESLA, INC. Courtesy of TESLA, INC.
|
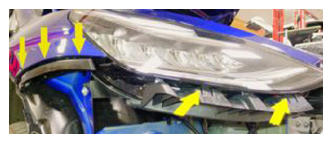
- Release both front corners then release front of front fascia by pulling upward and away from vehicle and place onto padded surface
NOTE:
8x clips. Recommend assistance. Use caution not to damage headlamp or fender during removal
 Courtesy of TESLA, INC. Courtesy of TESLA, INC.
|
 Courtesy of TESLA, INC. Courtesy of TESLA, INC.
|
 Courtesy of TESLA, INC. Courtesy of TESLA, INC.
|
 Courtesy of TESLA, INC. Courtesy of TESLA, INC.
|
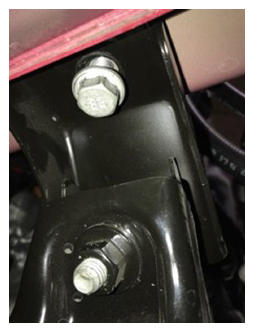
- Remove bolts securing front end carrier to LH front subframe crash can assembly
NOTE:
2x bolts, 13 mm, 16 N.m
 Courtesy of TESLA, INC. Courtesy of TESLA, INC.
|
- Remove bolts securing front end carrier to RH front subframe crash can assembly
NOTE:
2x bolts, 13 mm, 16 N.m
 Courtesy of TESLA, INC. Courtesy of TESLA, INC.
|
- Raise vehicle fully and lower lift onto locks
NOTE:
Set vehicle to comfortable working height. Make sure there's an audible click of the locks on both sides before lowering, otherwise vehicle may tilt to the side
- Remove nut securing front stabar link to LH front stabar
NOTE:
1x nyloc nut, 18 mm, 98 N.m. Counter hold ball joint with T40. Discard after removal
 Courtesy of TESLA, INC. Courtesy of TESLA, INC.
|
- Move LH front stabar link assembly aside
NOTE:
May need to move the stabilizer bar up/down to get the correct angle needed to remove end link
 Courtesy of TESLA, INC. Courtesy of TESLA, INC.
|
- Remove nut securing front stabar to RH front stabar link assembly
NOTE:
1x nyloc nut, 18 mm, 98 N.m. Counter hold ball joint with T40. Discard after removal
 Courtesy of TESLA, INC. Courtesy of TESLA, INC.
|
- Move RH front stabar link assembly aside
NOTE:
May be necessary to pull down on the sway bar to allow the end link to disengage
 Courtesy of TESLA, INC. Courtesy of TESLA, INC.
|
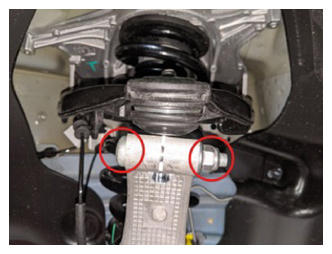
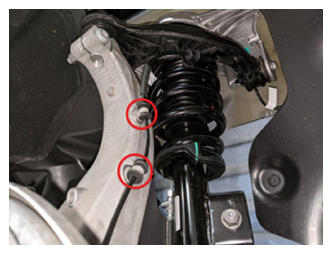
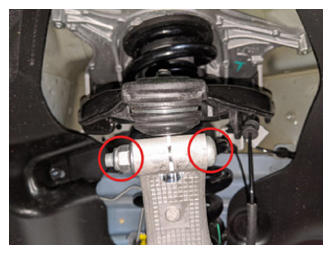
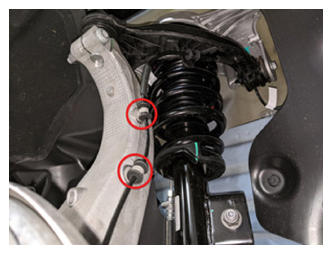
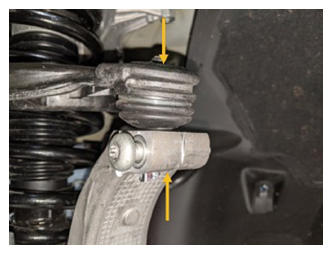
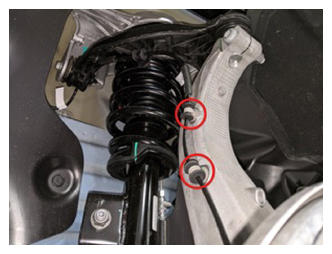
- Remove bolt and nut securing LH strut to LH front lower lateral link
NOTE:
1x bolt, 21 mm, 1x nut, 21 mm, 106 N.m
 Courtesy of TESLA, INC. Courtesy of TESLA, INC.
|
 Courtesy of TESLA, INC. Courtesy of TESLA, INC.
|
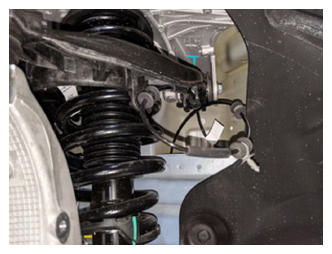
- Remove bolt and nut securing RH strut to lower control arm and move the RH front lower lateral link aside
NOTE:
1x bolt, 21 mm, 1x nut, 21 mm, 106 N.m
 Courtesy of TESLA, INC. Courtesy of TESLA, INC.
|
 Courtesy of TESLA, INC. Courtesy of TESLA, INC.
|
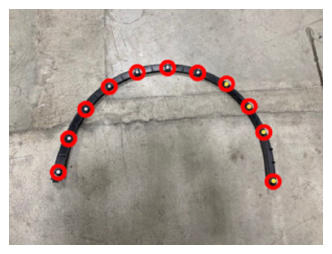
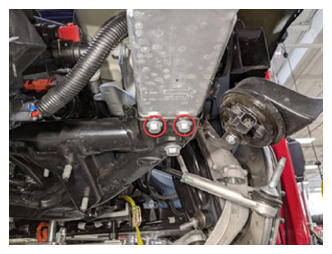
- Loosen the bolts securing front subframe to LH front subframe crash can assembly
NOTE:
2x bolts, 15 mm, 53 N.m, This will help when installing the subframe
 Courtesy of TESLA, INC. Courtesy of TESLA, INC.
|
- Loosen the bolts securing front subframe to RH front subframe crash can assembly
NOTE:
2x bolts, 15 mm, 53 N.m, This will help when installing the subframe
 Courtesy of TESLA, INC. Courtesy of TESLA, INC.
|
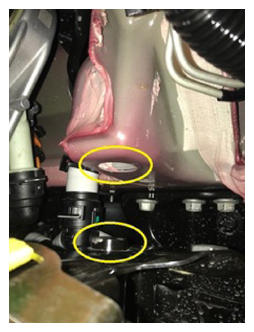
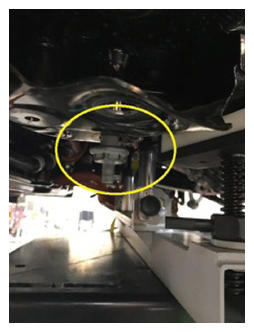
- Position coolant drain container underneath RH front of HV battery
 Courtesy of TESLA, INC. Courtesy of TESLA, INC.
|
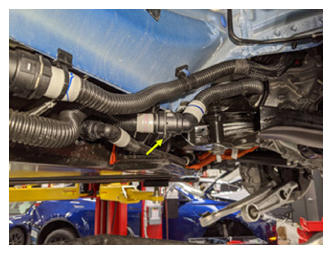
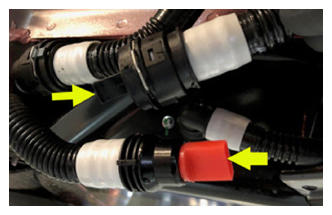
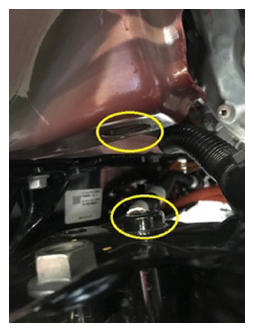
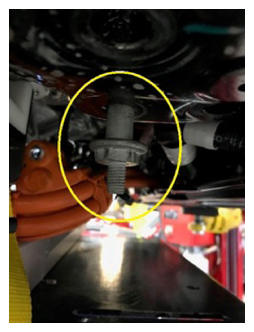
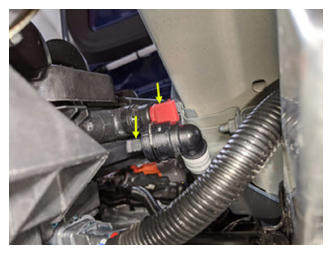
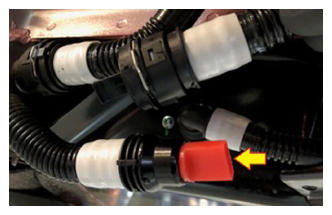
- Disconnect FDU coolant inlet hose at RH front of HV battery and plug both hose ends
NOTE:
1x spring clip
 Courtesy of TESLA, INC. Courtesy of TESLA, INC.
|
 Courtesy of TESLA, INC. Courtesy of TESLA, INC.
|
- Place coolant drain container below RH side of FDU
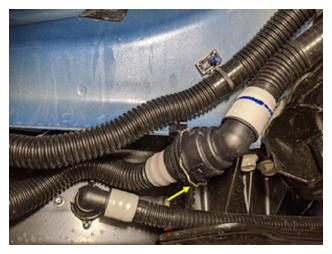
- Disconnect coolant hose from the FDU oil cooler to the coolant bottle and allow coolant to drain
NOTE:
1x spring clip
 Courtesy of TESLA, INC. Courtesy of TESLA, INC.
|
- Install plugs to both open coolant hose connections
NOTE:
1x spring clip
 Courtesy of TESLA, INC. Courtesy of TESLA, INC.
|
- Position coolant drain container below LH side of radiator
- Disconnect coolant hose from radiator inlet and plug both ends
NOTE:
1x spring clip, 2x plugs
 Courtesy of TESLA, INC. Courtesy of TESLA, INC.
|
 Courtesy of TESLA, INC. Courtesy of TESLA, INC.
|
- Remove coolant drain container from underneath vehicle
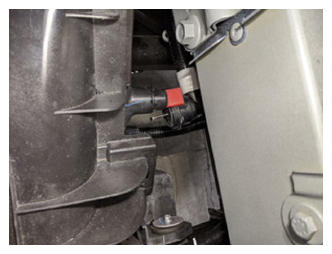
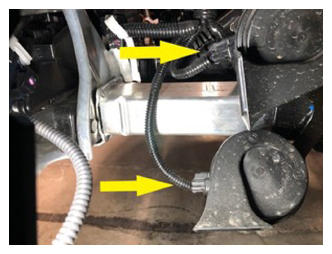
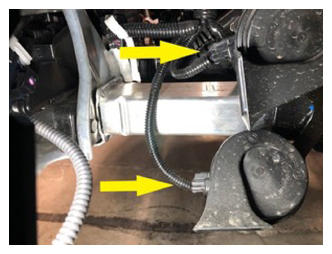
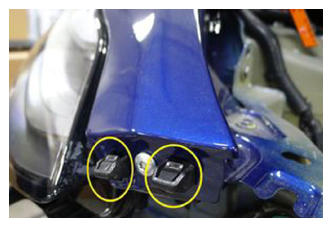
- Disconnect connectors from horn assembly
NOTE:
2x connectors
 Courtesy of TESLA, INC. Courtesy of TESLA, INC.
|
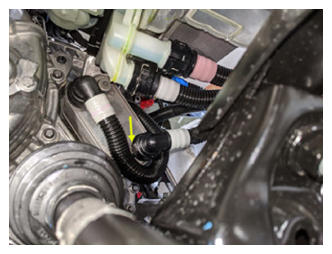
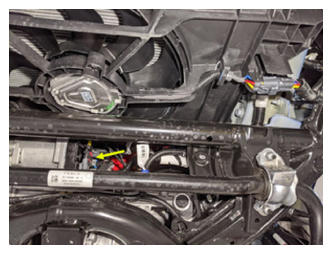
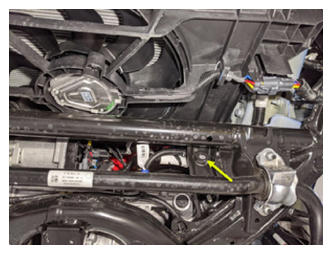
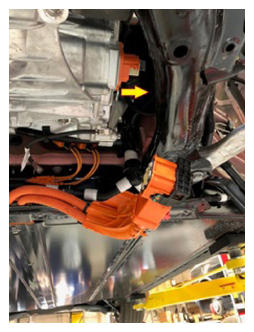
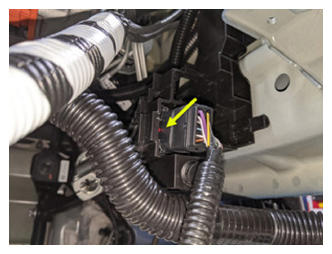
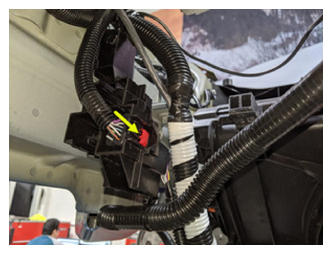
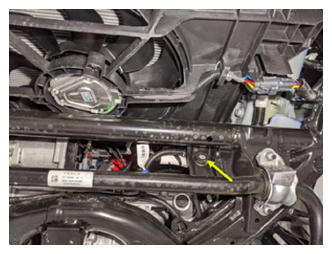
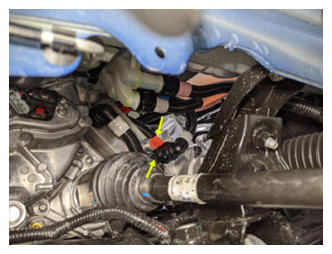
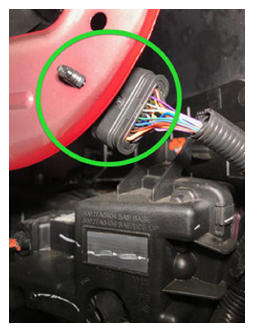
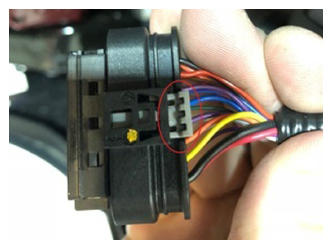
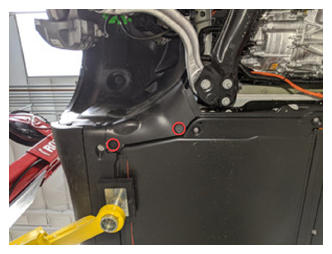
- Disconnect the logic connectors below steering gear
NOTE:
2x connectors. Do not push down on red tab. Pull red tab to disengage lock. Pull again to release connector. Image zoomed out for location reference
 Courtesy of TESLA, INC. Courtesy of TESLA, INC.
|
 Courtesy of TESLA, INC. Courtesy of TESLA, INC.
|
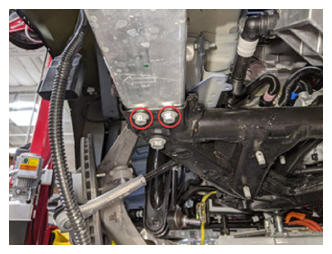
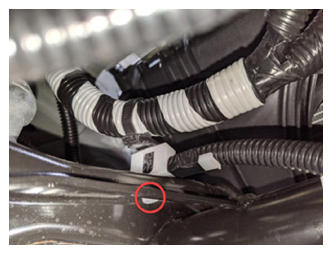
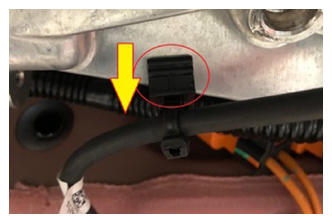
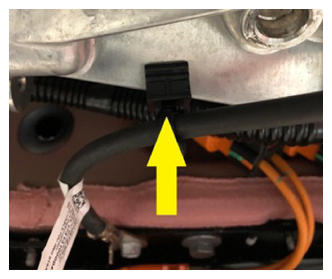
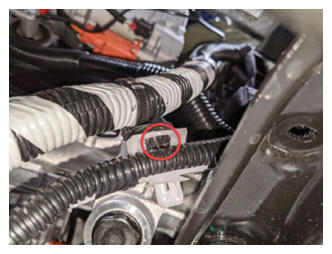
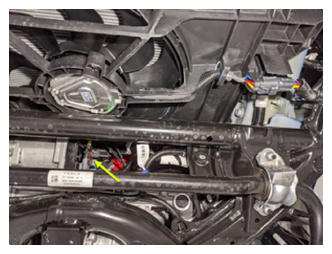
- Release harness clip from subframe assembly
NOTE:
1x clip, Image zoomed out for location reference
 Courtesy of TESLA, INC. Courtesy of TESLA, INC.
|
 Courtesy of TESLA, INC. Courtesy of TESLA, INC.
|
- Release harness clip from lower clip
NOTE:
1x clip
 Courtesy of TESLA, INC. Courtesy of TESLA, INC.
|
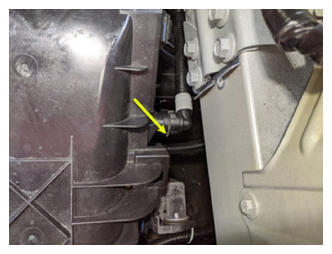
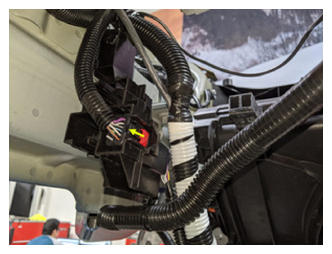
- Disconnect harness from LH front rail bracket
NOTE:
1x connector. Red locking tab. Release lock from opposite side of bracket then release connector towards front of vehicle. Image zoomed in for clarity
 Courtesy of TESLA, INC. Courtesy of TESLA, INC.
|
 Courtesy of TESLA, INC. Courtesy of TESLA, INC.
|
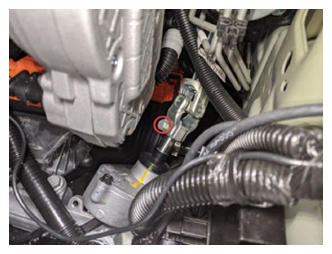
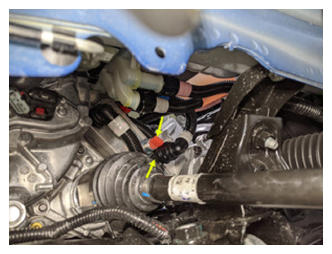
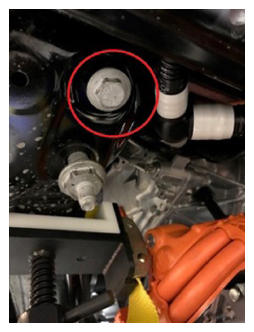
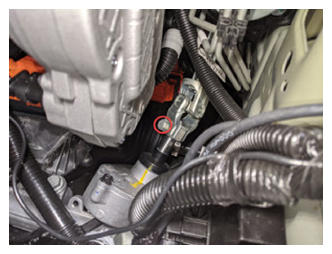
- Remove bolt securing FDU HV harness to the FDU
NOTE:
1x bolt, EP10, 10 N.m
 Courtesy of TESLA, INC. Courtesy of TESLA, INC.
|
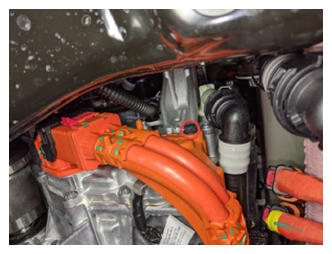
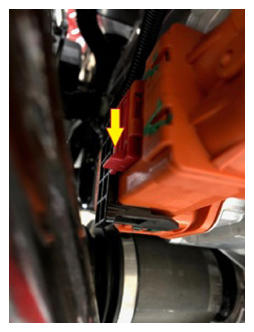
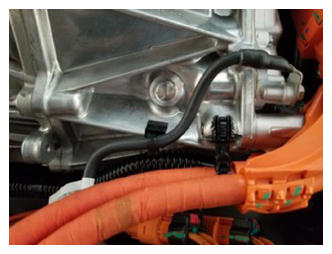
- Disconnect the FDU HV harness connector
NOTE:
1x clip. Release locking tab and rotate the release lever up to disengage the connector. Do not force the release lever up. Ensure the alignment tabs on the FDU header are not damaged
 Courtesy of TESLA, INC. Courtesy of TESLA, INC.
|
 Courtesy of TESLA, INC. Courtesy of TESLA, INC.
|
 Courtesy of TESLA, INC. Courtesy of TESLA, INC.
|
- Remove the FDU HV harness connector from the FDU and move aside
NOTE:
1x connector
 Courtesy of TESLA, INC. Courtesy of TESLA, INC.
|
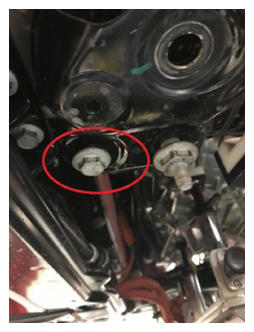
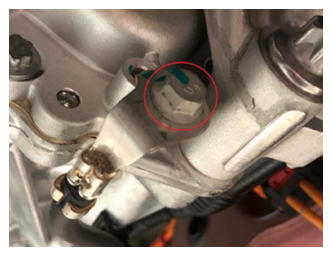
- Remove bolt securing FDU ground strap to FDU
NOTE:
1x bolt, 10 mm, 6 N.m
 Courtesy of TESLA, INC. Courtesy of TESLA, INC.
|
- Remove FDU ground strap harness clip from FDU
NOTE:
1x clip
 Courtesy of TESLA, INC. Courtesy of TESLA, INC.
|
- Loosen bolt securing FDU ground strap to HV battery and move aside
NOTE:
1x bolt, 10 mm, 10 N.m
 Courtesy of TESLA, INC. Courtesy of TESLA, INC.
|
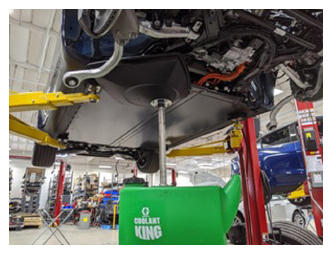
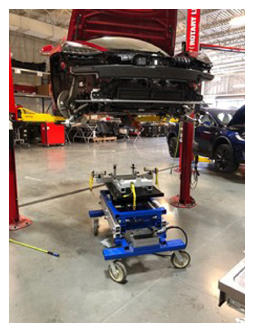
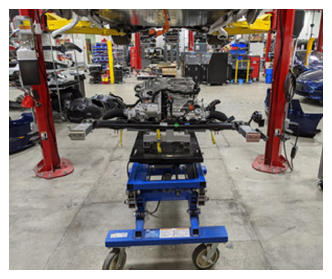
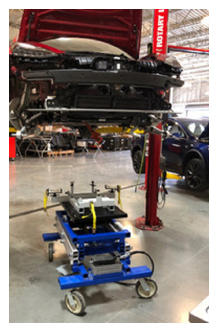
- Move the subframe lifting tool underneath the front subframe area
 Courtesy of TESLA, INC. Courtesy of TESLA, INC.
|
- Connect air supply to subframe lifting tool
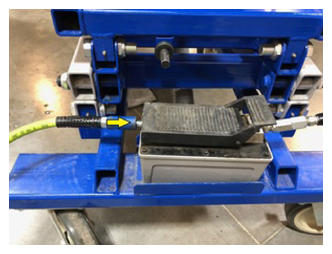 Courtesy of TESLA, INC. Courtesy of TESLA, INC.
|
- Position and support the front subframe with subframe lifting tool
NOTE:
Recommend assistance. Latch the subframe to subframe lifting tool. Make sure to align the two guides
 Courtesy of TESLA, INC. Courtesy of TESLA, INC.
|
 Courtesy of TESLA, INC. Courtesy of TESLA, INC.
|
 Courtesy of TESLA, INC. Courtesy of TESLA, INC.
|
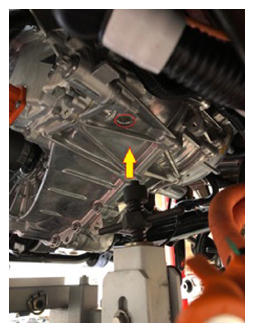
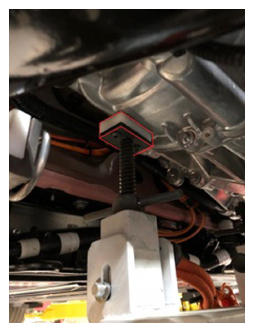
- Position the rear FDU support posts to the FDU
NOTE:
Both FDU supports need to engage the FDU. The left side post is dimpled and fits into a recess on the FDU and the right side post has a teflon block that sits against the FDU. Both posts are threaded and the handle should be turned until the posts are tight
 Courtesy of TESLA, INC. Courtesy of TESLA, INC.
|
 Courtesy of TESLA, INC. Courtesy of TESLA, INC.
|
 Courtesy of TESLA, INC. Courtesy of TESLA, INC.
|
- Remove bolt securing the LH motor mount to the LH motor mount bracket
NOTE:
1x bolt, E18, 105 N.m
 Courtesy of TESLA, INC. Courtesy of TESLA, INC.
|
- Remove bolt securing the RH motor mount to the RH motor mount bracket
NOTE:
1x bolt, E18, 105 N.m
 Courtesy of TESLA, INC. Courtesy of TESLA, INC.
|
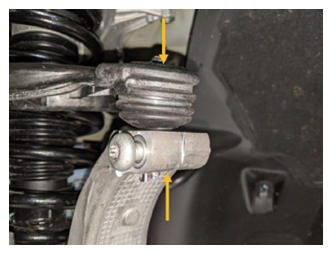
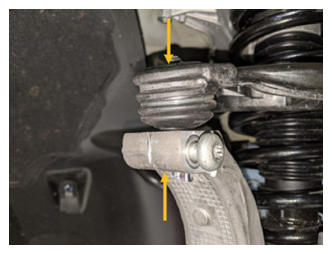
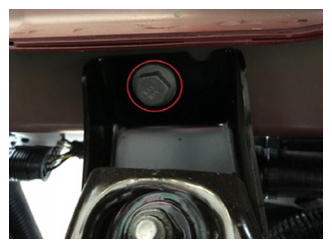
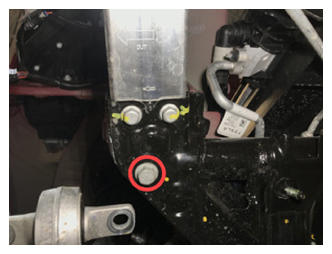
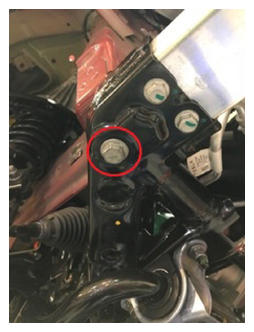
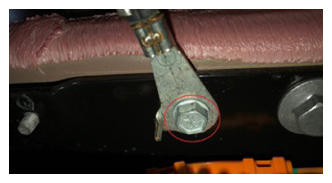
- Remove bolt securing LH mid mount to body
NOTE:
1x bolt, 15 mm, 50 N.m. Discard after removal
 Courtesy of TESLA, INC. Courtesy of TESLA, INC.
|
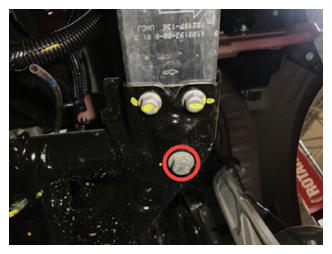
- Remove bolt securing RH mid mount to body
NOTE:
1x bolt, 15 mm, 50 N.m, Discard after removal
 Courtesy of TESLA, INC. Courtesy of TESLA, INC.
|
- Remove LH bolt securing the front portion of the front subframe to body
NOTE:
1x bolt, 18 mm, 72 N.m. Discard after removal
 Courtesy of TESLA, INC. Courtesy of TESLA, INC.
|
- Remove RH bolt securing the front portion of the front subframe to body
NOTE:
1x bolt, 18 mm, 72 N.m. Discard after removal
 Courtesy of TESLA, INC. Courtesy of TESLA, INC.
|
- Remove LH smaller bolt securing the rear portion of the front subframe to body
NOTE:
1x bolt, 15 mm, 50 N.m. Discard after removal
 Courtesy of TESLA, INC. Courtesy of TESLA, INC.
|
- Remove RH smaller bolt securing the rear portion of the front subframe to body
NOTE:
1x bolt, 15 mm, 50 N.m, Discard after removal
 Courtesy of TESLA, INC. Courtesy of TESLA, INC.
|
- Remove LH larger bolt securing the rear portion of the front subframe to body
NOTE:
1x bolt, 21 mm, 125 N.m, Discard after removal
 Courtesy of TESLA, INC. Courtesy of TESLA, INC.
|
- Remove RH larger bolt securing the rear portion of the front subframe to body
NOTE:
1x bolt, 21 mm, 125 N.m, Discard after removal
 Courtesy of TESLA, INC. Courtesy of TESLA, INC.
|
- Lower the subframe from vehicle
NOTE:
Recommend assistance
 Courtesy of TESLA, INC. Courtesy of TESLA, INC.
|
- Disconnect air supply from subframe lifting tool
 Courtesy of TESLA, INC. Courtesy of TESLA, INC.
|
- Remove subframe lifting tool from under vehicle
 Courtesy of TESLA, INC. Courtesy of TESLA, INC.
|
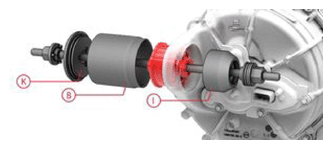
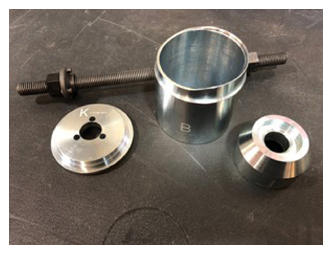
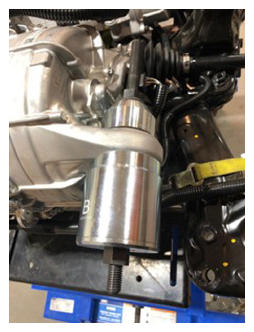
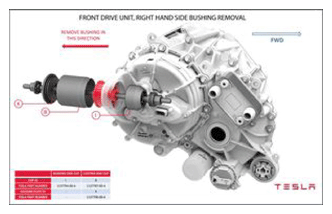
- Install the bushing removal cups and stud onto the RH side bushing
NOTE:
Use cups K, B, and I to drive the bushing out
 Courtesy of TESLA, INC. Courtesy of TESLA, INC.
|
 Courtesy of TESLA, INC. Courtesy of TESLA, INC.
|
 Courtesy of TESLA, INC. Courtesy of TESLA, INC.
|
- Press out the bushing from the FDU
NOTE:
Always apply torque to the bearing side when removing or installing a bushing, Drive the bushing until the cup and bushing assembly is free from the FDU
 Courtesy of TESLA, INC. Courtesy of TESLA, INC.
|
- Remove the cups and old bushing from the threaded stud
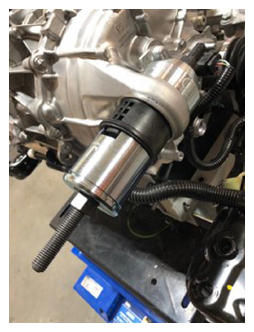
- Install bushing press cups with new bushing into position
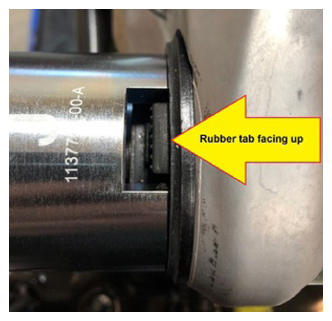
NOTE:
Use cups L, J, and C, When installing a new bushing ensure the rubber tab is visible at the top of cup J
 Courtesy of TESLA, INC. Courtesy of TESLA, INC.
|
 Courtesy of TESLA, INC. Courtesy of TESLA, INC.
|
- Press the new bushing into the FDU
NOTE:
Always apply torque to the bearing side when removing or installing a bushing, When installing a new bushing ensure the rubber tab is visible at the top of cup J, Press the new bushing in until the flange on the bushing makes contact with the FDU case
 Courtesy of TESLA, INC. Courtesy of TESLA, INC.
|
- Remove the cups from the FDU and inspect the alignment of the RH bushing
 Courtesy of TESLA, INC. Courtesy of TESLA, INC.
|
 Courtesy of TESLA, INC. Courtesy of TESLA, INC.
|
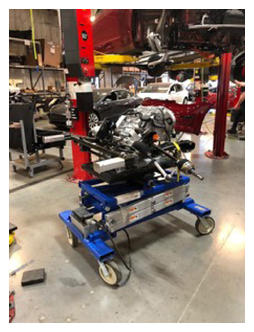
- Position lifting tool and subframe under vehicle for installation
 Courtesy of TESLA, INC. Courtesy of TESLA, INC.
|
- Connect air supply to subframe lifting tool
 Courtesy of TESLA, INC. Courtesy of TESLA, INC.
|
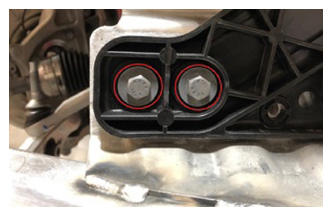
- Install bolt securing the RH motor mount to the RH motor mount bracket
NOTE:
1x bolt, E18, 105 N.m, May need adjust subfame jig to align mount with bolt hole
 Courtesy of TESLA, INC. Courtesy of TESLA, INC.
|
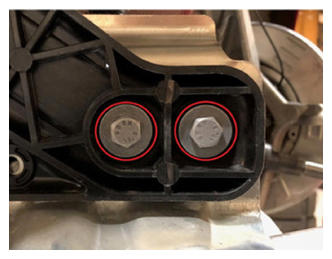
- Install bolt securing the LH motor mount to the LH motor mount bracket
NOTE:
1x bolt, E18, 105 N.m, May need adjust subfame jig to align mount with bolt hole
 Courtesy of TESLA, INC. Courtesy of TESLA, INC.
|
- Raise support tool until the front subframe and body meet
NOTE:
Recommend assistance, Guide the motor mount bushings into the motor mount isolators as the lift is being raised into position, Make sure to line up the rear locating pins on the subframe
 Courtesy of TESLA, INC. Courtesy of TESLA, INC.
|
 Courtesy of TESLA, INC. Courtesy of TESLA, INC.
|
- Loosely install the RH larger bolt securing rear portion of the front subframe to body
NOTE:
1x bolt, 21 mm, 125 N.m, Install new bolt
 Courtesy of TESLA, INC. Courtesy of TESLA, INC.
|
- Loosely install the LH larger bolt securing rear portion of the front subframe to body
NOTE:
1x bolt, 21 mm, 125 N.m, Install new bolt
 Courtesy of TESLA, INC. Courtesy of TESLA, INC.
|
- Loosely install the RH smaller bolt securing rear portion of the front subframe to body
NOTE:
1x bolt, 15 mm, 50 N.m, Install new bolt
 Courtesy of TESLA, INC. Courtesy of TESLA, INC.
|
- Loosely install the LH smaller bolt securing rear portion of the front subframe to body
NOTE:
1x bolt, 15 mm, 50 N.m, Install new bolt
 Courtesy of TESLA, INC. Courtesy of TESLA, INC.
|
- Loosely install RH bolt securing the front portion of the front subframe to body
NOTE:
1x bolt, 18 mm, 72 N.m, Install new bolt, Adjust subframe lifting tool if necessary
 Courtesy of TESLA, INC. Courtesy of TESLA, INC.
|
- Loosely install LH bolt securing the front portion of the front subframe to body
NOTE:
1x bolt, 18 mm, 72 N.m, Install new bolt, Adjust subframe lifting tool if necessary
 Courtesy of TESLA, INC. Courtesy of TESLA, INC.
|
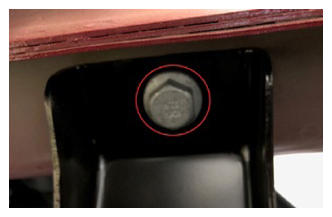
- Loosely install bolt securing the RH mid mount to body
NOTE:
1x bolt, 15 mm, 50 N.m, Install new bolt
 Courtesy of TESLA, INC. Courtesy of TESLA, INC.
|
- Loosely install bolt securing the LH mid mount to body
NOTE:
1x bolt, 15 mm, 50 N.m, Install new bolt
 Courtesy of TESLA, INC. Courtesy of TESLA, INC.
|
- Loosely install the bolts securing front end carrier to RH front subframe crash can assembly
NOTE:
2x bolts, 13 mm, 16 N.m
 Courtesy of TESLA, INC. Courtesy of TESLA, INC.
|
- Loosely install the bolts securing front end carrier to LH front subframe crash can assembly
NOTE:
2x bolts, 13 mm, 16 N.m
 Courtesy of TESLA, INC. Courtesy of TESLA, INC.
|
- Torque the RH larger bolt securing the rear portion of the front subframe to body
NOTE:
1x bolt, 21 mm, 125 N.m
 Courtesy of TESLA, INC. Courtesy of TESLA, INC.
|
- Torque the LH larger bolt securing the rear portion of the front subframe to body
NOTE:
1x bolt, 21 mm, 125 N.m
 Courtesy of TESLA, INC. Courtesy of TESLA, INC.
|
- Torque the RH smaller bolt securing the rear portion of the front subframe to body
NOTE:
1x bolt, 15 mm, 50 N.m
 Courtesy of TESLA, INC. Courtesy of TESLA, INC.
|
- Torque the LH smaller bolt securing the rear portion of the front subframe to body
NOTE:
1x bolt, 15 mm, 50 N.m
 Courtesy of TESLA, INC. Courtesy of TESLA, INC.
|
- Torque the RH bolt securing the front portion of the front subframe to body
NOTE:
1x bolt, 18 mm, 72 N.m
 Courtesy of TESLA, INC. Courtesy of TESLA, INC.
|
- Torque the LH bolt securing the front portion of the front subframe to body
NOTE:
1x bolt, 18 mm, 72 N.m
 Courtesy of TESLA, INC. Courtesy of TESLA, INC.
|
- Torque the bolt securing the RH mid mount to body
NOTE:
1x bolt, 15 mm, 50 N.m
 Courtesy of TESLA, INC. Courtesy of TESLA, INC.
|
 Courtesy of TESLA, INC. Courtesy of TESLA, INC.
|
- Torque the bolt securing the LH mid mount to body
NOTE:
1x bolt, 15 mm, 50 N.m
 Courtesy of TESLA, INC. Courtesy of TESLA, INC.
|
- Torque bolt and nut securing LH strut to lower control arm
NOTE:
1x bolt, 21 mm, 1x nut, 21 mm, 106 N.m
 Courtesy of TESLA, INC. Courtesy of TESLA, INC.
|
 Courtesy of TESLA, INC. Courtesy of TESLA, INC.
|
- Torque bolt and nut securing RH strut to lower control arm
NOTE:
1x bolt, 21 mm, 1x nut, 21 mm, 106 N.m
 Courtesy of TESLA, INC. Courtesy of TESLA, INC.
|
 Courtesy of TESLA, INC. Courtesy of TESLA, INC.
|
- Torque the bolts securing front subframe to RH front subframe crash can assembly
NOTE:
2x bolts, 15 mm, 53 N.m
 Courtesy of TESLA, INC. Courtesy of TESLA, INC.
|
- Torque the bolts securing LH front subframe crash can assembly to front subframe
NOTE:
2x bolts, 15 mm, 53 N.m
 Courtesy of TESLA, INC. Courtesy of TESLA, INC.
|
- Torque the bolts securing front end carrier to RH front subframe crash can assembly
NOTE:
2x bolts, 13 mm, 16 N.m
 Courtesy of TESLA, INC. Courtesy of TESLA, INC.
|
- Torque the bolts securing front end carrier to LH front subframe crash can assembly
NOTE:
2x bolts, 13 mm, 16 N.m
 Courtesy of TESLA, INC. Courtesy of TESLA, INC.
|
- Lower the subframe lifting tool from the vehicle
NOTE:
Unlatch the subframe lifting tool from front subframe
 Courtesy of TESLA, INC. Courtesy of TESLA, INC.
|
- Disconnect air supply from subframe lifting tool
 Courtesy of TESLA, INC. Courtesy of TESLA, INC.
|
- Remove the subframe lifting tool from vehicle
 Courtesy of TESLA, INC. Courtesy of TESLA, INC.
|
- Place FDU ground strap to original position and install bolt to HV battery
NOTE:
1x bolt, 10 mm, 10 N.m
 Courtesy of TESLA, INC. Courtesy of TESLA, INC.
|
- Install FDU ground strap harness clip to FDU
NOTE:
1x clip, Make sure to properly route the ground strap
 Courtesy of TESLA, INC. Courtesy of TESLA, INC.
|
 Courtesy of TESLA, INC. Courtesy of TESLA, INC.
|
- Install bolt securing FDU ground strap to FDU
NOTE:
1x bolt, 10 mm, 6 N.m
 Courtesy of TESLA, INC. Courtesy of TESLA, INC.
|
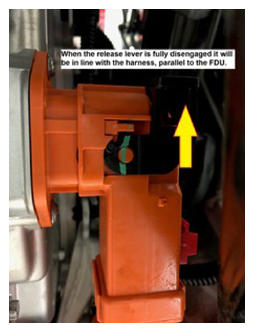
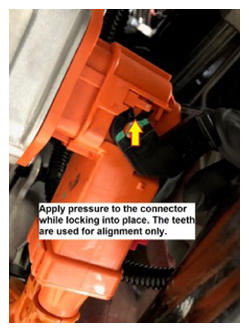
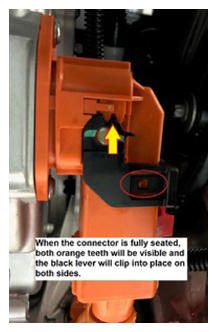
- Connect the FDU HV harness connector and lock the release lever
NOTE:
1x clip, Apply slight pressure to the connector as the lever is rotated into position, Move the lever to the closed position slowly and ensure the lever teeth and manifold teeth are properly meshed, There should be a very small gap between the manifold and the connector when fully seated
 Courtesy of TESLA, INC. Courtesy of TESLA, INC.
|
 Courtesy of TESLA, INC. Courtesy of TESLA, INC.
|
 Courtesy of TESLA, INC. Courtesy of TESLA, INC.
|
- Install bolt securing FDU HV harness to FDU
NOTE:
1x bolt, 10 mm, 10 N.m
 Courtesy of TESLA, INC. Courtesy of TESLA, INC.
|
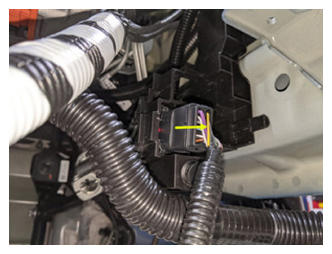
- Connect harness located at LH front rail bracket
NOTE:
1x connector, Red locking tab, Connect from front of bracket and lock from opposite side of bracket, Image zoomed in for clarity
 Courtesy of TESLA, INC. Courtesy of TESLA, INC.
|
 Courtesy of TESLA, INC. Courtesy of TESLA, INC.
|
- Install upper harness clip onto lower harness clip
NOTE:
1x clip
 Courtesy of TESLA, INC. Courtesy of TESLA, INC.
|
- Install lower harness clip into subframe
NOTE:
1x clip
 Courtesy of TESLA, INC. Courtesy of TESLA, INC.
|
 Courtesy of TESLA, INC. Courtesy of TESLA, INC.
|
- Connect the logic connectors below steering gear
NOTE:
2x connectors, Engage locking tabs
 Courtesy of TESLA, INC. Courtesy of TESLA, INC.
|
 Courtesy of TESLA, INC. Courtesy of TESLA, INC.
|
- Connect horn assembly connectors
NOTE:
2x connectors
 Courtesy of TESLA, INC. Courtesy of TESLA, INC.
|
- Position coolant drain container below LH side of radiator
- Remove plugs and connect coolant inlet hose to LH side of radiator
NOTE:
1x spring clip
 Courtesy of TESLA, INC. Courtesy of TESLA, INC.
|
 Courtesy of TESLA, INC. Courtesy of TESLA, INC.
|
- Position coolant drain container under RH side of FDU
- Remove plugs and connect coolant hose from coolant bottle to oil cooler
NOTE:
1x spring clip
 Courtesy of TESLA, INC. Courtesy of TESLA, INC.
|
 Courtesy of TESLA, INC. Courtesy of TESLA, INC.
|
- Position coolant drain container underneath RH front of HV battery
- Remove plugs and connect FDU coolant inlet hose at the RH side of vehicle
NOTE:
1x spring clip
 Courtesy of TESLA, INC. Courtesy of TESLA, INC.
|
 Courtesy of TESLA, INC. Courtesy of TESLA, INC.
|
- Remove coolant drain container from underneath vehicle
- Position the RH front stabar link assembly to front stabar
NOTE:
May be necessary to pull down on the sway bar to allow the end link to engage
 Courtesy of TESLA, INC. Courtesy of TESLA, INC.
|
- Install nut securing front stabar to RH front stabar link assembly
NOTE:
1x nyloc nut, 18 mm, 98 N.m, Install new nyloc nut, Counter hold ball joint with T40, Mark with paint pen
 Courtesy of TESLA, INC. Courtesy of TESLA, INC.
|
- Position LH front stabar link assembly to front stabar
NOTE:
May be necessary to pull down on the sway bar to allow the end link to engage
 Courtesy of TESLA, INC. Courtesy of TESLA, INC.
|
- Install nut securing front stabar link to LH front stabar
NOTE:
1x nyloc nut, 18 mm, 98 N.m, Install new nyloc nut, Counter hold ball joint with T40, Mark with paint pen
 Courtesy of TESLA, INC. Courtesy of TESLA, INC.
|
- Lower vehicle partially and set onto locks
NOTE:
Raise lift off locks, then hold lock release lever to keep locks free while vehicle is lowered, Set vehicle to comfortable working height
- Install front fascia onto vehicle and secure front clips and both front corners
NOTE:
8x clips, Recommend assistance, Use caution not to damage headlamp or fender during installation
 Courtesy of TESLA, INC. Courtesy of TESLA, INC.
|
 Courtesy of TESLA, INC. Courtesy of TESLA, INC.
|
 Courtesy of TESLA, INC. Courtesy of TESLA, INC.
|
- Connect 12V harness for front fascia
NOTE:
1x locking connector, Engage locking tab
 Courtesy of TESLA, INC. Courtesy of TESLA, INC.
|
 Courtesy of TESLA, INC. Courtesy of TESLA, INC.
|
- Connect pedestrian warning harness
NOTE:
1x connector, 1x clip, Engage locking tab
 Courtesy of TESLA, INC. Courtesy of TESLA, INC.
|
- Install bolt securing RH side of fascia to fender
NOTE:
1x bolt, 10 mm, 4 N.m
 Courtesy of TESLA, INC. Courtesy of TESLA, INC.
|
- Install bolt and nut securing RH front upper control arm to knuckle
NOTE:
1x bolt, T47IP, 1x nyloc nut, 15 mm, 56 N.m, Compress joint to install bolt, Install new nyloc nut
 Courtesy of TESLA, INC. Courtesy of TESLA, INC.
|
 Courtesy of TESLA, INC. Courtesy of TESLA, INC.
|
- Install RH front wheel speed sensor harness to knuckle
NOTE:
2x harness clips
 Courtesy of TESLA, INC. Courtesy of TESLA, INC.
|
- Install bolt securing RH front wheel speed sensor to knuckle
NOTE:
1x bolt, 10 mm, 5 N.m
 Courtesy of TESLA, INC. Courtesy of TESLA, INC.
|
- Install RH front brake caliper to RH front knuckle
NOTE:
2x bolts, E18, 94 N.m, Install new bolts, Mark with paint pen, Remove S-hook from vehicle
 Courtesy of TESLA, INC. Courtesy of TESLA, INC.
|
 Courtesy of TESLA, INC. Courtesy of TESLA, INC.
|
- Install bolt securing RH front brake caliper hose to RH front knuckle
NOTE:
1x bolt, 10 mm, 5 N.m
 Courtesy of TESLA, INC. Courtesy of TESLA, INC.
|
- Install RH front wheel liner to vehicle
NOTE:
14x clips
 Courtesy of TESLA, INC. Courtesy of TESLA, INC.
|
- Install clips securing RH front wheel liner to vehicle
NOTE:
14x clips
 Courtesy of TESLA, INC. Courtesy of TESLA, INC.
|
- Install RH front fender garnish
NOTE:
11x clips, 1x push clip, 3x tabs, Start at rear and maneuver into rocker panel
 Courtesy of TESLA, INC. Courtesy of TESLA, INC.
|
 Courtesy of TESLA, INC. Courtesy of TESLA, INC.
|
 Courtesy of TESLA, INC. Courtesy of TESLA, INC.
|
 Courtesy of TESLA, INC. Courtesy of TESLA, INC.
|
- Install RH front wheel
NOTE:
5x nuts, 21 mm, 175 N.m, Start lug nuts by hand before using power tool
- Install bolt securing LH side of fascia to fender
NOTE:
1x bolt, 10 mm, 4 N.m
 Courtesy of TESLA, INC. Courtesy of TESLA, INC.
|
- Install bolt and nut securing LH front upper control arm to knuckle
NOTE:
1x bolt, T47IP, 1x nyloc nut, 15 mm, 56 N.m, Recommend assistance, Compress joint to install bolt, Install new nyloc nut
 Courtesy of TESLA, INC. Courtesy of TESLA, INC.
|
 Courtesy of TESLA, INC. Courtesy of TESLA, INC.
|
- Install LH front wheel speed sensor harness to knuckle
NOTE:
2x harness clips
 Courtesy of TESLA, INC. Courtesy of TESLA, INC.
|
- Install bolt securing LH front wheel speed sensor to knuckle
NOTE:
1x bolt, 10 mm, 5 N.m, Install new bolt
 Courtesy of TESLA, INC. Courtesy of TESLA, INC.
|
- Install LH front brake caliper to LH front knuckle
NOTE:
2x bolts, E18, 94 N.m, Install new bolts, Mark with paint pen, Remove S-hook from vehicle
 Courtesy of TESLA, INC. Courtesy of TESLA, INC.
|
 Courtesy of TESLA, INC. Courtesy of TESLA, INC.
|
- Install bolt securing LH front brake caliper hose to LH front knuckle
NOTE:
1x bolt, 10 mm, 5 N.m
 Courtesy of TESLA, INC. Courtesy of TESLA, INC.
|
- Install LH front wheel liner to vehicle
 Courtesy of TESLA, INC. Courtesy of TESLA, INC.
|
- Install LH front wheel liner clips securing LH front wheel liner to vehicle
NOTE:
14x clips
 Courtesy of TESLA, INC. Courtesy of TESLA, INC.
|
- Install LH front fender garnish_x000A_
NOTE:
12x clips, 3x tabs, Start at rear and maneuver into rocker panel, Be cautious not to bend front tabs going into front fascia
 Courtesy of TESLA, INC. Courtesy of TESLA, INC.
|
 Courtesy of TESLA, INC. Courtesy of TESLA, INC.
|
 Courtesy of TESLA, INC. Courtesy of TESLA, INC.
|
 Courtesy of TESLA, INC. Courtesy of TESLA, INC.
|
- Install LH front wheel
NOTE:
5x nuts, 21 mm, 175 N.m, Start lug nuts by hand before using power tool
- Raise vehicle fully and lower lift onto locks
NOTE:
Set vehicle to comfortable working height, Make sure there's an audible click of the locks on both sides before lowering, otherwise vehicle may tilt to the side
- Install LH front wheel liner to HV battery
NOTE:
1x clip, 1x bolt, 10 mm, 5 N.m
 Courtesy of TESLA, INC. Courtesy of TESLA, INC.
|
- Install RH front wheel liner to HV battery
NOTE:
1x clip, 1x bolt, 10 mm, 5 N.m
 Courtesy of TESLA, INC. Courtesy of TESLA, INC.
|
- Position the front aero shield to vehicle and install nuts
NOTE:
2x nuts, 15 mm, 5 N.m
 Courtesy of TESLA, INC. Courtesy of TESLA, INC.
|
- Apply Loctite 222 onto front aero shield bolts and install outer fasteners to front aero shield
NOTE:
7x bolts, 10 mm, 5 N.m
 Courtesy of TESLA, INC. Courtesy of TESLA, INC.
|
- Lower vehicle until tires are just above the ground
NOTE:
The front wheels should still move freely for aligning the intermediate shaft, Raise lift off locks, then hold lock release lever to keep locks free while vehicle is lowered
- Install fasteners holding upper portion of front fascia to vehicle
NOTE:
5x bolts, 10 mm, 4 N.m
 Courtesy of TESLA, INC. Courtesy of TESLA, INC.
|
- Connect the steering gear assembly connectors
NOTE:
2x locking connectors, Engage locking tab
 Courtesy of TESLA, INC. Courtesy of TESLA, INC.
|
- Slide the intermediate shaft assembly downward to install it to the steering gear assembly
NOTE:
Ensure the intermediate shaft is aligned and fully seated, Recommend assistance if necessary to align the shaft to steering gear
 Courtesy of TESLA, INC. Courtesy of TESLA, INC.
|
- Install bolt securing the intermediate shaft assembly to the steering gear assembly
NOTE:
1x bolt, 13 mm, 18 N.m
 Courtesy of TESLA, INC. Courtesy of TESLA, INC.
|
- Lower vehicle until tires are touching the ground
NOTE:
Raise lift off locks, then hold lock release lever to keep locks free while vehicle is lowered
- Torque RH front wheel
NOTE:
5x nuts, 21 mm, 175 N.m
- Torque LH front wheel
NOTE:
5x nuts, 21 mm, 175 N.m
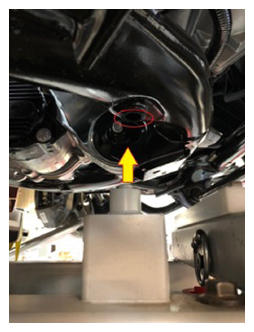
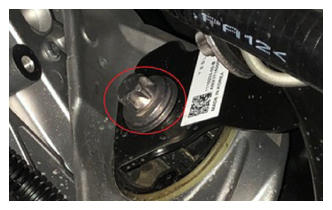
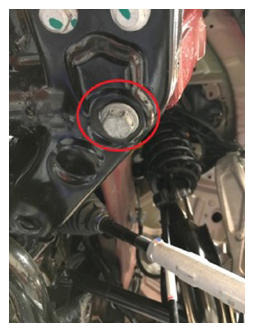
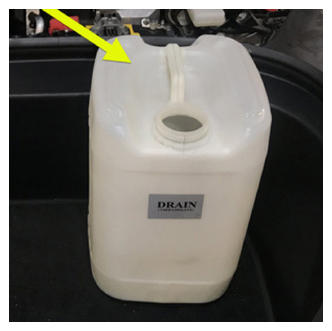
- Remove coolant bottle cap
 Courtesy of TESLA, INC. Courtesy of TESLA, INC.
|
- Place empty coolant container into front storage area
 Courtesy of TESLA, INC. Courtesy of TESLA, INC.
|
- Fill container with at least 15L of coolant
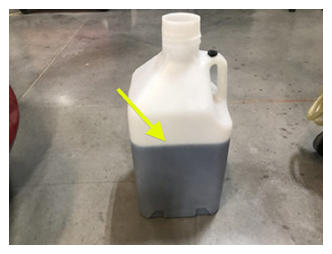 Courtesy of TESLA, INC. Courtesy of TESLA, INC.
|
- Place filled coolant container into front storage area
 Courtesy of TESLA, INC. Courtesy of TESLA, INC.
|
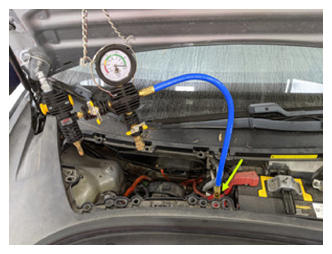
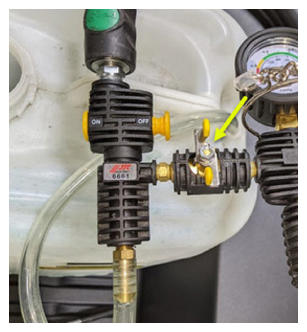
- Setup vacuum refill tool
NOTE:
Verify all valves on refill tool are in the closed position, see image for clarity
 Courtesy of TESLA, INC. Courtesy of TESLA, INC.
|
 Courtesy of TESLA, INC. Courtesy of TESLA, INC.
|
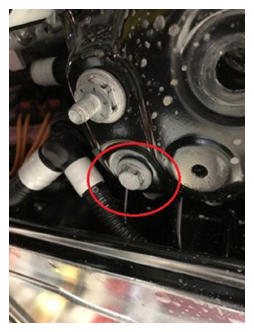
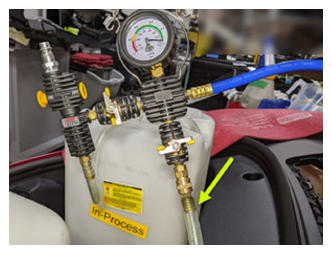
- Install vacuum refill cap onto coolant bottle assembly
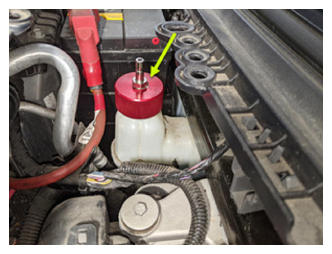 Courtesy of TESLA, INC. Courtesy of TESLA, INC.
|
- Setup vacuum refill tool
NOTE:
Verify all valves on refill tool are in the closed position, see image for clarity
 Courtesy of TESLA, INC. Courtesy of TESLA, INC.
|
 Courtesy of TESLA, INC. Courtesy of TESLA, INC.
|
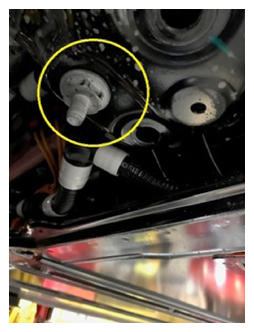
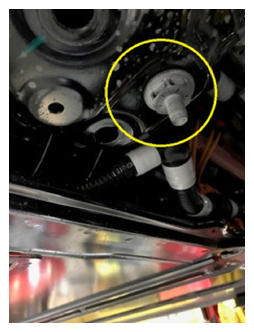
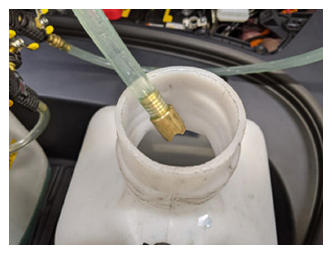
- Install vacuum refill hose into refill cap on coolant bottle
NOTE:
Perform push-pull-push test to verify hose is fully installed
 Courtesy of TESLA, INC. Courtesy of TESLA, INC.
|
- Position overflow hose into empty container
 Courtesy of TESLA, INC. Courtesy of TESLA, INC.
|
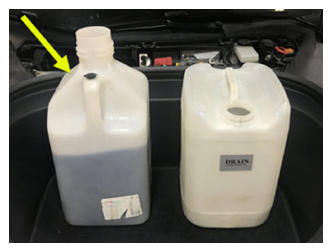
- Place refill hose inside filled coolant container
NOTE:
Make sure hose end is fully submerged into coolant
 Courtesy of TESLA, INC. Courtesy of TESLA, INC.
|
 Courtesy of TESLA, INC. Courtesy of TESLA, INC.
|
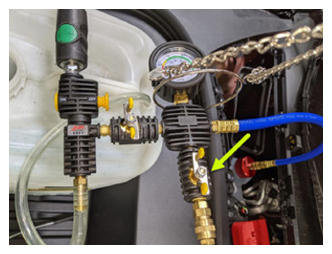
- Connect shop air supply to coolant refill tool
NOTE:
If not already done, Verify refill valve is set to off
 Courtesy of TESLA, INC. Courtesy of TESLA, INC.
|
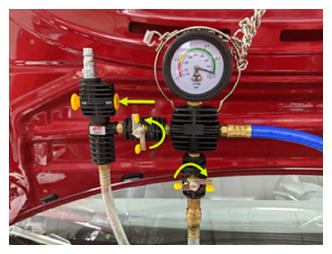
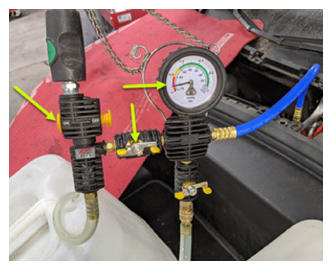
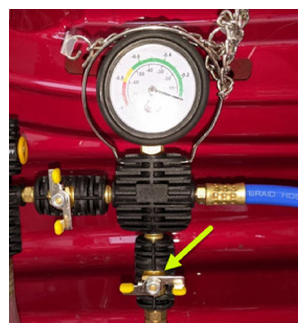
- Open air inlet valve to draw a vacuum, Once gauge stabilizes, Fully close valve
NOTE:
Gauge stabilizes roughly (60-70 cmHg), Vacuum should not drop after the valves are closed
 Courtesy of TESLA, INC. Courtesy of TESLA, INC.
|
 Courtesy of TESLA, INC. Courtesy of TESLA, INC.
|
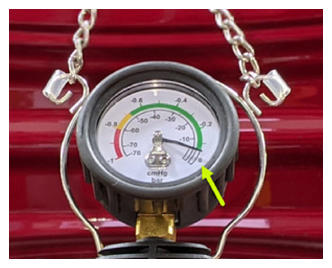
- Slowly open the refill valve to allow coolant to be drawn into the system
NOTE:
Make sure hose end of refill hose is fully submerged during entire process
 Courtesy of TESLA, INC. Courtesy of TESLA, INC.
|
- Once the gauge reads zero, close the refill valve
 Courtesy of TESLA, INC. Courtesy of TESLA, INC.
|
 Courtesy of TESLA, INC. Courtesy of TESLA, INC.
|
- Once the gauge reads zero, close the refill valve
 Courtesy of TESLA, INC. Courtesy of TESLA, INC.
|
 Courtesy of TESLA, INC. Courtesy of TESLA, INC.
|
- Once the gauge reads zero, close the refill valve
 Courtesy of TESLA, INC. Courtesy of TESLA, INC.
|
 Courtesy of TESLA, INC. Courtesy of TESLA, INC.
|
- Once the gauge reads zero, close the refill valve
 Courtesy of TESLA, INC. Courtesy of TESLA, INC.
|
 Courtesy of TESLA, INC. Courtesy of TESLA, INC.
|
- Disconnect shop air supply from coolant refill tool
 Courtesy of TESLA, INC. Courtesy of TESLA, INC.
|
- Remove coolant refill hose from coolant container
 Courtesy of TESLA, INC. Courtesy of TESLA, INC.
|
- Remove coolant overflow hose from coolant container
 Courtesy of TESLA, INC. Courtesy of TESLA, INC.
|
- Remove vacuum refill hose from refill cap on coolant bottle
 Courtesy of TESLA, INC. Courtesy of TESLA, INC.
|
- Remove coolant refill tool from vehicle
 Courtesy of TESLA, INC. Courtesy of TESLA, INC.
|
 Courtesy of TESLA, INC. Courtesy of TESLA, INC.
|
- Remove both coolant containers from inside underhood area
 Courtesy of TESLA, INC. Courtesy of TESLA, INC.
|
- Connect first responder loop and 12V negative terminal
NOTE:
1x nut, 10 mm, 6 N.m, 1x connector, Engage locking tab, Connect FRL first before connecting 12V to avoid damage to car computer
 Courtesy of TESLA, INC. Courtesy of TESLA, INC.
|
 Courtesy of TESLA, INC. Courtesy of TESLA, INC.
|
- Remove the steering wheel holder
- Connect to vehicle using Toolbox
NOTE:
Vehicle connection is integrated into drivers footwell cover, Open Toolbox 3 website and establish connection to the vehicle. https://toolbox.teslamotors.com, Select connection status icon at top right corner, and select connect locally (icon will turn green when vehicle is connected)
- Select 'TEST_VCFRONT_X_THERMAL-COOLANT-AIR-PURGE ', click 'Run', and allow routine to complete
NOTE:
Make sure vehicle is not in drive state, Plan is still running despite the stop message, Coolant pumps will be audible, Test lasts approximately 10 mins, Speeds can be monitored in garage under PT Thermal tab, Idle speed = ~1500 RPM, Test will vary speeds from 3500-6500 RPM and actuate valve between SERIES and PARALLEL, Putting vehicle into drive state will stop this routine, If speeds hover at 7000 RPM, that means the pumps are air locked, perform vacuum fill again, Continue to add coolant and purge until the coolant level reaches between the NOM and MAX Lines on the bottle, Select 'X' at top right of window to close once complete
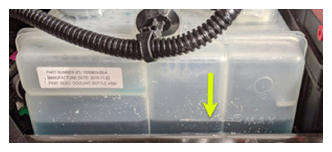
- Inspect coolant level and top off as necessary
NOTE:
Ensure that the fluid level is at the Max line
 Courtesy of TESLA, INC. Courtesy of TESLA, INC.
|
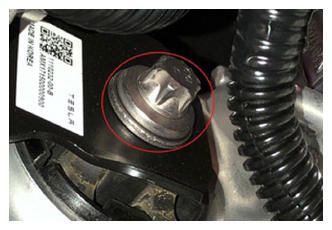
- Install coolant bottle cap
 Courtesy of TESLA, INC. Courtesy of TESLA, INC.
|
- Install frunk assembly into vehicle
NOTE:
6x clips, Replace any clips if broken or missing
 Courtesy of TESLA, INC. Courtesy of TESLA, INC.
|
- Install fasteners securing the frunk assembly
NOTE:
5x bolts, 10 mm, 5 N.m, Newer vehicles may be equipped with 1x push clip securing frunk to washer bottle neck
 Courtesy of TESLA, INC. Courtesy of TESLA, INC.
|
 Courtesy of TESLA, INC. Courtesy of TESLA, INC.
|
- Install access panel
NOTE:
3x clips, 1x connector
 Courtesy of TESLA, INC. Courtesy of TESLA, INC.
|
 Courtesy of TESLA, INC. Courtesy of TESLA, INC.
|
- Install rear apron
NOTE:
14x clips, Hold rear wall of frunk to keep from flexing while engaging front clips
 Courtesy of TESLA, INC. Courtesy of TESLA, INC.
|
 Courtesy of TESLA, INC. Courtesy of TESLA, INC.
|
- Close hood
 Courtesy of TESLA, INC. Courtesy of TESLA, INC.
|
- Reposition 2nd row seat cushion
NOTE:
Slide cushion rearward then align with buckles and foam with seat rail, Make sure cushion is fully seated with push & pull test
 Courtesy of TESLA, INC. Courtesy of TESLA, INC.
|
- Move RH front seat to original position
- Move LH front seat to original position
- Raise all four windows
- Close all four doors
NOTE:
If 12V is powered up, Unlatch rear doors before closing
- Remove vehicle from lift
NOTE:
Lower rack arms fully and remove from under vehicle if necessary, Remove air suspension from "Jack Mode" if equipped
- Check tire pressures
NOTE:
4x tires, Set to specification if necessary, Refer to the "Tire and Loading Information" label located on the driver side B-pillar
 Courtesy of TESLA, INC. Courtesy of TESLA, INC.
|
- Verify the alignment slip/turn plates are locked
 Courtesy of TESLA, INC. Courtesy of TESLA, INC.
|
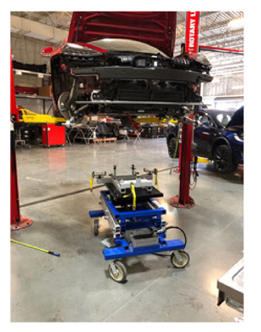
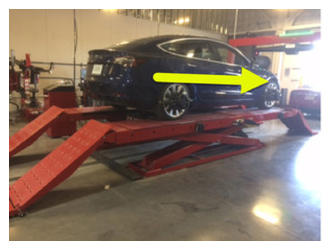
- Drive vehicle onto alignment rack
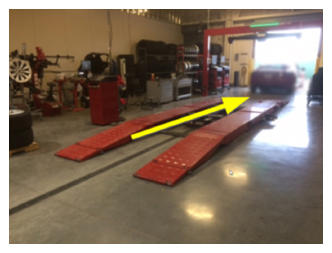 Courtesy of TESLA, INC. Courtesy of TESLA, INC.
|
- Pull vehicle forward and stop ~ ft before turn plates to allow for rolling compensation
NOTE:
Shift to park
 Courtesy of TESLA, INC. Courtesy of TESLA, INC.
|
 Courtesy of TESLA, INC. Courtesy of TESLA, INC.
|
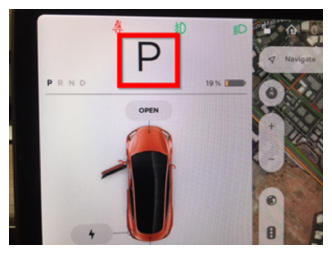
- Shift to park
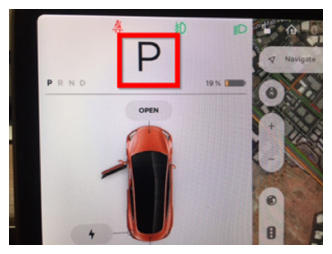 Courtesy of TESLA, INC. Courtesy of TESLA, INC.
|
- Install wheel chocks
NOTE:
Place chocks on both sides of the driver's side rear tire
 Courtesy of TESLA, INC. Courtesy of TESLA, INC.
|
- Latch the driver seat belt to buckle
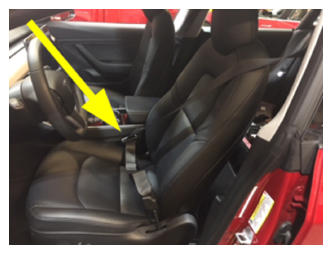 Courtesy of TESLA, INC. Courtesy of TESLA, INC.
|
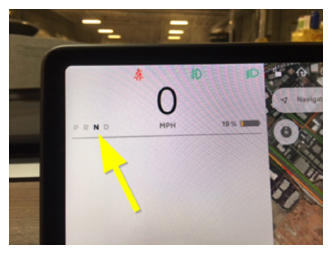
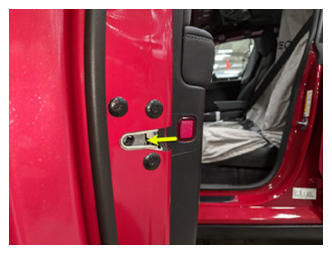
- Latch LH front door and place vehicle into neutral
NOTE:
Careful not to slam the door while latch is engaged
 Courtesy of TESLA, INC. Courtesy of TESLA, INC.
|
 Courtesy of TESLA, INC. Courtesy of TESLA, INC.
|
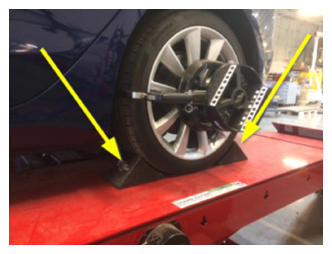
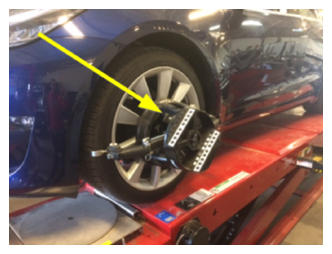
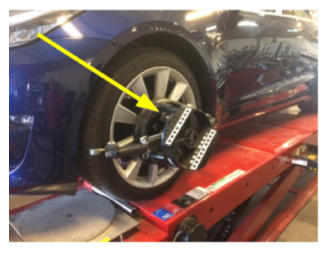
- Install alignment heads onto wheels
NOTE:
4x alignment heads
 Courtesy of TESLA, INC. Courtesy of TESLA, INC.
|
- Enter vehicle information to alignment machine
- Perform rolling compensation
NOTE:
Remove the wheel chocks from the LH rear tire and push the back of the tire to roll vehicle forward. Reinstall wheel chocks once vehicle is in position
 Courtesy of TESLA, INC. Courtesy of TESLA, INC.
|
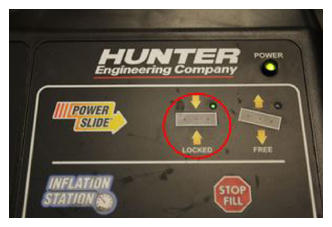
- Unlock alignment slip/turn plates
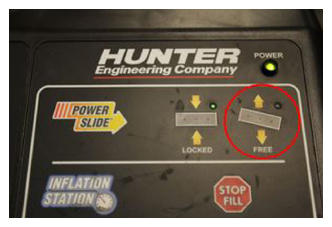 Courtesy of TESLA, INC. Courtesy of TESLA, INC.
|
- Verify chassis height measurement tool is calibrated
NOTE:
Adjust if necessary, Measure height of tool and adjust reading to match
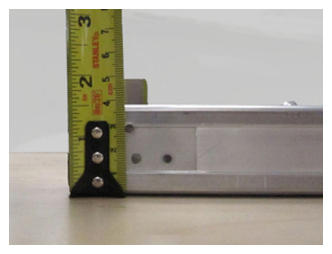 Courtesy of TESLA, INC. Courtesy of TESLA, INC.
|
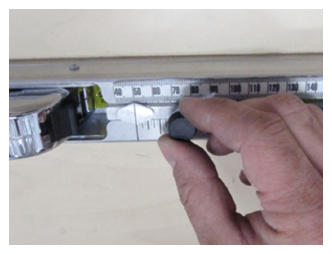 Courtesy of TESLA, INC. Courtesy of TESLA, INC.
|
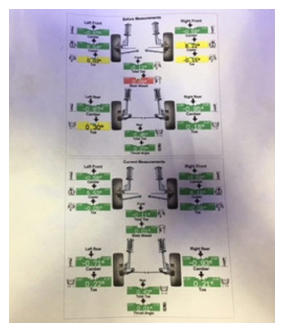
- Perform ride height measurement
NOTE:
Measure the ride height 75 mm inward of the HV battery ski hole at each corner, If using ballast bags, move the front seats as necessary to achieve ride height spec, see Service Information for ride height specifications
 Courtesy of TESLA, INC. Courtesy of TESLA, INC.
|
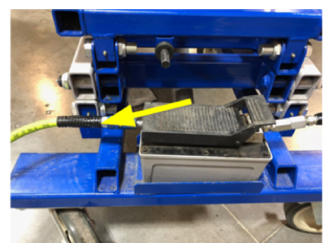
- Apply brake pedal depressor
 Courtesy of TESLA, INC. Courtesy of TESLA, INC.
|
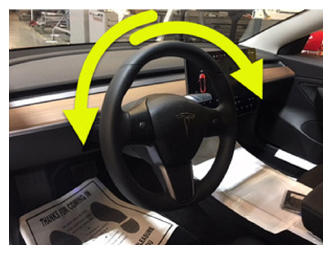
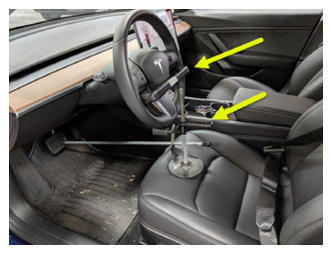
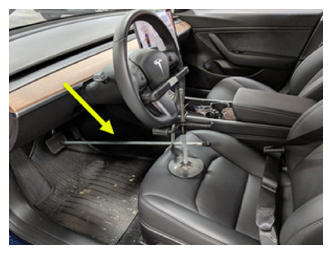
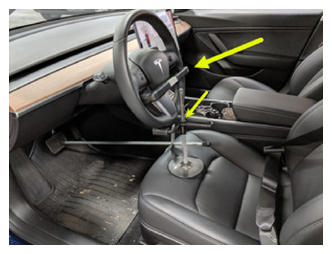
- Perform caster sweep and install steering wheel holder and level tool
NOTE:
If camber and caster are out of specification, perform necessary camber and caster adjustment
 Courtesy of TESLA, INC. Courtesy of TESLA, INC.
|
 Courtesy of TESLA, INC. Courtesy of TESLA, INC.
|
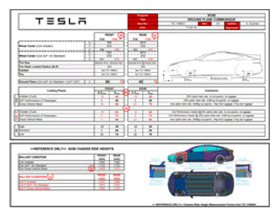
- Verify alignment reading is within specification and print vehicle summary
 Courtesy of TESLA, INC. Courtesy of TESLA, INC.
|
- Remove alignment heads from wheels
NOTE:
4x alignment heads
 Courtesy of TESLA, INC. Courtesy of TESLA, INC.
|
- Remove brake pedal depressor
 Courtesy of TESLA, INC. Courtesy of TESLA, INC.
|
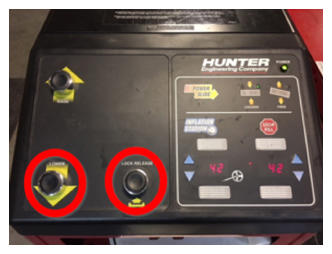
- Lock alignment slip/turn plates
 Courtesy of TESLA, INC. Courtesy of TESLA, INC.
|
- Lower the alignment rack to ground
 Courtesy of TESLA, INC. Courtesy of TESLA, INC.
|
- Unlatch the driver door, place vehicle in park and remove steering wheel leveler and steering wheel holder
 Courtesy of TESLA, INC. Courtesy of TESLA, INC.
|
 Courtesy of TESLA, INC. Courtesy of TESLA, INC.
|
 Courtesy of TESLA, INC. Courtesy of TESLA, INC.
|
- Unlatch LH front seat belt
- Remove wheel chocks
- Remove vehicle from alignment rack