- While performing the courtesy inspection, note any abnormal tire wear that could indicate the need for an alignment.
- Move the vehicle to a 2 post lift. See Raise Vehicle - 2 Post Lift
.
- Chock a front wheel to prevent the vehicle from rolling in subsequent steps.
 Courtesy of TESLA, INC. Courtesy of TESLA, INC.
|
- Enable Service Mode from the touchscreen. See Service Mode
.
- From the touchscreen, touch Thermal > Actions > Start Thermal Fill Drain (Coolant + Refrigerant)
, and allow the routine to complete.
- From the touchscreen, touch Controls (vehicle icon) > Service > Towing > Transport Mode
, and allow the routine to complete.
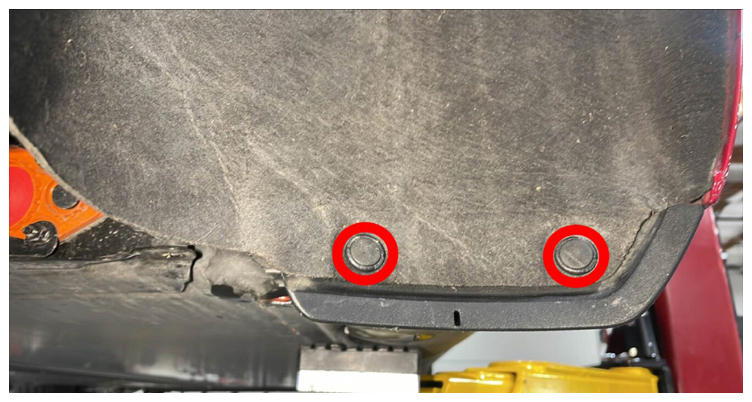
- Remove the rear underhood apron. See Underhood Apron - Rear (Remove And Replace)
.
- Remove the HEPA filter assembly. See Assembly - Filter - Hepa (Remove And Replace)
.
- Remove the HEPA duct. See Duct - Hepa (Remove And Replace)
.
- Disconnect LV power. See 12V/LV POWER (Disconnect And Connect)
.
- Perform the vehicle electrical isolation procedure. See Vehicle Electrical Isolation Procedure
.
- Remove the LH and RH rear wheels. See Wheel (Remove And Replace)
.
- Remove the LH and RH rear suspension covers. See Cover - Rear Suspension - Lh (Remove And Replace)
.
- Remove the mid aero shield panel. See Panel - Aero Shield - Mid (Remove And Replace)
.
- Remove the rear diffuser. See Diffuser - Rear Fascia (Remove And Replace)
.
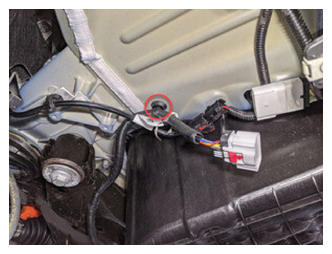
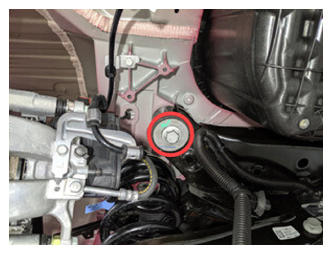
- Remove the nut that attaches the rear drive unit ground strap to the body, and then remove the ground strap from the body.
 Courtesy of TESLA, INC. Courtesy of TESLA, INC.
|
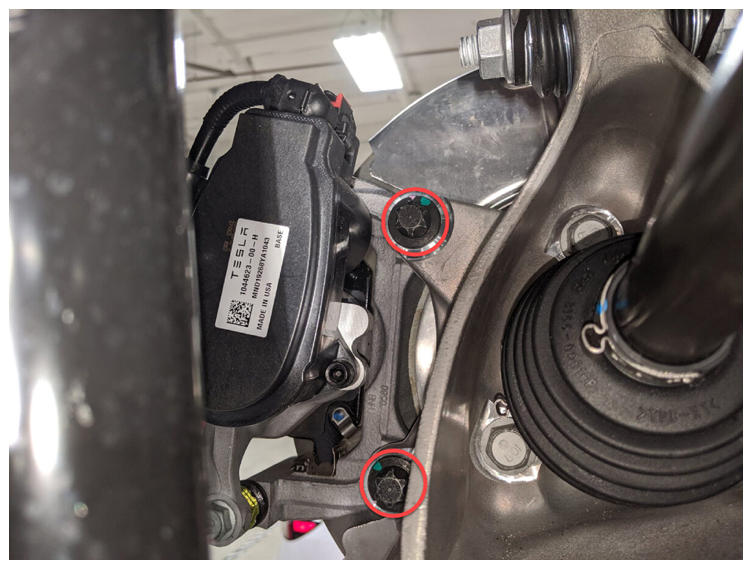
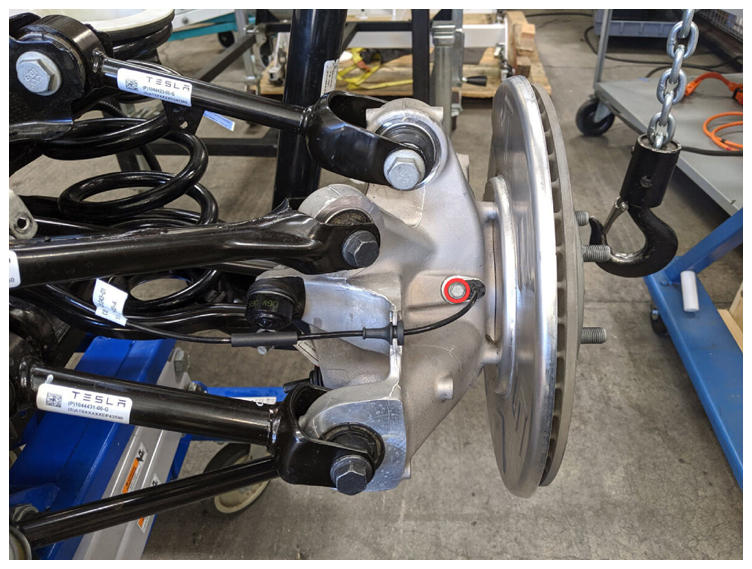
- Remove and discard the bolts (x2) that attach the LH rear brake caliper to the LH rear knuckle, remove the caliper from the knuckle, and then hang the caliper from an S-hook.
 Courtesy of TESLA, INC. Courtesy of TESLA, INC.
|
 Courtesy of TESLA, INC. Courtesy of TESLA, INC.
|
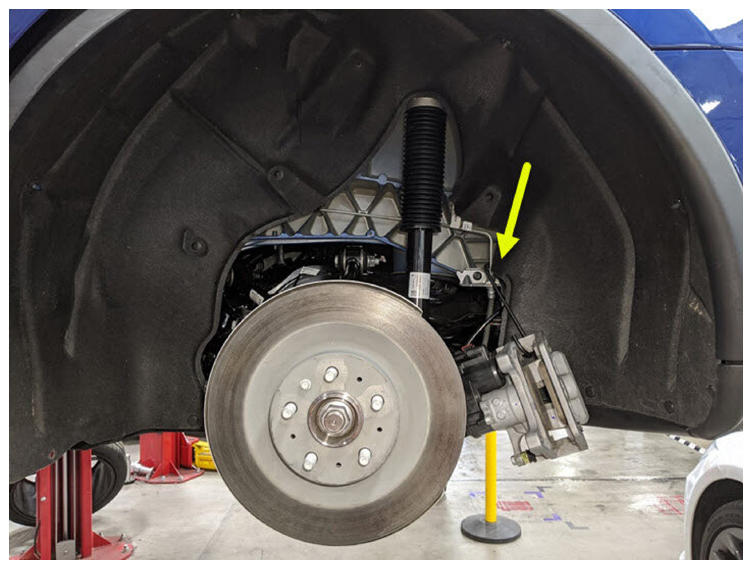
- Install the Gedore spring compressor onto the LH rear coil spring, and slightly compress the spring to take the load off of the suspension.
NOTE:
Refer to the Tooling Profile for additional information.
 Courtesy of TESLA, INC. Courtesy of TESLA, INC.
|
 Courtesy of TESLA, INC. Courtesy of TESLA, INC.
|
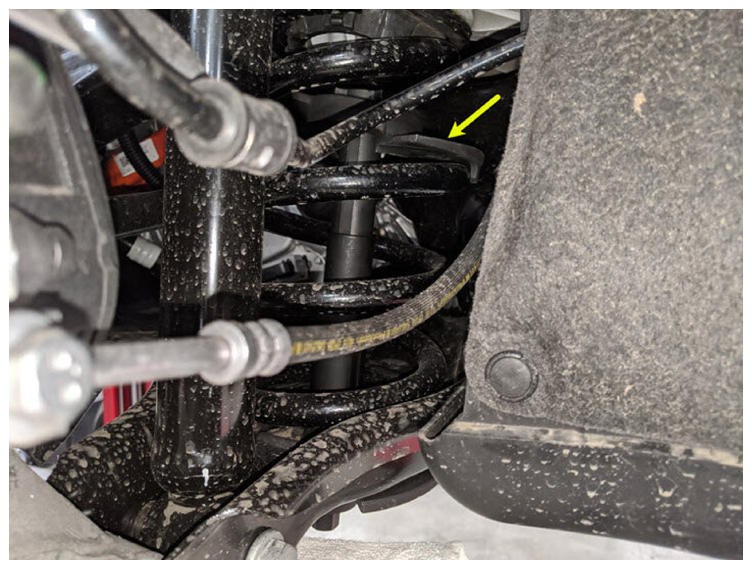
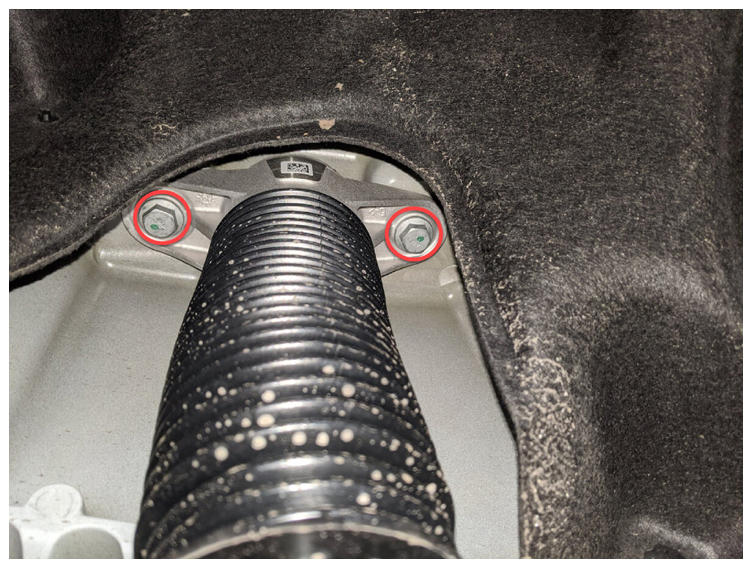
- Remove the bolts (x2) that attach the LH rear strut to the body at the LH top mount.
 Courtesy of TESLA, INC. Courtesy of TESLA, INC.
|
- Repeat step 17 through step 19 on the RH side of the vehicle.
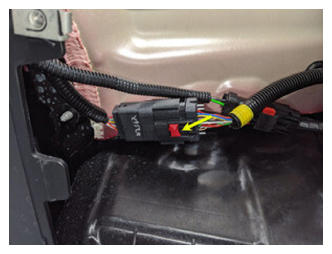
- Release the red locking tab and then disconnect the electrical harness from the rear subframe harness RH connector.
 Courtesy of TESLA, INC. Courtesy of TESLA, INC.
|
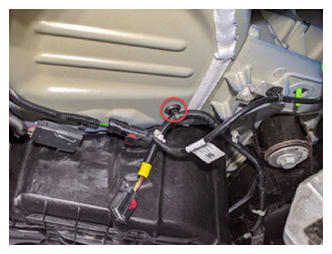
- Release the clip that attaches the rear subframe harness to the body on the RH side.
 Courtesy of TESLA, INC. Courtesy of TESLA, INC.
|
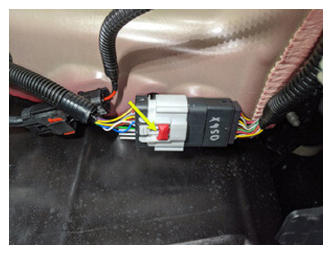
- Release the red locking tab and then disconnect the electrical harness from the rear subframe harness LH connector.
 Courtesy of TESLA, INC. Courtesy of TESLA, INC.
|
- Release the clip that attaches the rear subframe harness to the body on the LH side.
 Courtesy of TESLA, INC. Courtesy of TESLA, INC.
|
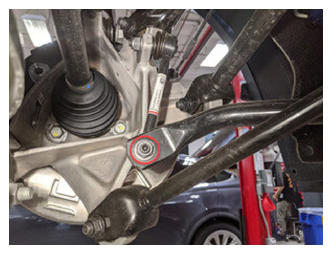
- Remove and discard the nut that attaches the LH rear stabilizer bar end link to the rear stabilizer bar.
NOTE:
Use a 5 mm allen wrench to prevent the ball joint stud from turning and damaging the ball joint.
 Courtesy of TESLA, INC. Courtesy of TESLA, INC.
|
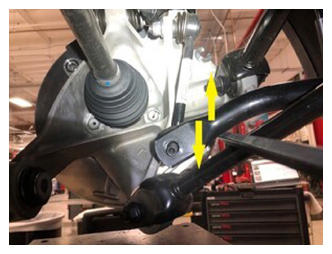
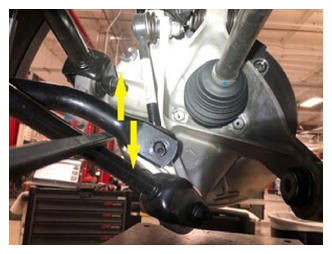
- Remove LH rear stabilizer bar end link from the rear stabilizer bar.
NOTE:
Move the stabilizer bar up and down to ease removal of the end link.
 Courtesy of TESLA, INC. Courtesy of TESLA, INC.
|
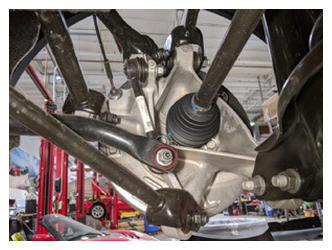
- Remove and discard the nut that attaches the RH rear stabilizer bar end link to the rear stabilizer bar.
NOTE:
Use a 5 mm allen wrench to prevent the ball joint stud from turning and damaging the ball joint.
 Courtesy of TESLA, INC. Courtesy of TESLA, INC.
|
- Remove RH rear stabilizer bar end link from the rear stabilizer bar.
NOTE:
Move the stabilizer bar up and down to ease removal of the end link.
 Courtesy of TESLA, INC. Courtesy of TESLA, INC.
|
- Remove and discard the bolts (x4) that attach the rear stabilizer bar to the rear subframe, and then remove the stabilizer bar from the subframe.
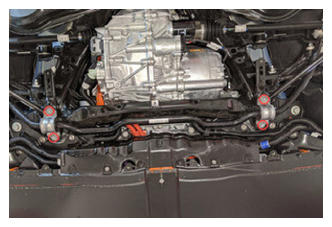 Courtesy of TESLA, INC. Courtesy of TESLA, INC.
|
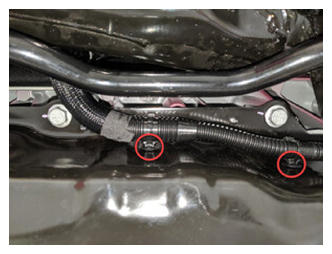
- Release the clips (x2) that attach the coolant hoses to LH shear plate.
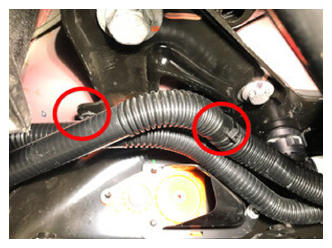 Courtesy of TESLA, INC. Courtesy of TESLA, INC.
|
- Release the clips (x4) that attach the coolant hoses to the rear skid plate.
NOTE:
Clip quantity varies with older vehicles.
 Courtesy of TESLA, INC. Courtesy of TESLA, INC.
|
 Courtesy of TESLA, INC. Courtesy of TESLA, INC.
|
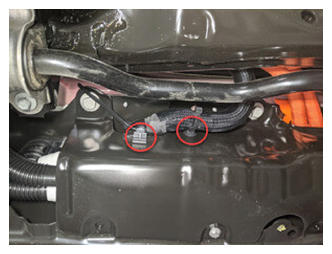
- Release the clips (x2) that attach the coolant hoses to RH shear plate.
 Courtesy of TESLA, INC. Courtesy of TESLA, INC.
|
- Remove the HV battery rear skid plate. See Skid Plate - HV Battery - Rear (Remove And Replace)
.
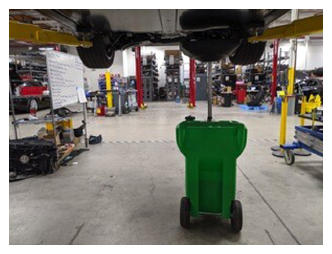
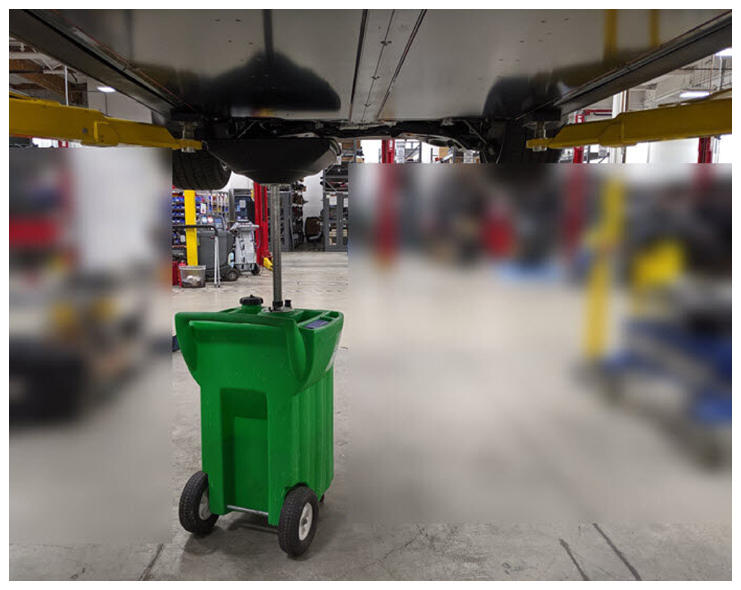
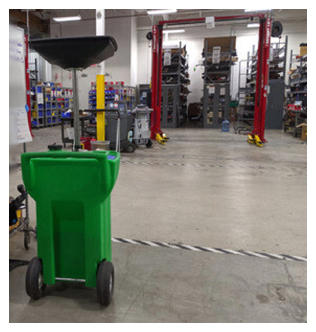
- Position a coolant drain collector underneath the LH rear of the HV battery.
 Courtesy of TESLA, INC. Courtesy of TESLA, INC.
|
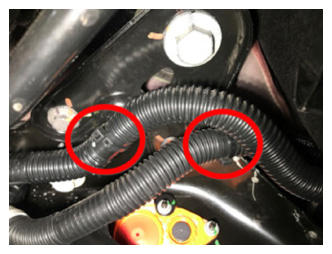
- Release the clip, disconnect the rear drive unit inverter inlet hose from the HV battery, and then immediately plug both fittings.
 Courtesy of TESLA, INC. Courtesy of TESLA, INC.
|
- Release the clip, disconnect the rear drive unit inverter inlet hose from the rear drive unit inverter, and then immediately plug both fittings.
 Courtesy of TESLA, INC. Courtesy of TESLA, INC.
|
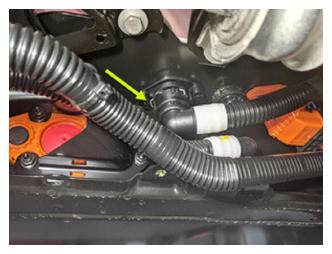
- Release the clip that attaches the rear drive unit inverter inlet hose from rear drive unit HV harness.
 Courtesy of TESLA, INC. Courtesy of TESLA, INC.
|
- Remove the rear drive unit inverter inlet hose down and out from between the rear subframe and the HV battery.
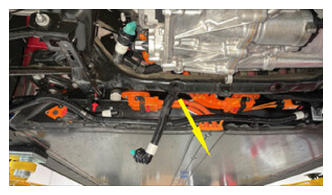 Courtesy of TESLA, INC. Courtesy of TESLA, INC.
|
- Position a coolant drain collector underneath the RH rear of the HV battery.
 Courtesy of TESLA, INC. Courtesy of TESLA, INC.
|
- Release the clips (x2) that attach the RH rear wheel arch liner to the RH rocker panel, and then move the liner aside for access.
 Courtesy of TESLA, INC. Courtesy of TESLA, INC.
|
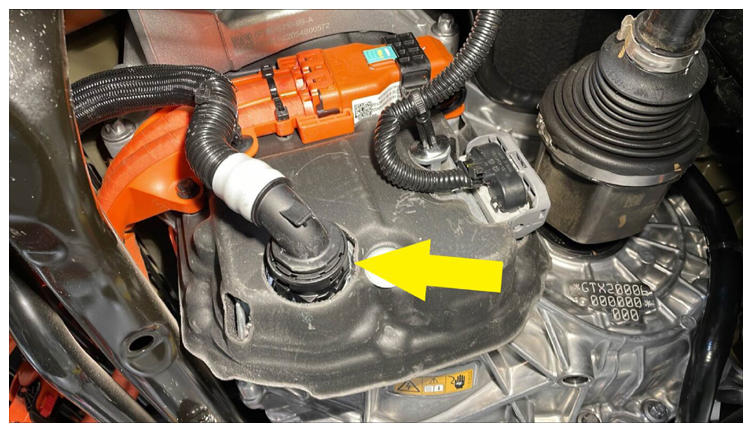
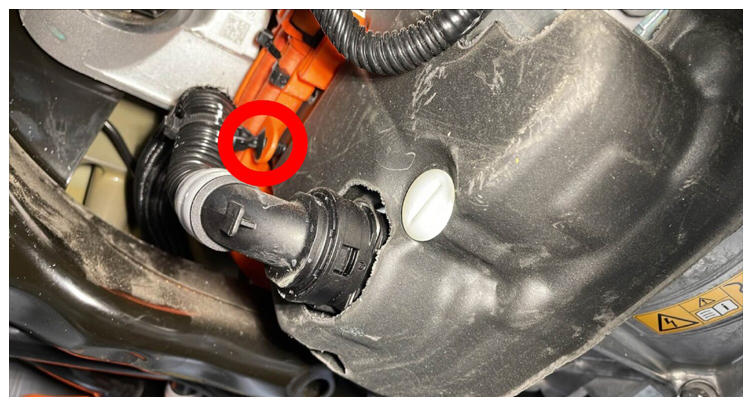
- Release the clip, disconnect the rear drive unit coolant outlet hose from the powertrain return hose, and then immediately plug both fittings.
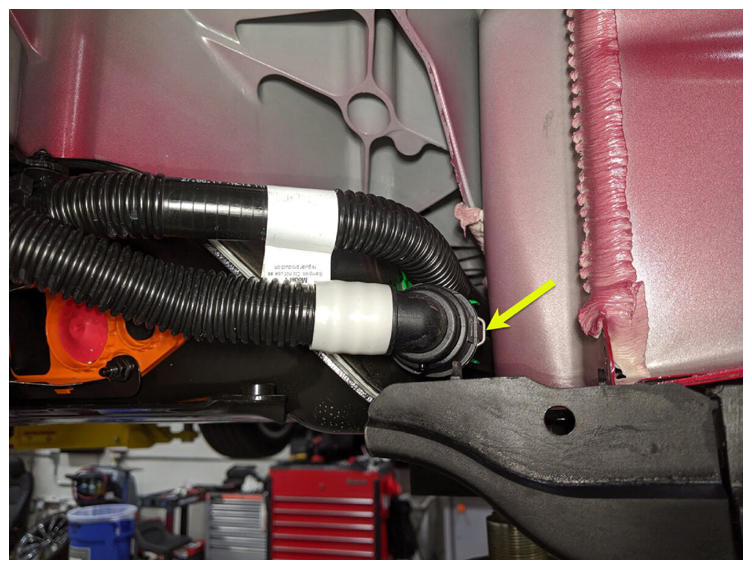 Courtesy of TESLA, INC. Courtesy of TESLA, INC.
|
- Remove the coolant drain collector from under the vehicle.
 Courtesy of TESLA, INC. Courtesy of TESLA, INC.
|
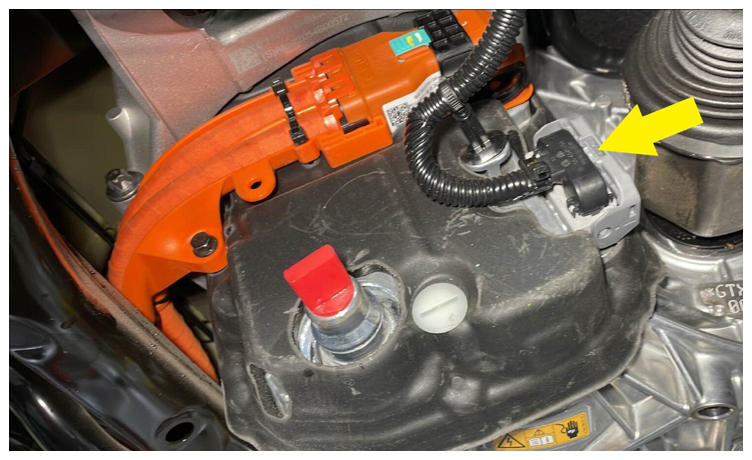
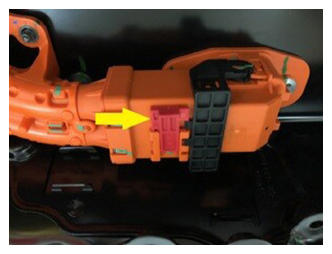
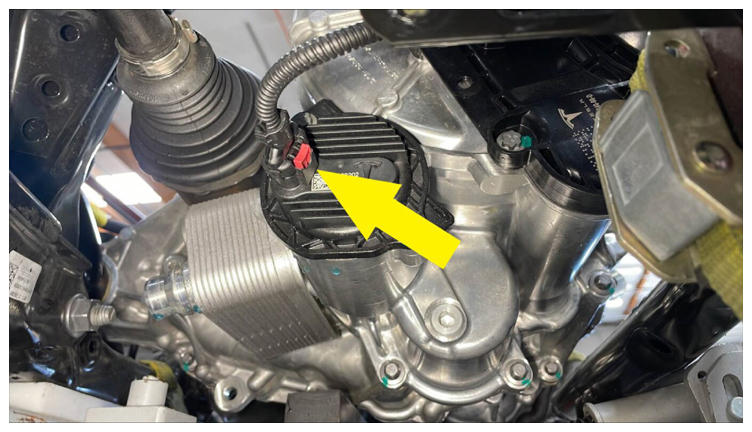
- Release the locking tab, push the handle downward, and then disconnect the rear subframe electrical harness from the rear drive unit inverter logic connector.
CAUTION:
Once disconnected, make sure that coolant does not get into the connectors.
 Courtesy of TESLA, INC. Courtesy of TESLA, INC.
|
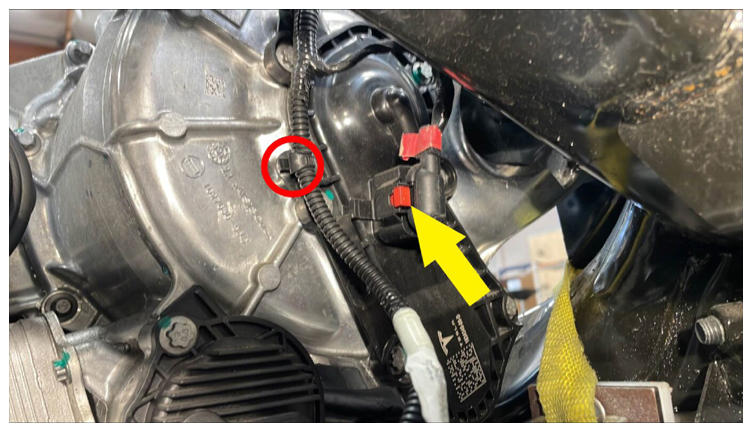
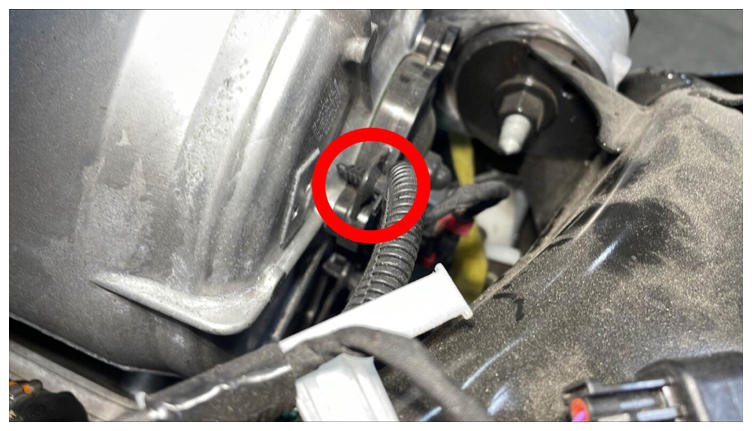
- Release the clip that attaches the rear subframe electrical harness to the rear drive unit inverter.
 Courtesy of TESLA, INC. Courtesy of TESLA, INC.
|
- Remove the bolt that attaches the rear drive unit HV harness bracket to the rear drive unit inverter.
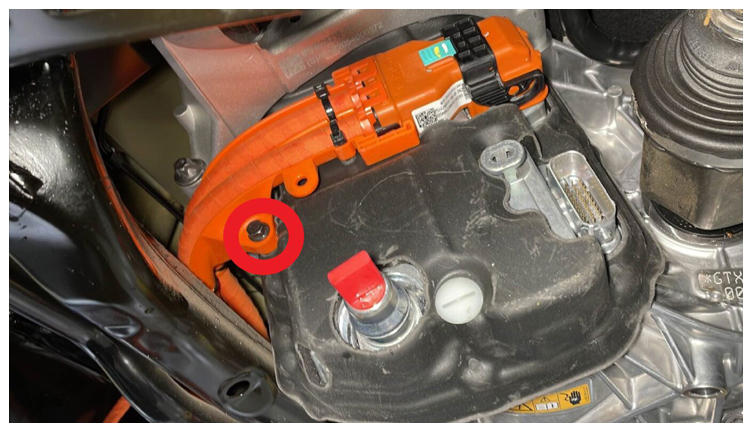 Courtesy of TESLA, INC. Courtesy of TESLA, INC.
|
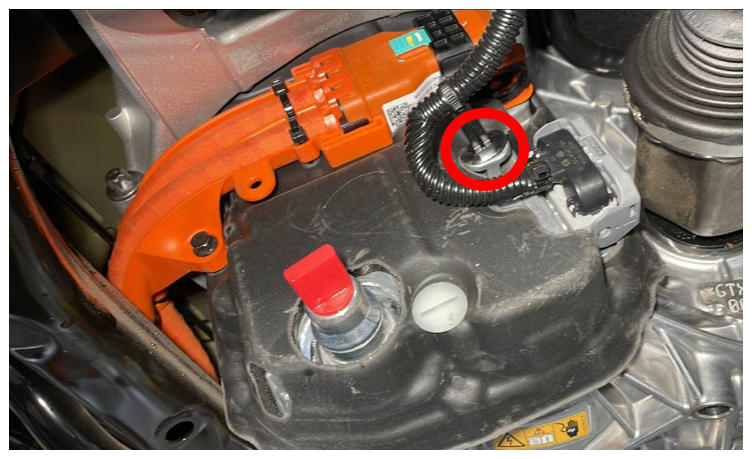
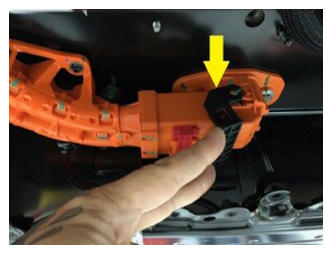
- Slide the locking tab, raise the black handle, disconnect the rear drive unit HV harness from the rear drive unit inverter HV header, and then set the HV harness aside.
 Courtesy of TESLA, INC. Courtesy of TESLA, INC.
|
- Remove the nut(s) that attach(es) the rear drive unit HV harness bracket to the HV battery.
 Courtesy of TESLA, INC. Courtesy of TESLA, INC.
|
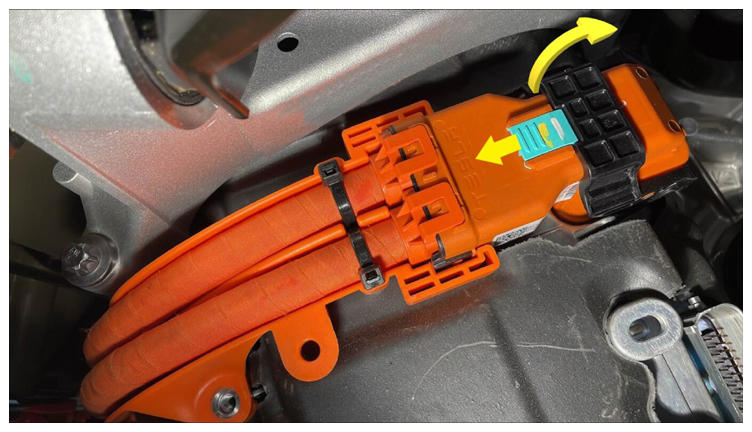
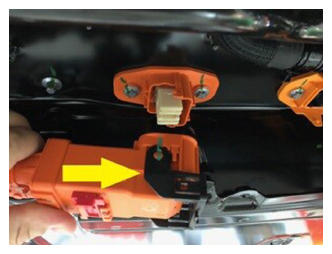
- Slide the red locking tab, raise the black handle, and then disconnect the rear drive unit HV harness from the HV battery header.
 Courtesy of TESLA, INC. Courtesy of TESLA, INC.
|
 Courtesy of TESLA, INC. Courtesy of TESLA, INC.
|
 Courtesy of TESLA, INC. Courtesy of TESLA, INC.
|
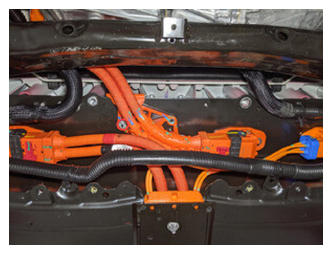
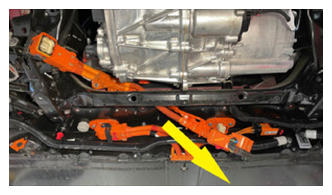
- Remove the rear drive unit HV harness down and out from between the rear subframe and the HV battery.
NOTE:
Rotate the harness as it is removed to allow access for the bracket.
 Courtesy of TESLA, INC. Courtesy of TESLA, INC.
|
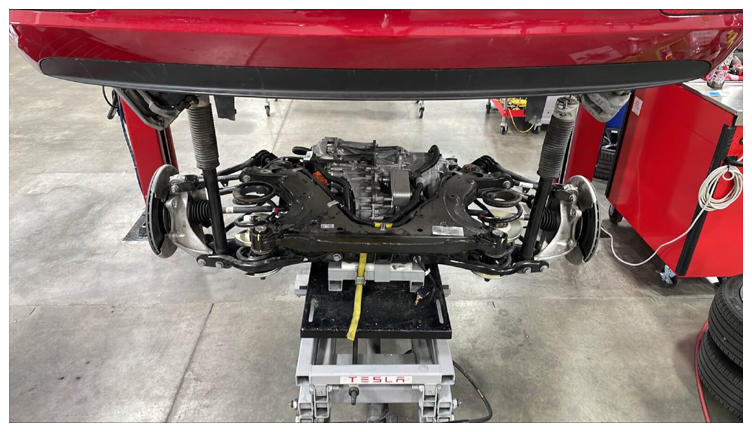
- Position the subframe lifting tool under, and up against the rear subframe.
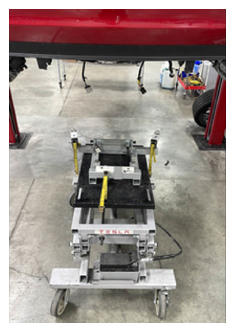 Courtesy of TESLA, INC. Courtesy of TESLA, INC.
|
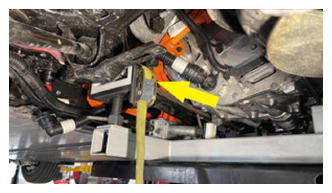
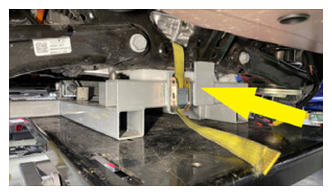
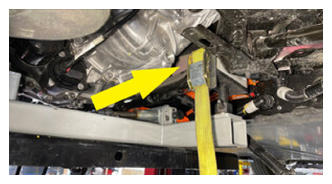
- With the help of an assistant, fully secure the straps (x3) that attach the rear subframe to the subframe lifting tool.
 Courtesy of TESLA, INC. Courtesy of TESLA, INC.
|
 Courtesy of TESLA, INC. Courtesy of TESLA, INC.
|
 Courtesy of TESLA, INC. Courtesy of TESLA, INC.
|
- Use a paint pen to trace around the LH and RH rear subframe mounting bolts, so that the bolts can be realigned later during the subframe installation.
 Courtesy of TESLA, INC. Courtesy of TESLA, INC.
|
 Courtesy of TESLA, INC. Courtesy of TESLA, INC.
|
- Use a paint pen to apply a witness mark where the rear subframe contacts the body at the LH and RH rear subframe mounting bolts, so that the subframe can be realigned to the body later during subframe installation.
 Courtesy of TESLA, INC. Courtesy of TESLA, INC.
|
 Courtesy of TESLA, INC. Courtesy of TESLA, INC.
|
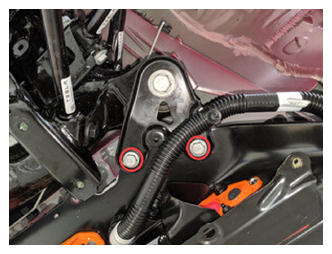
- Remove the small bolts (x2) that attach the LH shear plate to the HV battery.
 Courtesy of TESLA, INC. Courtesy of TESLA, INC.
|
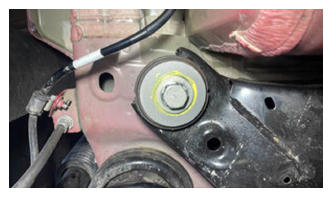
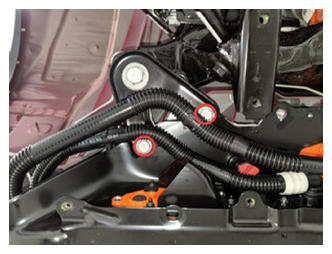
- Remove the large bolt that attaches the LH shear plate and rear subframe to the body, and then remove shear plate.
 Courtesy of TESLA, INC. Courtesy of TESLA, INC.
|
- Remove the small bolts (x2) that attach the RH shear plate to the HV battery.
 Courtesy of TESLA, INC. Courtesy of TESLA, INC.
|
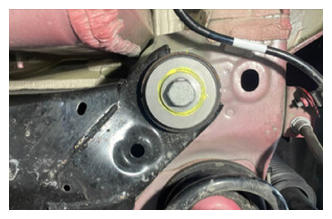
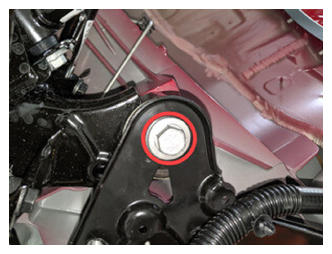
- Remove the large bolt that attaches the RH shear plate and rear subframe to the body, and then remove shear plate.
 Courtesy of TESLA, INC. Courtesy of TESLA, INC.
|
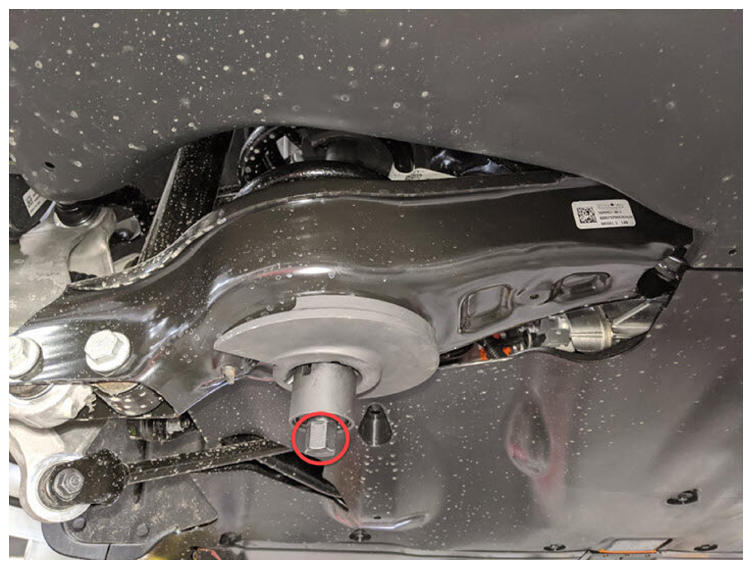
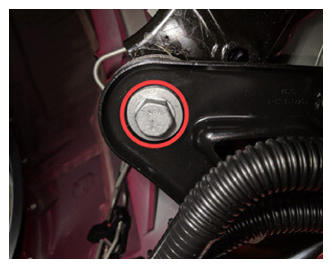
- Remove and discard the LH rear subframe bolt that attaches the subframe to the body.
 Courtesy of TESLA, INC. Courtesy of TESLA, INC.
|
- Carefully lower the rear subframe and rear drive unit assembly from the vehicle, and move it out from under the vehicle.
CAUTION:
Do not damage hoses or harnesses while lowering the subframe.
 Courtesy of TESLA, INC. Courtesy of TESLA, INC.
|
- Release the clip that attaches the rear drive unit ground strap to the rear subframe.
 Courtesy of TESLA, INC. Courtesy of TESLA, INC.
|
- Remove the bolt that attaches the rear drive unit ground strap to the rear drive unit, and then remove the ground strap from the drive unit.
 Courtesy of TESLA, INC. Courtesy of TESLA, INC.
|
- Position a coolant catcher under the RH side of the subframe and rear drive unit assembly, and position a foldable funnel to direct coolant drain from the heat exchanger.
 Courtesy of TESLA, INC. Courtesy of TESLA, INC.
|
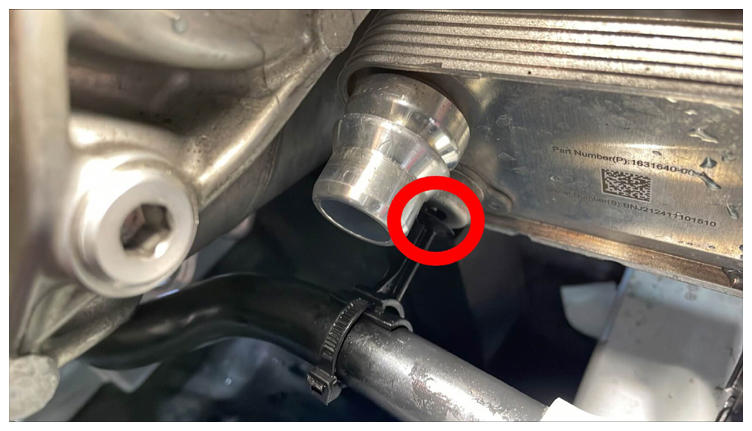
- Release the clip, disconnect the rear drive unit coolant outlet hose from the rear drive unit heat exchanger, and allow the heat exchanger and hose to drain.
 Courtesy of TESLA, INC. Courtesy of TESLA, INC.
|
- Release clips (x3) that attach the rear drive unit coolant outlet hose to rear drive unit, and then manuever the hose out from between the drive unit and rear subframe.
 Courtesy of TESLA, INC. Courtesy of TESLA, INC.
|
 Courtesy of TESLA, INC. Courtesy of TESLA, INC.
|
 Courtesy of TESLA, INC. Courtesy of TESLA, INC.
|
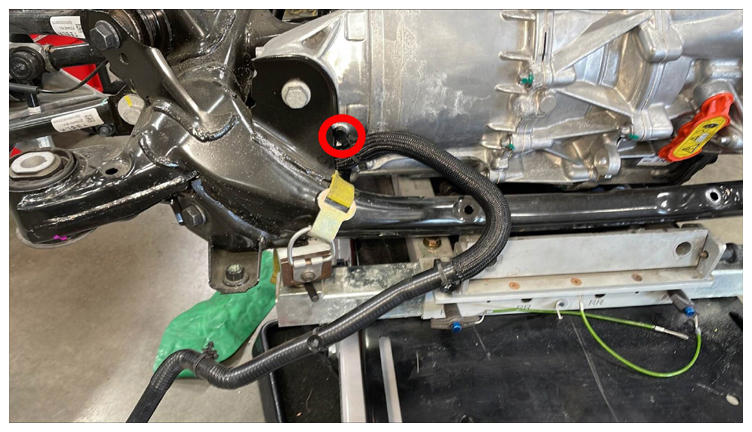
- Release the clips (x2) that attach the rear drive unit inverter outlet to heat exchanger hose to the rear drive unit.
 Courtesy of TESLA, INC. Courtesy of TESLA, INC.
|
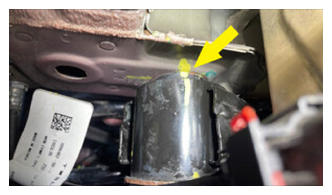
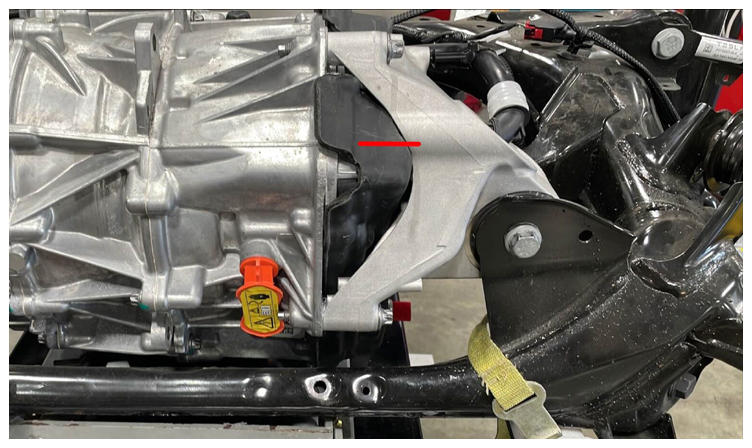
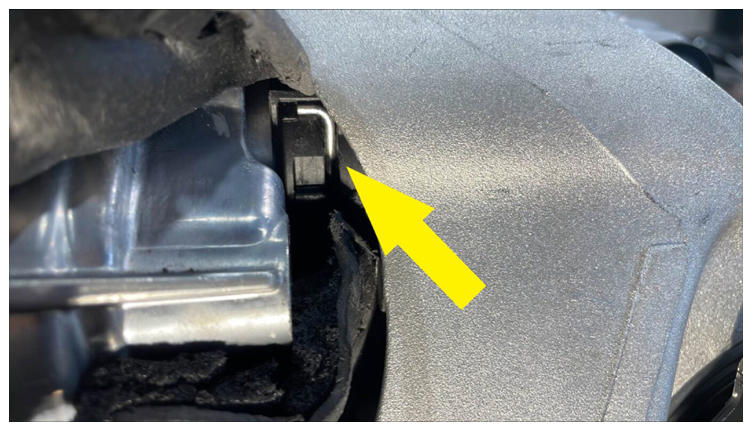
- Cut the rear drive unit inverter NVH cover at the line indicated so as to access the clip for the rear drive unit inverter to heat exchanger hose.
NOTE:
Open the cut in the NVH cover, but be carefull not to remove any of the cover in doing so.
 Courtesy of TESLA, INC. Courtesy of TESLA, INC.
|
- Release the clip, disconnect the rear drive unit inverter to heat exchanger hose from the rear drive unit inverter outlet, and allow to drain.
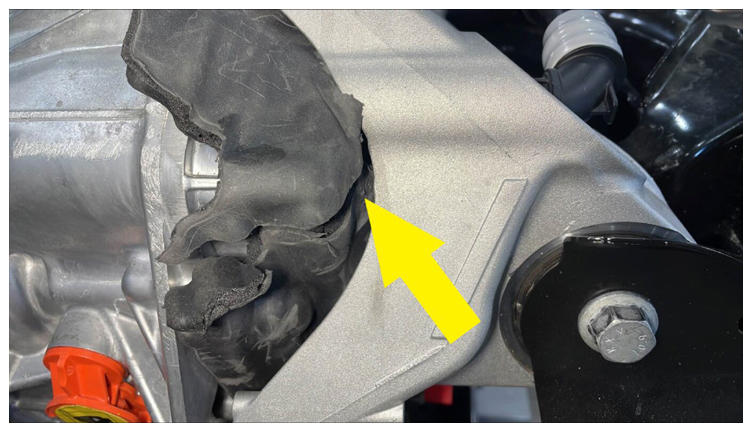 Courtesy of TESLA, INC. Courtesy of TESLA, INC.
|
 Courtesy of TESLA, INC. Courtesy of TESLA, INC.
|
- Release the clip, disconnect the rear drive unit inverter to heat exchanger hose from the rear drive unit heat exchanger, and allow to drain.
 Courtesy of TESLA, INC. Courtesy of TESLA, INC.
|
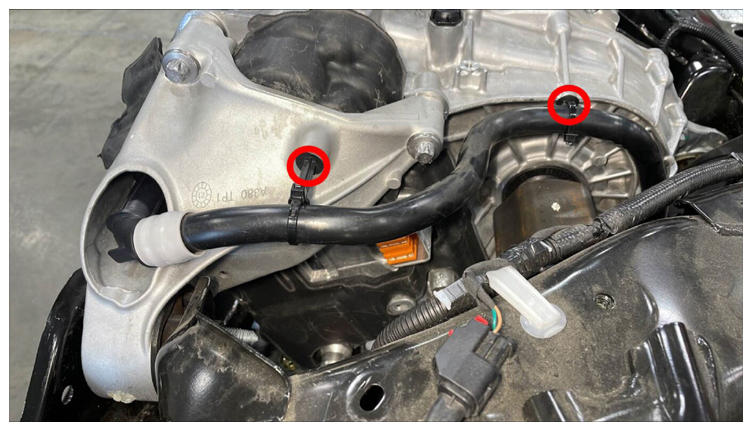
- Release the remaining clips (x2) that attach the rear drive unit inverter outlet to heat exchanger hose to the rear drive unit, and then manuever the hose out from between the drive unit and rear subframe.
 Courtesy of TESLA, INC. Courtesy of TESLA, INC.
|
 Courtesy of TESLA, INC. Courtesy of TESLA, INC.
|
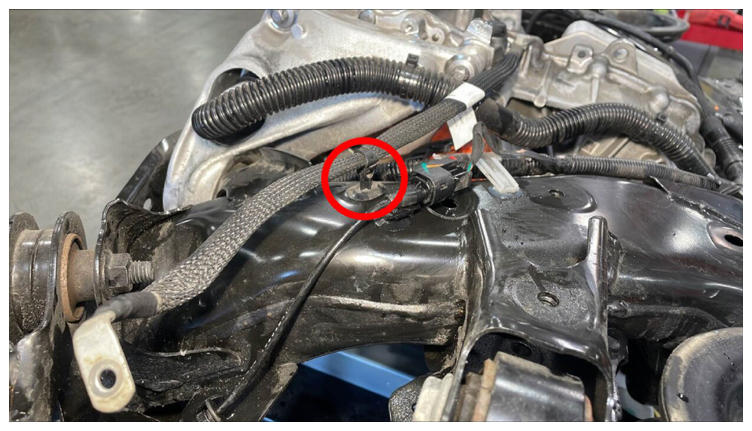
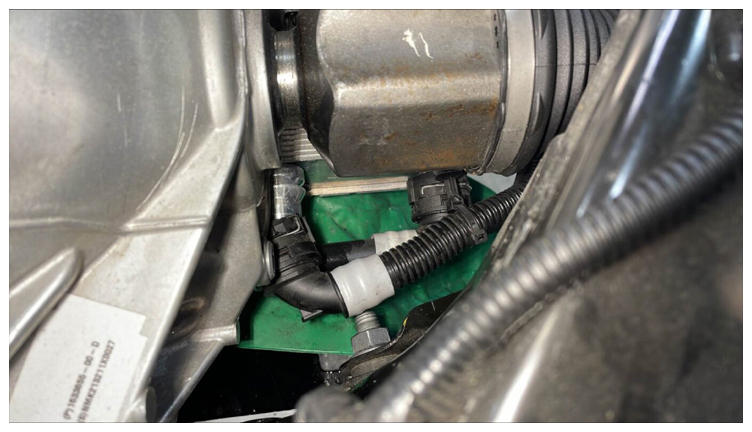
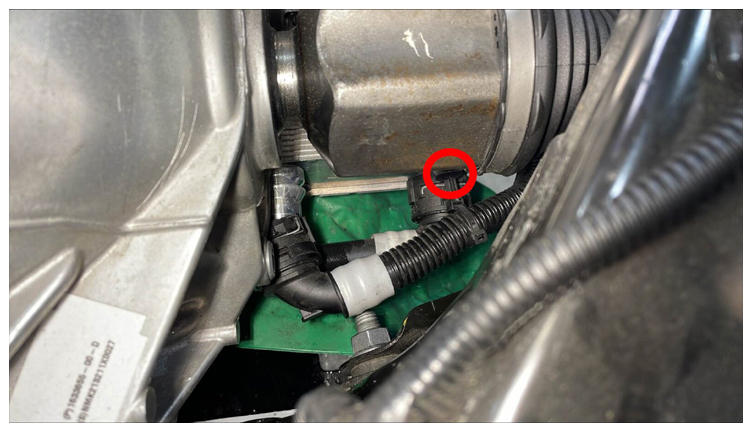
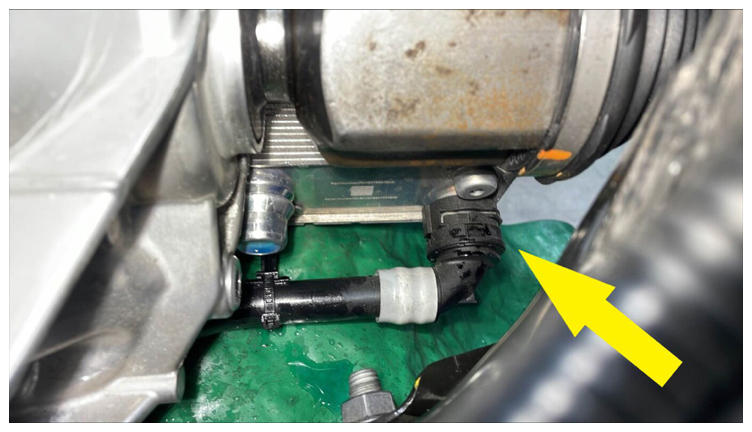
- Pull the red tab to release, and then pull the red tab again to disconnect the rear subframe harness from the oil pump connector.
 Courtesy of TESLA, INC. Courtesy of TESLA, INC.
|
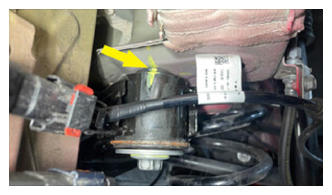
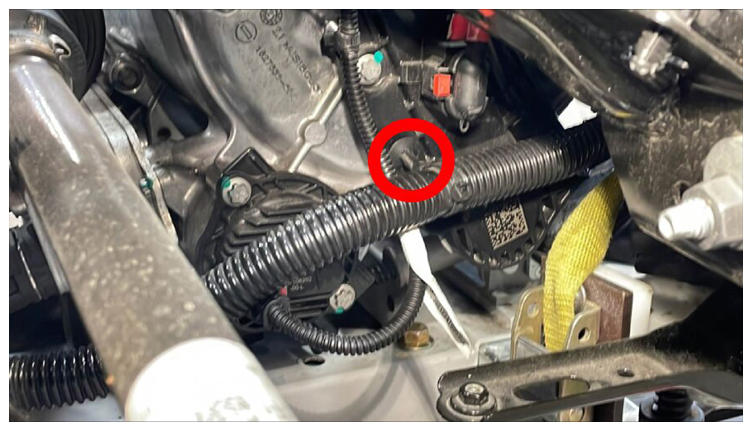
- Pull the red tab to release, pull the red tab again to disconnect the rear subframe harness from the resolver connector, and then release the clips (x2) that attach the subframe harness to the rear drive unit.
 Courtesy of TESLA, INC. Courtesy of TESLA, INC.
|
 Courtesy of TESLA, INC. Courtesy of TESLA, INC.
|
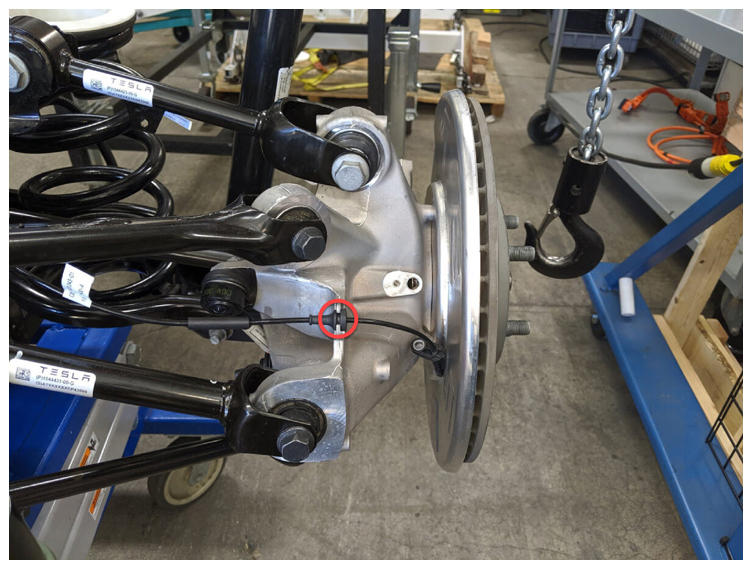
- Remove the bolt that attaches the LH rear wheel speed sensor to LH rear knuckle, and then remove the sensor from the knuckle.
 Courtesy of TESLA, INC. Courtesy of TESLA, INC.
|
- Release the grommet that attaches the LH rear wheel speed sensor harness to LH rear knuckle.
 Courtesy of TESLA, INC. Courtesy of TESLA, INC.
|
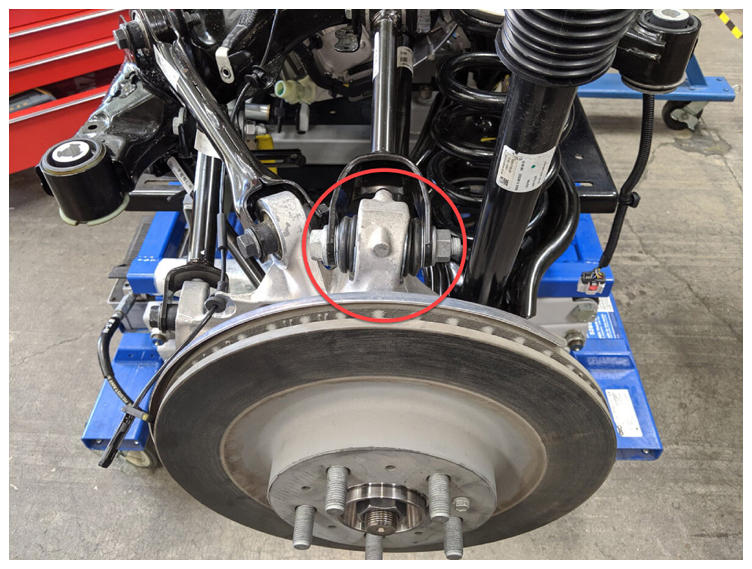
- Remove the nut and bolt that attach the LH rear upper aft link to the LH rear knuckle.
 Courtesy of TESLA, INC. Courtesy of TESLA, INC.
|
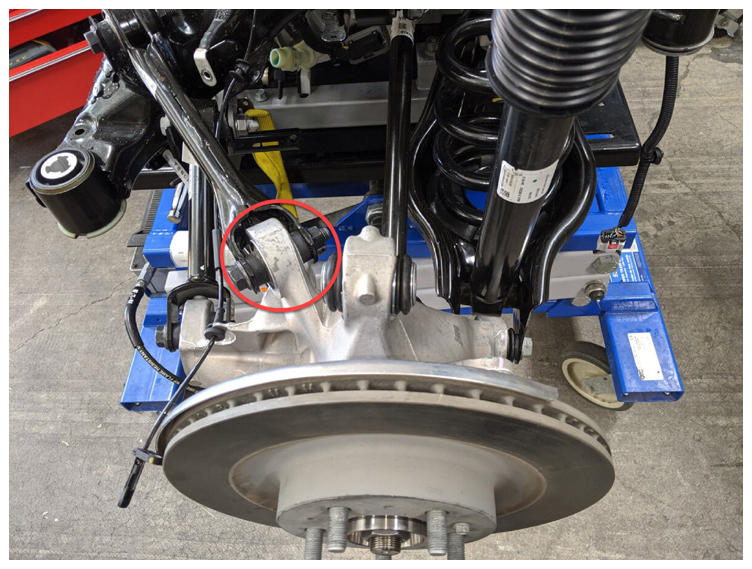
- Remove the nut and bolt that attach the LH rear upper fore link to the LH rear knuckle.
 Courtesy of TESLA, INC. Courtesy of TESLA, INC.
|
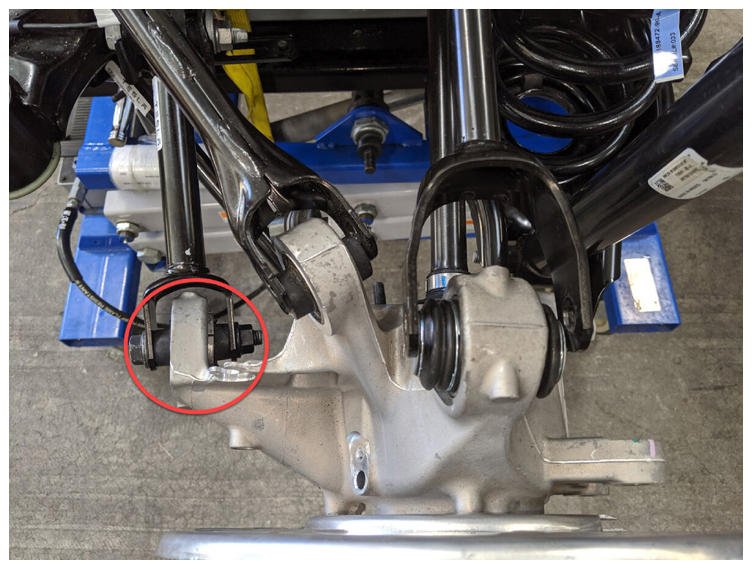
- Remove the nut and bolt that attach the LH rear toe link to the LH rear knuckle.
 Courtesy of TESLA, INC. Courtesy of TESLA, INC.
|
- Loosen, but do not remove, the nut and bolt that attach the LH rear lower fore link to the LH rear knuckle.
 Courtesy of TESLA, INC. Courtesy of TESLA, INC.
|
- Position the axle remover cable around the inner joint of the LH rear drive unit halfshaft, and then use the U-bolt to hold the axle remover cable in position.
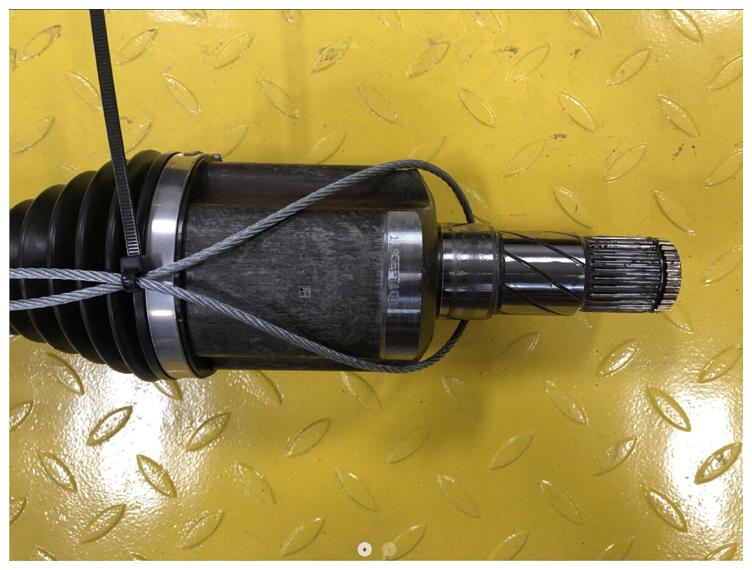 Courtesy of TESLA, INC. Courtesy of TESLA, INC.
|
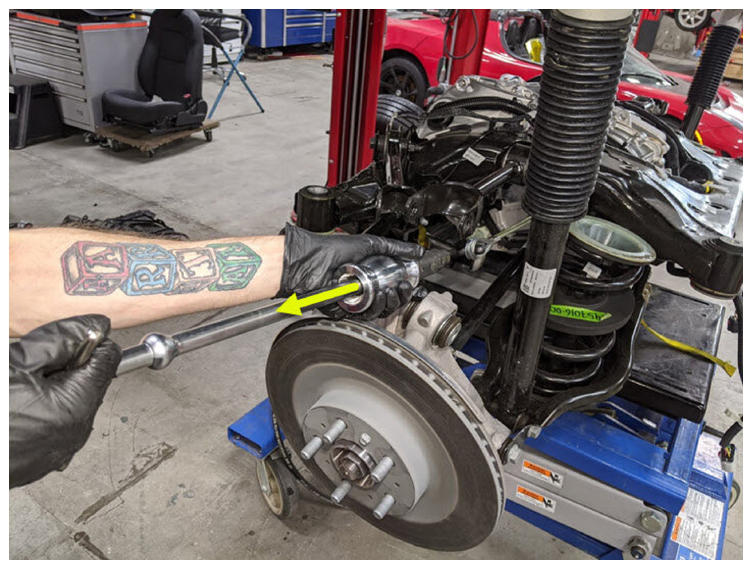
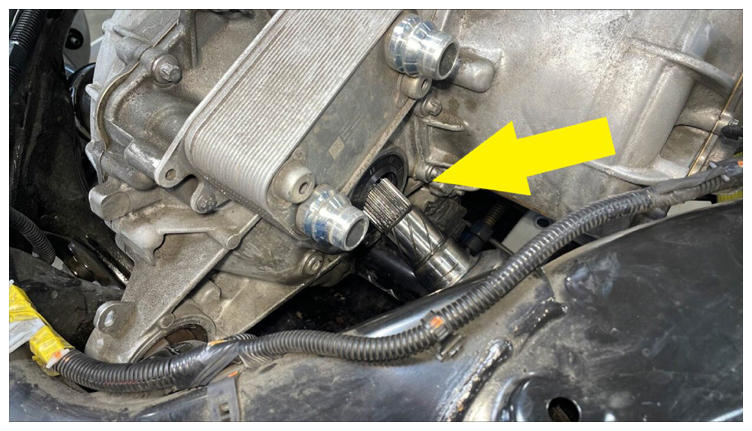
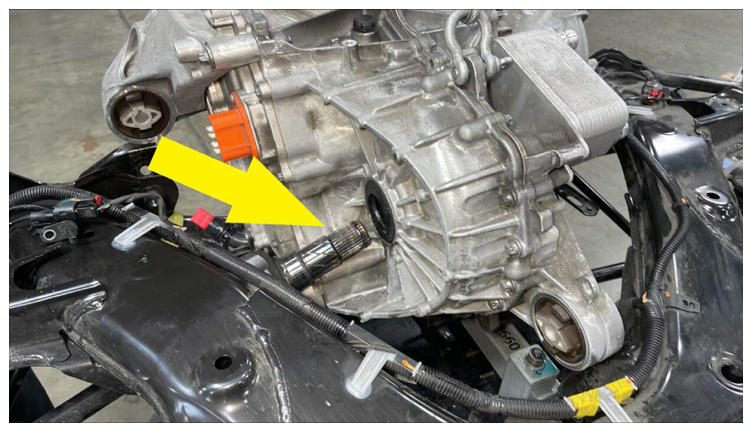
- Hook the axle remover slide hammer onto the 2 axle remover cable loops, and then use the slide hammer to remove the LH halfshaft from the rear drive unit.
NOTE:
Be carefull not to damage the halfshaft boots and drive unit seals when separating the halfshaft from the drive unit.
 Courtesy of TESLA, INC. Courtesy of TESLA, INC.
|
- Repeat step 72 through step 79 on the RH side of the rear subframe assembly.
- Position the rear subframe assembly under the gantry.
 Courtesy of TESLA, INC. Courtesy of TESLA, INC.
|
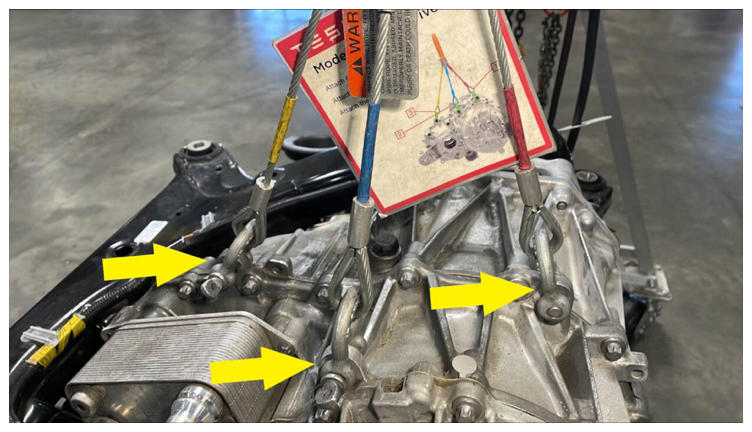
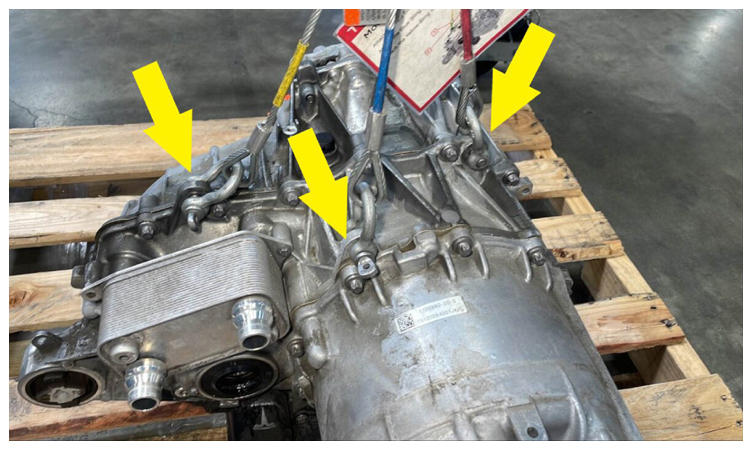
- Use the shackles (x3) to attach the drive unit sling tool to the rear drive unit.
 Courtesy of TESLA, INC. Courtesy of TESLA, INC.
|
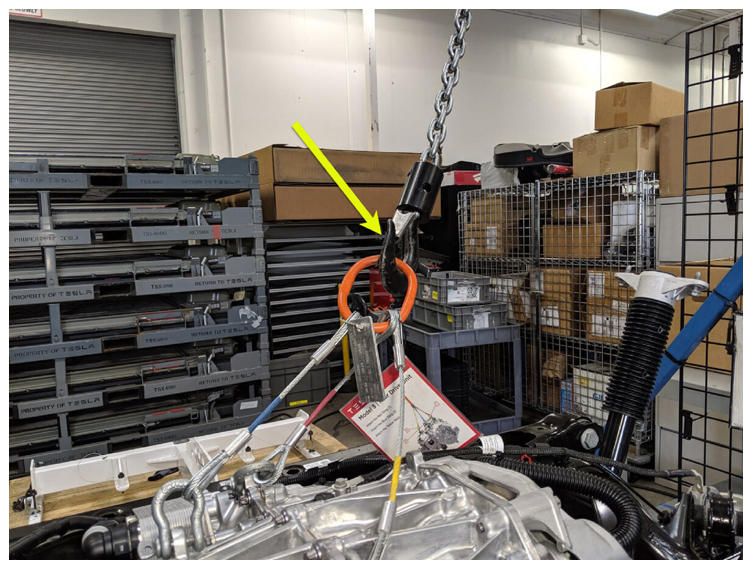
- Attach the drive unit sling tool to the gantry.
 Courtesy of TESLA, INC. Courtesy of TESLA, INC.
|
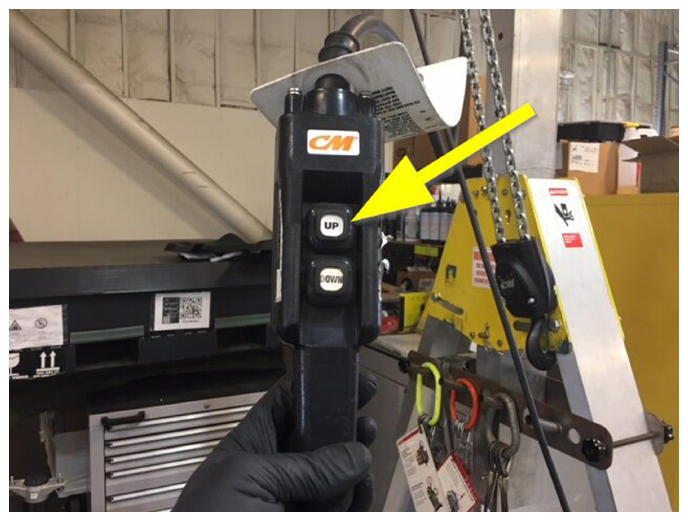
- Use the gantry to raise the drive unit sling tool so that there is slight tension in the cables.
 Courtesy of TESLA, INC. Courtesy of TESLA, INC.
|
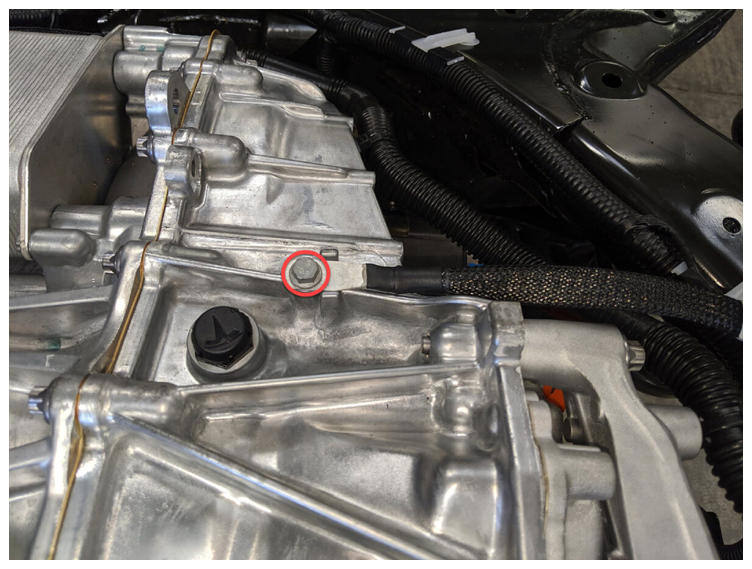
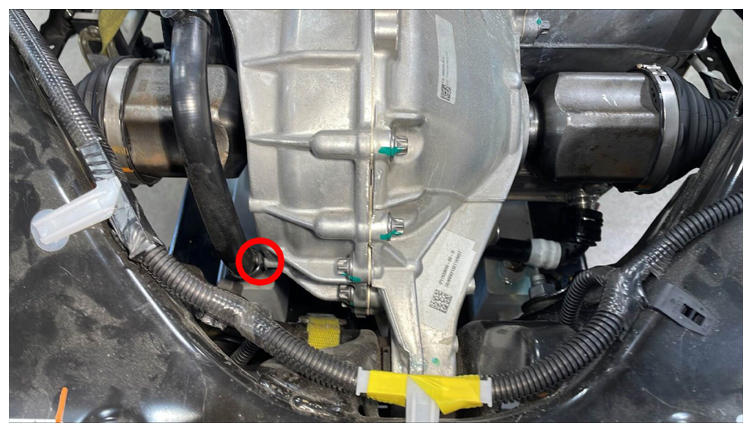
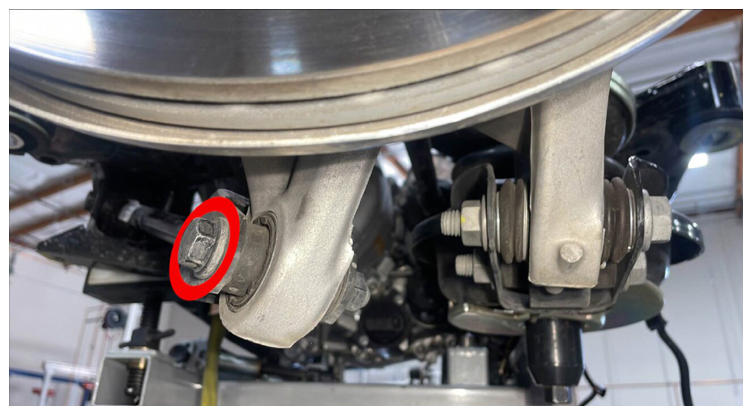
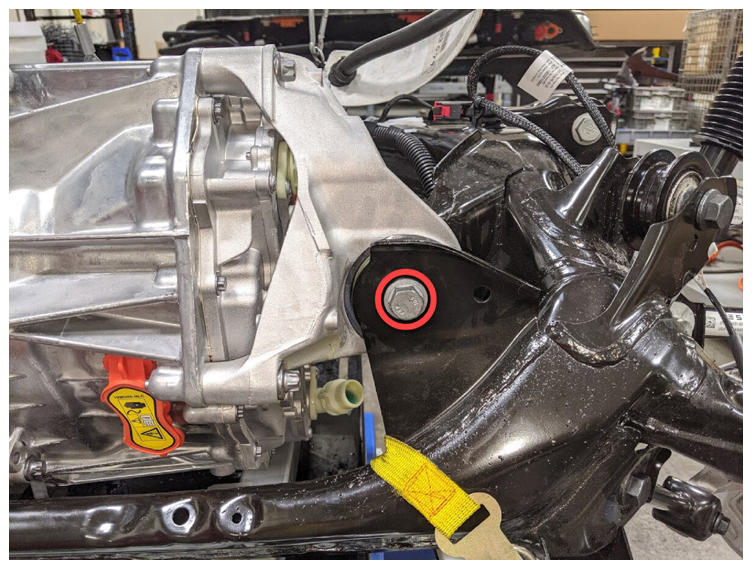
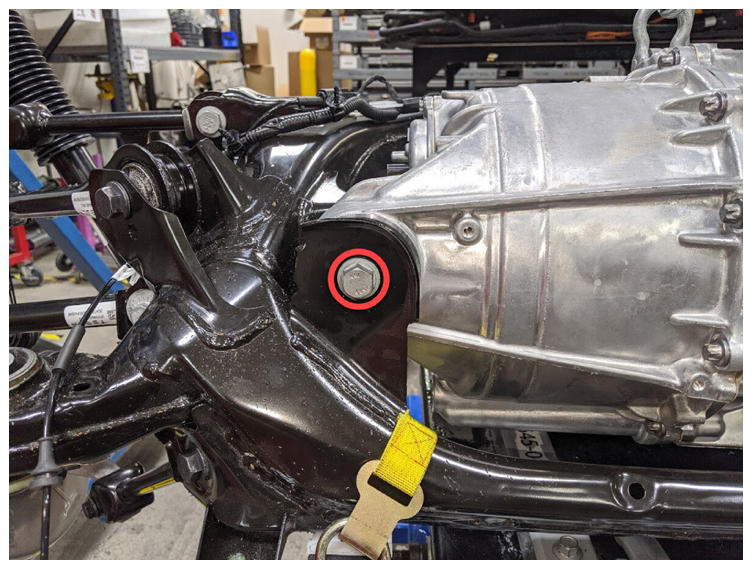
- Remove the bolt that attaches the rear drive unit to the LH side of the rear subframe.
 Courtesy of TESLA, INC. Courtesy of TESLA, INC.
|
- Remove the bolt that attaches the rear drive unit to the RH side of the rear subframe.
 Courtesy of TESLA, INC. Courtesy of TESLA, INC.
|
- Remove the bolt that attaches the rear drive unit to the rear of the rear subframe.
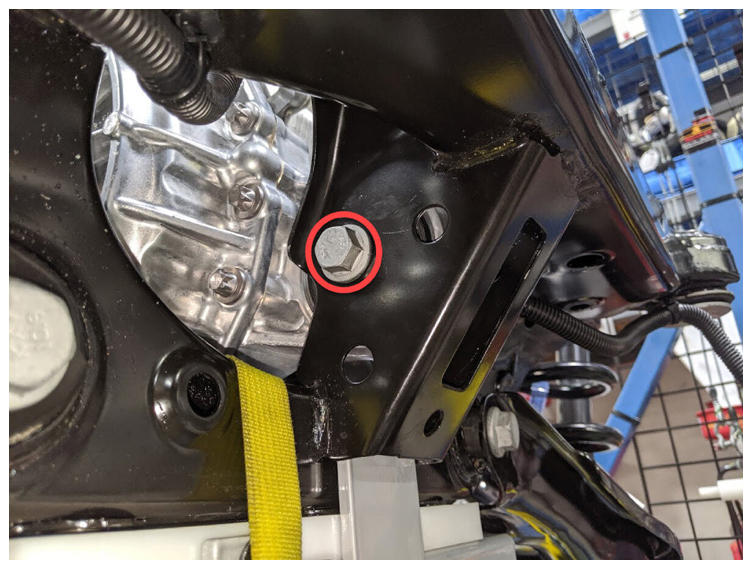 Courtesy of TESLA, INC. Courtesy of TESLA, INC.
|
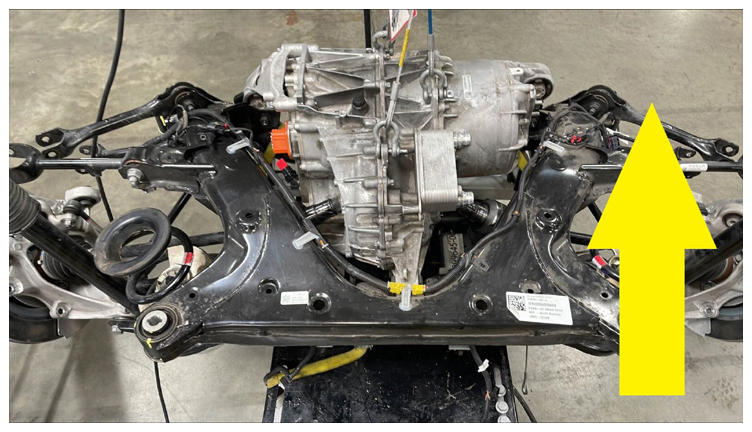
- With the help of an assistant, use the gantry to raise the rear drive unit sling tool, guide halfshafts away from the rear drive unit, and separate the rear drive unit up from the rear subframe.
 Courtesy of TESLA, INC. Courtesy of TESLA, INC.
|
 Courtesy of TESLA, INC. Courtesy of TESLA, INC.
|
 Courtesy of TESLA, INC. Courtesy of TESLA, INC.
|
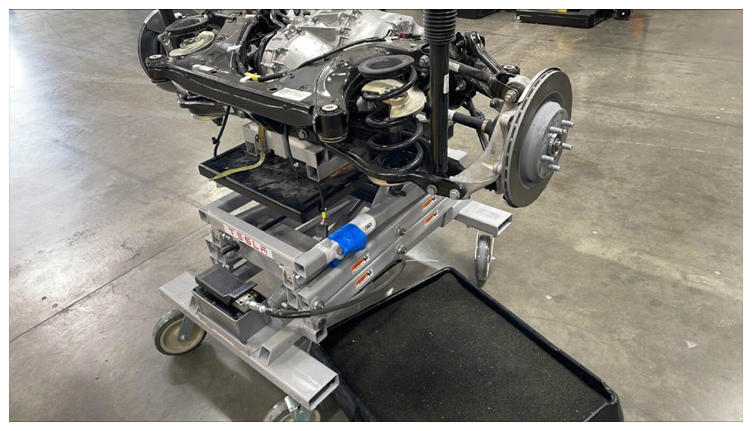
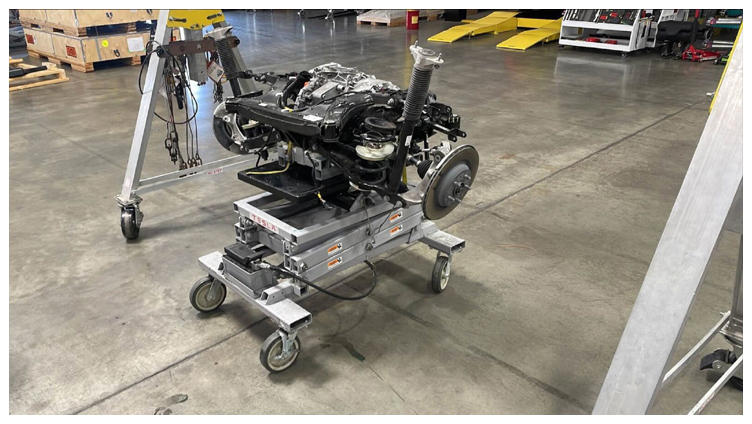
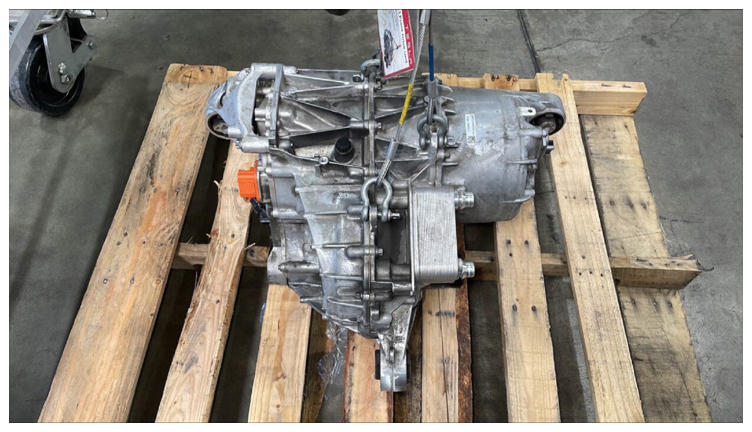
- Move the rear subframe and subframe lift out from underneath the rear drive unit, and then lower the rear drive unit onto a protected surface.
 Courtesy of TESLA, INC. Courtesy of TESLA, INC.
|
- Remove the drive unit sling tool from the rear drive unit.
 Courtesy of TESLA, INC. Courtesy of TESLA, INC.
|