- Move the vehicle to a 2 post lift. See Raise Vehicle - 2 Post Lift
.
- Connect a laptop with Toolbox 3 to the vehicle. See Toolbox 3 (Connect and Disconnect)
.
- Release the electronic parking brake. See Park Brake Caliper - Release - Toolbox
.
- Disconnect the laptop with Toolbox 3 from the vehicle. See Toolbox 3 (Connect and Disconnect)
.
- Remove the rear underhood apron. See Underhood Apron - Rear (Remove and Replace)
.
- Remove the underhood storage unit. See Underhood Storage Unit (Remove and Install)
.
- Disconnect LV power. See LV Power (Disconnect and Connect)
.
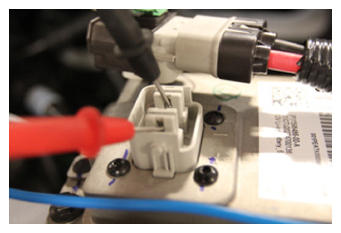
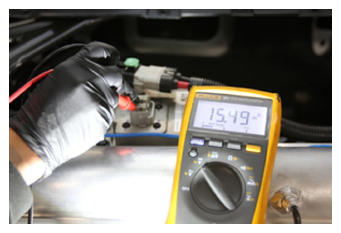
- Set the high voltage multimeter to DC voltage, lightly touch the probes to the auxiliary battery connector contacts, and verify that the multimeter displays a voltage.
NOTE:
Battery voltage is typically 14.5 to 15.5 volts.
 Courtesy of TESLA, INC. Courtesy of TESLA, INC.
|
 Courtesy of TESLA, INC. Courtesy of TESLA, INC.
|
- Remove the rear wheels. See Wheel (Remove and Install)
.
- Remove the mid aero shield panel. See Panel - Aero Shield - Mid (Remove and Replace)
.
- Perform the vehicle electrical isolation procedure. See Vehicle Electrical Isolation Procedure
.
- Remove the leather glove protectors and HV insulating gloves.
 Courtesy of TESLA, INC. Courtesy of TESLA, INC.
|
- Remove the rear fascia diffuser. See Diffuser - Rear Fascia (Remove and Replace)
.
- Remove the nut that attaches the rear drive unit ground strap to the body stud, and then remove the ground strap from the stud.
 Courtesy of TESLA, INC. Courtesy of TESLA, INC.
|
- Remove the rear subframe assembly. See Subframe Assembly - Rear (Remove and Install)
.
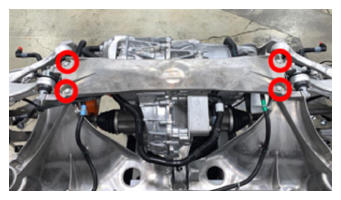
- Remove the bolts (x4) that attach the rear subframe stiffener to the rear subframe, and then remove the stiffener from the subframe.
 Courtesy of TESLA, INC. Courtesy of TESLA, INC.
|
- Remove the bolt and release the clips (x2) that attach the ground strap to the rear drive unit and rear subframe, and then remove the ground strap from the subframe.
 Courtesy of TESLA, INC. Courtesy of TESLA, INC.
|
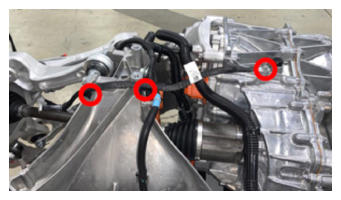
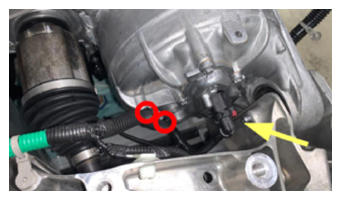
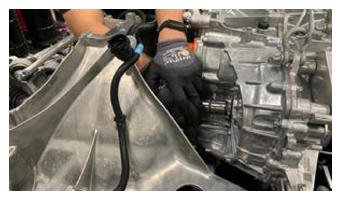
- Release the clip, disconnect the powertrain coolant return hose from the rear drive unit heat exchanger, and then immediately plug the fitting for the heat exchanger.
- Release the clips (x3) that attach the powertrain coolant return hose to the rear drive unit, and then move the hose aside.
 Courtesy of TESLA, INC. Courtesy of TESLA, INC.
|
- Pull on red release tab, pull tab again to disconnect the rear subframe electrical harness from the rear drive unit resolver connector, release the clips (x2) that attach the electrical harness to the RH side of the rear drive unit, and move the electrical harness aside.
 Courtesy of TESLA, INC. Courtesy of TESLA, INC.
|
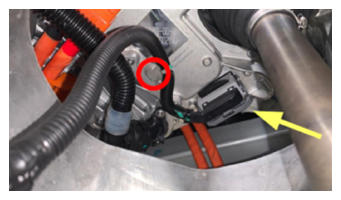
- Press the locking tab, disconnect the rear subframe electrical harness from the logic connector, release the clip that attaches the electrical harness to the LH side of the rear drive unit, and move the electrical harness aside.
 Courtesy of TESLA, INC. Courtesy of TESLA, INC.
|
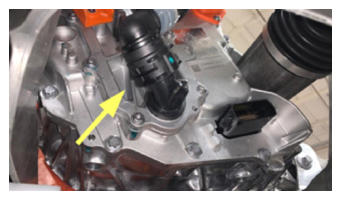
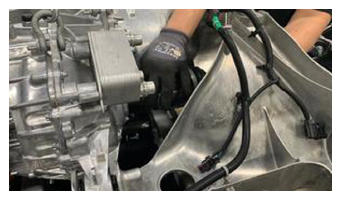
- Release the clip, disconnect the powertrain coolant supply hose from the rear drive unit inverter, and then immediately plug the fitting for the inverter.
 Courtesy of TESLA, INC. Courtesy of TESLA, INC.
|
- Remove the bolt that attaches the LH ride height sensor arm to the LH upper fore link.
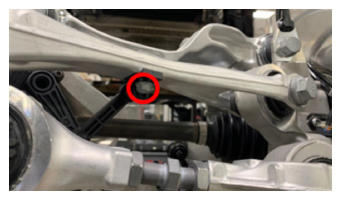 Courtesy of TESLA, INC. Courtesy of TESLA, INC.
|
- Disconnect the electrical harness from the LH ride height sensor connector, and then release the clip that attaches the electrical harness to the rear drive unit.
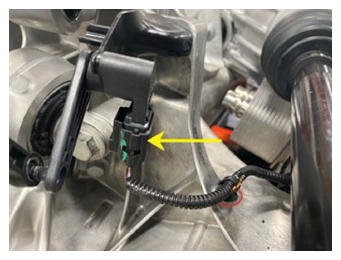 Courtesy of TESLA, INC. Courtesy of TESLA, INC.
|
- Remove the bolts (x2) that attach the LH upper aft link to the rear subframe.
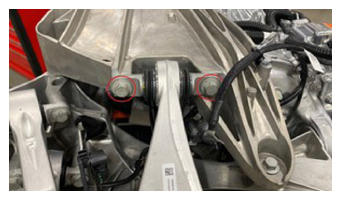 Courtesy of TESLA, INC. Courtesy of TESLA, INC.
|
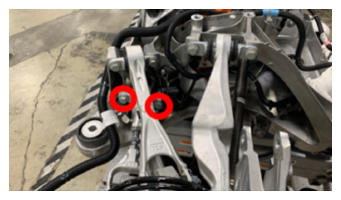
- Remove the bolts (x2) that attach the LH upper fore link to the rear subframe.
 Courtesy of TESLA, INC. Courtesy of TESLA, INC.
|
- Remove the bolts (x2) that attach the LH toe link to the rear subframe.
NOTE:
Support the knuckle while removing.
 Courtesy of TESLA, INC. Courtesy of TESLA, INC.
|
- Install the axle removal tool around the inner joint of the LH rear halfshaft.
NOTE:
Make sure that the cable loop is not wrapped around the inner boot.
- Use the slide hammer to release the LH rear halfshaft from the rear drive unit.
 Courtesy of TESLA, INC. Courtesy of TESLA, INC.
|
- Repeat step 25 through step 31 for the RH side of the vehicle.
- Position the subframe lift underneath the gantry.
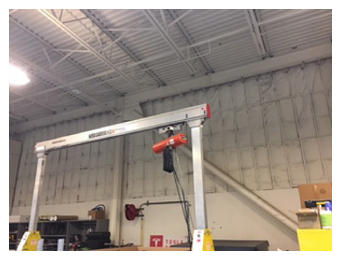 Courtesy of TESLA, INC. Courtesy of TESLA, INC.
|
- Use the hooks (x3) to attach the drive unit sling tool to the rear drive unit.
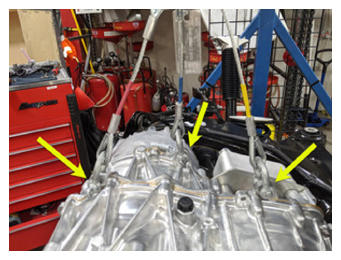 Courtesy of TESLA, INC. Courtesy of TESLA, INC.
|
- Attach the drive unit sling tool to the gantry.
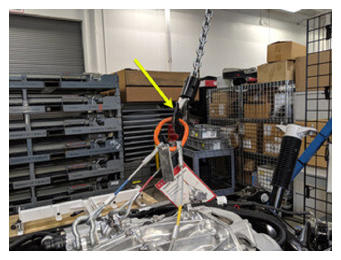 Courtesy of TESLA, INC. Courtesy of TESLA, INC.
|
- Use the gantry to raise the drive unit sling tool so that there is slight tension in the cables.
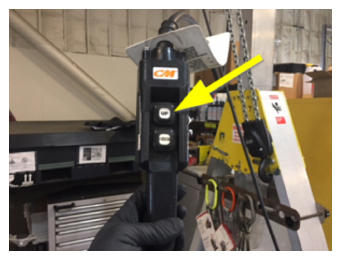 Courtesy of TESLA, INC. Courtesy of TESLA, INC.
|
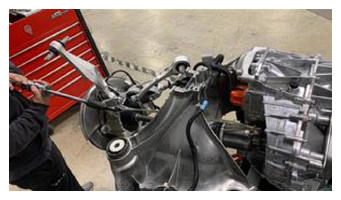
- Remove the bolt that attaches the rear drive unit to the LH side of the rear subframe.
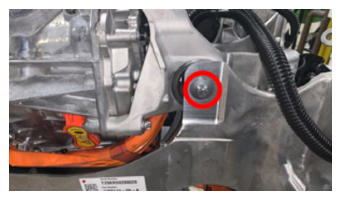 Courtesy of TESLA, INC. Courtesy of TESLA, INC.
|
- Remove the bolt that attaches the rear drive unit to the RH side of the rear subframe.
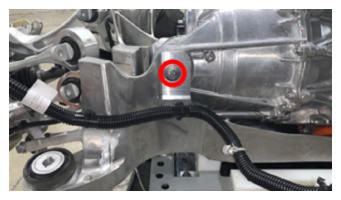 Courtesy of TESLA, INC. Courtesy of TESLA, INC.
|
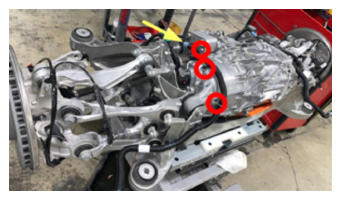
- Remove the bolt that attaches the rear drive unit to the rear of the rear subframe.
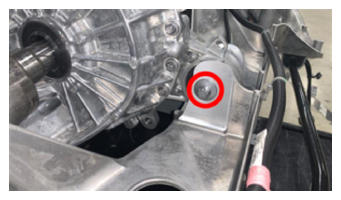 Courtesy of TESLA, INC. Courtesy of TESLA, INC.
|
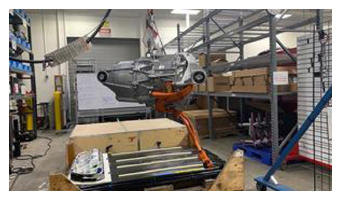
- With the help of an assistant, use the gantry to raise the rear drive unit sling tool, guide halfshafts away from the rear drive unit, and separate the rear drive unit up from the rear subframe.
 Courtesy of TESLA, INC. Courtesy of TESLA, INC.
|
 Courtesy of TESLA, INC. Courtesy of TESLA, INC.
|
 Courtesy of TESLA, INC. Courtesy of TESLA, INC.
|
- Move the rear subframe and subframe lift out from underneath the rear drive unit.
 Courtesy of TESLA, INC. Courtesy of TESLA, INC.
|