- Remove the HV battery. See HV Battery (AWD) (Remove and Install)
.
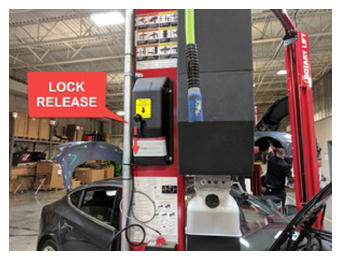
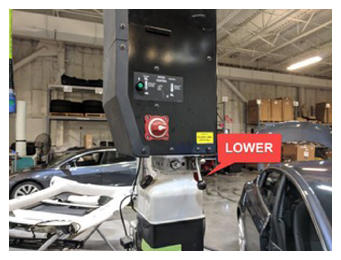
- Lower vehicle until tires are touching the ground
NOTE:
Raise lift off locks, then hold lock release lever to keep locks free while vehicle is lowered
 Courtesy of TESLA, INC. Courtesy of TESLA, INC.
|
 Courtesy of TESLA, INC. Courtesy of TESLA, INC.
|
 Courtesy of TESLA, INC. Courtesy of TESLA, INC.
|
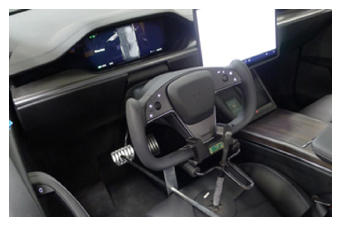
- Lock steering wheel into position
 Courtesy of TESLA, INC. Courtesy of TESLA, INC.
|
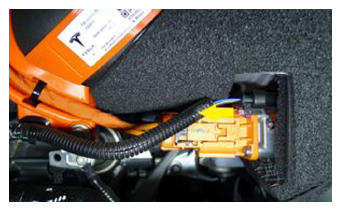
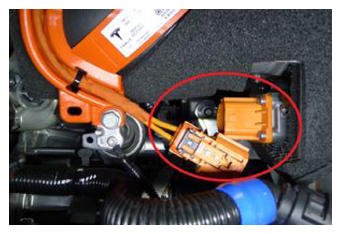
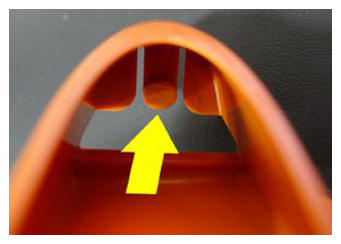
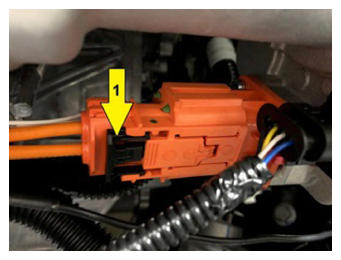
- Disconnect AC compressor logic connector
NOTE:
1x locking electrical connector, Do not push down on red tab, Pull to disengage lock, Pull again to release connector
 Courtesy of TESLA, INC. Courtesy of TESLA, INC.
|
 Courtesy of TESLA, INC. Courtesy of TESLA, INC.
|
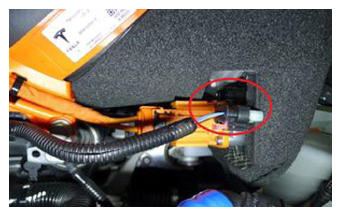
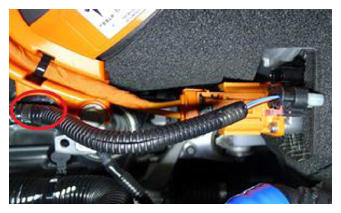
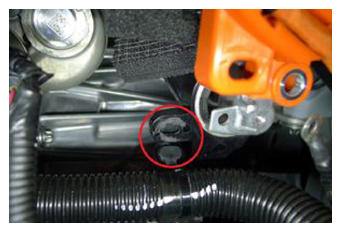
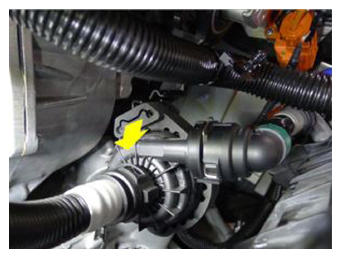
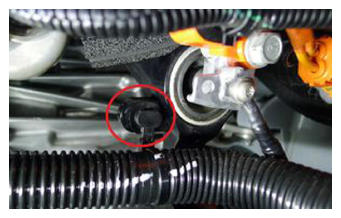
- Remove retaining clip securing AC compressor logic harness to AC compressor HV harness bracket
NOTE:
1x fir tree clip
 Courtesy of TESLA, INC. Courtesy of TESLA, INC.
|
 Courtesy of TESLA, INC. Courtesy of TESLA, INC.
|
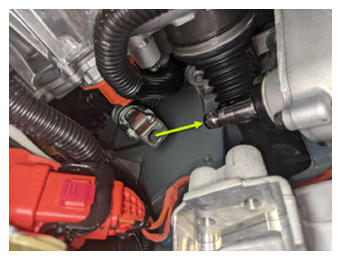
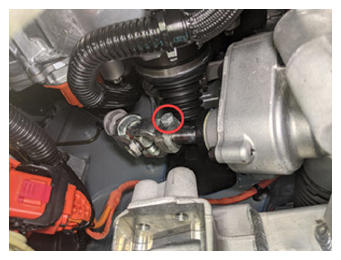
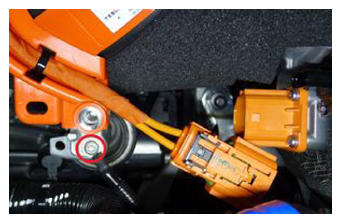
- Remove fastener securing AC compressor HV harness bracket to AC compressor
NOTE:
1x bolt, 13 mm, 9 N.m
 Courtesy of TESLA, INC. Courtesy of TESLA, INC.
|
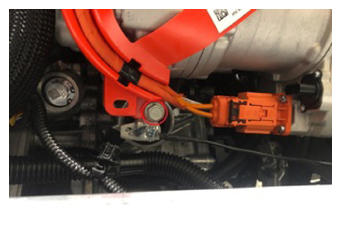
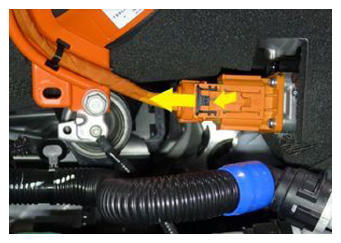
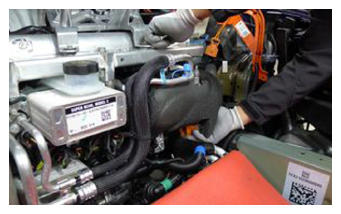
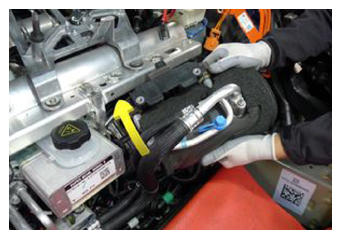
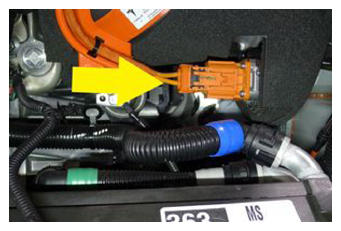
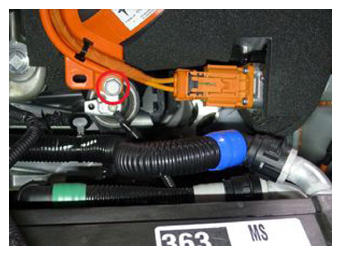
- Disconnect HV harness connector from AC compressor
NOTE:
1x locking electrical connector, Move black locking tab away form the AC compressor, Push down on locking connector to release and pull straight out of socket
 Courtesy of TESLA, INC. Courtesy of TESLA, INC.
|
 Courtesy of TESLA, INC. Courtesy of TESLA, INC.
|
- Remove AC compressor ground strap
NOTE:
1x bolt, T25, 7 N.m
 Courtesy of TESLA, INC. Courtesy of TESLA, INC.
|
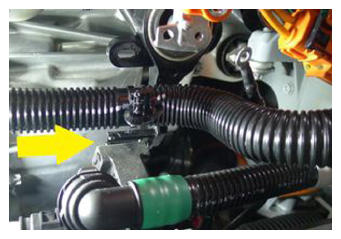
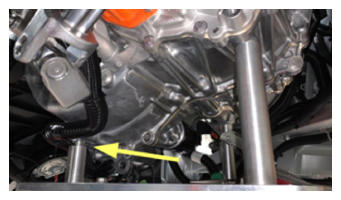
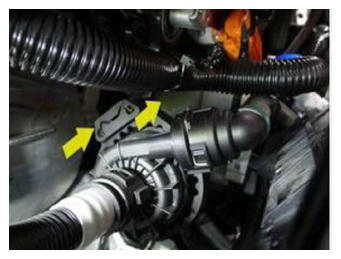
- Release clip securing the coolant hose to the AC compressor bracket
NOTE:
1x fir tree clip
 Courtesy of TESLA, INC. Courtesy of TESLA, INC.
|
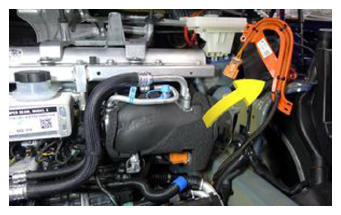
- Remove PT coolant pump from AC compressor bracket
NOTE:
Slide pump assembly away from compressor off lower bracket
 Courtesy of TESLA, INC. Courtesy of TESLA, INC.
|
 Courtesy of TESLA, INC. Courtesy of TESLA, INC.
|
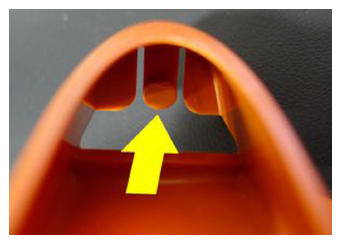
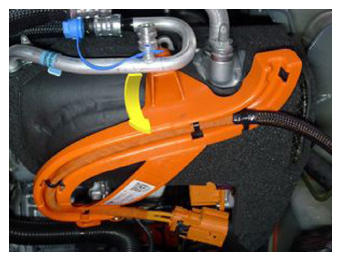
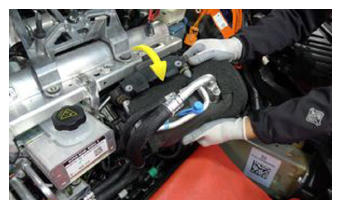
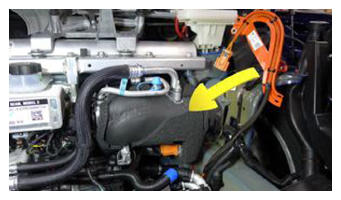
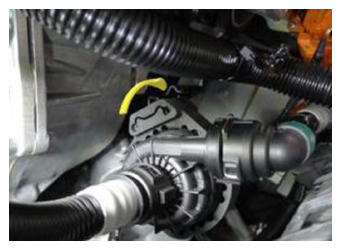
- Release the HV heat pump bracket from the compressor eyelet
NOTE:
1x tab, Release bracket tab and rotate rearward and up to clear compressor eyelet
 Courtesy of TESLA, INC. Courtesy of TESLA, INC.
|
 Courtesy of TESLA, INC. Courtesy of TESLA, INC.
|
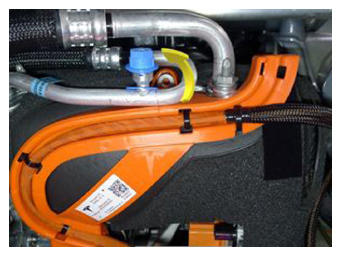
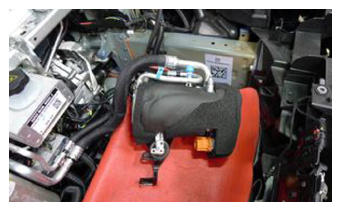
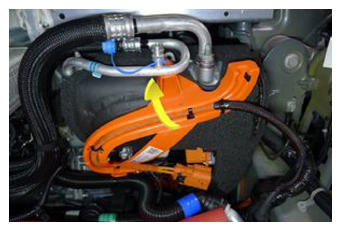
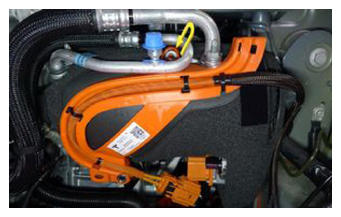
- Set HV heat pump bracket aside
NOTE:
Negotiate underneath high pressure pipe
 Courtesy of TESLA, INC. Courtesy of TESLA, INC.
|
 Courtesy of TESLA, INC. Courtesy of TESLA, INC.
|
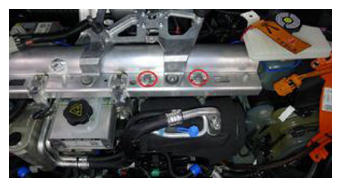
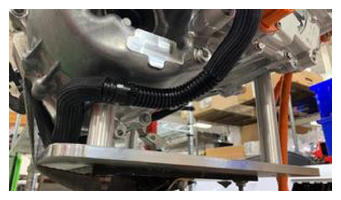
- Release compressor bracket from multi-system beam
NOTE:
2x bolts, 15 mm, 31 N.m, Recommend assistance, Support the AC compressor while removing the fasteners, Carefully remove the AC compressor and AC compressor bracket towards the front of the vehicle and under the multi-system beam, Be cautious around the coolant hose and supermanifold harness, Place fender cover on fan housing and gently place AC compressor assembly down
 Courtesy of TESLA, INC. Courtesy of TESLA, INC.
|
 Courtesy of TESLA, INC. Courtesy of TESLA, INC.
|
 Courtesy of TESLA, INC. Courtesy of TESLA, INC.
|
 Courtesy of TESLA, INC. Courtesy of TESLA, INC.
|
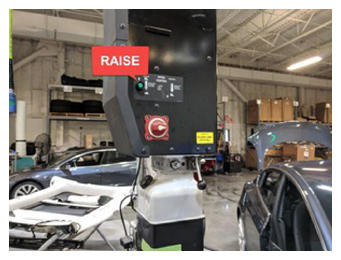
- Raise vehicle partially and lower onto locks
NOTE:
Set vehicle to comfortable working height, Make sure there's an audible click of the locks on both sides before lowering, otherwise vehicle may tilt to the side
 Courtesy of TESLA, INC. Courtesy of TESLA, INC.
|
 Courtesy of TESLA, INC. Courtesy of TESLA, INC.
|
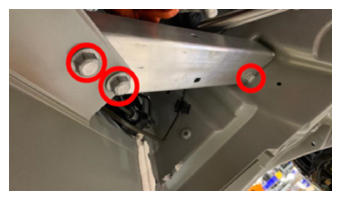
- Remove LH toeboard brace
NOTE:
3x bolts, 15 mm, 30 N.m
 Courtesy of TESLA, INC. Courtesy of TESLA, INC.
|
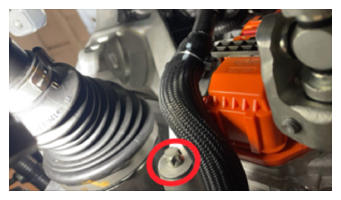
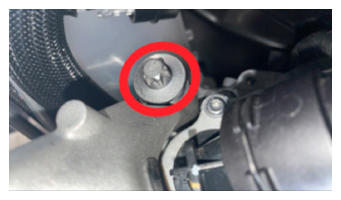
- Remove bolt securing steering gear assembly to electric steering column and separate
NOTE:
1x bolt, 13 mm, 30 N.m
 Courtesy of TESLA, INC. Courtesy of TESLA, INC.
|
 Courtesy of TESLA, INC. Courtesy of TESLA, INC.
|
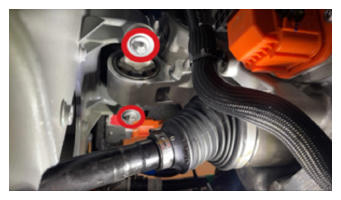
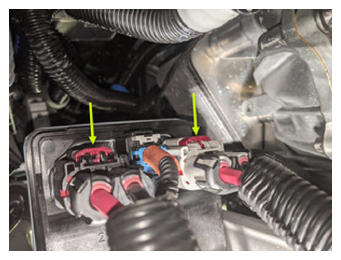
- Disconnect steering gear assembly connectors
NOTE:
2x connectors, Two-stage connectors, Slide red locking tab to unlock then depress connector release to disconnect
 Courtesy of TESLA, INC. Courtesy of TESLA, INC.
|
 Courtesy of TESLA, INC. Courtesy of TESLA, INC.
|
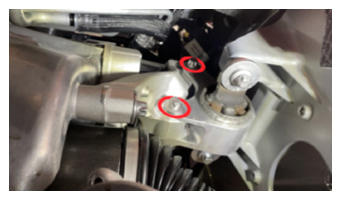
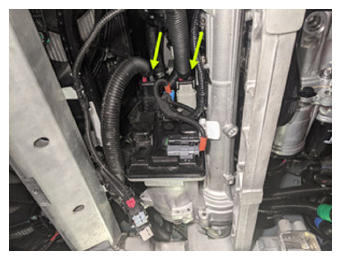
- Disconnect EPAS CAN connectors
NOTE:
2x connectors, Do not push down on red tab, Pull red tab to disengage lock, Pull again to release connector
 Courtesy of TESLA, INC. Courtesy of TESLA, INC.
|
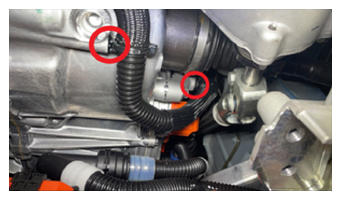
- Release clips securing FDU Inverter to oil cooler hose
NOTE:
4x clips
 Courtesy of TESLA, INC. Courtesy of TESLA, INC.
|
 Courtesy of TESLA, INC. Courtesy of TESLA, INC.
|
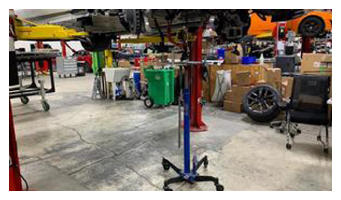
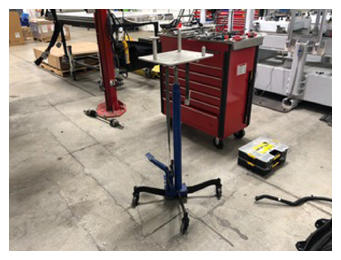
- Position transmission jack fixture under drive unit
NOTE:
Secure FDU strap, Use caution if using a non-leveling transmission jack, FDU may not sit flush, Once mount bolts are removed, move FDU into correct position
 Courtesy of TESLA, INC. Courtesy of TESLA, INC.
|
 Courtesy of TESLA, INC. Courtesy of TESLA, INC.
|
 Courtesy of TESLA, INC. Courtesy of TESLA, INC.
|
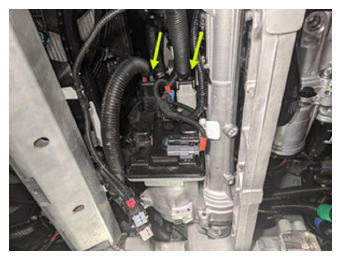
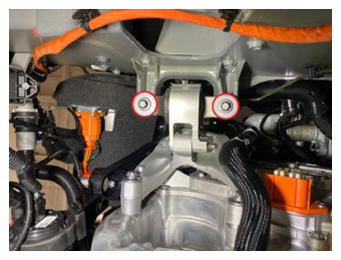
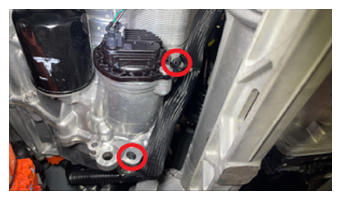
- Remove bolts from LH FDU clevis mount to body
NOTE:
2x bolts, E14, 65 N.m
 Courtesy of TESLA, INC. Courtesy of TESLA, INC.
|
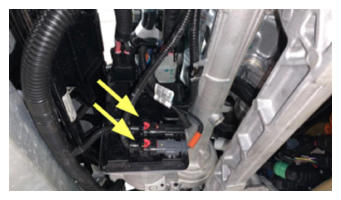
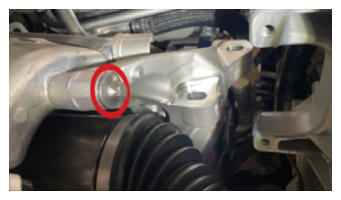
- Release bolts securing clevis to LH motor mount assembly
NOTE:
2x bolts, E14, 92 N.m
 Courtesy of TESLA, INC. Courtesy of TESLA, INC.
|
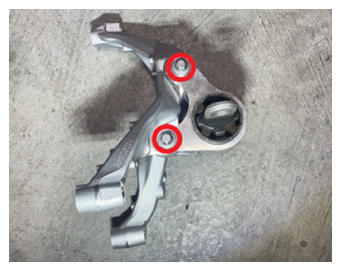
- Release bolts securing LH motor mount assembly to FDU
NOTE:
3x bolts, E14, 35 N.m + 55 degrees
 Courtesy of TESLA, INC.
 Courtesy of TESLA, INC. Courtesy of TESLA, INC.
|
 Courtesy of TESLA, INC. Courtesy of TESLA, INC.
|
 Courtesy of TESLA, INC. Courtesy of TESLA, INC.
|
 Courtesy of TESLA, INC. Courtesy of TESLA, INC.
|
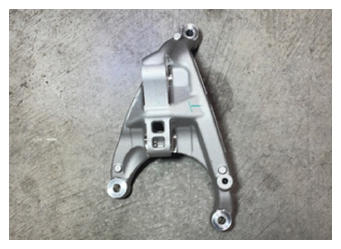
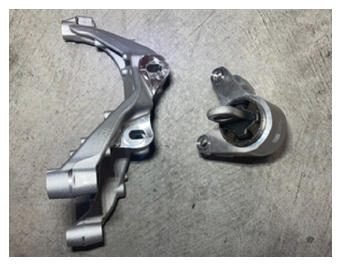
- Separate clevis mount from LH motor mount assembly
NOTE:
2x bolts, E14, 92 N.m, Comes as assembly
 Courtesy of TESLA, INC. Courtesy of TESLA, INC.
|
 Courtesy of TESLA, INC. Courtesy of TESLA, INC.
|
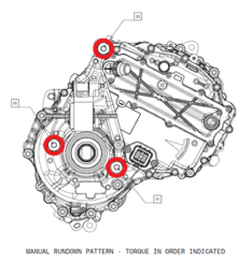
- Install bolts securing LH motor mount assembly to FDU
NOTE:
3x bolts, E14, 35 N.m + 55 degrees, Install bolts and perform final torque in the sequence shown
 Courtesy of TESLA, INC. Courtesy of TESLA, INC.
|
 Courtesy of TESLA, INC. Courtesy of TESLA, INC.
|
 Courtesy of TESLA, INC. Courtesy of TESLA, INC.
|
 Courtesy of TESLA, INC. Courtesy of TESLA, INC.
|
 Courtesy of TESLA, INC.
- Install the bolts securing the clevis mount to the body
NOTE:
2x bolts, E14, 65 N.m
 Courtesy of TESLA, INC. Courtesy of TESLA, INC.
|
- Install bolts securing clevis to LH motor mount assembly
NOTE:
2x bolts, E14, 92 N.m, Center clevis mount and torque bolts
 Courtesy of TESLA, INC. Courtesy of TESLA, INC.
|
- Lower the FDU stand and underhoist stand away from the FDU
 Courtesy of TESLA, INC. Courtesy of TESLA, INC.
|
- Secure clips for the FDU Inverter to oil cooler hose
NOTE:
4x clips
 Courtesy of TESLA, INC. Courtesy of TESLA, INC.
|
 Courtesy of TESLA, INC. Courtesy of TESLA, INC.
|
- Connect EPAS CAN connectors
NOTE:
2x connectors, Engage locking tab
 Courtesy of TESLA, INC. Courtesy of TESLA, INC.
|
- Connect steering gear assembly connectors
NOTE:
2x connectors, Two-stage connectors, Ensure locking tab is engaged after an audible click is heard when connecting
 Courtesy of TESLA, INC. Courtesy of TESLA, INC.
|
 Courtesy of TESLA, INC. Courtesy of TESLA, INC.
|
- Slide lower electric steering column onto steering gear and install bolt
NOTE:
1x bolt, 13 mm, 30 N.m
 Courtesy of TESLA, INC. Courtesy of TESLA, INC.
|
 Courtesy of TESLA, INC. Courtesy of TESLA, INC.
|
- Install LH toeboard brace
NOTE:
3x bolts, 15 mm, 30 N.m
 Courtesy of TESLA, INC. Courtesy of TESLA, INC.
|
- Lower vehicle until tires are touching the ground
NOTE:
Raise lift off locks, then hold lock release lever to keep locks free while vehicle is lowered
 Courtesy of TESLA, INC. Courtesy of TESLA, INC.
|
 Courtesy of TESLA, INC. Courtesy of TESLA, INC.
|
 Courtesy of TESLA, INC. Courtesy of TESLA, INC.
|
- Position AC compressor bracket assembly into vehicle and secure AC compressor assembly to multi-system beam
NOTE:
2x bolts, 15 mm, 31 N.m, Recommend assistance, Support the AC compressor while installing the fasteners, Carefully install the AC compressor and AC compressor bracket towards the rear of the vehicle and under the multi-system beam, Negotiate bracket around coolant hose and supermanifold harness, Hand start bolts
 Courtesy of TESLA, INC. Courtesy of TESLA, INC.
|
 Courtesy of TESLA, INC. Courtesy of TESLA, INC.
|
- Torque AC compressor bracket bolts to multi-system beam
NOTE:
2x bolts, 15 mm, 31 N.m
 Courtesy of TESLA, INC. Courtesy of TESLA, INC.
|
- Position HV heat pump bracket
NOTE:
Negotiate underneath high pressure pipe
 Courtesy of TESLA, INC. Courtesy of TESLA, INC.
|
 Courtesy of TESLA, INC. Courtesy of TESLA, INC.
|
- Secure HV heat pump bracket to AC compressor eyelet
NOTE:
Ensure locking tab engages eyelet
 Courtesy of TESLA, INC. Courtesy of TESLA, INC.
|
 Courtesy of TESLA, INC. Courtesy of TESLA, INC.
|
- Connect HV harness connector to AC compressor
NOTE:
1x locking electrical connector, 3 stage locking connector, After fully seating the connector onto the AC compressor engage the black locking tab by pushing toward the AC compressor, Perform push-pull-push test to ensure proper seating
 Courtesy of TESLA, INC. Courtesy of TESLA, INC.
|
 Courtesy of TESLA, INC. Courtesy of TESLA, INC.
|
- Install fastener securing AC compressor HV harness bracket to AC compressor
NOTE:
1x bolt, 13 mm, 9 N.m
 Courtesy of TESLA, INC. Courtesy of TESLA, INC.
|
- Install AC compressor ground strap
NOTE:
1x bolt, T25, 7 N.m
 Courtesy of TESLA, INC. Courtesy of TESLA, INC.
|
- Secure PT coolant pump onto AC compressor bracket
NOTE:
Slide pump assembly onto compressor lower bracket
 Courtesy of TESLA, INC. Courtesy of TESLA, INC.
|
 Courtesy of TESLA, INC. Courtesy of TESLA, INC.
|
- Install clip securing the coolant hose to the AC compressor bracket
NOTE:
1x fir tree clip
 Courtesy of TESLA, INC. Courtesy of TESLA, INC.
|
- Install the HV battery. See HV Battery (AWD) (Remove and Install)
.