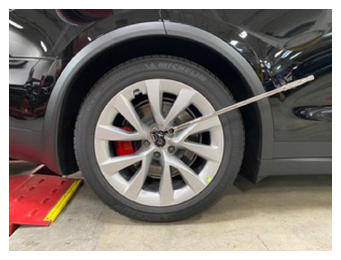
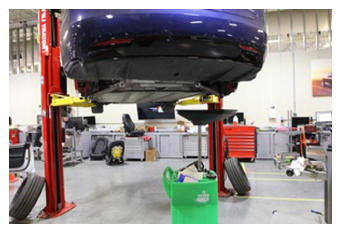
- Raise and support vehicle.
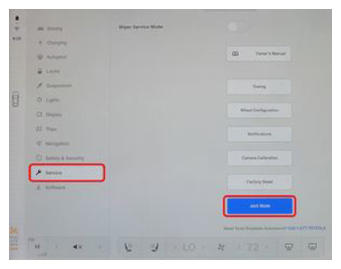
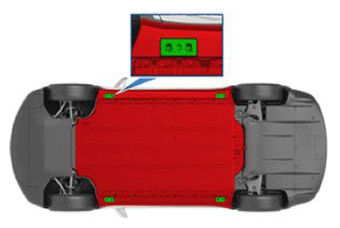
NOTE:
Prepare to raise vehicle, Set air suspension to "Jack Mode", Position lift arm pads on vehicle jack pads, DO NOT position the lift arm pads under the battery or side rails, as shown in red.
 Courtesy of TESLA, INC. Courtesy of TESLA, INC.
|
 Courtesy of TESLA, INC. Courtesy of TESLA, INC.
|
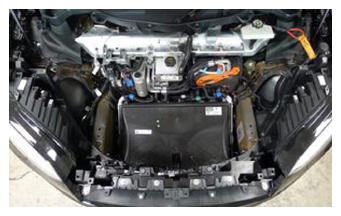
- Open hood.
NOTE:
Via center display > Controls > Frunk Open.
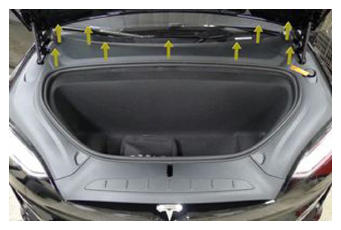
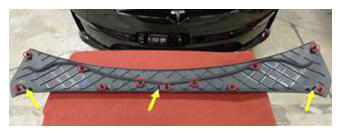
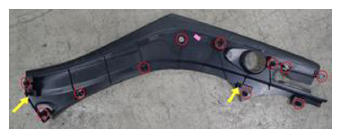
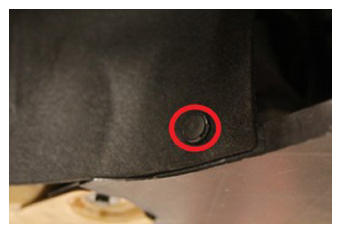
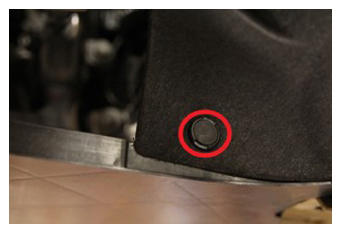
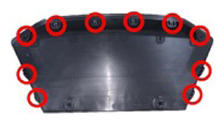
- Remove rear underhood apron.
NOTE:
11x clips, 2x datums.
 Courtesy of TESLA, INC. Courtesy of TESLA, INC.
|
 Courtesy of TESLA, INC. Courtesy of TESLA, INC.
|
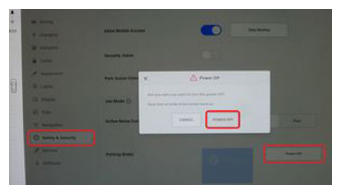
- Power off vehicle via center display.
NOTE:
Controls > Safety & Security > Power Off.
 Courtesy of TESLA, INC. Courtesy of TESLA, INC.
|
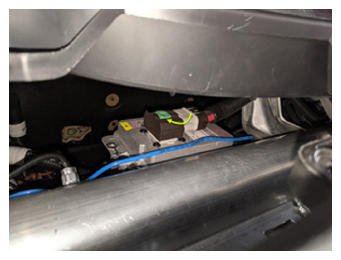
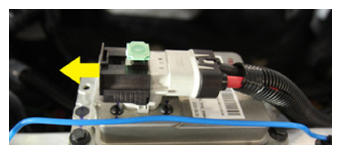
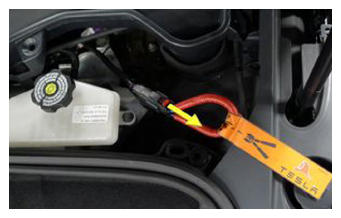
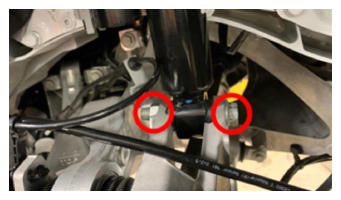
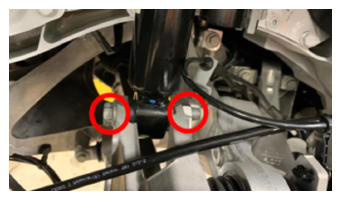
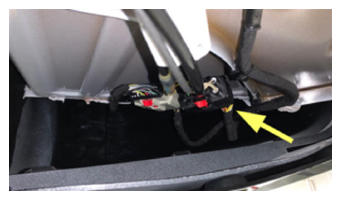
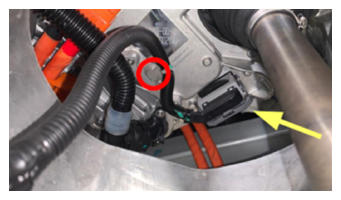
- Disconnect LV battery connector and First Responder Loop.
NOTE:
2x connectors, Lift up and release green locking tab, Pull black connector lock outwards to release connection, Release red lock tab on FRL.
 Courtesy of TESLA, INC. Courtesy of TESLA, INC.
|
 Courtesy of TESLA, INC. Courtesy of TESLA, INC.
|
 Courtesy of TESLA, INC. Courtesy of TESLA, INC.
|
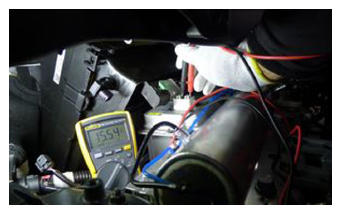
- Verify operation of multimeter.
NOTE:
Set multimeter to DC voltage, Confirm multimeter is properly measuring voltage by testing LV battery, Touch lightly and do not damage terminals.
 Courtesy of TESLA, INC. Courtesy of TESLA, INC.
|
 Courtesy of TESLA, INC. Courtesy of TESLA, INC.
|
- Remove RH underhood apron.
NOTE:
11x clips, 2x datums, Remove brush clip at hinge cover first, Take note of clip at headlamp.
 Courtesy of TESLA, INC. Courtesy of TESLA, INC.
|
 Courtesy of TESLA, INC. Courtesy of TESLA, INC.
|
 Courtesy of TESLA, INC. Courtesy of TESLA, INC.
|
 Courtesy of TESLA, INC. Courtesy of TESLA, INC.
|
- Remove LH underhood apron.
NOTE:
11x clips, 2x datums, Remove brush clip at hinge cover first, Take note of clip at headlamp.
 Courtesy of TESLA, INC. Courtesy of TESLA, INC.
|
 Courtesy of TESLA, INC. Courtesy of TESLA, INC.
|
 Courtesy of TESLA, INC. Courtesy of TESLA, INC.
|
 Courtesy of TESLA, INC. Courtesy of TESLA, INC.
|
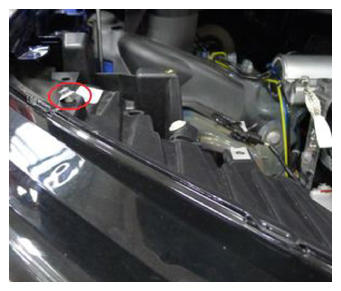
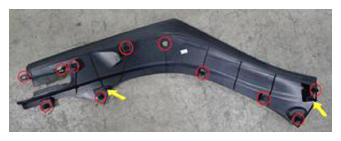
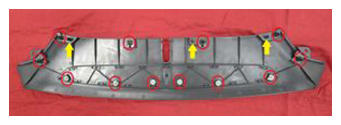
- Remove front underhood apron.
NOTE:
12x clips, 3 datums.
 Courtesy of TESLA, INC. Courtesy of TESLA, INC.
|
 Courtesy of TESLA, INC. Courtesy of TESLA, INC.
|
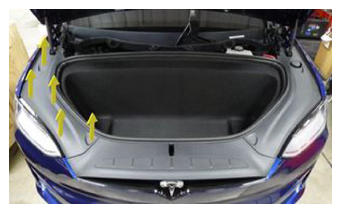
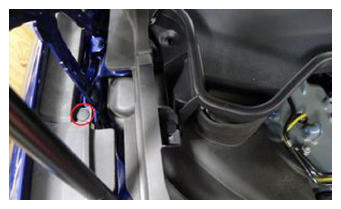
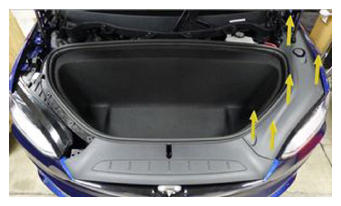
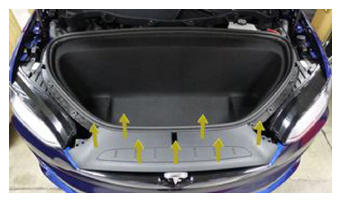
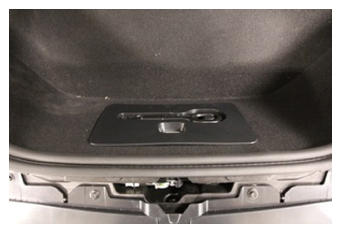
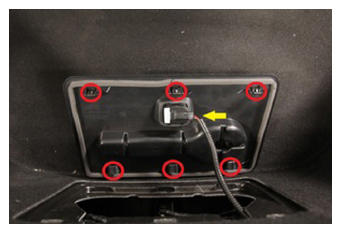
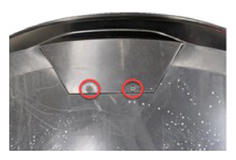
- Remove frunk access panel.
NOTE:
3x clips, 3x hooks, 1x connector.
 Courtesy of TESLA, INC. Courtesy of TESLA, INC.
|
 Courtesy of TESLA, INC. Courtesy of TESLA, INC.
|
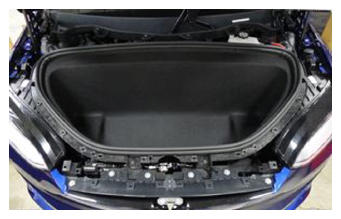
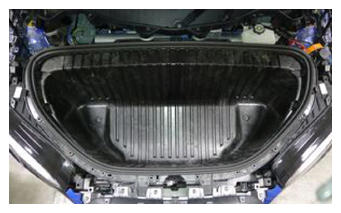
- Remove frunk carpet.
 Courtesy of TESLA, INC. Courtesy of TESLA, INC.
|
 Courtesy of TESLA, INC. Courtesy of TESLA, INC.
|
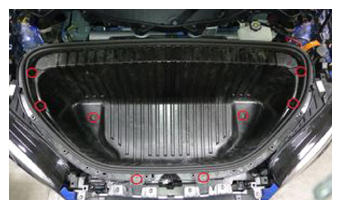
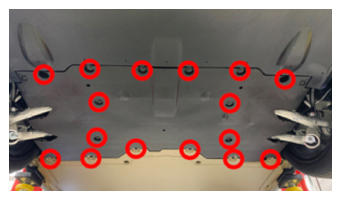
- Remove frunk assembly.
NOTE:
8x bolts, 10 mm, 5 N.m.
 Courtesy of TESLA, INC. Courtesy of TESLA, INC.
|
 Courtesy of TESLA, INC. Courtesy of TESLA, INC.
|
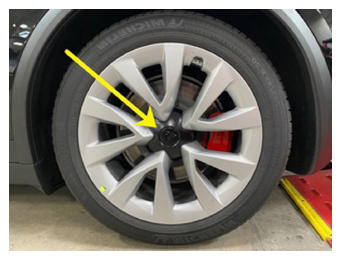
- Remove LH rear wheel center cap.
NOTE:
1x cap.
 Courtesy of TESLA, INC. Courtesy of TESLA, INC.
|
 Courtesy of TESLA, INC. Courtesy of TESLA, INC.
|
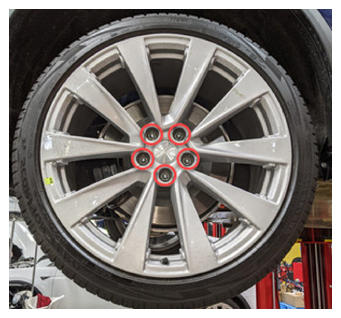
- Loosen LH rear wheel.
NOTE:
5x nuts, 21 mm, 175 N.m.
 Courtesy of TESLA, INC. Courtesy of TESLA, INC.
|
 Courtesy of TESLA, INC. Courtesy of TESLA, INC.
|
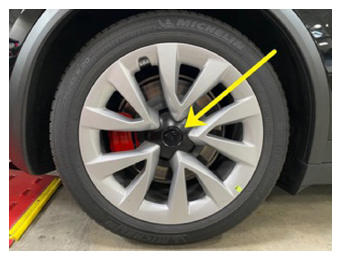
- Remove RH rear wheel center cap.
NOTE:
1x cap.
 Courtesy of TESLA, INC. Courtesy of TESLA, INC.
|
 Courtesy of TESLA, INC. Courtesy of TESLA, INC.
|
- Loosen RH rear wheel.
NOTE:
5x nuts, 21 mm, 175 N.m.
 Courtesy of TESLA, INC. Courtesy of TESLA, INC.
|
 Courtesy of TESLA, INC. Courtesy of TESLA, INC.
|
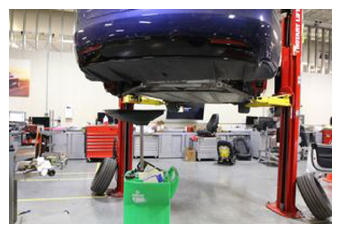
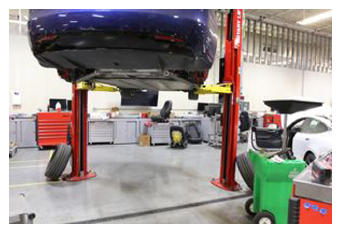
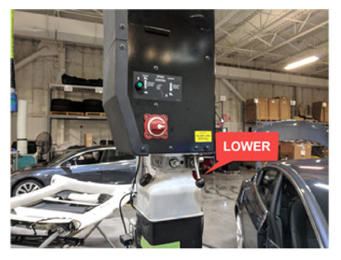
- Raise vehicle fully and lower lift onto locks.
NOTE:
Set vehicle to comfortable working height, Make sure there's an audible click of the locks on both sides before lowering, otherwise vehicle may tilt to the side.
 Courtesy of TESLA, INC. Courtesy of TESLA, INC.
|
 Courtesy of TESLA, INC. Courtesy of TESLA, INC.
|
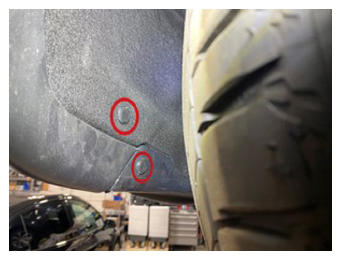
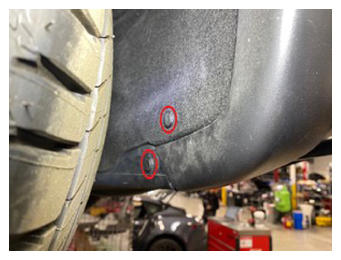
- Remove clips securing mid aeroshield.
NOTE:
4x push clips.
 Courtesy of TESLA, INC. Courtesy of TESLA, INC.
|
 Courtesy of TESLA, INC. Courtesy of TESLA, INC.
|
 Courtesy of TESLA, INC. Courtesy of TESLA, INC.
|
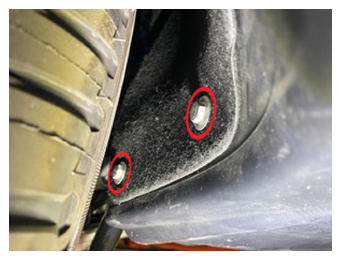
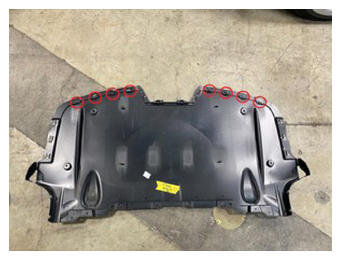
- Remove bolts securing mid aeroshield and remove from vehicle.
NOTE:
16x bolts, 10 mm, 6 N.m.
 Courtesy of TESLA, INC. Courtesy of TESLA, INC.
|
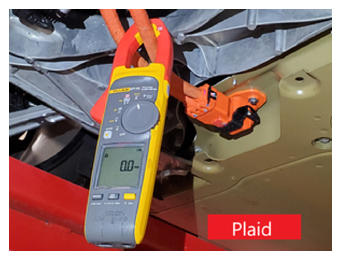
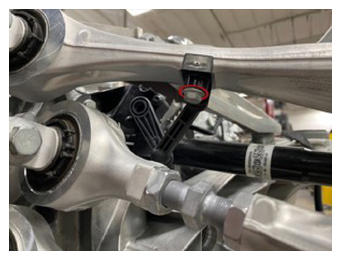
- Install amp clamp to LH RDU HV harness.
NOTE:
Verify meter is zeroed out before performing measurement, Measure single cable. Verify ammeter is installed in correct direction. If current > 0.5A do not proceed with disconnecting HV connector. In this case, start vehicle electrical isolation again to make sure that all was properly shut down. If current < 0.5A, Ok to disconnect and check voltage at HV plug on the battery side.
 Courtesy of TESLA, INC. Courtesy of TESLA, INC.
|
 Courtesy of TESLA, INC. Courtesy of TESLA, INC.
|
- Remove all items from pockets and ensure not wearing metal items.
 Courtesy of TESLA, INC. Courtesy of TESLA, INC.
|
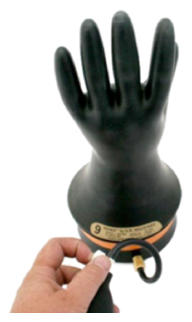
- Inspect HV insulating gloves.
NOTE:
Check gloves for damage prior to use, Refer to service document TN-15-92-003, for information on inspecting HV gloves.
 Courtesy of TESLA, INC. Courtesy of TESLA, INC.
|
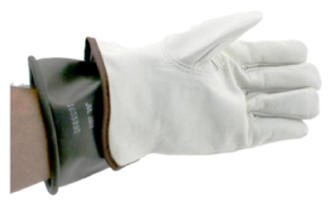
- Put on HV insulating gloves and leather over gloves.
 Courtesy of TESLA, INC. Courtesy of TESLA, INC.
|
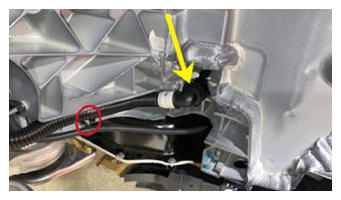
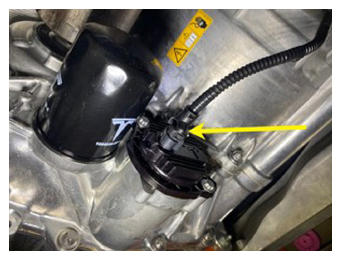
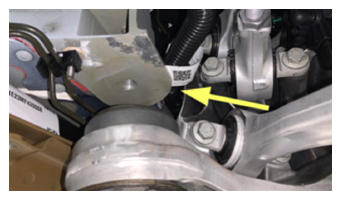
- Remove PRDU dummy plug from HV battery pack.
NOTE:
1x connector, Disengage locking tab, then release connector body.
 Courtesy of TESLA, INC. Courtesy of TESLA, INC.
|
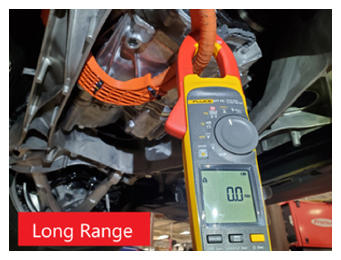
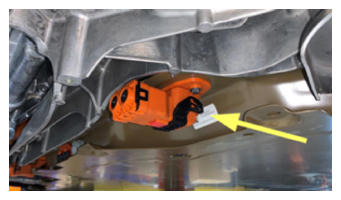
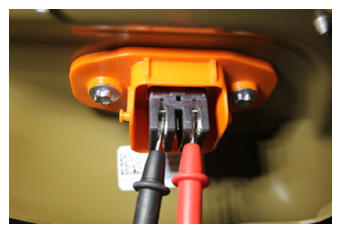
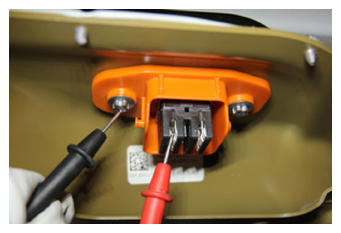
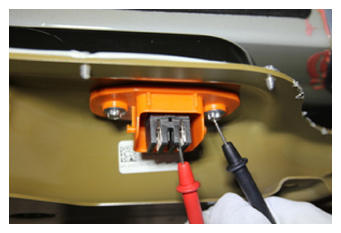
- Verify no high voltage present at RH side RDU HV header.
NOTE:
Make sure to wear PPE (HV gloves, safety glasses) when working on high voltage component, Measure B+ to Ground, B- to Ground, B+ to B-, If voltage is greater than 10V, Pack contactors are not open or welded, Stop work and reach out to Service Engineering.
 Courtesy of TESLA, INC. Courtesy of TESLA, INC.
|
 Courtesy of TESLA, INC. Courtesy of TESLA, INC.
|
 Courtesy of TESLA, INC. Courtesy of TESLA, INC.
|
- Remove the leather glove protectors and HV insulating gloves.
 Courtesy of TESLA, INC. Courtesy of TESLA, INC.
|
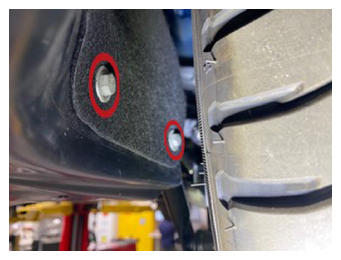
- Remove tow hitch cover.
NOTE:
2x plastic retainers, 10x tabs, Plastic retainers are captive, Do not pry on clips as they may snap off.
 Courtesy of TESLA, INC. Courtesy of TESLA, INC.
|
 Courtesy of TESLA, INC. Courtesy of TESLA, INC.
|
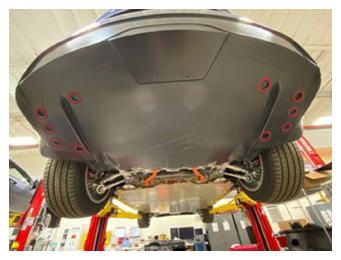
- Remove rear diffuser from vehicle.
NOTE:
14x bolts, 10 mm, 5 N.m, 4x push clips, 8x tabs.
 Courtesy of TESLA, INC. Courtesy of TESLA, INC.
|
 Courtesy of TESLA, INC. Courtesy of TESLA, INC.
|
 Courtesy of TESLA, INC. Courtesy of TESLA, INC.
|
 Courtesy of TESLA, INC. Courtesy of TESLA, INC.
|
 Courtesy of TESLA, INC. Courtesy of TESLA, INC.
|
 Courtesy of TESLA, INC. Courtesy of TESLA, INC.
|
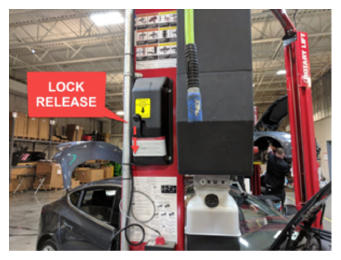
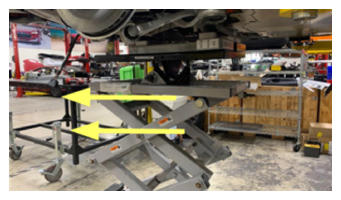
- Lower vehicle partially and set lift onto locks.
NOTE:
Raise lift off locks, then hold lock release lever to keep locks free while vehicle is lowered, Set vehicle to comfortable working height.
 Courtesy of TESLA, INC. Courtesy of TESLA, INC.
|
 Courtesy of TESLA, INC. Courtesy of TESLA, INC.
|
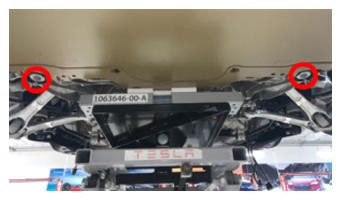
- Remove LH rear wheel.
NOTE:
5x nuts, 21 mm, 175 N.m.
 Courtesy of TESLA, INC. Courtesy of TESLA, INC.
|
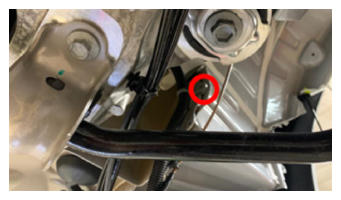
- Release RDU ground stud from body.
NOTE:
1x nut, 10 mm, 10 N.m.
 Courtesy of TESLA, INC. Courtesy of TESLA, INC.
|
- Release subframe harness from LH rear active dampener.
NOTE:
2x connectors, 1x grommet.
 Courtesy of TESLA, INC. Courtesy of TESLA, INC.
|
- Disconnect EPB harness connector to the LH caliper motor.
NOTE:
1x connector, Disengage locking tab then release connector.
 Courtesy of TESLA, INC. Courtesy of TESLA, INC.
|
- Release chassis harness from LH lower control arm bracket.
NOTE:
1x fir tree clip.
 Courtesy of TESLA, INC. Courtesy of TESLA, INC.
|
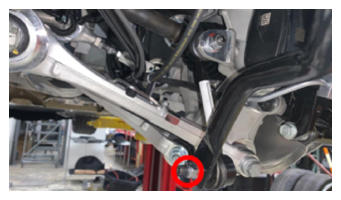
- Release LH rear brake hose from LH rear lower control arm.
NOTE:
1x bolt, 10 mm, 6 N.m.
 Courtesy of TESLA, INC. Courtesy of TESLA, INC.
|
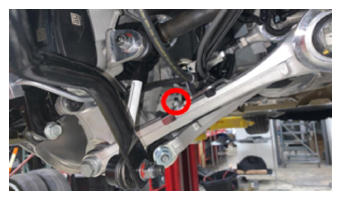
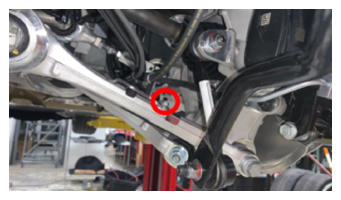
- Release LH rear stabar link from rear stabar assembly.
NOTE:
1x nyloc nut, 15 mm, 55 N.m, Break nut loose then counter-hold ball joint with 5 mm hex, Discard after removal.
 Courtesy of TESLA, INC. Courtesy of TESLA, INC.
|
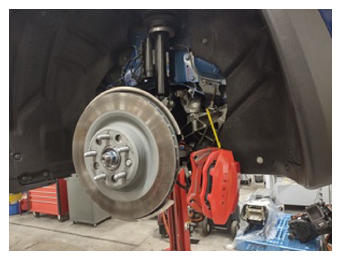
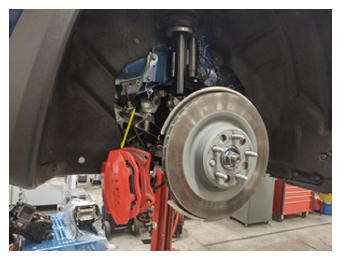
- Remove LH rear brake caliper from LH rear knuckle and hang from body.
NOTE:
2x bolts, E18, 125 N.m, Hang caliper from body if not fully removing, Route caliper hose so that it does not get caught on stabar assembly.
 Courtesy of TESLA, INC. Courtesy of TESLA, INC.
|
 Courtesy of TESLA, INC. Courtesy of TESLA, INC.
|
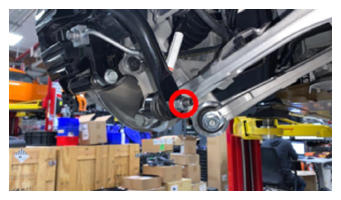
- Remove nut securing LH rear air spring module to LH rear knuckle.
NOTE:
1x nut, 21 mm, 140 N.m, Do not remove the bolt.
 Courtesy of TESLA, INC. Courtesy of TESLA, INC.
|
- Position coolant drain container underneath LH rear of vehicle.
 Courtesy of TESLA, INC. Courtesy of TESLA, INC.
|
- Disconnect PT supply coolant hose from PT side sill supply hose.
NOTE:
1x spring clip, 1x clip, Plug hoses as needed, Use shop towel to clean any residue coolant inside LH rocker panel if necessary.
 Courtesy of TESLA, INC. Courtesy of TESLA, INC.
|
- Remove RH rear wheel.
NOTE:
5x nuts, 21 mm, 175 N.m.
 Courtesy of TESLA, INC. Courtesy of TESLA, INC.
|
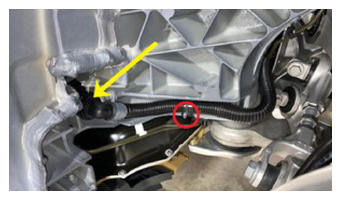
- Release subframe harness from RH rear active dampener.
NOTE:
2x connectors, 1x grommet.
 Courtesy of TESLA, INC. Courtesy of TESLA, INC.
|
- Disconnect EPB harness connector to the RH caliper motor.
NOTE:
1x connector, Disengage locking tab then release connector.
 Courtesy of TESLA, INC. Courtesy of TESLA, INC.
|
- Release subframe harness from RH lower control arm.
NOTE:
1x clip.
 Courtesy of TESLA, INC. Courtesy of TESLA, INC.
|
- Release RH rear brake caliper line from RH rear lower control arm.
NOTE:
1x bolt, 10 mm, 6 N.m.
 Courtesy of TESLA, INC. Courtesy of TESLA, INC.
|
- Release RH rear stabar link from rear stabar assembly.
NOTE:
1x nyloc nut, 15 mm, 55 N.m, Break nut loose then counter-hold ball joint with 5 mm hex, Discard after removal.
 Courtesy of TESLA, INC. Courtesy of TESLA, INC.
|
- Remove RH rear brake caliper from RH rear knuckle and hang from body.
NOTE:
2x bolts, E18, 125 N.m, Hang caliper from body if not fully removing, Route caliper hose so that it does not get caught on stabar assembly.
 Courtesy of TESLA, INC. Courtesy of TESLA, INC.
|
 Courtesy of TESLA, INC. Courtesy of TESLA, INC.
|
- Remove nut securing RH rear air spring module to RH rear knuckle.
NOTE:
1x nut, 21 mm, 140 N.m, Do not remove the bolt.
 Courtesy of TESLA, INC. Courtesy of TESLA, INC.
|
- Position coolant drain underneath RH rear of vehicle.
 Courtesy of TESLA, INC. Courtesy of TESLA, INC.
|
- Release RDU PT return hose from side sill PT return hose.
NOTE:
1x spring clip, 1x clip, Plug hoses as needed, Use shop towel to clean any residue coolant inside RH rocker panel if necessary.
 Courtesy of TESLA, INC. Courtesy of TESLA, INC.
|
- Remove coolant drain container from underneath vehicle.
 Courtesy of TESLA, INC. Courtesy of TESLA, INC.
|
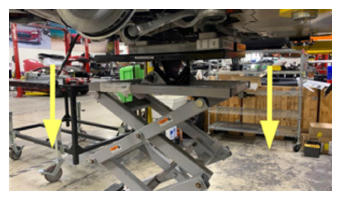
- Raise vehicle fully and lower lift onto locks.
NOTE:
Set vehicle to comfortable working height, Make sure there's an audible click of the locks on both sides before lowering, otherwise vehicle may tilt to the side.
 Courtesy of TESLA, INC. Courtesy of TESLA, INC.
|
 Courtesy of TESLA, INC. Courtesy of TESLA, INC.
|
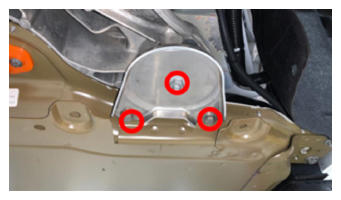
- Remove RH shear plate.
NOTE:
1x nut, 15 mm, 60 N.m, 2x bolts, 10 mm, 30 N.m.
 Courtesy of TESLA, INC. Courtesy of TESLA, INC.
|
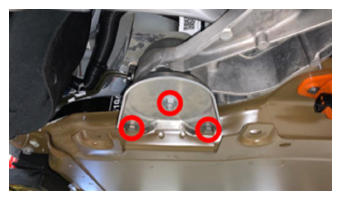
- Remove LH shear plate.
NOTE:
1x nut, 15 mm, 60 N.m, 2x bolts, 10 mm, 30 N.m.
 Courtesy of TESLA, INC. Courtesy of TESLA, INC.
|
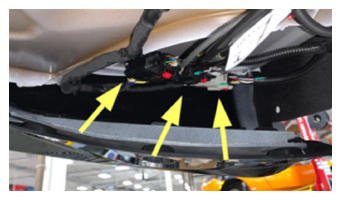
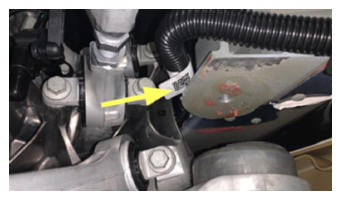
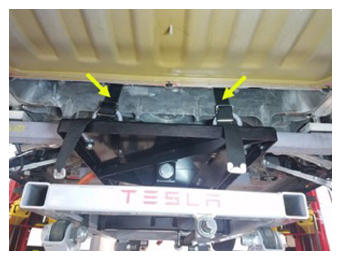
- Remove rear subframe harness connectors from body harness.
NOTE:
4x connectors, 1x clip, Disengage locking tab, then release connector body, Clip located on LH wheel well.
 Courtesy of TESLA, INC. Courtesy of TESLA, INC.
|
 Courtesy of TESLA, INC. Courtesy of TESLA, INC.
|
 Courtesy of TESLA, INC. Courtesy of TESLA, INC.
|
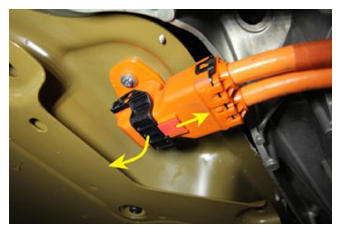
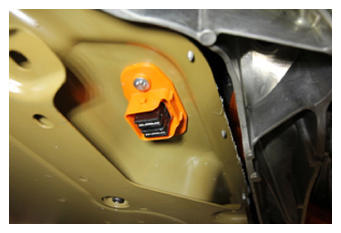
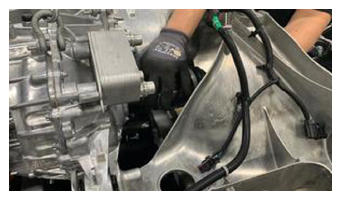
- Release LH RDU HV harness from HV battery.
NOTE:
1x connector, Hold down red locking tab and disengage the release lever, Do not force the release lever up.
 Courtesy of TESLA, INC. Courtesy of TESLA, INC.
|
 Courtesy of TESLA, INC. Courtesy of TESLA, INC.
|
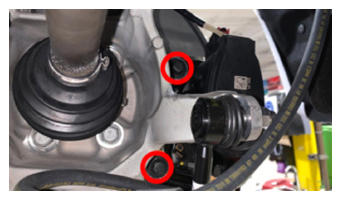
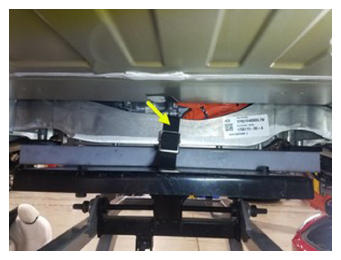
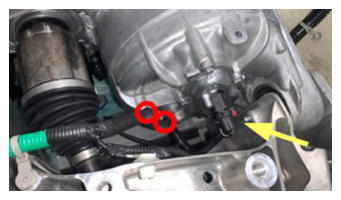
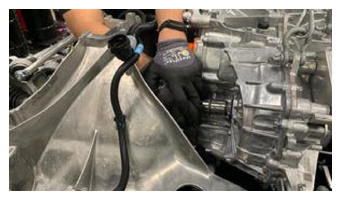
- Disconnect oil pump connector.
NOTE:
1x connector, Pull grey tab to disengage lock then disconnect.
 Courtesy of TESLA, INC. Courtesy of TESLA, INC.
|
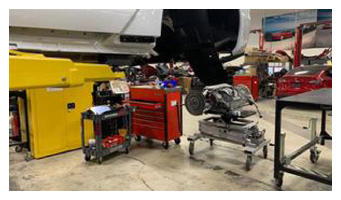
- Position powertrain lift under rear subframe.
 Courtesy of TESLA, INC. Courtesy of TESLA, INC.
|
- Connect shop air supply to powertrain table.
 Courtesy of TESLA, INC. Courtesy of TESLA, INC.
|
- Raise powertrain lift to rear subframe.
NOTE:
Make sure the height setting of the hoist can be reached with the powertrain lift height limit.
 Courtesy of TESLA, INC. Courtesy of TESLA, INC.
|
 Courtesy of TESLA, INC. Courtesy of TESLA, INC.
|
 Courtesy of TESLA, INC. Courtesy of TESLA, INC.
|
 Courtesy of TESLA, INC. Courtesy of TESLA, INC.
|
 Courtesy of TESLA, INC. Courtesy of TESLA, INC.
|
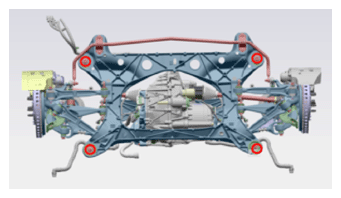
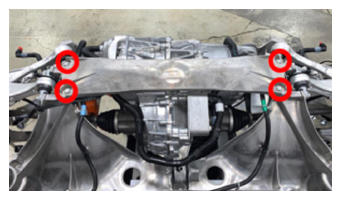
- Loosen bolts securing subframe to body.
NOTE:
4x bolts, 21 mm, 175 N.m.
 Courtesy of TESLA, INC. Courtesy of TESLA, INC.
|
- Remove the bolts securing the rear subframe to the body with battery powered drill.
NOTE:
4x bolts, 21 mm, 175 N.m.
 Courtesy of TESLA, INC. Courtesy of TESLA, INC.
|
 Courtesy of TESLA, INC. Courtesy of TESLA, INC.
|
 Courtesy of TESLA, INC. Courtesy of TESLA, INC.
|
- Carefully lower the powertrain to remove air spring module fasteners.
NOTE:
Recommend assistance, Use caution to make sure nothing gets hung up while lowering.
 Courtesy of TESLA, INC. Courtesy of TESLA, INC.
|
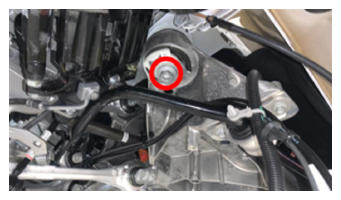
- Remove bolt securing LH rear air spring module to LH rear knuckle.
NOTE:
1x bolt, 21 mm, 150 N.m, May need to adjust powertrain table height to relieve tension on bolt.
 Courtesy of TESLA, INC. Courtesy of TESLA, INC.
|
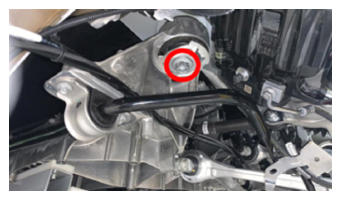
- Remove bolt securing RH rear air spring module to RH rear knuckle.
NOTE:
1x bolt, 21 mm, 140 N.m, May need to adjust powertrain table height to relieve tension on bolt.
 Courtesy of TESLA, INC. Courtesy of TESLA, INC.
|
- Lower subframe table.
NOTE:
Use caution with RDU coolant hoses, Subframe table will need to be moved back and tilted to prevent coolant lines getting caught and damaging HV battery assembly with front motor mount.
 Courtesy of TESLA, INC. Courtesy of TESLA, INC.
|
 Courtesy of TESLA, INC. Courtesy of TESLA, INC.
|
 Courtesy of TESLA, INC. Courtesy of TESLA, INC.
|
 Courtesy of TESLA, INC. Courtesy of TESLA, INC.
|
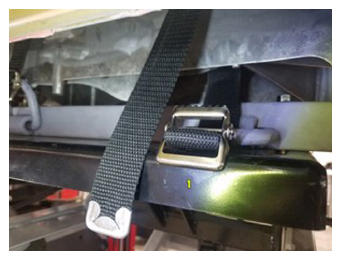
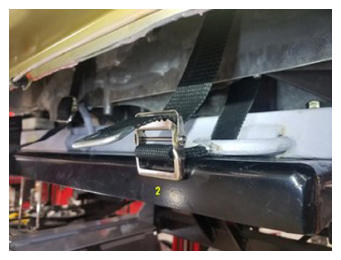
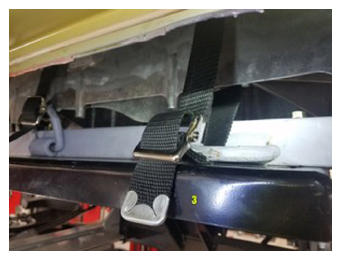
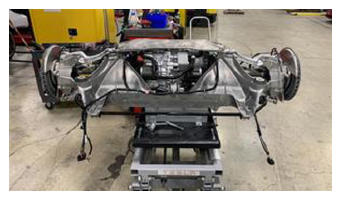
- Safely secure rear subframe onto powertrain lift.
NOTE:
3x three-step straps, Secure front strap onto front crossbeam and rear straps onto rear crossbeam.
 Courtesy of TESLA, INC. Courtesy of TESLA, INC.
|
 Courtesy of TESLA, INC. Courtesy of TESLA, INC.
|
 Courtesy of TESLA, INC. Courtesy of TESLA, INC.
|
 Courtesy of TESLA, INC. Courtesy of TESLA, INC.
|
 Courtesy of TESLA, INC. Courtesy of TESLA, INC.
|
- Remove rear subframe assembly from under vehicle.
 Courtesy of TESLA, INC. Courtesy of TESLA, INC.
|
 Courtesy of TESLA, INC. Courtesy of TESLA, INC.
|
- Remove rear subframe brace.
NOTE:
4x bolts, 16 mm, 120 N.m.
 Courtesy of TESLA, INC. Courtesy of TESLA, INC.
|
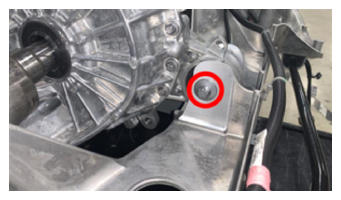
- Remove ground strap.
NOTE:
1x bolt, 10 mm, 10 N.m, 2x clips.
 Courtesy of TESLA, INC. Courtesy of TESLA, INC.
|
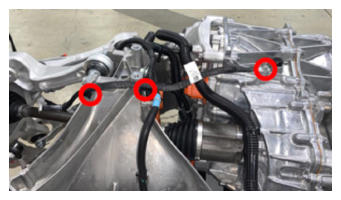
- Release RH side of subframe harness from RDU.
NOTE:
2x clips, 1x connector, Disengage locking tab, then release connector body.
 Courtesy of TESLA, INC. Courtesy of TESLA, INC.
|
- Release LH side of subframe harness from RDU.
NOTE:
1x logic connector, 1x clip, Disengage locking tab, then release connector body.
 Courtesy of TESLA, INC. Courtesy of TESLA, INC.
|
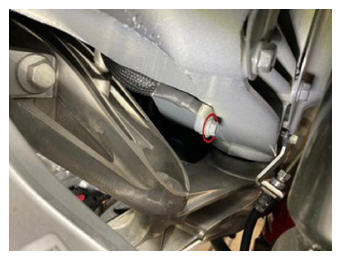
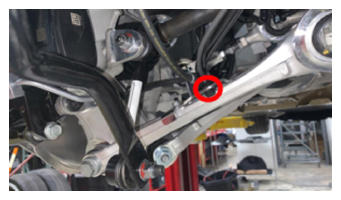
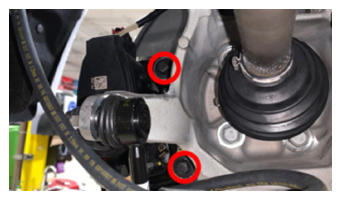
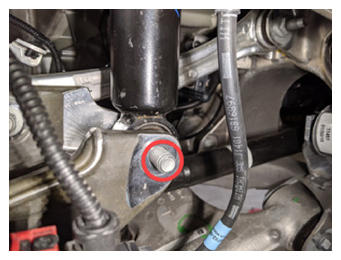
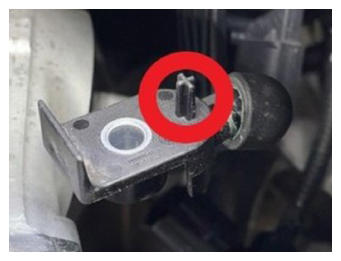
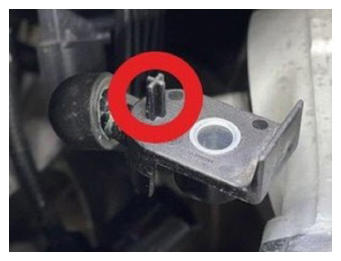
- Release bolt securing LH rear ride height sensor to suspension arm.
NOTE:
1x bolt, 10 mm, 5 N.m, 1x datum.
 Courtesy of TESLA, INC. Courtesy of TESLA, INC.
|
 Courtesy of TESLA, INC. Courtesy of TESLA, INC.
|
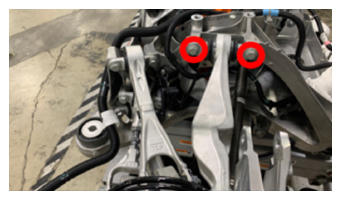
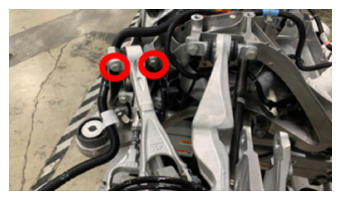
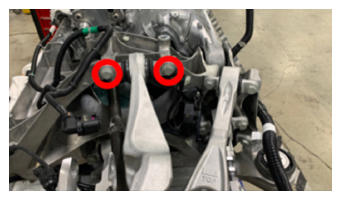
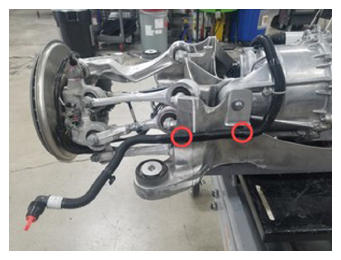
- Remove bolts securing LH upper aft link to subframe.
NOTE:
2x bolts, 16 mm, 85 N.m.
 Courtesy of TESLA, INC. Courtesy of TESLA, INC.
|
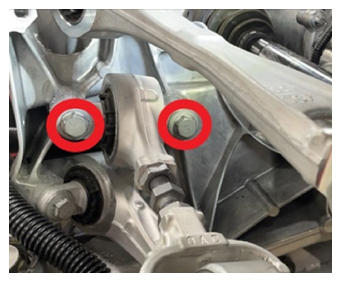
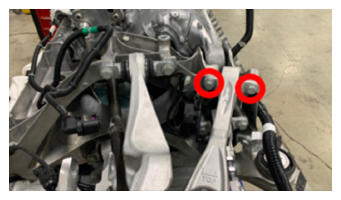
- Remove bolts securing LH upper fore link to subframe.
NOTE:
2x bolts, 16 mm, 85 N.m.
 Courtesy of TESLA, INC. Courtesy of TESLA, INC.
|
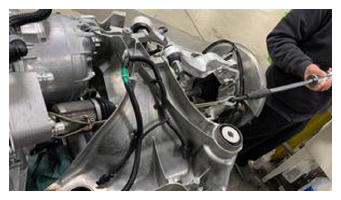
- Remove bolts securing LH toe link to subframe.
NOTE:
2x bolts, 16 mm, 85 N.m, Support knuckle while removing.
 Courtesy of TESLA, INC. Courtesy of TESLA, INC.
|
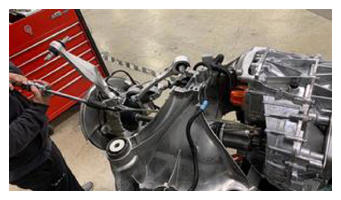
- Release LH inboard CV joint.
NOTE:
1x U-bolt, 2x nuts, 10 mm, Torque hand-tight, Wrap cable around inner joint, then tighten with U-bolt, Use slide hammer with cable eyelets to release, To avoid damage to the halfshaft boots and oil seals, exercise caution when removing.
 Courtesy of TESLA, INC. Courtesy of TESLA, INC.
|
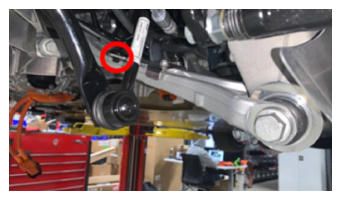
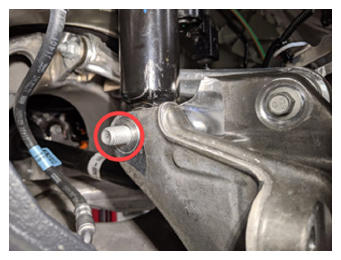
- Release bolt securing RH rear ride height sensor to suspension arm.
NOTE:
1x bolt, 10 mm, 5 N.m, 1x datum.
 Courtesy of TESLA, INC. Courtesy of TESLA, INC.
|
 Courtesy of TESLA, INC. Courtesy of TESLA, INC.
|
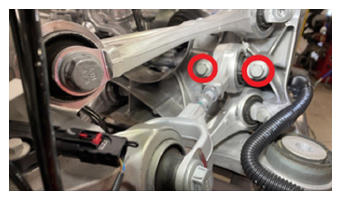
- Remove bolts securing RH upper aft link to subframe.
NOTE:
2x bolts, 16 mm, 85 N.m.
 Courtesy of TESLA, INC. Courtesy of TESLA, INC.
|
- Remove bolts securing RH upper fore link to subframe.
NOTE:
2x bolts, 16 mm, 85 N.m.
 Courtesy of TESLA, INC. Courtesy of TESLA, INC.
|
- Remove bolts securing RH toe link to subframe.
NOTE:
2x bolts, 16 mm, 85 N.m.
 Courtesy of TESLA, INC. Courtesy of TESLA, INC.
|
- Release RH inboard CV joint.
NOTE:
1x U-bolt, 2x nuts, 10 mm, Torque hand-tight, Wrap cable around inner joint, then tighten with U-bolt, Use slide hammer with cable eyelets to release, To avoid damage to the halfshaft boots and oil seals, exercise caution when removing.
 Courtesy of TESLA, INC. Courtesy of TESLA, INC.
|
- Remove clips securing PT return hose to subframe.
NOTE:
2x clips.
 Courtesy of TESLA, INC. Courtesy of TESLA, INC.
|
- Remove clips securing PT supply hose to subframe.
NOTE:
2x clips.
 Courtesy of TESLA, INC. Courtesy of TESLA, INC.
|
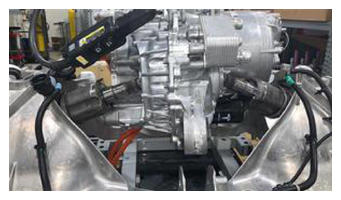
- Position drive unit stand underneath gantry.
 Courtesy of TESLA, INC. Courtesy of TESLA, INC.
|
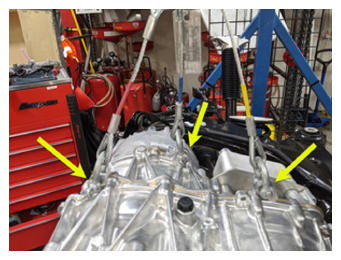
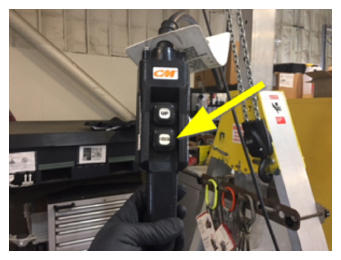
- Attach drive unit sling tool to drive unit.
NOTE:
3x hooks.
 Courtesy of TESLA, INC. Courtesy of TESLA, INC.
|
- Secure drive unit sling to gantry.
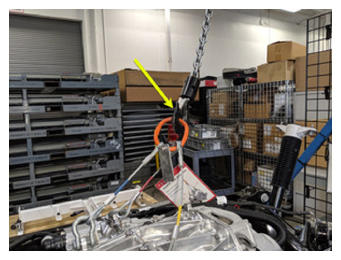 Courtesy of TESLA, INC. Courtesy of TESLA, INC.
|
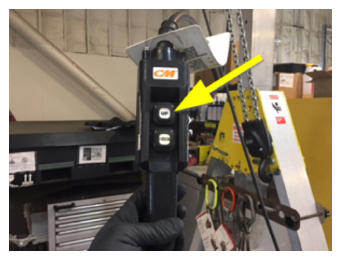
- Raise sling so there is slight tension on the cables.
 Courtesy of TESLA, INC. Courtesy of TESLA, INC.
|
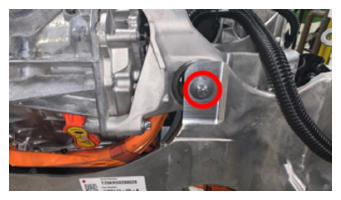
- Remove LH bolt securing drive unit to subframe.
NOTE:
1x bolt, E18, 120 N.m.
 Courtesy of TESLA, INC. Courtesy of TESLA, INC.
|
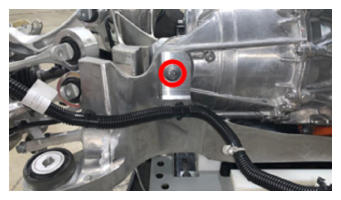
- Remove RH bolt securing drive unit to subframe.
NOTE:
1x bolt, E18, 120 N.m.
 Courtesy of TESLA, INC. Courtesy of TESLA, INC.
|
- Remove bolt securing rear of drive unit to subframe.
NOTE:
1x bolt, E18, 120 N.m.
 Courtesy of TESLA, INC. Courtesy of TESLA, INC.
|
- Raise sling to lift drive unit out of subframe.
NOTE:
Recommend assistance, Carefully guide halfshafts away from FDU while lifting.
 Courtesy of TESLA, INC. Courtesy of TESLA, INC.
|
 Courtesy of TESLA, INC. Courtesy of TESLA, INC.
|
 Courtesy of TESLA, INC. Courtesy of TESLA, INC.
|
- Move subframe and lifting tool from underneath rear drive unit.
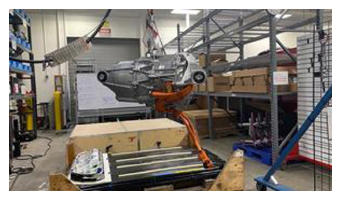 Courtesy of TESLA, INC. Courtesy of TESLA, INC.
|
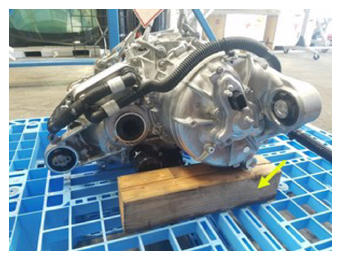
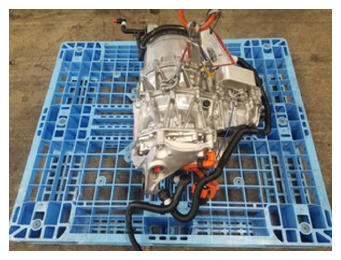
- Lower rear drive unit onto empty pallet.
NOTE:
Place wood block under stator to keep RDU upright.
 Courtesy of TESLA, INC. Courtesy of TESLA, INC.
|
 Courtesy of TESLA, INC. Courtesy of TESLA, INC.
|
 Courtesy of TESLA, INC. Courtesy of TESLA, INC.
|
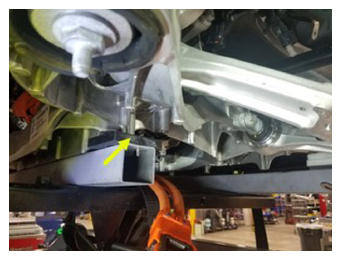
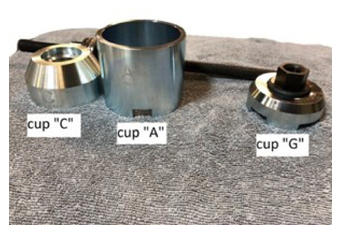
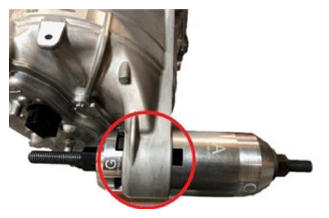
- Install bushing removal tool on RH front bushing.
NOTE:
2x nuts, 22 mm, use cups "C", "A", and "G" to drive bushing out, always drive on the bearing side and hold the opposite.
 Courtesy of TESLA, INC. Courtesy of TESLA, INC.
|
 Courtesy of TESLA, INC. Courtesy of TESLA, INC.
|
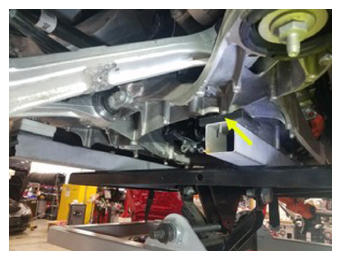
- Press bushing out from casting.
NOTE:
Set up bushing removal tool with the bearing away from the drive unit, the threaded rod is very close to RDU components and damage to the tool/RDU may occur if the bushing is drive out from the drive unit side.
 Courtesy of TESLA, INC. Courtesy of TESLA, INC.
|
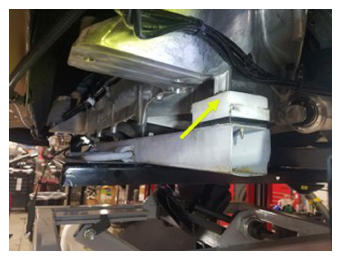
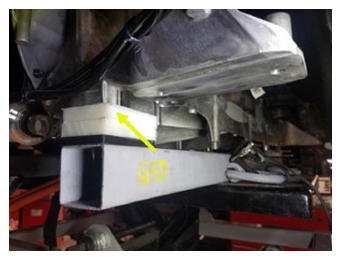
- Separate bushing tool and remove bushing.
 Courtesy of TESLA, INC. Courtesy of TESLA, INC.
|
 Courtesy of TESLA, INC. Courtesy of TESLA, INC.
|
 Courtesy of TESLA, INC. Courtesy of TESLA, INC.
|