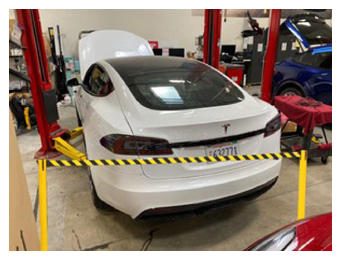
- Move the vehicle to a 2 post lift. See Raise Vehicle - 2 Post Lift
.
- Place stanchions around rear of vehicle to setup safety perimeter.
 Courtesy of TESLA, INC. Courtesy of TESLA, INC.
|
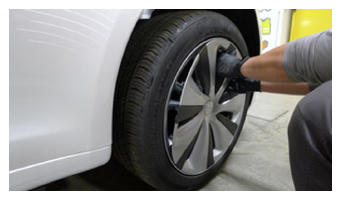
- Remove the wheel center cap or lug nut covers from the LH and RH front wheels.
 Courtesy of TESLA, INC. Courtesy of TESLA, INC.
|
 Courtesy of TESLA, INC. Courtesy of TESLA, INC.
|
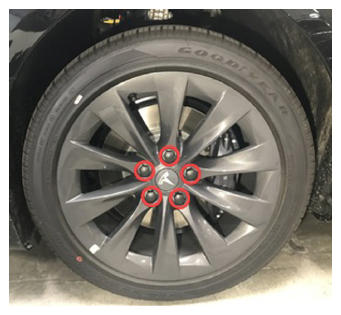
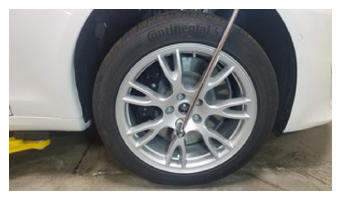
- Loosen, but do not remove, the lug nuts (x5) that attach the LH and RH front wheels to their respective hubs.
 Courtesy of TESLA, INC. Courtesy of TESLA, INC.
|
- On the touchscreen, enable service mode. See Service Mode (Enable and Disable)
.
- Unlock the gateway. See Gateway (Unlock)
.
- Enable Service Mode Plus. See Service Mode Plus
- On the touchscreen, touch High Voltage Procedures
, and under Drive-Inverter-Replacement, touch Front Drive Inverter Replacement
.
- On the touchscreen, under Before Inverter Replacement, touch Store Bootloader Data
, press and release the brake pedal, touch Run
, allow the routine to complete, and then touch Close
.
- Under Before Inverter Replacement, touch Store Application Data
, press and release the brake pedal, touch Run
, allow the routine to complete, and then touch Close
.
- Under Before Inverter Replacement, touch Start Fluid Fill/Drain
, touch Run
, allow the routine to complete, and then touch Close
.
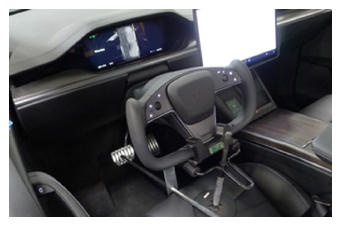
- Set the steering wheel straight ahead, place a protector sheet onto the driver seat, and then install the steering wheel lock.
 Courtesy of TESLA, INC. Courtesy of TESLA, INC.
|
- Remove the rear underhood apron. See Underhood Apron - Rear (Remove and Replace)
.
- Remove the underhood storage unit. See Underhood Storage Unit (Remove and Replace)
.
- Disconnect LV power. See LV Power (Disconnect and Connect)
.
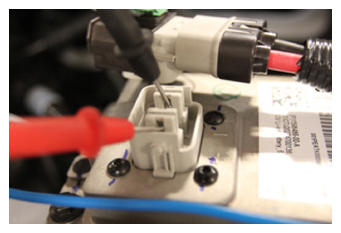
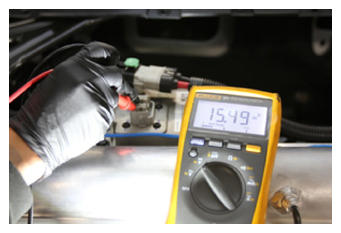
- Set the high voltage multimeter to DC voltage, lightly touch the probes to the auxiliary battery connector contacts, and verify that the multimeter displays a voltage.
NOTE:
Battery voltage is typically 14.5 to 15.5 volts.
 Courtesy of TESLA, INC. Courtesy of TESLA, INC.
|
 Courtesy of TESLA, INC. Courtesy of TESLA, INC.
|
- Remove the LH and RH front wheels. See Wheel (Remove and Install)
.
- Remove the mid aero shield panel. See Panel - Aero Shield - Mid (Remove and Replace)
.
- Perform the vehicle electrical isolation procedure. See Vehicle Electrical Isolation Procedure
.
- Remove the leather glove protectors and the HV insulating gloves.
 Courtesy of TESLA, INC. Courtesy of TESLA, INC.
|
- Remove the front aero shield panel. See Panel - Aero Shield - Front (Remove and Replace)
.
- Remove the front skid plate. See Skidplate - Front (Remove and Replace)
.
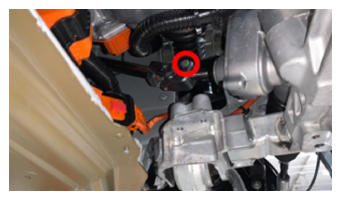
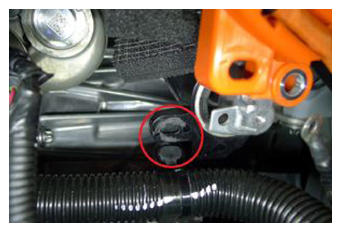
- Remove the bolt that attaches the steering column intermediate shaft to the steering rack input shaft.
 Courtesy of TESLA, INC. Courtesy of TESLA, INC.
|
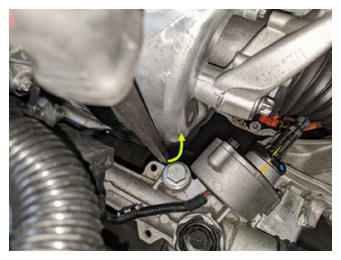
- Slide the steering column intermediate shaft up and off of the steering rack input shaft.
 Courtesy of TESLA, INC. Courtesy of TESLA, INC.
|
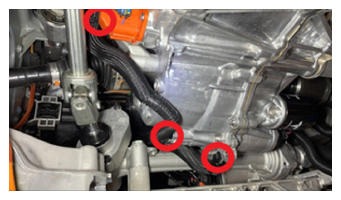
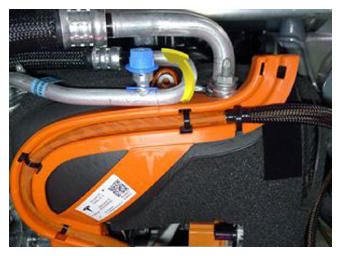
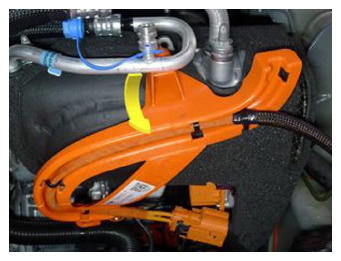
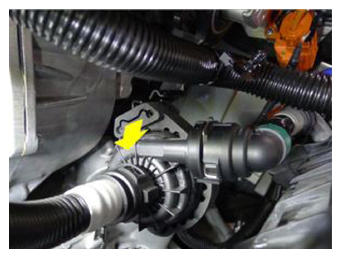
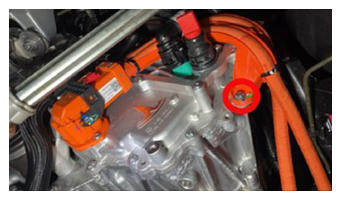
- Release the clips (x4) that attach the front drive unit inverter to heat exchanger hose to the front drive unit.
 Courtesy of TESLA, INC. Courtesy of TESLA, INC.
|
 Courtesy of TESLA, INC. Courtesy of TESLA, INC.
|
- Recover the A/C refrigerant. See A/C Refrigerant (Recovery and Recharge)
.
NOTE:
Perform the next steps concurrent with A/C refrigerant recovery.
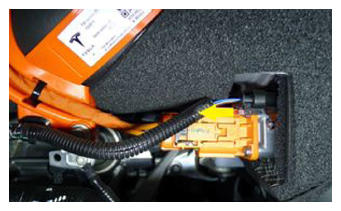
- Pull the red tab, and then pull the red tab again to disconnect the electrical harness from the A/C compressor logic connector.
 Courtesy of TESLA, INC. Courtesy of TESLA, INC.
|
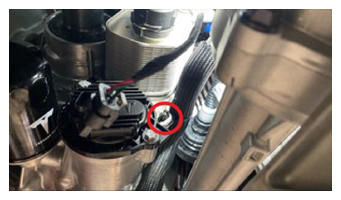
- Release the clip that attaches the electrical harness to the A/C compressor HV harness bracket.
 Courtesy of TESLA, INC. Courtesy of TESLA, INC.
|
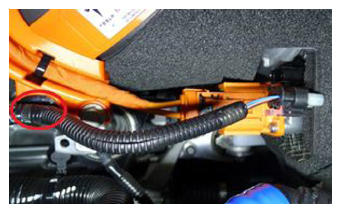
- Remove the bolt that attaches the ground strap to the A/C compressor, and then remove the ground strap from the compressor.
 Courtesy of TESLA, INC. Courtesy of TESLA, INC.
|
- Remove the bolt that attaches the A/C compressor HV harness bracket to the A/C compressor.
 Courtesy of TESLA, INC. Courtesy of TESLA, INC.
|
- Slide the black locking tab, press the release, and disconnect the HV harness from the A/C compressor HV header.
 Courtesy of TESLA, INC. Courtesy of TESLA, INC.
|
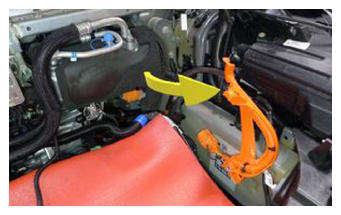
- Release the HV heat pump bracket tab, rotate the HV heat pump bracket rearward and upward to release the bracket from the A/C compressor eyelet.
 Courtesy of TESLA, INC. Courtesy of TESLA, INC.
|
 Courtesy of TESLA, INC. Courtesy of TESLA, INC.
|
- Move the HV heat pump bracket out from under the A/C compressor discharge pipe, and then move to the LH side.
 Courtesy of TESLA, INC. Courtesy of TESLA, INC.
|
 Courtesy of TESLA, INC. Courtesy of TESLA, INC.
|
- Release the clip that attaches the coolant hose to the A/C compressor bracket.
 Courtesy of TESLA, INC. Courtesy of TESLA, INC.
|
- Slide the powertrain coolant pump away from the A/C compressor, and off of the A/C compressor lower bracket.
 Courtesy of TESLA, INC. Courtesy of TESLA, INC.
|
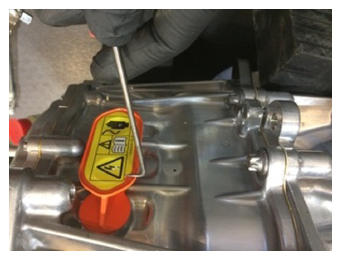
- Remove and discard the rear drive unit phase out cover label to access the bolts behind.
 Courtesy of TESLA, INC. Courtesy of TESLA, INC.
|
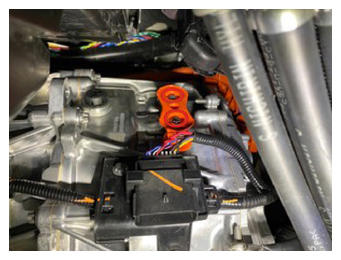
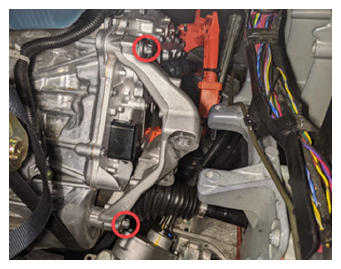
- Remove the bolts (x2) that attach the phase out cover to the front drive unit gearbox, and then use a plastic trim tool to remove the cover from the gearbox.
 Courtesy of TESLA, INC. Courtesy of TESLA, INC.
|
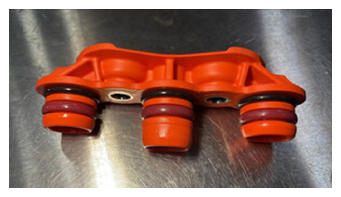
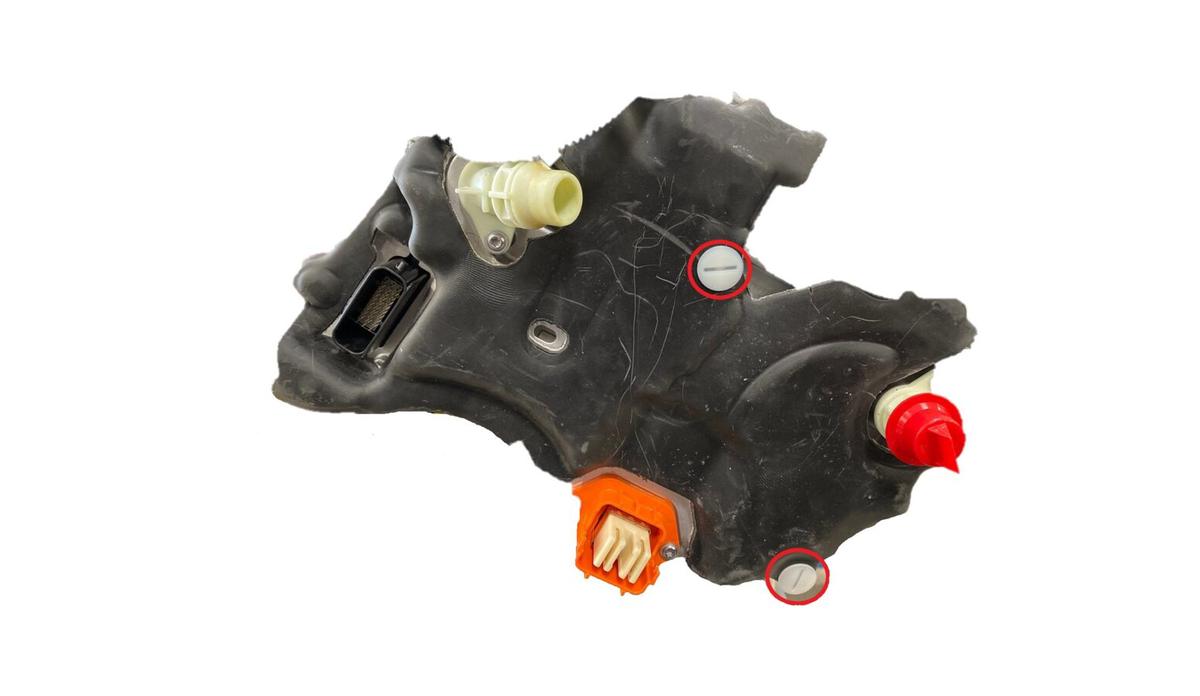
- Inspect the condition of the phase out cover and O-rings. If the cover has less than 6 O-rings, or if the O-rings or cover are damaged, discard the cover and use a new cover, part 1096984-00-C or newer revision, for installation.
 Courtesy of TESLA, INC. Courtesy of TESLA, INC.
|
- Remove the bolts (x3) that attach the front drive unit motor 3-phase terminals to the front drive unit inverter 3-phase terminals.
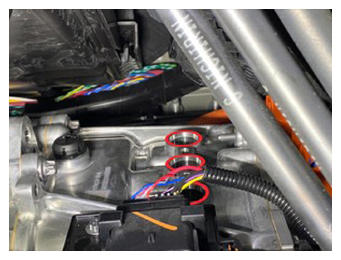 Courtesy of TESLA, INC. Courtesy of TESLA, INC.
|
- After the A/C refrigerant recovery has finished, disconnect the A/C hoses from the vehicle.
CAUTION:
Do not continue this procedure until the A/C refrigerant recovery has completed.
- Remove the bolt that attaches the Supermanifold to A/C compressor lines to the Supermanifold, and then disconnect the lines from the Supermanifold.
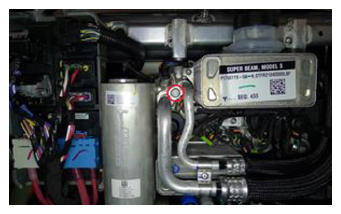 Courtesy of TESLA, INC. Courtesy of TESLA, INC.
|
- With the help of an assistant, remove the bolts (x2) that attach the A/C compressor bracket to the multi-system beam, and then remove the A/C compressor out from under the multi-system beam and out of the vehicle.
 Courtesy of TESLA, INC. Courtesy of TESLA, INC.
|
 Courtesy of TESLA, INC. Courtesy of TESLA, INC.
|
- Remove the nut that attaches the Supermanifold to HVAC line to the Supermanifold plate.
 Courtesy of TESLA, INC. Courtesy of TESLA, INC.
|
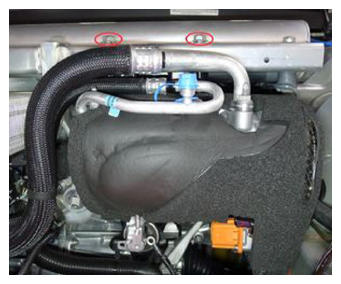
- Remove the bolts (x2) that attach the Supermanifold to HVAC lines to the HVAC assembly, and then separate the lines from the HVAC assembly.
 Courtesy of TESLA, INC. Courtesy of TESLA, INC.
|
- Place a clean shop towel under the Supermanifold plate, and then remove the Supermanifold to HVAC lines from the Supermanifold plate.
NOTE:
Move the lines rearward until the stud clears the Supermanifold plate.
 Courtesy of TESLA, INC. Courtesy of TESLA, INC.
|
 Courtesy of TESLA, INC. Courtesy of TESLA, INC.
|
- Move the Supermanifold to HVAC lines around the coolant reservoir and out of the vehicle.
 Courtesy of TESLA, INC. Courtesy of TESLA, INC.
|
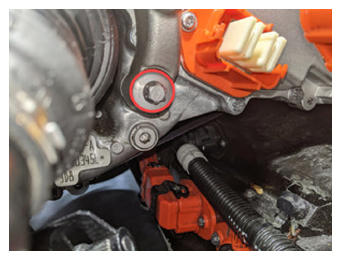
- Remove the bolt that attaches the front drive unit ground strap to the LH body casting.
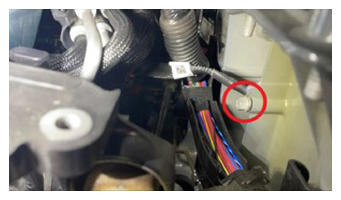 Courtesy of TESLA, INC. Courtesy of TESLA, INC.
|
- Remove the bolt that attaches the front drive unit ground strap to the front drive unit, and then remove the ground strap from the vehicle.
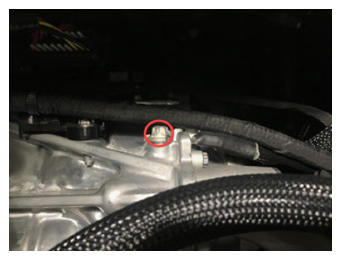 Courtesy of TESLA, INC. Courtesy of TESLA, INC.
|
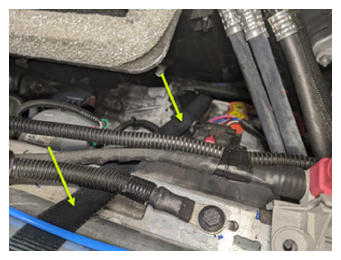
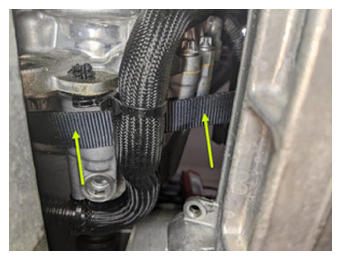
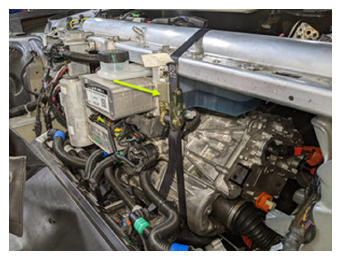
- Setup and tighten ratchet straps so that the multi-system beam supports the LH side of the front drive unit.
CAUTION:
Make sure that the straps do not route over air suspension lines, coolant hoses, or electrical harnesses.
 Courtesy of TESLA, INC. Courtesy of TESLA, INC.
|
 Courtesy of TESLA, INC. Courtesy of TESLA, INC.
|
 Courtesy of TESLA, INC. Courtesy of TESLA, INC.
|
 Courtesy of TESLA, INC. Courtesy of TESLA, INC.
|
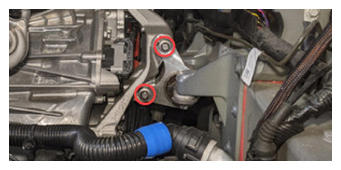
- Remove the bolts (x2) that attach the LH clevis mount to the LH isolator mount.
 Courtesy of TESLA, INC. Courtesy of TESLA, INC.
|
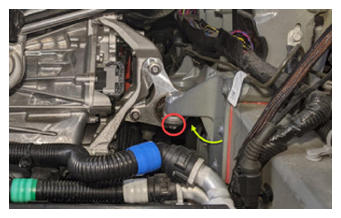
- Remove the bolts (x2) that attach the LH clevis mount to the LH frame rail.
NOTE:
Use a pry bar between the steering rack and front drive unit to help with bolt removal.
 Courtesy of TESLA, INC. Courtesy of TESLA, INC.
|
 Courtesy of TESLA, INC. Courtesy of TESLA, INC.
|
 Courtesy of TESLA, INC. Courtesy of TESLA, INC.
|
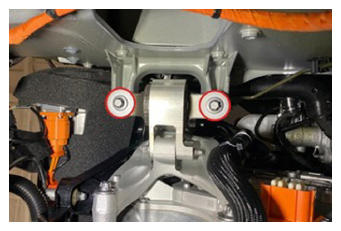
- Remove the bolts (x3) that attach the LH isolator mount to the front drive unit, and then remove the isolator mount from the drive unit.
 Courtesy of TESLA, INC. Courtesy of TESLA, INC.
|
 Courtesy of TESLA, INC. Courtesy of TESLA, INC.
|
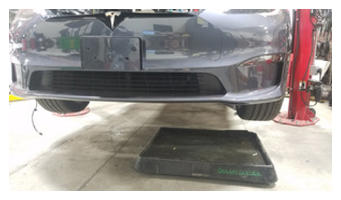
- Move a coolant catcher under the LH front of the vehicle.
 Courtesy of TESLA, INC. Courtesy of TESLA, INC.
|
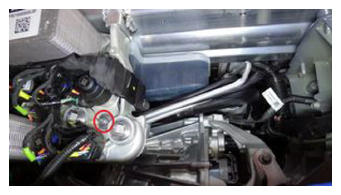
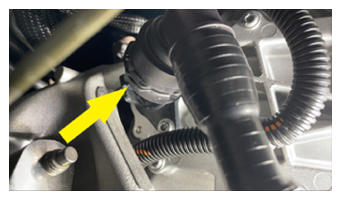
- Release the clip, disconnect the front drive unit inverter to heat exchanger hose from the front drive unit inverter outlet, and then immediately plug both fittings.
 Courtesy of TESLA, INC. Courtesy of TESLA, INC.
|
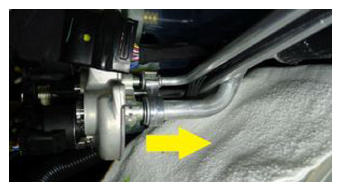
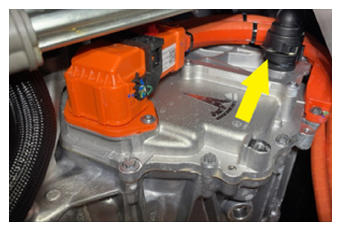
- Release the clip, disconnect the front drive unit inverter inlet hose from the front drive unit inverter, and then immediately plug both fittings.
 Courtesy of TESLA, INC. Courtesy of TESLA, INC.
|
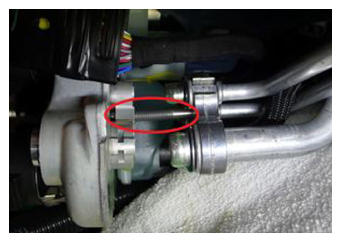
- Release the fir tree clip that attaches the front drive unit inverter inlet hose to the front drive unit inverter.
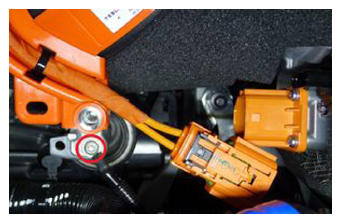
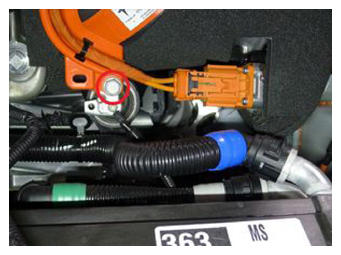
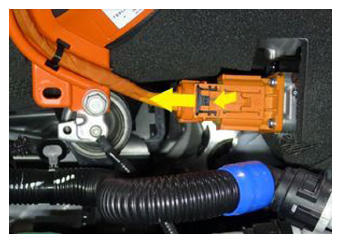
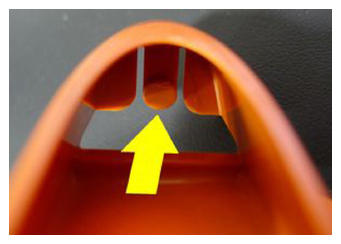
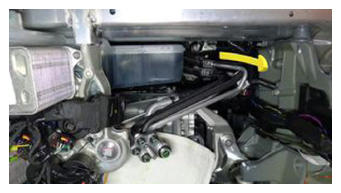
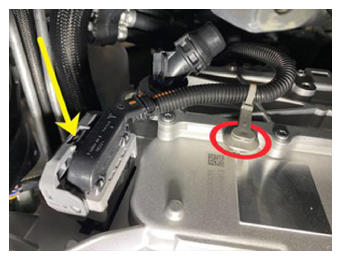
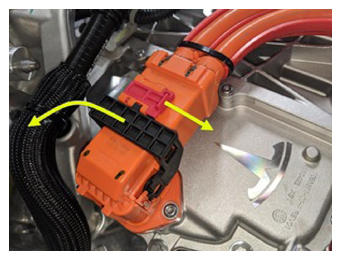
- Release the locking tab, push the handle downward, and then disconnect the front subframe electrical harness from the front drive unit inverter logic connector.
 Courtesy of TESLA, INC. Courtesy of TESLA, INC.
|
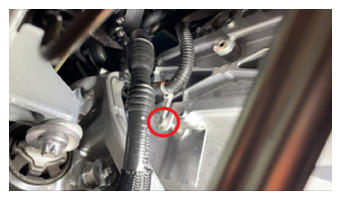
- Release the clip that attaches the front subframe electrical harness to the front drive unit inverter.
 Courtesy of TESLA, INC. Courtesy of TESLA, INC.
|
- Remove the bolt that attaches the front drive unit HV harness bracket to the front drive unit inverter.
 Courtesy of TESLA, INC. Courtesy of TESLA, INC.
|
- Slide the red locking tab, raise the black handle, disconnect the front drive unit HV harness from the front drive unit inverter HV header, and then set the HV harness aside.
 Courtesy of TESLA, INC. Courtesy of TESLA, INC.
|
 Courtesy of TESLA, INC. Courtesy of TESLA, INC.
|
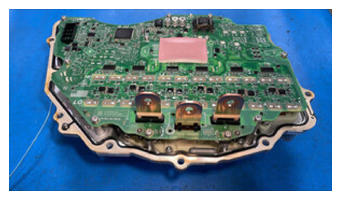
- Remove the brush clips (x2) that attach the front drive unit inverter cover to the front drive unit inverter, and then remove the cover from the inverter.
 Courtesy of TESLA, INC. Courtesy of TESLA, INC.
|
- Put on the ESD wrist strap and attach it to the front drive unit inverter housing.
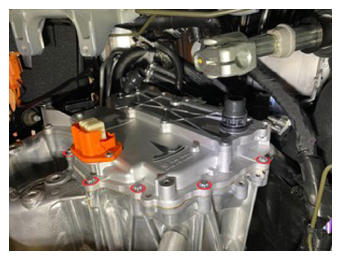
- Remove the bolts (x12) that attach the front drive unit inverter to the front drive unit gearbox.
 Courtesy of TESLA, INC. Courtesy of TESLA, INC.
|
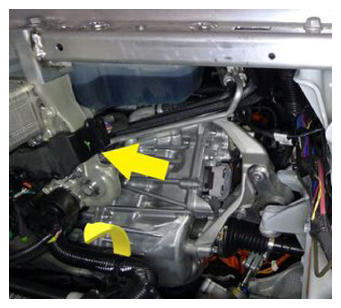
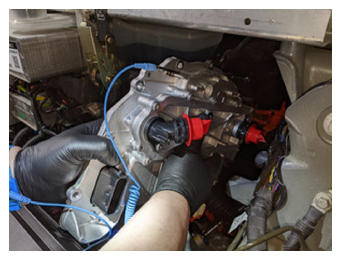
- Carefully remove the front drive unit inverter from the front drive unit gearbox, and move the inverter up and out between the fan module and the multi-system beam.
CAUTION:
Take care not to damage the inverter circuit board when removing the inverter.
 Courtesy of TESLA, INC. Courtesy of TESLA, INC.
|
- Remove the plugs from the inverter and drain the coolant.
- Remove and discard the bolt that attaches the 55 degree fluid coupling to the front drive unit inverter, remove the coupling from the inverter, and then set the coupling aside.
 Courtesy of TESLA, INC. Courtesy of TESLA, INC.
|
- Set the front drive unit inverter onto an ESD mat, and then remove the ESD wrist strap clip from the inverter housing.
 Courtesy of TESLA, INC. Courtesy of TESLA, INC.
|
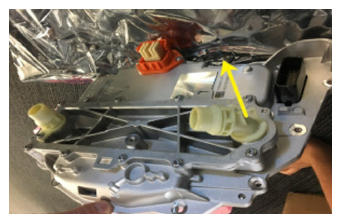
- Inspect the front drive unit gearbox housing to make sure that there is no gap pad stuck there. If there is, remove the gap pad, clean the area with an alcohol wipe, and allow at least one minute to dry.
NOTE:
Also inspect the gearbox housing and remove any dropped fasteners or loose debris.