Air Bag - Front Passenger's - Remove And Install: Installation
- Installation procedure is the reverse of removal, except for the following:
- Reinstalling the top pad requires two technicians: One technician presses down on the LH side of the top pad to secure the LH clips while the other technician presses down on the RH side to secure the RH clips. Working from the outer edges of the top pad inward, secure all the clips.
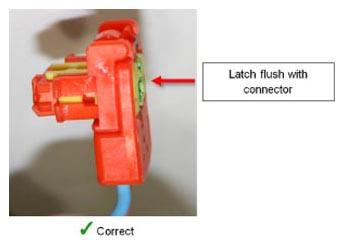
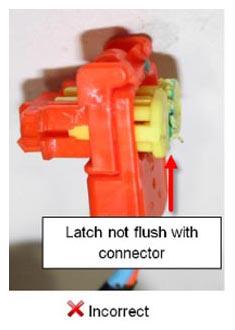
- After reconnecting each harness to the sides of the airbag, press in on the latch so that it is flush with the face of the connector. Gently try to pull the connector out again without releasing the latch to ensure that the connection is tight.
 Courtesy of TESLA, INC. Courtesy of TESLA, INC.
|
 Courtesy of TESLA, INC. Courtesy of TESLA, INC.
|
- Follow the proper glove box reinstallation procedure Glove Box (Remove And Replace)
.
- If the component was replaced due to an internal failure, use the Toolbox "DTCs" panel to read DTCs, and then clear all related DTCs.
- Connect a laptop with Toolbox 3 to the vehicle.
- Unlock the gateway. See Gateway Unlock
- In Toolbox 3, click the Tools
tab, type "DTC" into the search field, click DTCs
, and then select SDM or RCM depending on the Restraint Control Type of the vehicle.
- Click Read DTCs to display the DTCs.
- Click Clear DTCs to clear the DTCs.
- After all procedures are complete, sit in the driver's seat and press the brake pedal to turn on drive rails. Ensure that the airbag safety indicator light exhibits normal operation: The light displays for 5 seconds during vehicle startup, then turns off.