- Raise and support the vehicle on a 2 post lift. See RAISE VEHICLE - 2 POST LIFT
.
- Point the steering wheel towards the center, and then install the steering wheel holder on the steering wheel and secure the steering wheel from turning.
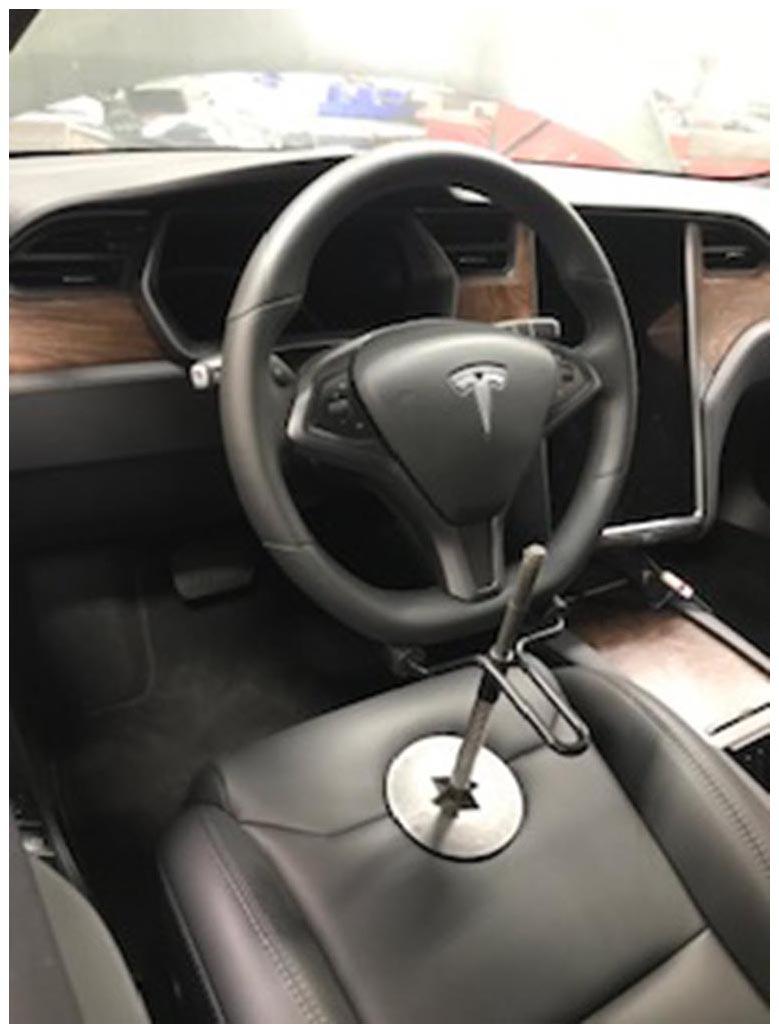 Courtesy of TESLA, INC. Courtesy of TESLA, INC.
|
- Remove the rear center underhood apron. See UNDERHOOD APRON - CENTER - REAR (REMOVE AND REPLACE)
.
- Remove the LH and RH underhood aprons. See UNDERHOOD APRON - LH (REMOVE AND REPLACE)
.
- Recover the A/C refrigerant. See A/C REFRIGERANT RECOVERY AND RECHARGE (REMOVE AND REPLACE)
.
NOTE:
Continue this procedure until the A/C refrigerant recovery is complete.
- Remove the underhood storage carpet. See CARPET - UNDERHOOD STORAGE (REMOVE AND INSTALL)
.
- Remove the underhood storage unit. See UNDERHOOD STORAGE UNIT (REMOVE AND REPLACE)
.
- Remove the HEPA filter. See FILTER - HEPA (REMOVE AND REPLACE)
.
- Remove both wiper arms. See WIPER ARM - LH (REMOVE AND REPLACE)
.
- Remove the cowl screen panel. See PANEL - COWL SCREEN (REMOVE AND REPLACE)
.
- Remove the HEPA filter duct. See DUCT - HEPA FILTER (REMOVE AND REPLACE)
.
- Disconnect 12V power. See DISCONNECT 12V POWER
.
- Remove the front aero shield. See PANEL - AERO SHIELD - FRONT (REMOVE AND REPLACE)
.
- Remove the mid aero shield. See PANEL - AERO SHIELD - MID (REMOVE AND REPLACE)
.
- Remove the HV battery. See HV BATTERY (AWD) (REMOVE AND INSTALL)
.
- Remove the 12V auxiliary battery cage. See CAGE - BATTERY - AUXILIARY - 12V (REMOVE AND REPLACE)
.
- Remove the wiper motor assembly. See WIPER MOTOR ASSEMBLY (REMOVE AND REPLACE)
.
- Remove the compressor. See COMPRESSOR (REMOVE AND REPLACE)
.
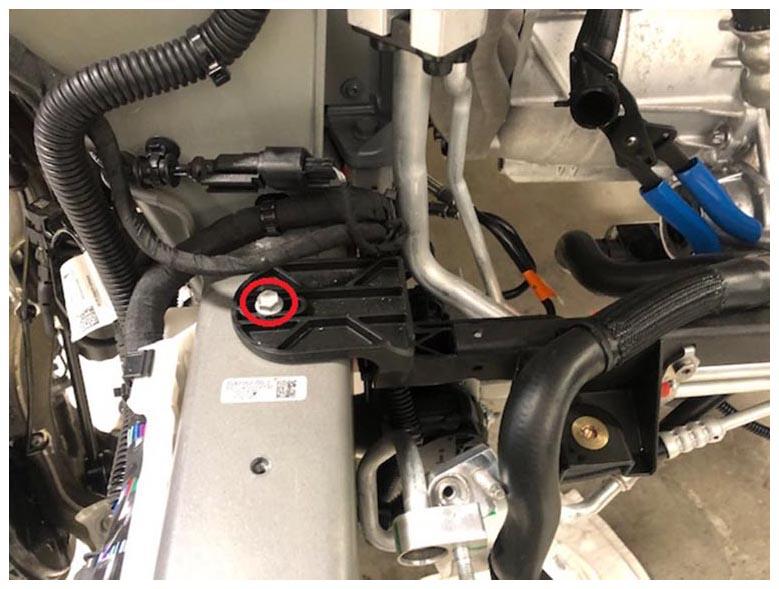
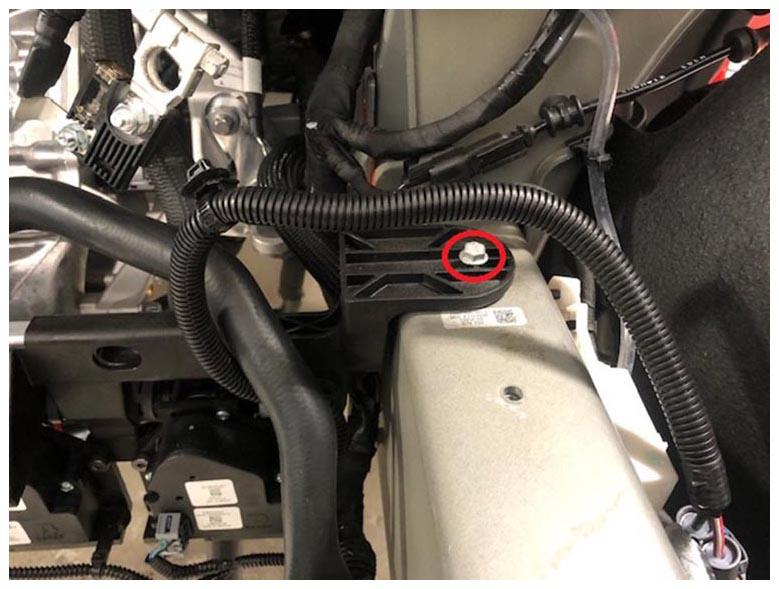
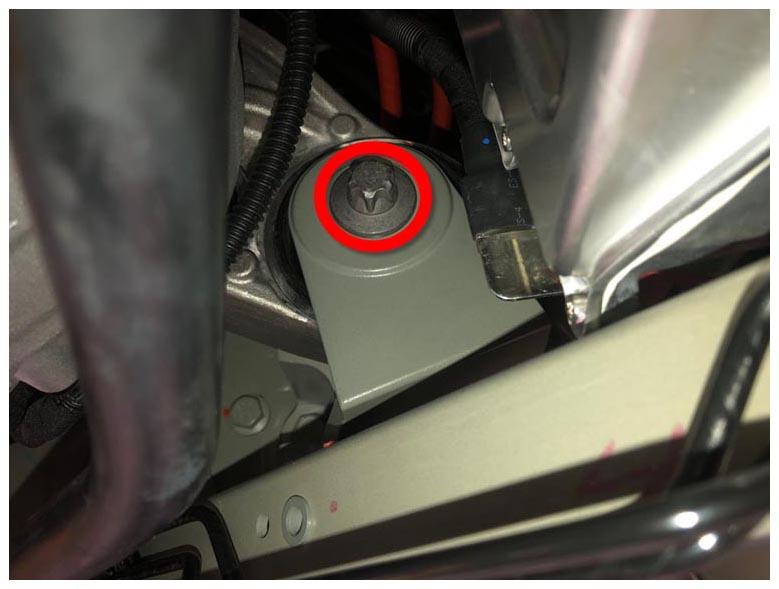
- Remove the upper bolt that attaches the LH side isolator mount to the front drive unit (torque 38 N.m).
 Courtesy of TESLA, INC. Courtesy of TESLA, INC.
|
- Remove the edge clip that attaches the front drive unit electrical harness to the connector bracket.
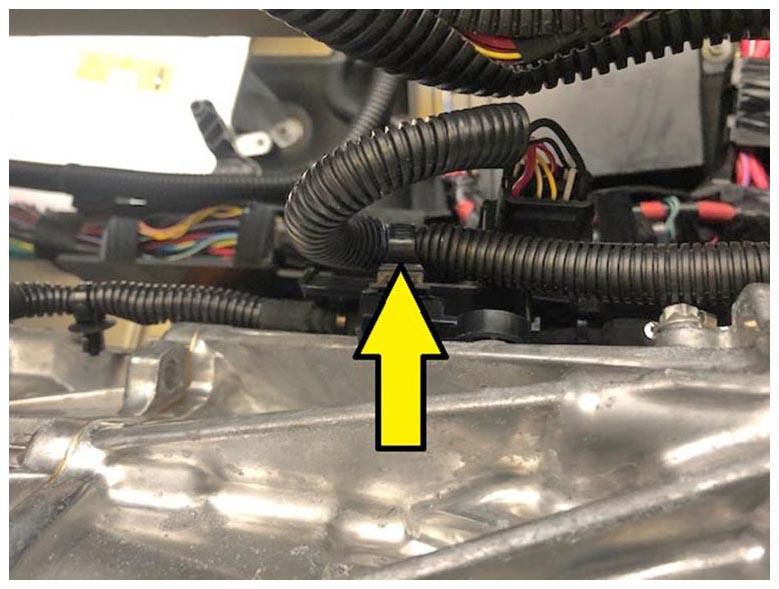 Courtesy of TESLA, INC. Courtesy of TESLA, INC.
|
- Disconnect the front drive unit electrical connector, and then set the harness aside.
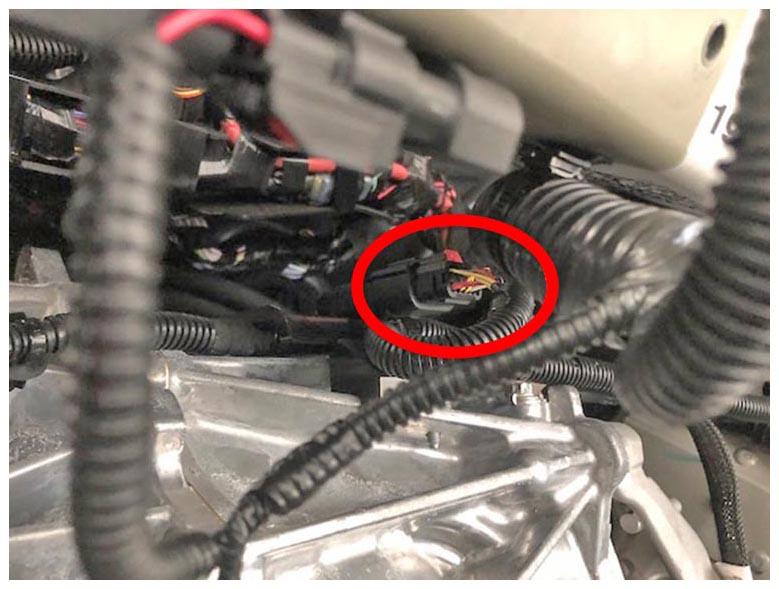 Courtesy of TESLA, INC. Courtesy of TESLA, INC.
|
- Disconnect the ground strap from the left side of the body (torque 9 N.m).
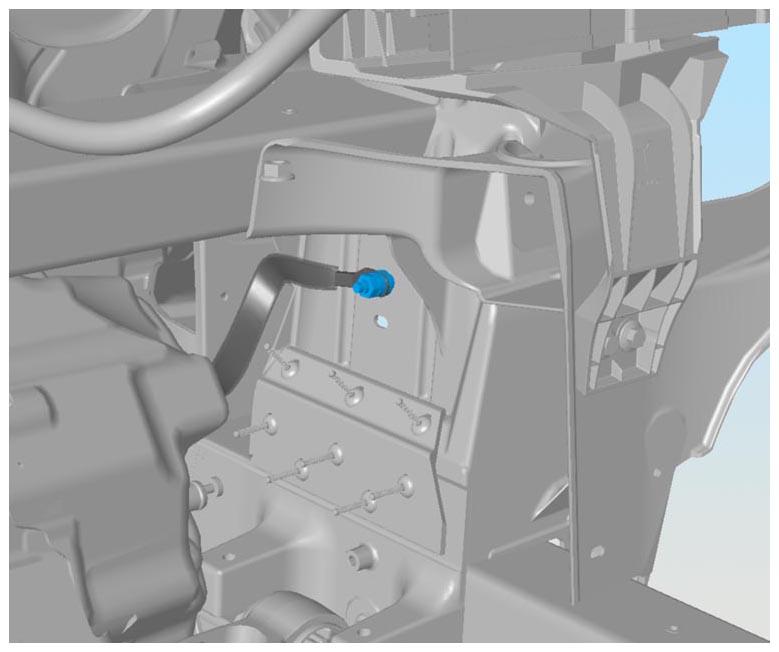 Courtesy of TESLA, INC. Courtesy of TESLA, INC.
|
- Remove the LH and RH front wheel center caps from the vehicles using a suction cup clamp.
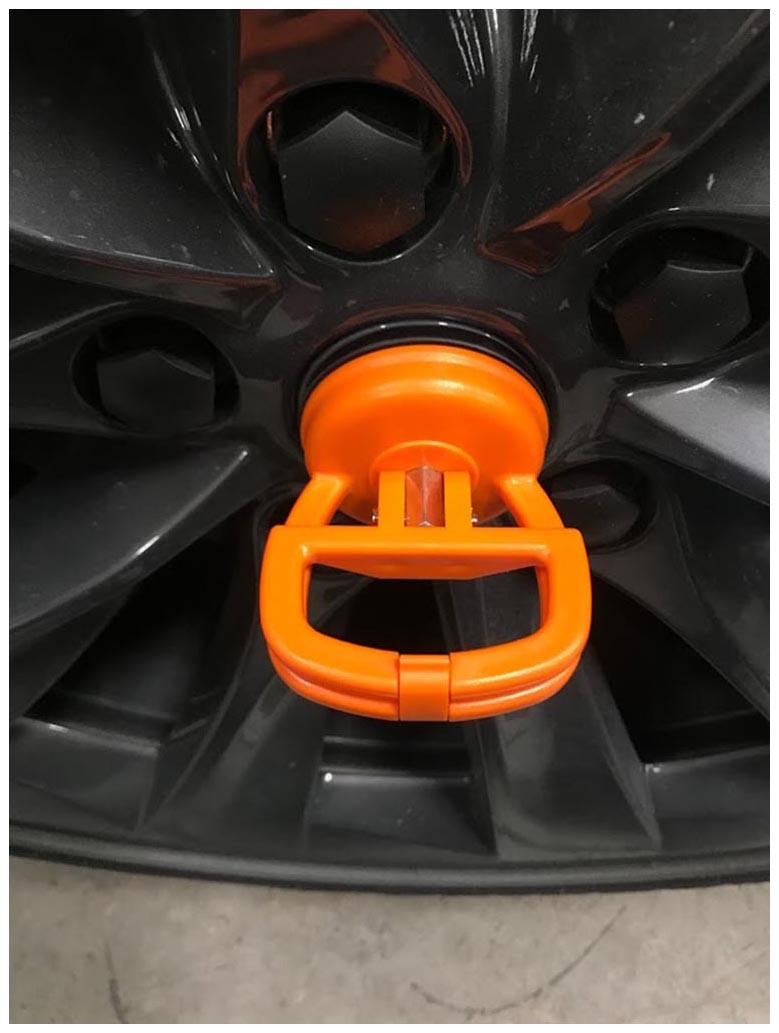 Courtesy of TESLA, INC. Courtesy of TESLA, INC.
|
- Loosen the LH and RH front axle nuts, but do not remove them yet (torque 245 N.m).
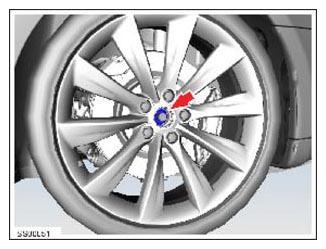 Courtesy of TESLA, INC. Courtesy of TESLA, INC.
|
- Remove the LH and RH front lug nut covers from the front wheels using the wheel nut cover removal tool.
 Courtesy of TESLA, INC. Courtesy of TESLA, INC.
|
- Loosen the LH and RH front lug nuts (torque 175 N.m).
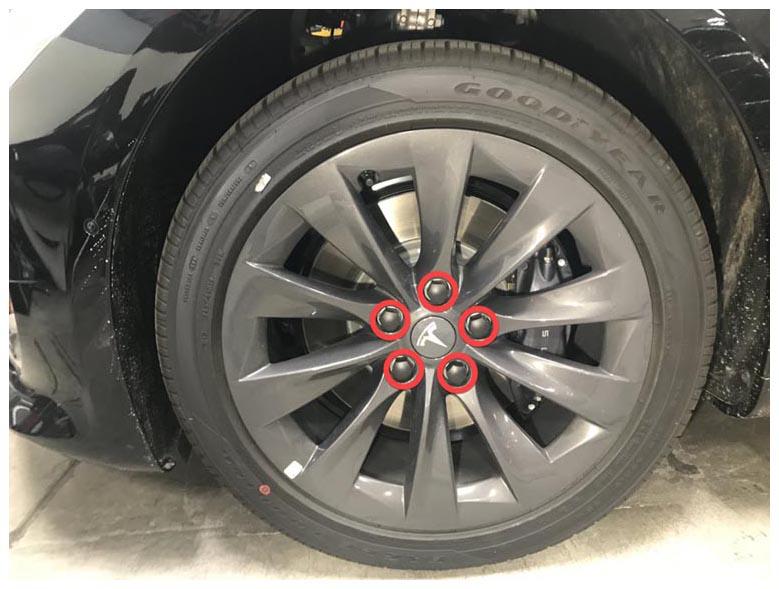 Courtesy of TESLA, INC. Courtesy of TESLA, INC.
|
- Remove the LH and RH front fender garnishes. See GARNISH - FENDER - FRONT - LH (REMOVE AND REPLACE)
.
- Remove the front fascia assembly. See FASCIA ASSEMBLY - FRONT (REMOVE AND INSTALL)
.
- Remove the center active louver. See ACTIVE LOUVER - CENTER (REMOVE AND REPLACE)
.
- Remove the cooling fan module. See COOLING FAN MODULE (REMOVE AND INSTALL)
.
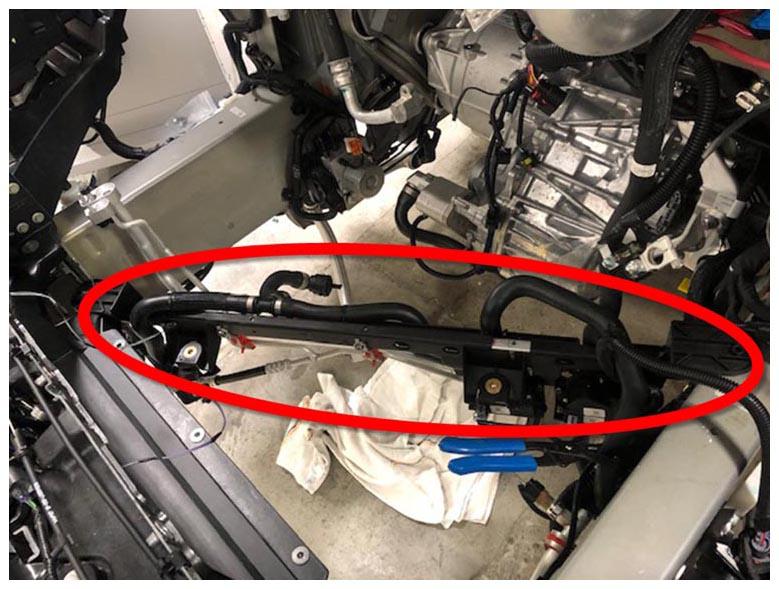
- Remove the bolts (x2) that attach the support beam to the body (torque 9 N.m).
 Courtesy of TESLA, INC. Courtesy of TESLA, INC.
|
 Courtesy of TESLA, INC. Courtesy of TESLA, INC.
|
- Position the thermal beam away from the front drive unit.
 Courtesy of TESLA, INC. Courtesy of TESLA, INC.
|
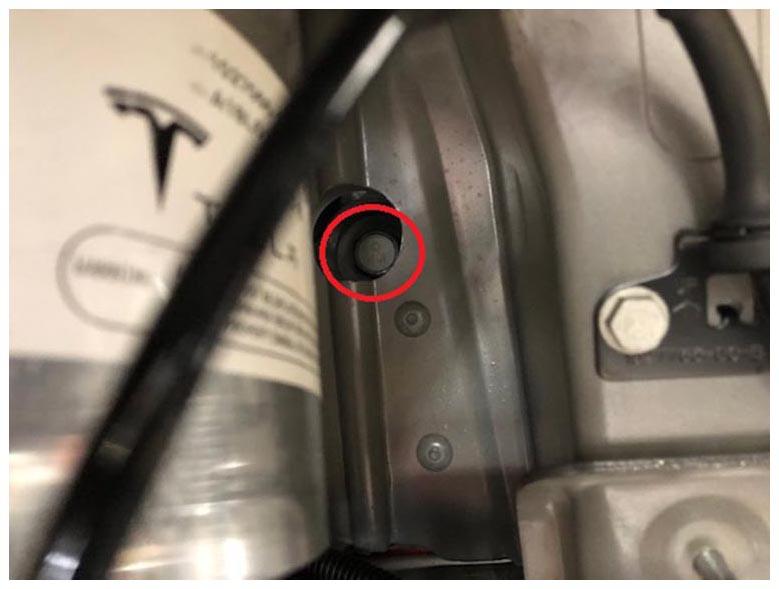
- Remove the bolt that attaches the RH front drive unit mount to the body (torque 120 N.m).
 Courtesy of TESLA, INC. Courtesy of TESLA, INC.
|
- Remove the bolt that attaches the front drive unit HV harness to the front drive unit (torque 10 N.m).
 Courtesy of TESLA, INC. Courtesy of TESLA, INC.
|
- Remove the 2nd generation front subframe assembly. See SUBFRAME ASSEMBLY - FRONT - 2ND GENERATION (REMOVE AND INSTALL)
.
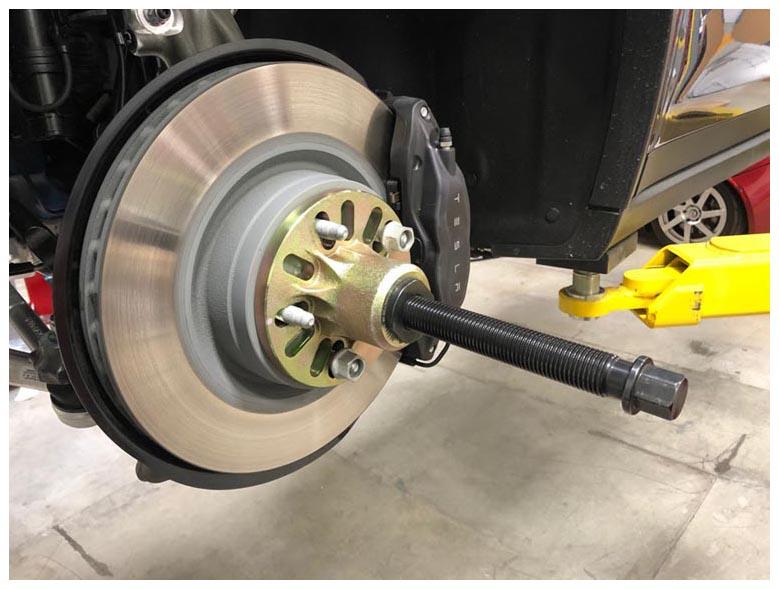
- Install the hydraulic hub puller on the LH front brake rotor using 2 lug nuts and 2 hydraulic hub puller washers.
 Courtesy of TESLA, INC. Courtesy of TESLA, INC.
|
- Separate the halfshaft from the hub splines using the hydraulic hub puller, and then remove the puller from the hub.
 Courtesy of TESLA, INC. Courtesy of TESLA, INC.
|
- Remove the halfshaft from the hub.
- Install the axle removal tool around the inner joint of the halfshaft.
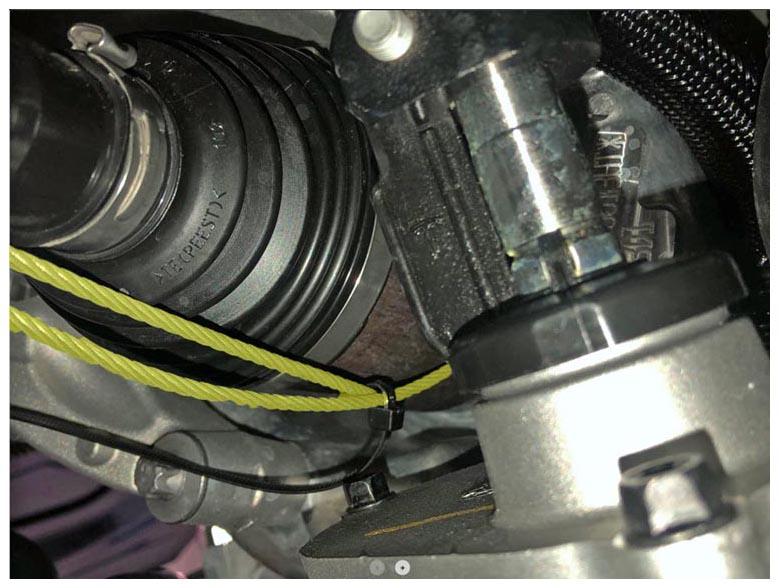 Courtesy of TESLA, INC. Courtesy of TESLA, INC.
|
NOTE:
Use a cable tie to secure the axle removal tool in place.
 Courtesy of TESLA, INC. Courtesy of TESLA, INC.
|
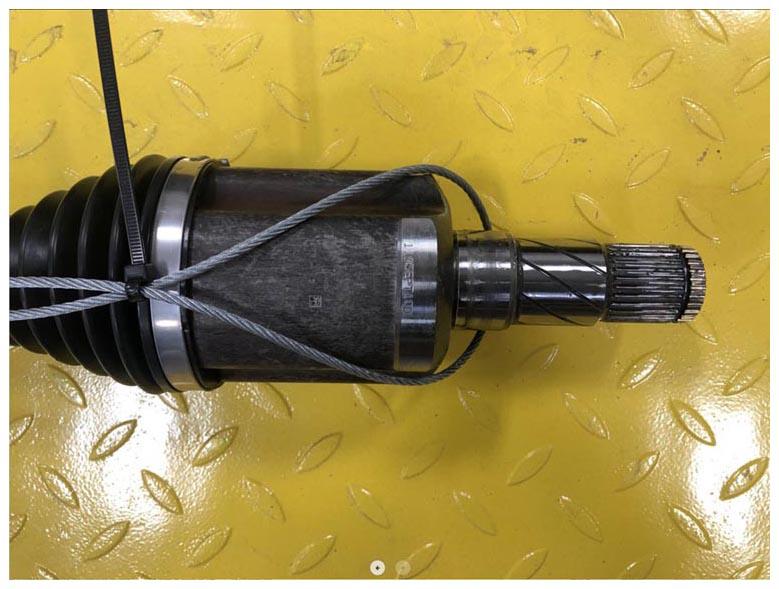
- Remove the halfshaft from the front drive unit using the axle removal tool, and then remove the halfshaft from the vehicle.
- Repeat step 33 - 37 on the RH halfshaft.
- Disconnect the brake lines between the ABS modulator and the master cylinder (torque 23 N.m), and then move the brake lines aside.
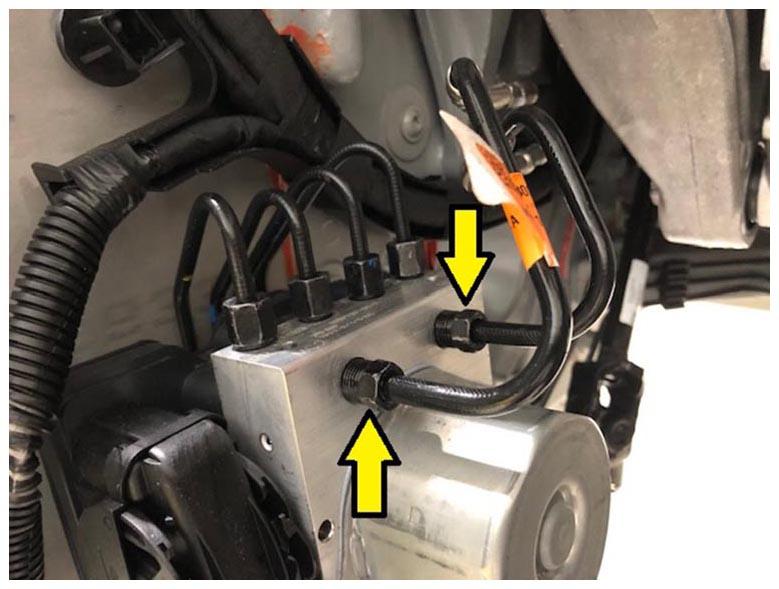 Courtesy of TESLA, INC. Courtesy of TESLA, INC.
|
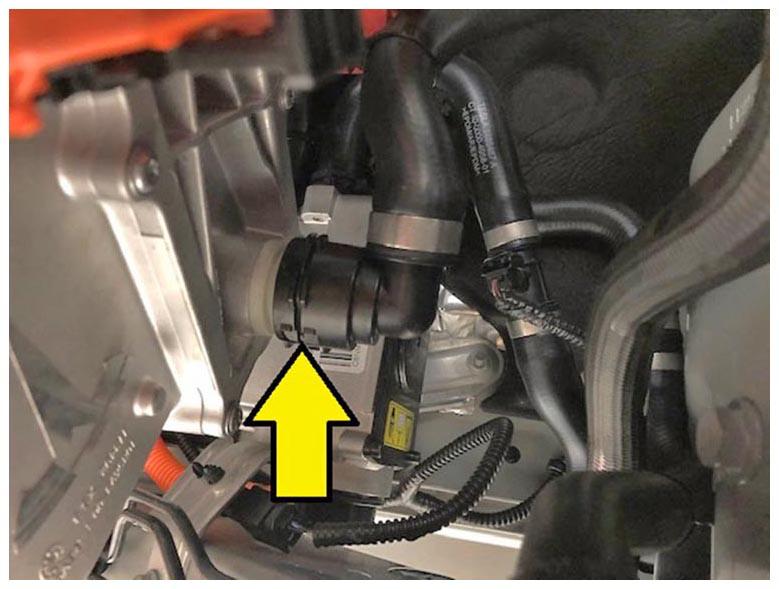
- Remove the spring clip, and then disconnect the lower coolant hose from the front drive unit heat exchanger. Plug both the heat exchanger and the hose using plugs from the coolant hose plug kit.
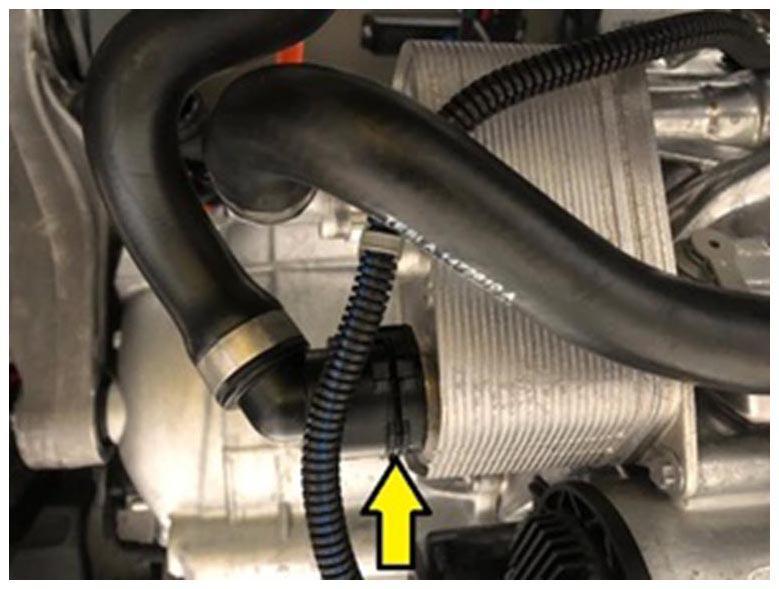 Courtesy of TESLA, INC. Courtesy of TESLA, INC.
|
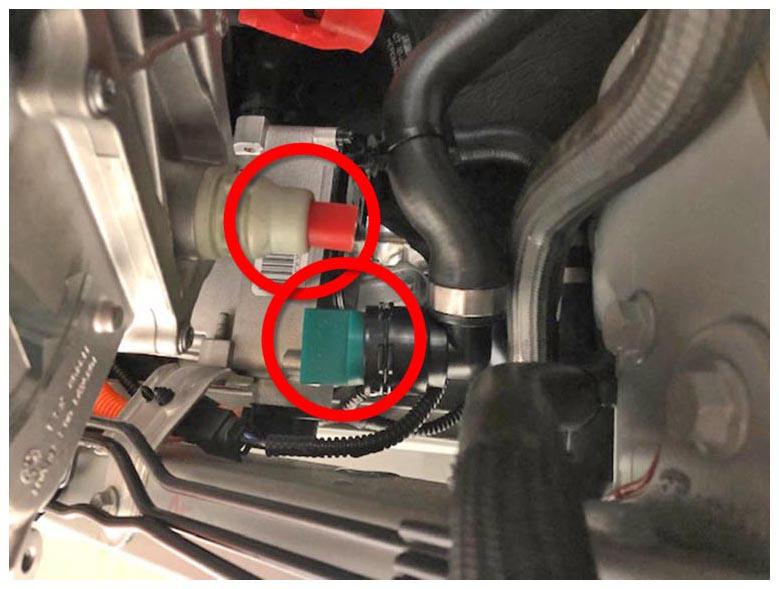
- Remove the spring clip, and then disconnect the inverter outlet coolant hose. Plug the hose using a plug from the coolant hose plug kit.
 Courtesy of TESLA, INC. Courtesy of TESLA, INC.
|
 Courtesy of TESLA, INC. Courtesy of TESLA, INC.
|
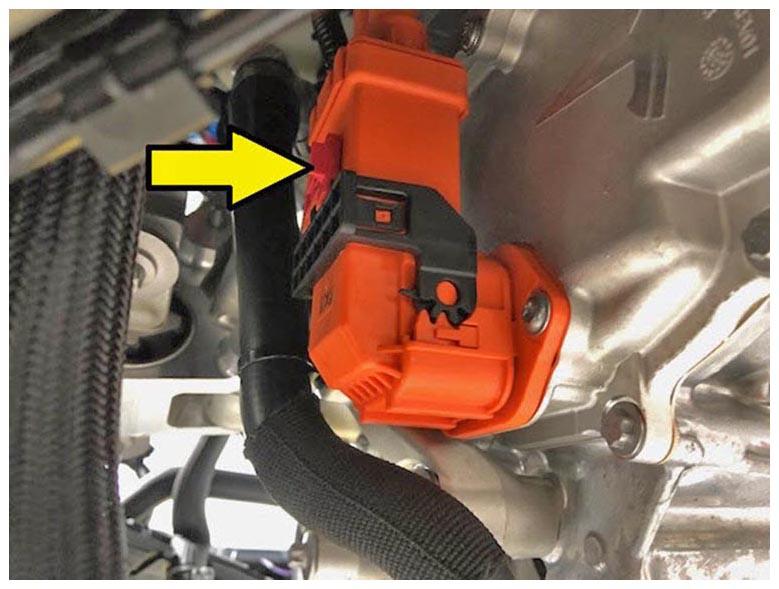
- Slide the release to unlock the tab, and then rotate the release lever up to disengage the front drive unit HV harness connector.
CAUTION:
Dot not force the release lever up.
NOTE:
Make sure the alignment tabs on the front drive unit header are not damaged.
 Courtesy of TESLA, INC. Courtesy of TESLA, INC.
|
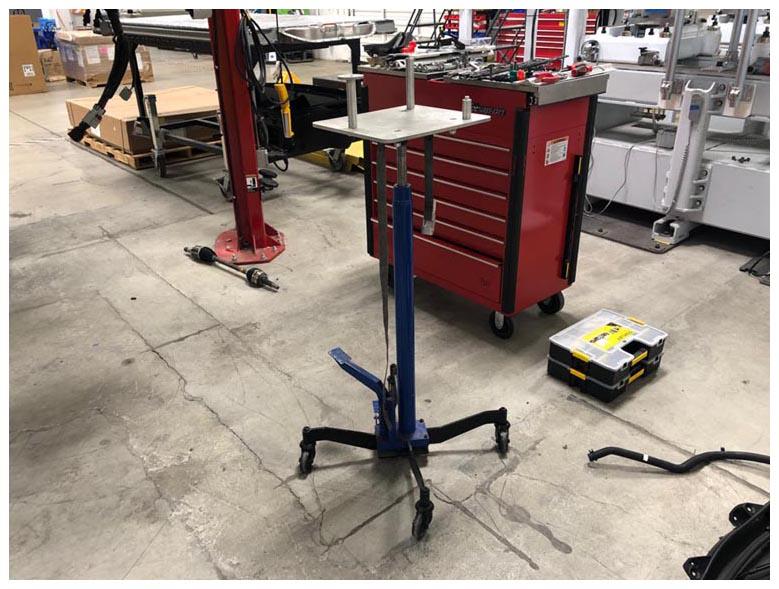
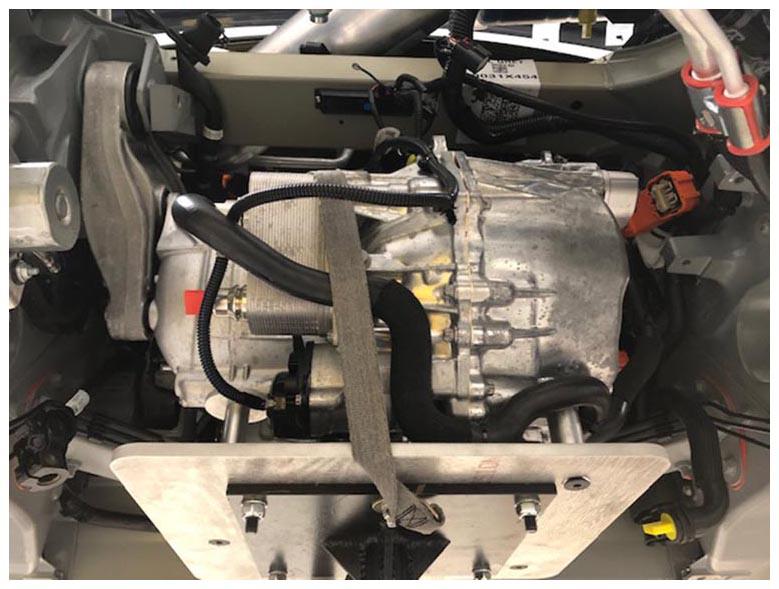
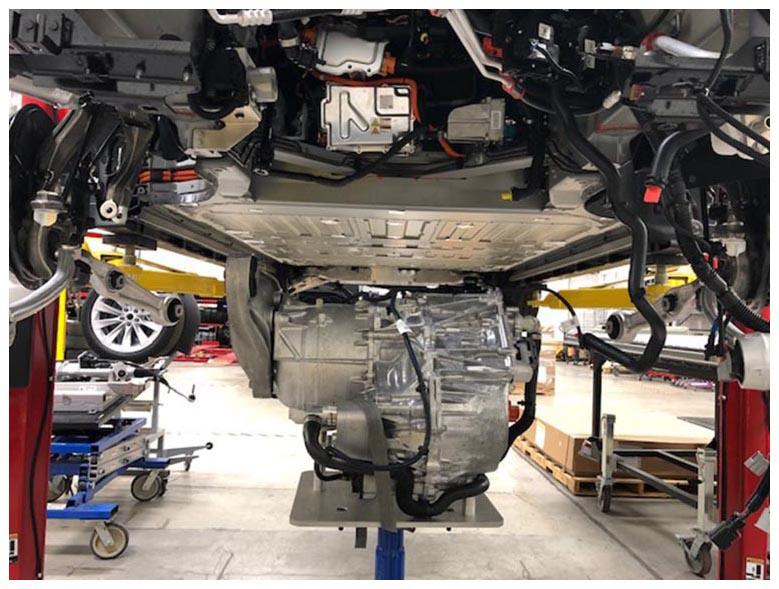
- Position the front drive unit stand and underhoist stand under the vehicle.
 Courtesy of TESLA, INC. Courtesy of TESLA, INC.
|
- Using the front drive unit stand and transmission jack, support the weight of the front drive unit.
NOTE:
Make sure that the front drive unit adapter engages the recesses in the front drive unit itself and it is also strapped to the motor stand adapter to prevent movement.
 Courtesy of TESLA, INC. Courtesy of TESLA, INC.
|
- Remove the bolts (x2) that attach the clevis mount to the body (torque 65 N.m).
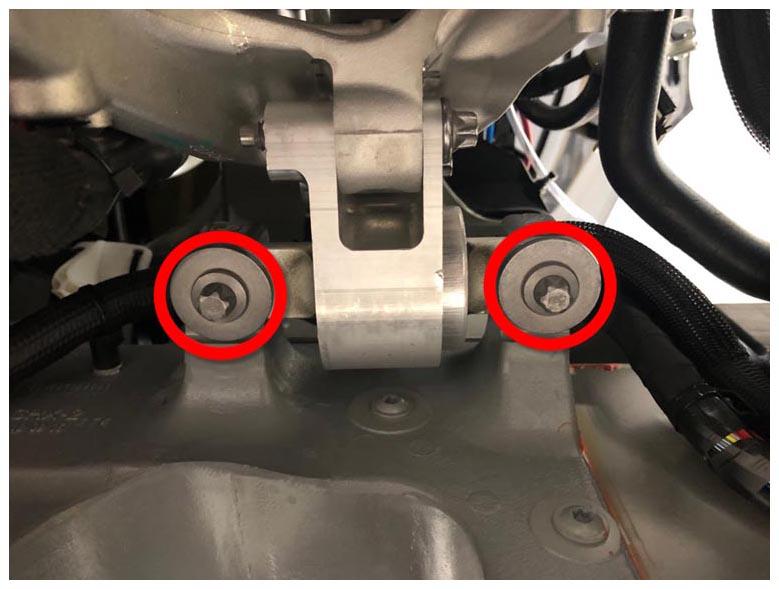 Courtesy of TESLA, INC. Courtesy of TESLA, INC.
|
- Remove the bolts (x2) that attach the clevis mount to the isolator mount (torque 92 N.m).
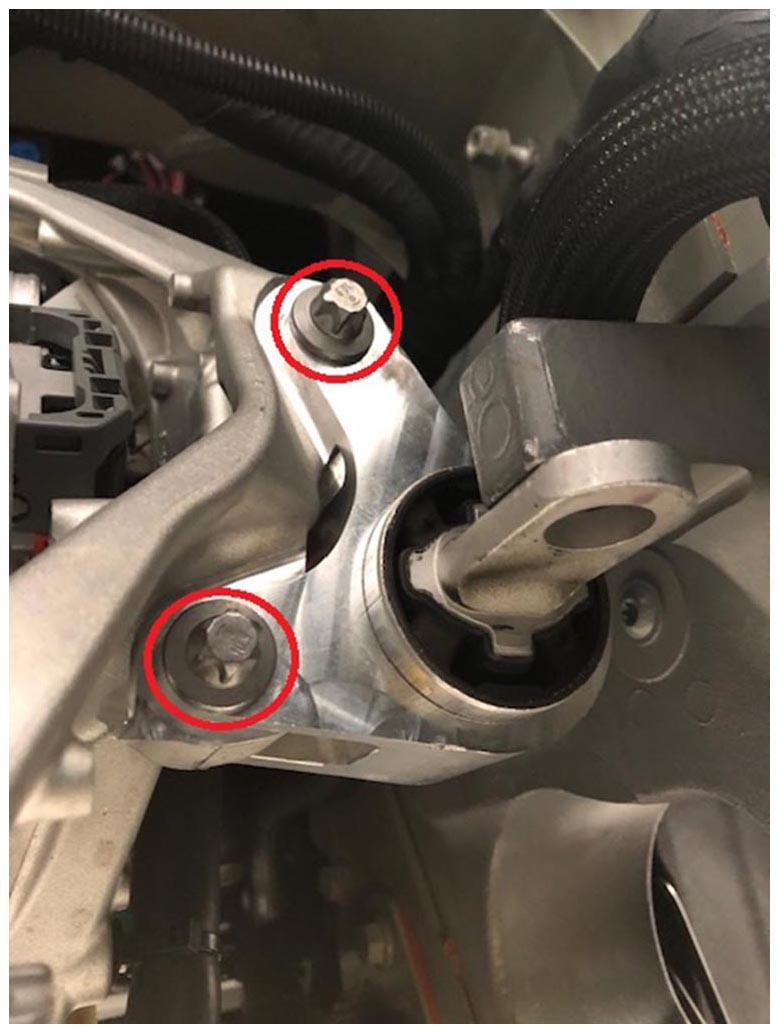 Courtesy of TESLA, INC. Courtesy of TESLA, INC.
|
- Remove the bolts (x2) that attach the isolator mount to the front drive unit (torque 38 N.m), and then remove the isolator mount from the front drive unit.
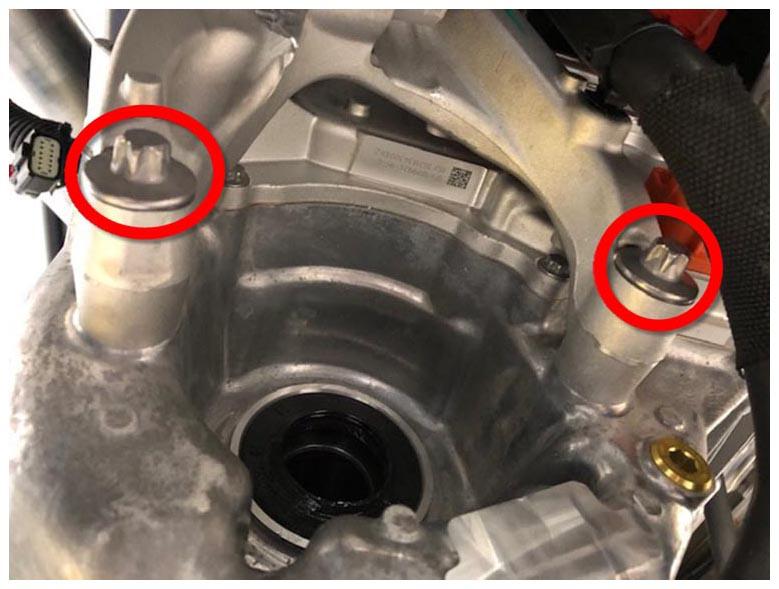 Courtesy of TESLA, INC. Courtesy of TESLA, INC.
|
- Remove the rear lower bolt that attaches the RH side of the front drive unit mount to the body (torque 120 N.m).
 Courtesy of TESLA, INC. Courtesy of TESLA, INC.
|
- Remove the front drive unit from the vehicle.
NOTE:
Make sure not to damage the ABS modulator and brake lines during the removal of the front drive unit.
NOTE:
Manipulate the front drive unit to clear the ABS modulator and the body side mount brackets.
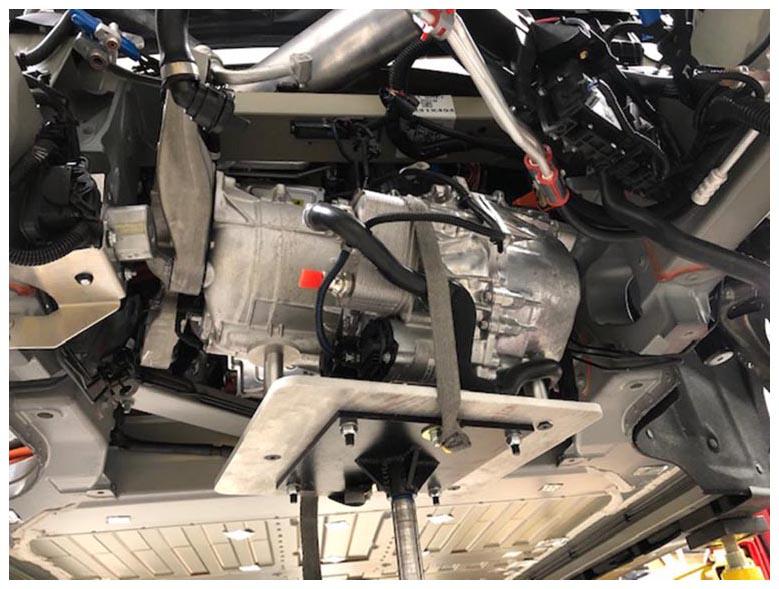 Courtesy of TESLA, INC. Courtesy of TESLA, INC.
|
 Courtesy of TESLA, INC. Courtesy of TESLA, INC.
|