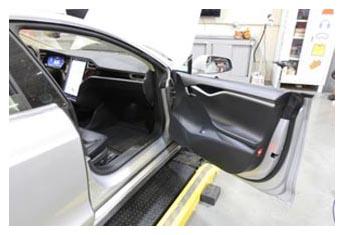
- Open RH front door
 Courtesy of TESLA, INC. Courtesy of TESLA, INC.
|
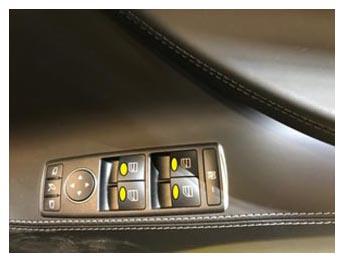
- Lower front windows
 Courtesy of TESLA, INC. Courtesy of TESLA, INC.
|
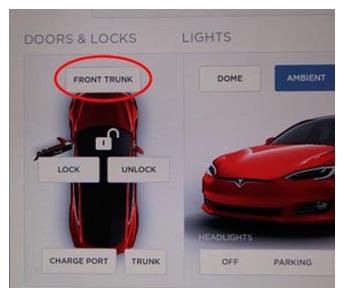
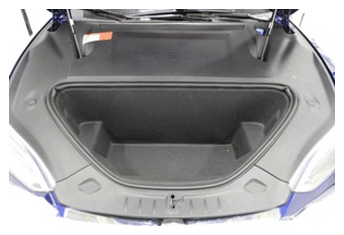
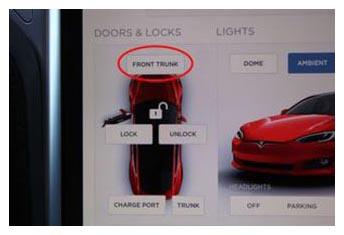
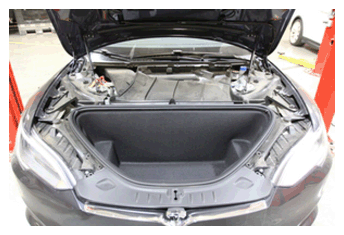
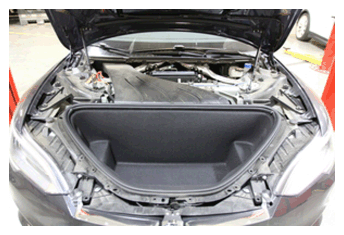
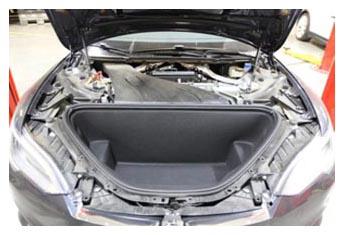
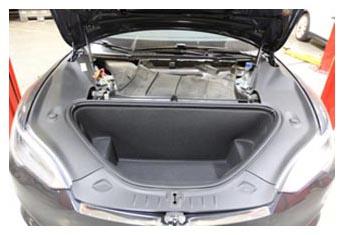
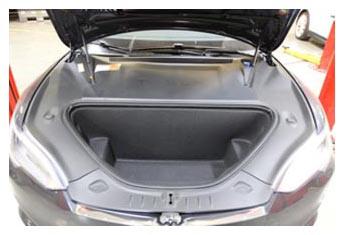
- Open hood
NOTE:
Using MCU touchscreen > Controls > Frunk Trunk
 Courtesy of TESLA, INC. Courtesy of TESLA, INC.
|
 Courtesy of TESLA, INC. Courtesy of TESLA, INC.
|
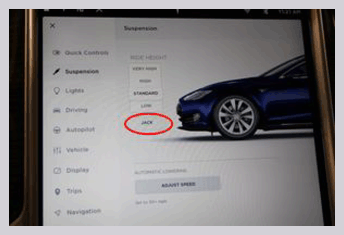
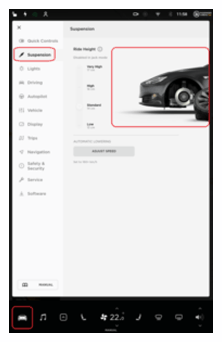
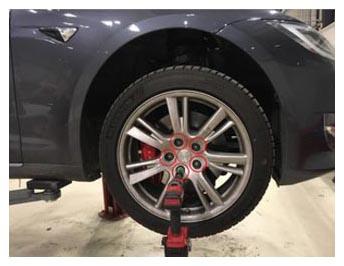
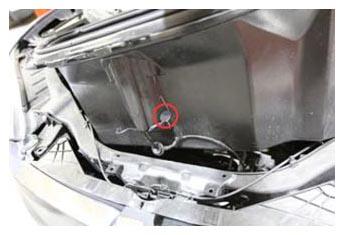
- Place air suspension into "Jack Mode"
NOTE:
Controls > Suspension > Jack mode
 Courtesy of TESLA, INC. Courtesy of TESLA, INC.
|
- Center steering wheel and install steering wheel holder
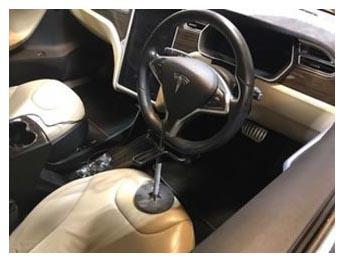 Courtesy of TESLA, INC. Courtesy of TESLA, INC.
|
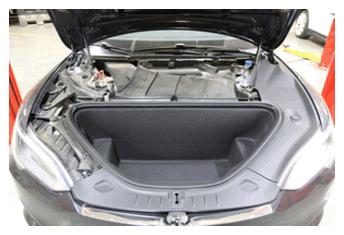
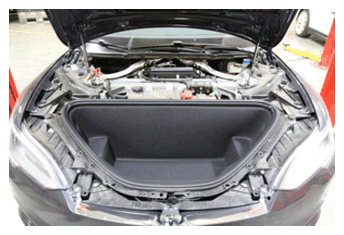
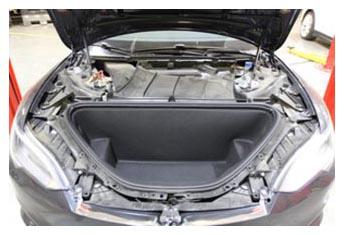
- Open hood
NOTE:
Using MCU touchscreen > Controls > Frunk Trunk
 Courtesy of TESLA, INC. Courtesy of TESLA, INC.
|
 Courtesy of TESLA, INC. Courtesy of TESLA, INC.
|
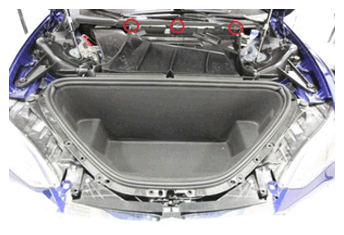
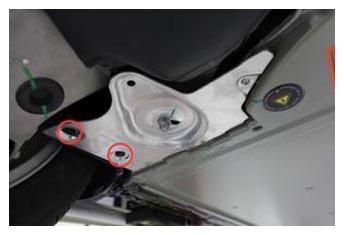
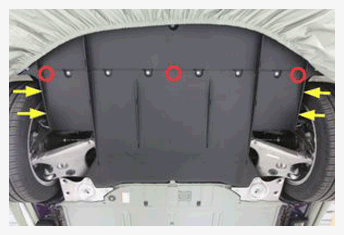
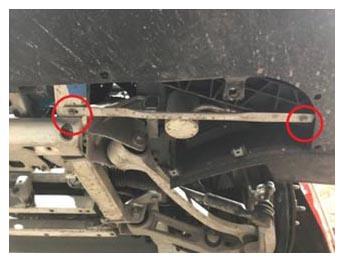
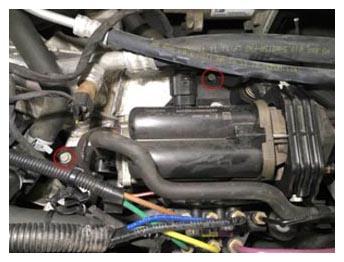
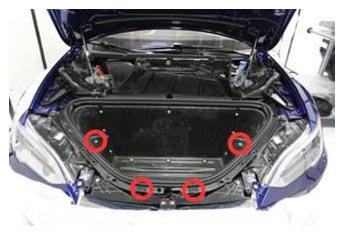
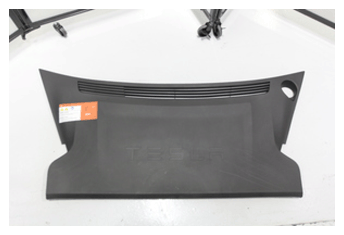
- Remove rear underhood apron
NOTE:
8x clips
 Courtesy of TESLA, INC. Courtesy of TESLA, INC.
|
 Courtesy of TESLA, INC. Courtesy of TESLA, INC.
|
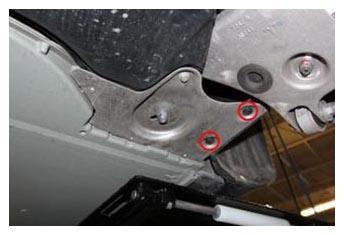
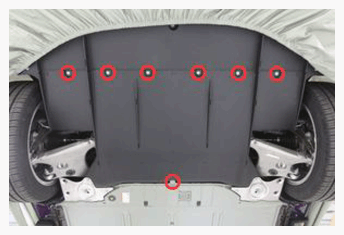
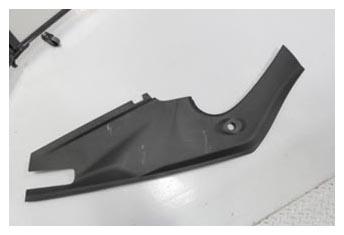
- Remove LH underhood apron
NOTE:
9x clips
 Courtesy of TESLA, INC. Courtesy of TESLA, INC.
|
 Courtesy of TESLA, INC. Courtesy of TESLA, INC.
|
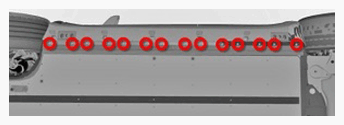
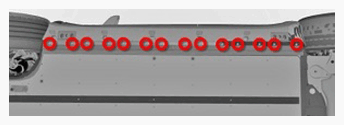
- Remove RH underhood apron
NOTE:
9x clips
 Courtesy of TESLA, INC. Courtesy of TESLA, INC.
|
 Courtesy of TESLA, INC. Courtesy of TESLA, INC.
|
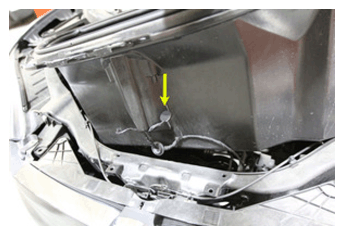
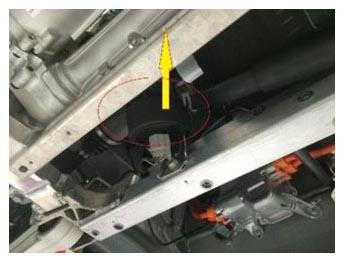
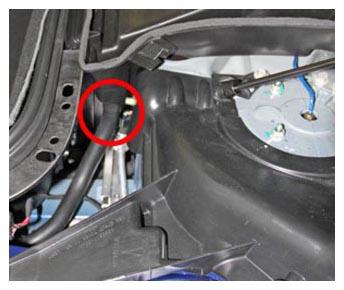
- Release drainage hoses from HEPA filter inlet duct
NOTE:
2x hoses
 Courtesy of TESLA, INC. Courtesy of TESLA, INC.
|
 Courtesy of TESLA, INC. Courtesy of TESLA, INC.
|
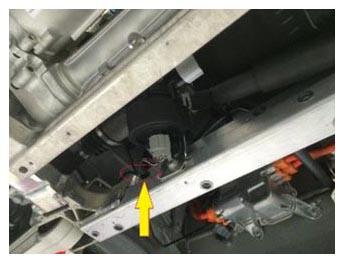
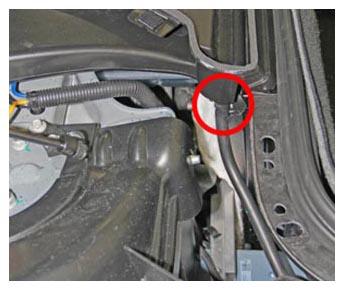
- Remove clips securing HEPA filter inlet duct to cowl panel
NOTE:
3x push clips
 Courtesy of TESLA, INC. Courtesy of TESLA, INC.
|
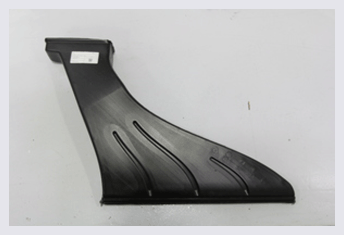
- Remove HEPA filter inlet duct
NOTE:
2x clips on HEPA filter
 Courtesy of TESLA, INC. Courtesy of TESLA, INC.
|
 Courtesy of TESLA, INC. Courtesy of TESLA, INC.
|
- Remove HEPA filter outlet duct from vehicle
NOTE:
Lift up, pull towards front of vehicle, then rotate clockwise
 Courtesy of TESLA, INC. Courtesy of TESLA, INC.
|
 Courtesy of TESLA, INC. Courtesy of TESLA, INC.
|
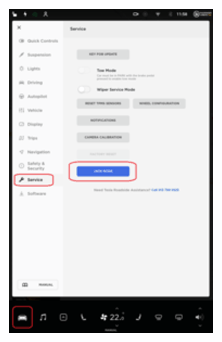
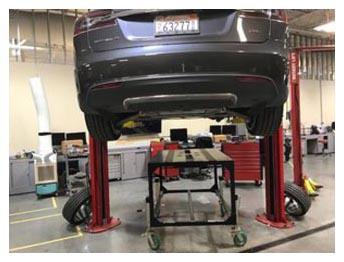
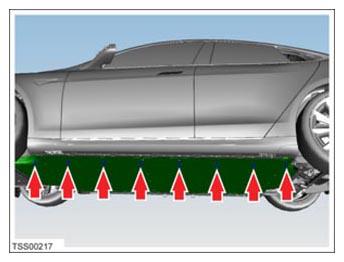
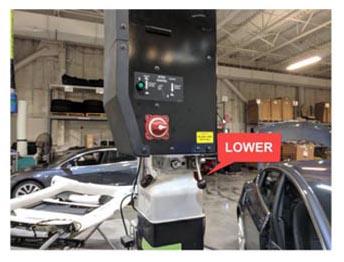
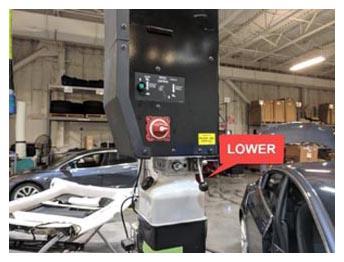
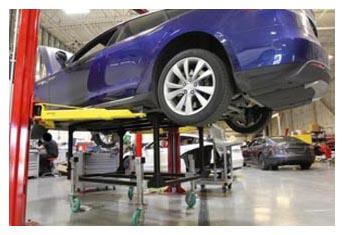
- Raise and support vehicle
NOTE:
Set air suspension to "Jack Mode" if equipped Via Controls > "Service"
 Courtesy of TESLA, INC. Courtesy of TESLA, INC.
|
 Courtesy of TESLA, INC. Courtesy of TESLA, INC.
|
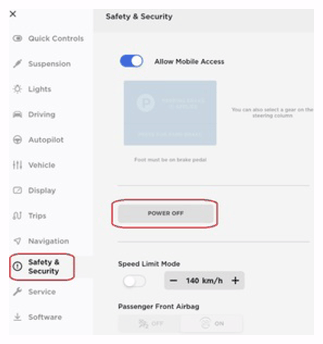
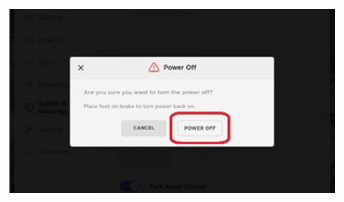
- Power down vehicle using MCU
NOTE:
Controls > Safety & Security > Power Off > "POWER OFF"
 Courtesy of TESLA, INC. Courtesy of TESLA, INC.
|
 Courtesy of TESLA, INC. Courtesy of TESLA, INC.
|
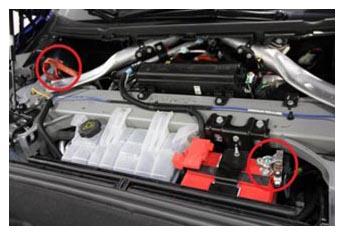
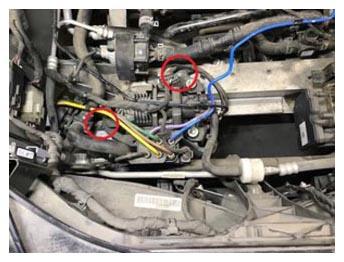
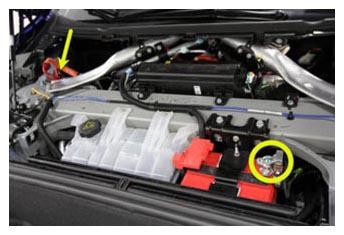
- Disconnect 12V negative terminal and First Responder Loop
NOTE:
1x nut, 10 mm, 5 N.m, 1x connector, Wait at least 2 minutes before disconnecting modules or HV components
 Courtesy of TESLA, INC. Courtesy of TESLA, INC.
|
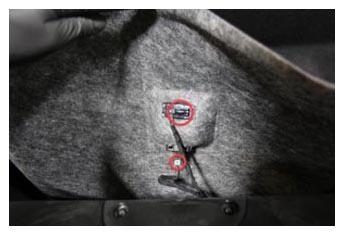
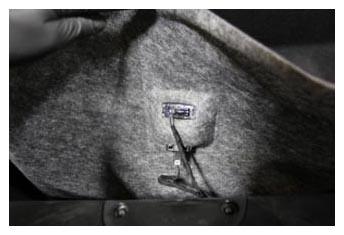
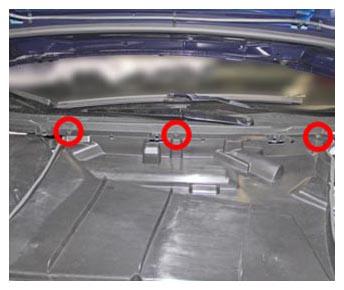
- Disconnect light and release switch connectors and remove underhood storage carpet
NOTE:
2x connectors, Release edge of carpet from underneath underhood storage unit seal
 Courtesy of TESLA, INC. Courtesy of TESLA, INC.
|
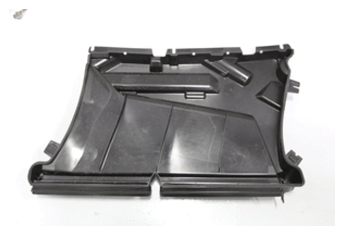
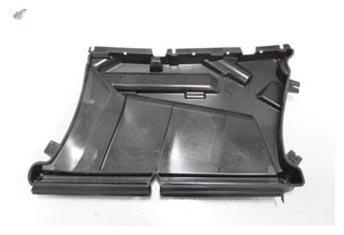
- Remove underhood storage unit
NOTE:
2x bolts, 10 mm, 7 N.m, 2x push clips
 Courtesy of TESLA, INC. Courtesy of TESLA, INC.
|
- Push wiring harness grommet through underhood storage unit and remove
NOTE:
1x grommet
 Courtesy of TESLA, INC. Courtesy of TESLA, INC.
|
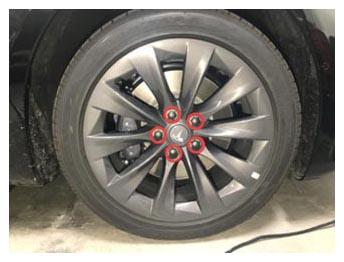
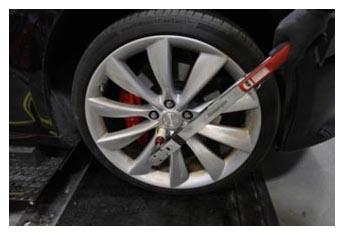
- Remove lug nut covers from LH front wheel
NOTE:
5x covers
 Courtesy of TESLA, INC. Courtesy of TESLA, INC.
|
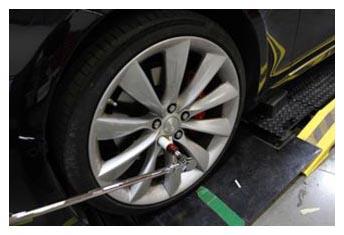
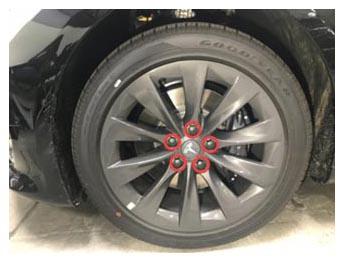
- Loosen LH front wheel
NOTE:
5x nuts, 21 mm, 175 N.m
 Courtesy of TESLA, INC. Courtesy of TESLA, INC.
|
- Remove lug nut covers from RH front wheel
NOTE:
5x covers
 Courtesy of TESLA, INC. Courtesy of TESLA, INC.
|
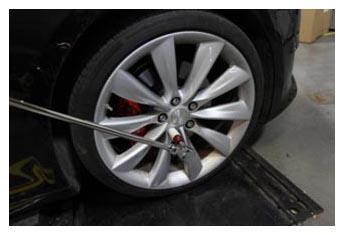
- Loosen RH front wheel
NOTE:
5x nuts, 21 mm, 175 N.m
 Courtesy of TESLA, INC. Courtesy of TESLA, INC.
|
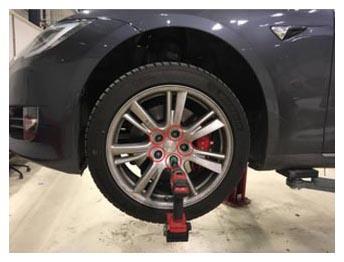
- Raise vehicle partially and lower onto locks
NOTE:
Set vehicle to comfortable working height, Make sure there's an audible click of the locks on both sides before lowering, otherwise vehicle may tilt to the side
 Courtesy of TESLA, INC. Courtesy of TESLA, INC.
|
 Courtesy of TESLA, INC. Courtesy of TESLA, INC.
|
- Remove LH front wheel
NOTE:
5x nuts, 21 mm, 175 N.m
 Courtesy of TESLA, INC. Courtesy of TESLA, INC.
|
- Remove RH front wheel
NOTE:
5x nuts, 21 mm, 175 N.m
 Courtesy of TESLA, INC. Courtesy of TESLA, INC.
|
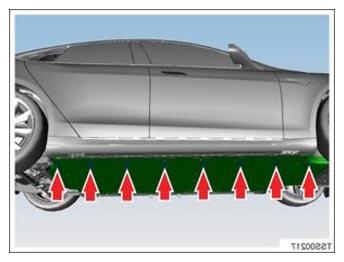
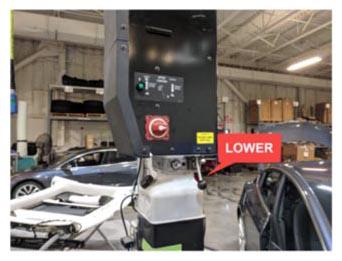
- Raise vehicle fully and lower lift onto locks
NOTE:
Set vehicle to comfortable working height, Make sure there's an audible click of the locks on both sides before lowering, otherwise vehicle may tilt to the side
 Courtesy of TESLA, INC. Courtesy of TESLA, INC.
|
 Courtesy of TESLA, INC. Courtesy of TESLA, INC.
|
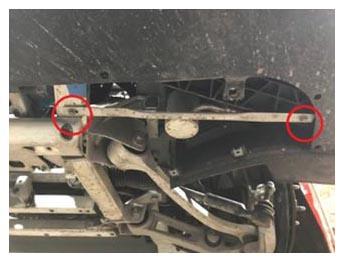
- Remove clips securing LH shear plate to wheel fairing
NOTE:
2x push clips
 Courtesy of TESLA, INC. Courtesy of TESLA, INC.
|
- Remove LH shear plate
NOTE:
1x nyloc nut, 15 mm, 35 N.m, 3x screws, T25, 6 N.m, 1x bolt, 10 mm, 4 N.m, Discard nyloc nut after removal
 Courtesy of TESLA, INC. Courtesy of TESLA, INC.
|
- Remove clips securing RH shear plate to wheel fairing
NOTE:
2x push clips
 Courtesy of TESLA, INC. Courtesy of TESLA, INC.
|
- Remove RH shear plate
NOTE:
1x nyloc nut, 15 mm, 35 N.m, 3x screws, T25, 6 N.m, 1x bolt, 10 mm, 4 N.m, Discard nyloc nut after removal
 Courtesy of TESLA, INC. Courtesy of TESLA, INC.
|
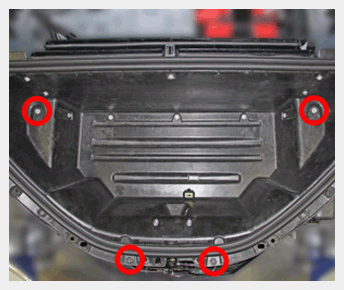
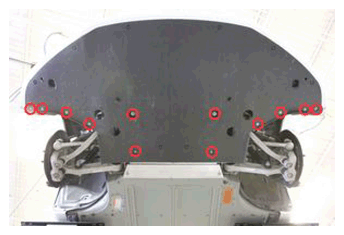
- Remove clips securing mid aero shield to vehicle
NOTE:
7x push clips
 Courtesy of TESLA, INC. Courtesy of TESLA, INC.
|
- Remove bolts securing mid aero shield to vehicle
NOTE:
7x bolts, 10 mm, 4 N.m
 Courtesy of TESLA, INC. Courtesy of TESLA, INC.
|
- Remove ski side covers on RH side
NOTE:
14x clips, 3x covers
 Courtesy of TESLA, INC. Courtesy of TESLA, INC.
|
- Remove ski side covers on LH side
NOTE:
14x clips, 3x covers
 Courtesy of TESLA, INC. Courtesy of TESLA, INC.
|
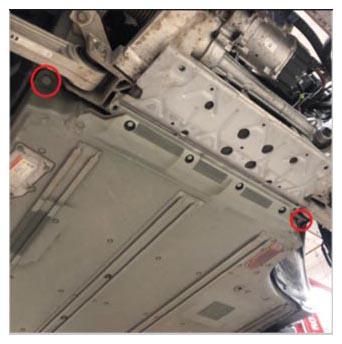
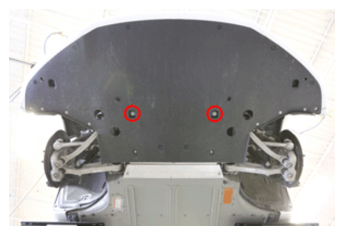
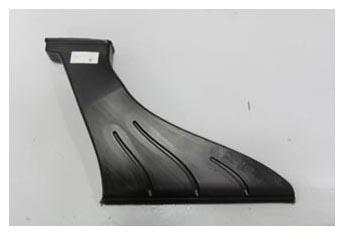
- Remove front lower bash plate extrusion
NOTE:
2x bolts, T30, 16 N.m
 Courtesy of TESLA, INC. Courtesy of TESLA, INC.
|
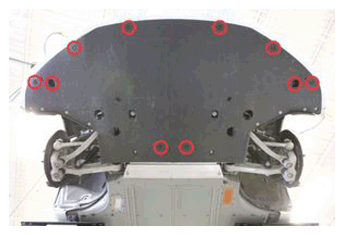
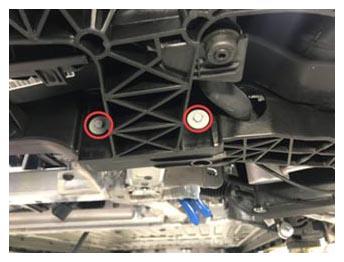
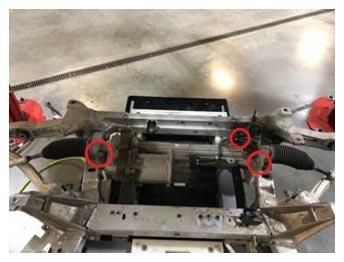
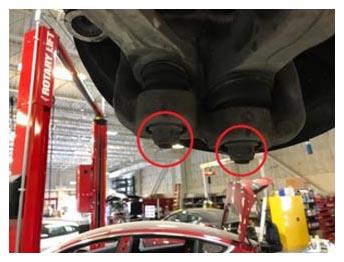
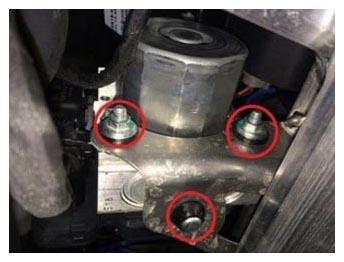
- Remove four center bolts securing HV battery
NOTE:
4x patch bolts, E12, 38 N.m, Discard after removal
 Courtesy of TESLA, INC. Courtesy of TESLA, INC.
|
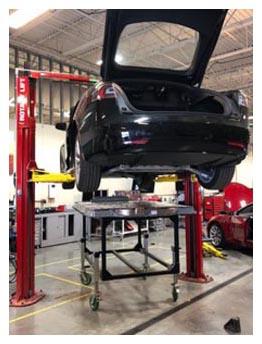
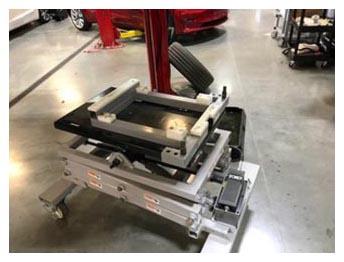
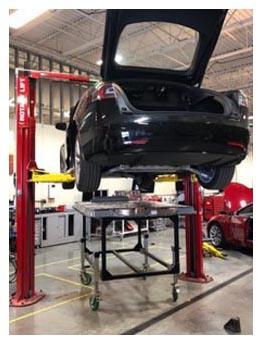
- Position battery table beneath vehicle
 Courtesy of TESLA, INC. Courtesy of TESLA, INC.
|
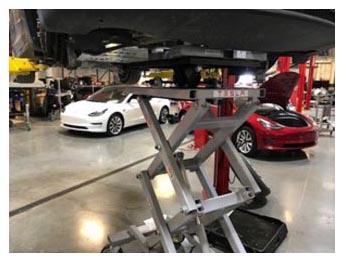
- Lower vehicle to table
NOTE:
Recommend assistance, Align table to vehicle and raise casters to level table if necessary
 Courtesy of TESLA, INC. Courtesy of TESLA, INC.
|
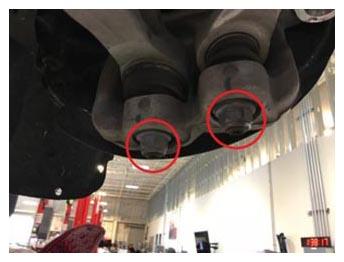
- Remove remaining eight center bolts securing HV battery
NOTE:
8x patch bolts, E12, 38 N.m, Discard after removal
 Courtesy of TESLA, INC. Courtesy of TESLA, INC.
|
- Remove front four HV battery bolts
NOTE:
4x patch bolts, 13 mm, 30 N.m, Discard after removal
 Courtesy of TESLA, INC. Courtesy of TESLA, INC.
|
- Remove 21 mm bolts securing front of HV battery
NOTE:
2x bolts, 21 mm, 115 N.m, Discard after removal
 Courtesy of TESLA, INC. Courtesy of TESLA, INC.
|
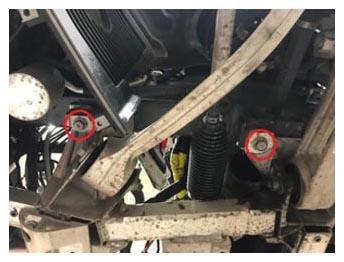
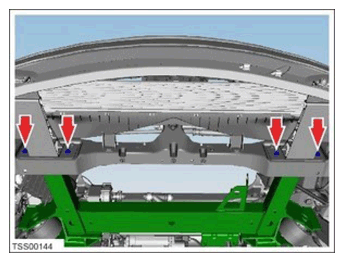
- Remove LH rocker bolts
NOTE:
8x patch bolts, 13 mm, 55 N.m, Discard after removal
 Courtesy of TESLA, INC. Courtesy of TESLA, INC.
|
- Remove RH rocker bolts
NOTE:
8x patch bolts, 13 mm, 55 N.m, Discard after removal
 Courtesy of TESLA, INC. Courtesy of TESLA, INC.
|
- Raise vehicle off of HV battery
 Courtesy of TESLA, INC. Courtesy of TESLA, INC.
|
- Move battery away from vehicle
 Courtesy of TESLA, INC. Courtesy of TESLA, INC.
|
- Remove all items from pockets and ensure not wearing metal items
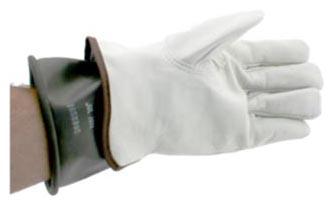
- Inspect HV insulating gloves
NOTE:
Check gloves for damage prior to use, Refer to service document TN-15-92-003, for information on inspecting HV gloves, https://service.teslamotors.com/documents?model=&keys=TN-15-92-003&vehicle_system=&sort_by=field_date_submitted&sort_order=DESC
 Courtesy of TESLA, INC. Courtesy of TESLA, INC.
|
- Put on HV insulating gloves and leather over gloves
 Courtesy of TESLA, INC. Courtesy of TESLA, INC.
|
- Check voltage on HV rapid mate
NOTE:
B+ to ground, B- to ground, and B+ to B-, If any voltage reading is more than 10V, the pack contactors are not fully opened, Contact Engineering for support
 Courtesy of TESLA, INC. Courtesy of TESLA, INC.
|
- Cover the high voltage connector with a HV Rapid Mate cover, and the low voltage connector with a LV Rapid Mate cover
NOTE:
If these covers are not available, cover the Rapid Mate connectors with masking tape to prevent debris from falling in
 Courtesy of TESLA, INC. Courtesy of TESLA, INC.
|
- Remove clips securing front aero shield to vehicle
NOTE:
10x push clips
 Courtesy of TESLA, INC. Courtesy of TESLA, INC.
|
- Remove bolts securing front aero shield to vehicle and remove
NOTE:
12x bolts, 10 mm, 4 N.m
 Courtesy of TESLA, INC. Courtesy of TESLA, INC.
|
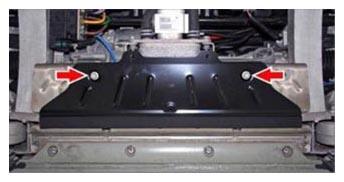
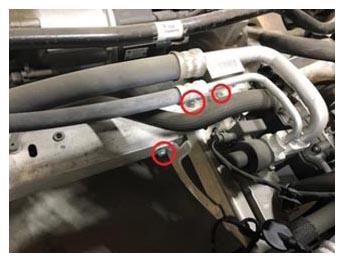
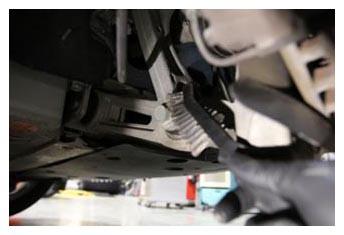
- Remove the bolts securing the bash plate stamping and skid plate to the front subframe skid plate
NOTE:
2x bolts, 10 mm, 9 N.m
 Courtesy of TESLA, INC. Courtesy of TESLA, INC.
|
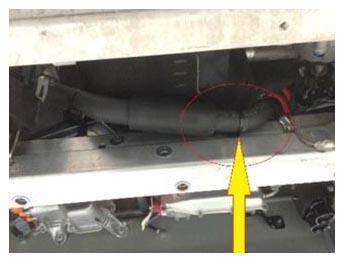
- Remove clip that secures the coolant pump 2 hose to the subframe
NOTE:
1x clip
 Courtesy of TESLA, INC. Courtesy of TESLA, INC.
|
- Remove PT coolant pump 2 harness clip from front subframe
NOTE:
1x clip
 Courtesy of TESLA, INC. Courtesy of TESLA, INC.
|
- Slide PT coolant pump 2 from front subframe
 Courtesy of TESLA, INC. Courtesy of TESLA, INC.
|
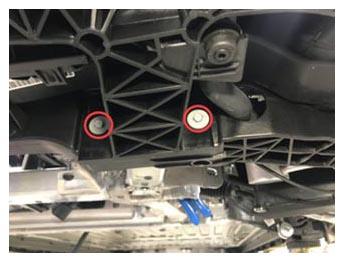
- Remove the LH stay bar
NOTE:
2x bolts, 10 mm, 11 N.m
 Courtesy of TESLA, INC. Courtesy of TESLA, INC.
|
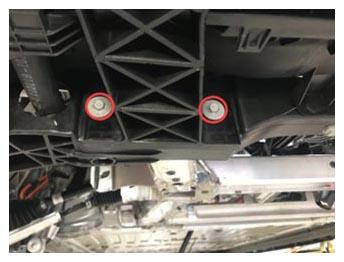
- Remove the RH stay bar
NOTE:
2x bolts, 10 mm, 11 N.m
 Courtesy of TESLA, INC. Courtesy of TESLA, INC.
|
- Remove skid bar from front subframe
NOTE:
4x bolts, 10 mm, 10 N.m
 Courtesy of TESLA, INC. Courtesy of TESLA, INC.
|
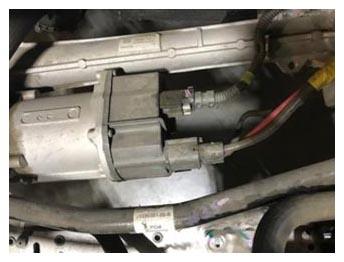
- Remove nuts holding ABS pump to subframe and release from rubber grommet
NOTE:
2x nuts, 10 mm, 9 N.m, 1 rubber grommet
 Courtesy of TESLA, INC. Courtesy of TESLA, INC.
|
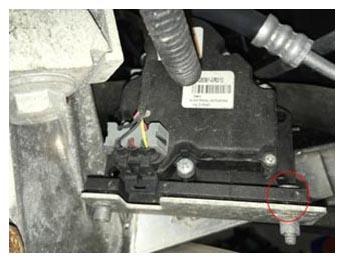
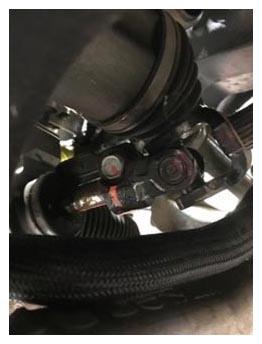
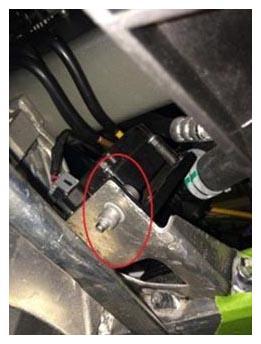
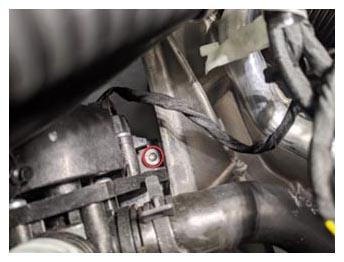
- Remove forward bolt securing RH 3-way valve to subframe bracket
NOTE:
1x bolts, T30, 5 N.m
 Courtesy of TESLA, INC. Courtesy of TESLA, INC.
|
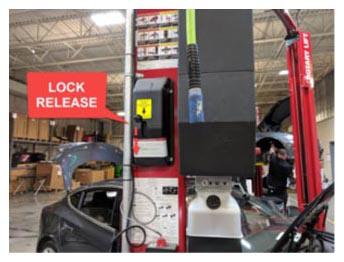
- Lower vehicle partially and set lift onto locks
NOTE:
Raise lift off locks, then hold lock release lever to keep locks free while vehicle is lowered, Set vehicle to comfortable working height
 Courtesy of TESLA, INC. Courtesy of TESLA, INC.
|
 Courtesy of TESLA, INC. Courtesy of TESLA, INC.
|
- Remove bolts for chiller to subframe
NOTE:
3x bolts, 10 mm, 5 N.m
 Courtesy of TESLA, INC. Courtesy of TESLA, INC.
|
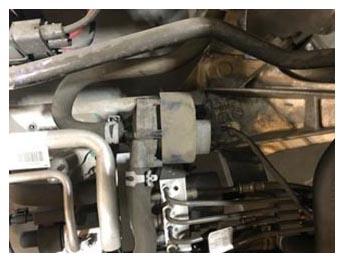
- Slide coolant pump 1 off of the subframe bracket
NOTE:
The coolant hose is still between subframe and sway bar
 Courtesy of TESLA, INC. Courtesy of TESLA, INC.
|
- Disconnect steering rack connectors
NOTE:
2x connectors
 Courtesy of TESLA, INC. Courtesy of TESLA, INC.
|
- Remove the fasteners securing air suspension pump bracket to subframe
NOTE:
2x bolts, 10 mm, 5.5 N.m
 Courtesy of TESLA, INC. Courtesy of TESLA, INC.
|
- Remove accessible bolt on RH 3-way valve
NOTE:
1x bolt, T30, 5 N.m, Remaining bolt will be removed at later step
 Courtesy of TESLA, INC. Courtesy of TESLA, INC.
|
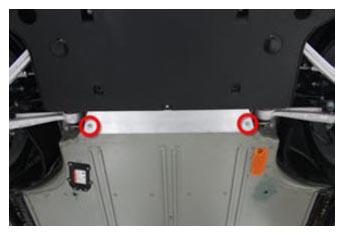
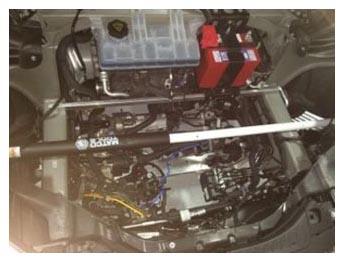
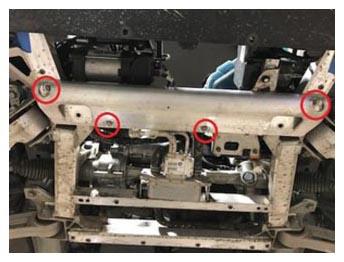
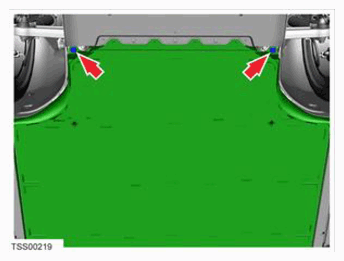
- Install a bar across frame rails and support removed accessories
 Courtesy of TESLA, INC. Courtesy of TESLA, INC.
|
- Raise vehicle partially and lower onto locks
NOTE:
Set vehicle to comfortable working height, Make sure there's an audible click of the locks on both sides before lowering, otherwise vehicle may tilt to the side
 Courtesy of TESLA, INC. Courtesy of TESLA, INC.
|
 Courtesy of TESLA, INC. Courtesy of TESLA, INC.
|
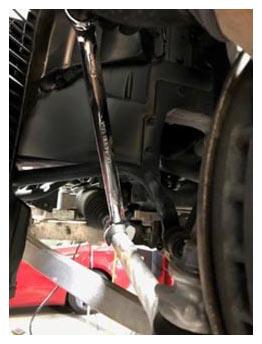
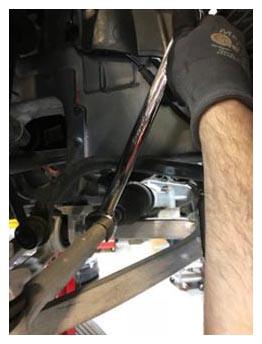
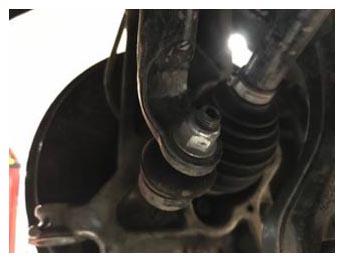
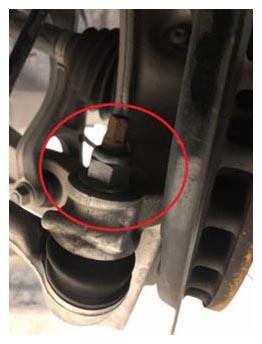
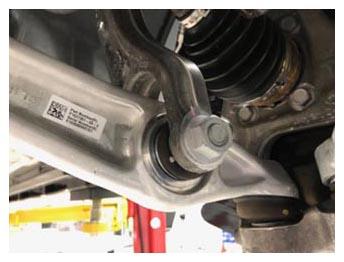
- Loosen the LH tie rod end jam nut
NOTE:
1x nut, 21 mm, 70 N.m
 Courtesy of TESLA, INC. Courtesy of TESLA, INC.
|
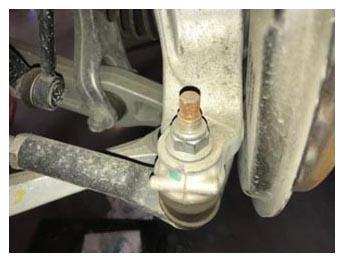
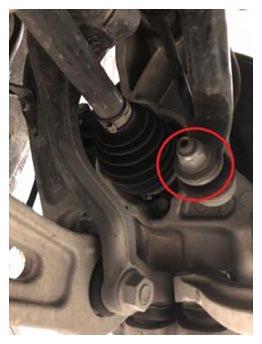
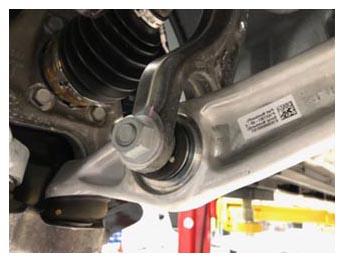
- Remove the LH nut that secures the tie rod end to the knuckle and disconnect tie rod from knuckle
NOTE:
1x nyloc nut, 21 mm, 103 N.m, Discard after removal
 Courtesy of TESLA, INC. Courtesy of TESLA, INC.
|
- Loosen the RH tie rod end jam nut
NOTE:
1x nut, 21 mm, 70 N.m
 Courtesy of TESLA, INC. Courtesy of TESLA, INC.
|
- Remove the nut that secures the tie rod end to the RH knuckle
NOTE:
1x nut, 21 mm, 103 N.m, Prevent ball joint damage from spinning by holding the ball joint pin with counter force to the nut, Discard after removal
 Courtesy of TESLA, INC. Courtesy of TESLA, INC.
|
- Raise vehicle fully and lower lift onto locks
NOTE:
Set vehicle to comfortable working height, Make sure there's an audible click of the locks on both sides before lowering, otherwise vehicle may tilt to the side
 Courtesy of TESLA, INC. Courtesy of TESLA, INC.
|
 Courtesy of TESLA, INC. Courtesy of TESLA, INC.
|
- Remove LH stabar nut from the stabar and move LH stabar end link away from the bar
NOTE:
1x nyloc nut, 15 mm, 70 N.m, Counter hold stud with 5 mm hex socket and use wrench to remove nut, Discard after removal
 Courtesy of TESLA, INC. Courtesy of TESLA, INC.
|
- Remove RH stabar nut from the stabar and move RH stabar end link away from the bar
NOTE:
1x nyloc nut, 15 mm, 70 N.m, Counter hold stud with 5 mm hex socket and use wrench to remove nut, Discard after removal
 Courtesy of TESLA, INC. Courtesy of TESLA, INC.
|
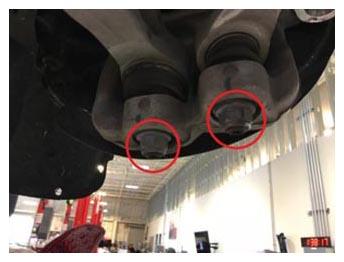
- Remove the bolt and nut that secure the LH front shock absorber to the rear lower control arm
NOTE:
1x nut, 21 mm, 1x bolt, 21 mm, 140 N.m
 Courtesy of TESLA, INC. Courtesy of TESLA, INC.
|
- Remove the bolt and nut that secure the RH front shock absorber to the rear lower control arm
NOTE:
1x nut, 21 mm, 1x bolt, 21 mm, 140 N.m
 Courtesy of TESLA, INC. Courtesy of TESLA, INC.
|
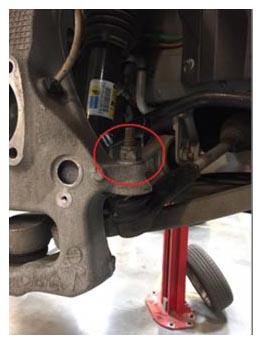
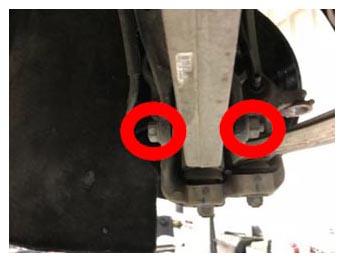
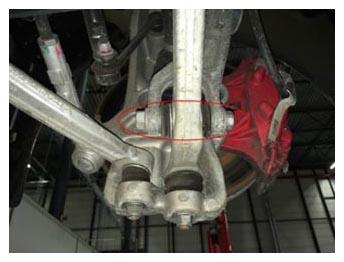
- Remove LH side lower control arm nuts
NOTE:
2x nyloc nuts, 21 mm, 196 N.m, 2x washers, Discard after removal, Need to hold ball joint to prevent damage
 Courtesy of TESLA, INC. Courtesy of TESLA, INC.
|
- Remove RH side lower control arm nuts
NOTE:
2x nyloc nuts, 21 mm, 196 N.m, 2x washers, Discard after removal, Need to hold ball joint to prevent damage
 Courtesy of TESLA, INC. Courtesy of TESLA, INC.
|
- Remove the bolt that secures the lower intermediate shaft to the steering rack and slide the shaft off of the rack
NOTE:
1x bolt, 13 mm, 49 N.m
 Courtesy of TESLA, INC. Courtesy of TESLA, INC.
|
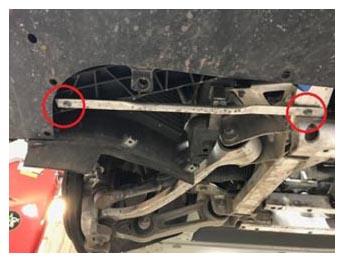
- Remove the bolts that secure the front subframe to the bumper carrier
NOTE:
4x patch bolts, 10 mm, 7.5 N.m, Discard after removal
 Courtesy of TESLA, INC. Courtesy of TESLA, INC.
|
 Courtesy of TESLA, INC. Courtesy of TESLA, INC.
|
 Courtesy of TESLA, INC. Courtesy of TESLA, INC.
|
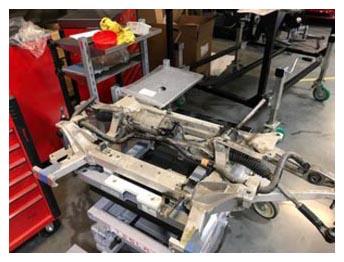
- Position subframe fixture beneath vehicle and raise fixture
 Courtesy of TESLA, INC. Courtesy of TESLA, INC.
|
 Courtesy of TESLA, INC. Courtesy of TESLA, INC.
|
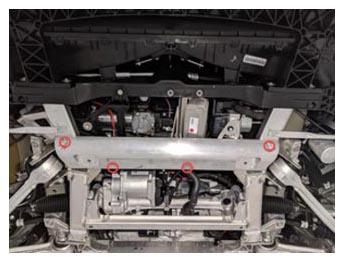
- Remove the bolts that secure the subframe to the chassis
NOTE:
2x bolts, 18 mm, 115 N.m, 2x bolts, 16 mm, 115 N.m,
 Courtesy of TESLA, INC. Courtesy of TESLA, INC.
|
 Courtesy of TESLA, INC. Courtesy of TESLA, INC.
|
- Lower subframe and move it away from vehicle
NOTE:
Need to tilt subframe back to remove from carrier, Be mindful of coolant hoses and chiller, may need to feed them past the sway bar
 Courtesy of TESLA, INC. Courtesy of TESLA, INC.
|
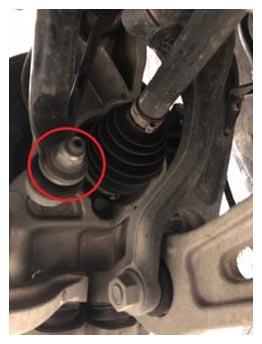
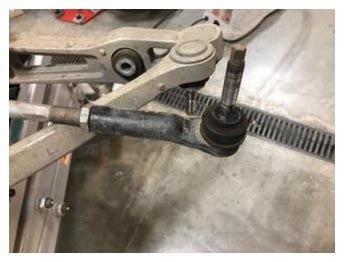
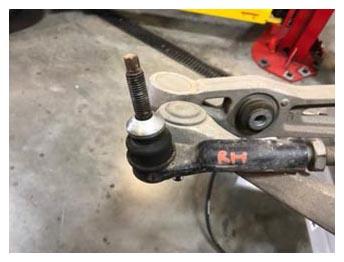
- Remove LH tie rod end
NOTE:
Count the number of turns and remember for install
 Courtesy of TESLA, INC. Courtesy of TESLA, INC.
|
- Remove RH tie rod end
NOTE:
Count the number of turns and remember for install
 Courtesy of TESLA, INC. Courtesy of TESLA, INC.
|
- Remove steering rack from subframe
NOTE:
3x bolts, 21 mm, 175 N.m,
 Courtesy of TESLA, INC. Courtesy of TESLA, INC.
|
- Install steering rack with new bolts
NOTE:
3x bolts, 21 mm, 175 N.m
 Courtesy of TESLA, INC. Courtesy of TESLA, INC.
|
- Install RH tie rod end and snug the jam nut
NOTE:
Remember how many turns to put back on
 Courtesy of TESLA, INC. Courtesy of TESLA, INC.
|
- Install LH tie rod end and snug the jam nut
NOTE:
Remember how many turns to put back on
 Courtesy of TESLA, INC. Courtesy of TESLA, INC.
|
- Install subframe in position for install
NOTE:
Need to tilt subframe back to install into the carrier, Be mindful of coolant hoses and chiller, may need to feed them past the sway bar
 Courtesy of TESLA, INC. Courtesy of TESLA, INC.
|
- Install the bolts that secure the subframe to the chassis
NOTE:
2x bolts, 18 mm, 115 N.m, 2x bolts, 16 mm, 115 N.m
 Courtesy of TESLA, INC. Courtesy of TESLA, INC.
|
 Courtesy of TESLA, INC. Courtesy of TESLA, INC.
|
- Remove subframe fixture from under vehicle
 Courtesy of TESLA, INC. Courtesy of TESLA, INC.
|
- Install the bolts that secure the front subframe to the bumper carrier
NOTE:
4x patch bolts, 10 mm, 7.5 N.m, Install new bolts
 Courtesy of TESLA, INC. Courtesy of TESLA, INC.
|
 Courtesy of TESLA, INC. Courtesy of TESLA, INC.
|
 Courtesy of TESLA, INC. Courtesy of TESLA, INC.
|
- Install the bolt that attaches the lower intermediate shaft to the steering rack.
NOTE:
1x bolt, 13 mm, 30 N.m
 Courtesy of TESLA, INC. Courtesy of TESLA, INC.
|
- Install RH side lower control arm nuts
NOTE:
2x nyloc nuts and washers, 21 mm, 196 N.m, Install new nuts and washers, Need to hold ball joint to prevent damage
 Courtesy of TESLA, INC. Courtesy of TESLA, INC.
|
- Install LH side lower control arm nuts
NOTE:
2x nyloc nuts and washers, 21 mm, 196 N.m, Install new nuts and washers, Need to hold ball joint to prevent damage
 Courtesy of TESLA, INC. Courtesy of TESLA, INC.
|
- Install new nut that secures the RH sway bar to the sway bar end links
NOTE:
1x nyloc nut, 15 mm, 70 N.m, Install new nuts
 Courtesy of TESLA, INC. Courtesy of TESLA, INC.
|
- Install nut securing LH stabar end link to stabar
NOTE:
1x nyloc nut, 15 mm, 70 N.m, Install new nut, Counter hold stud with 5 mm hex socket
 Courtesy of TESLA, INC. Courtesy of TESLA, INC.
|
- Loosely install the bolt and nut that secure the RH front shock absorber to the rear lower control arm
NOTE:
1x nut, 21 mm, 1x bolt, 21 mm, 140 N.m, Torqued at a later step
 Courtesy of TESLA, INC. Courtesy of TESLA, INC.
|
- Loosely install the bolt and nut that secure the LH front shock absorber to the rear lower control arm
NOTE:
1x nut, 21 mm, 1x bolt, 21 mm, 140 N.m, Torqued at a later step
 Courtesy of TESLA, INC. Courtesy of TESLA, INC.
|
- Install forward bolt of RH 3-way coolant valve
NOTE:
1x bolts, T30, 5 N.m
 Courtesy of TESLA, INC. Courtesy of TESLA, INC.
|
- Install ABS pump to subframe
NOTE:
2x nuts, 10 mm, 9 N.m
 Courtesy of TESLA, INC. Courtesy of TESLA, INC.
|
- Install skid bar onto the front subframe
NOTE:
4x bolts, 10 mm, 10 N.m
 Courtesy of TESLA, INC. Courtesy of TESLA, INC.
|
- Install RH stay bar
NOTE:
2x bolts, 10 mm, 11 N.m
 Courtesy of TESLA, INC. Courtesy of TESLA, INC.
|
- Install LH stay bar
NOTE:
2x bolts, 10 mm, 11 N.m
 Courtesy of TESLA, INC. Courtesy of TESLA, INC.
|
- Slide PT coolant pump 2 to front subframe
 Courtesy of TESLA, INC. Courtesy of TESLA, INC.
|
- Install PT coolant pump 2 harness clip to front subframe
NOTE:
1x clip
 Courtesy of TESLA, INC. Courtesy of TESLA, INC.
|
- Install clip that secures coolant pump 2 hose to the subframe
NOTE:
1x clip
 Courtesy of TESLA, INC. Courtesy of TESLA, INC.
|
- Install the bolts securing the bash plate stamping and skid plate to the front subframe skid plate
NOTE:
2x bolts, 10 mm, 9 N.m
 Courtesy of TESLA, INC. Courtesy of TESLA, INC.
|
- Lower vehicle partially and set lift onto locks
NOTE:
Raise lift off locks, then hold lock release lever to keep locks free while vehicle is lowered, Set vehicle to comfortable working height
 Courtesy of TESLA, INC. Courtesy of TESLA, INC.
|
 Courtesy of TESLA, INC. Courtesy of TESLA, INC.
|
 Courtesy of TESLA, INC. Courtesy of TESLA, INC.
|
- Install nut securing RH front tie rod end to RH front knuckle
NOTE:
1x nyloc nut, 21 mm, 103 N.m, Install new nut
 Courtesy of TESLA, INC. Courtesy of TESLA, INC.
|
- Install nut securing LH front tie rod end to LH front knuckle
NOTE:
1x nyloc nut, 21 mm, 103 N.m, Install new nut
 Courtesy of TESLA, INC. Courtesy of TESLA, INC.
|
- Lower vehicle partially and set lift onto locks
NOTE:
Raise lift off locks, then hold lock release lever to keep locks free while vehicle is lowered, Set vehicle to comfortable working height
 Courtesy of TESLA, INC. Courtesy of TESLA, INC.
|
 Courtesy of TESLA, INC. Courtesy of TESLA, INC.
|
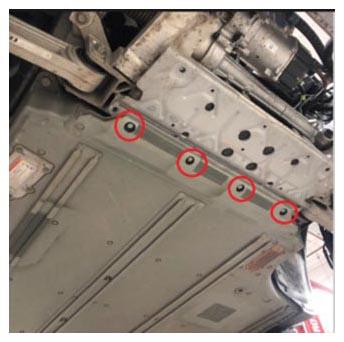
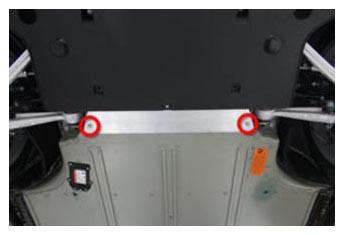
- Remove the bar across frame rails
 Courtesy of TESLA, INC. Courtesy of TESLA, INC.
|
- Install remaining fastener securing RH 3-way valve to subframe
NOTE:
1x bolt, T30, 5 N.m
 Courtesy of TESLA, INC. Courtesy of TESLA, INC.
|
- Install the fasteners securing air suspension pump bracket to subframe
NOTE:
2x bolts, 10 mm, 5.5 N.m
 Courtesy of TESLA, INC. Courtesy of TESLA, INC.
|
- Connect steering rack connectors
NOTE:
2x connectors
 Courtesy of TESLA, INC. Courtesy of TESLA, INC.
|
- Slide coolant pump 1 on to the subframe bracket
NOTE:
1x coolant pump
 Courtesy of TESLA, INC. Courtesy of TESLA, INC.
|
- Install the chiller to the subframe
NOTE:
3x bolts, 10 mm, 5 N.m
 Courtesy of TESLA, INC. Courtesy of TESLA, INC.
|
- Raise vehicle fully and lower onto locks
NOTE:
Set vehicle to comfortable working height, Make sure there's an audible click of the locks on both sides before lowering, otherwise vehicle may tilt to the side, Ensure the vehicle is stable by rocking the vehicle on the lift immediately after the tires have left the ground, Always lower the lift arms onto the locks after raising the vehicle
 Courtesy of TESLA, INC. Courtesy of TESLA, INC.
|
 Courtesy of TESLA, INC. Courtesy of TESLA, INC.
|
- Install front aero shield into position and hand tighten center bolts
NOTE:
2x bolts, 10 mm, 4 N.m
 Courtesy of TESLA, INC. Courtesy of TESLA, INC.
|
- Install clips securing aero shield to vehicle
NOTE:
10x push clips
 Courtesy of TESLA, INC. Courtesy of TESLA, INC.
|
- Install and tighten bolts securing aero shield to vehicle
NOTE:
4x bolts, 10 mm, 4 N.m, Outer bolts will be installed with wheel arch liners
- Position HV battery underneath vehicle
 Courtesy of TESLA, INC. Courtesy of TESLA, INC.
|
- Remove covers or tape from LV and HV rapid mates
 Courtesy of TESLA, INC. Courtesy of TESLA, INC.
|
- Lower vehicle onto pack
NOTE:
Align rapid mate connections before lowering fully, Recommend assistance
 Courtesy of TESLA, INC. Courtesy of TESLA, INC.
|
- Loosely install 4 new front bolts for HV battery
NOTE:
4x patch bolts, 13 mm, 30 N.m, Install new patch bolts, Torque at later step
 Courtesy of TESLA, INC. Courtesy of TESLA, INC.
|
 Courtesy of TESLA, INC. Courtesy of TESLA, INC.
|
- Loosely install LH rocker bolts
NOTE:
8x patch bolts, 13 mm, 55 N.m, Install new patch bolts, Torque at later step
 Courtesy of TESLA, INC. Courtesy of TESLA, INC.
|
- Loosely install RH rocker bolts
NOTE:
8x patch bolts, 13 mm, 55 N.m, Install new patch bolts, Torque at later step
 Courtesy of TESLA, INC. Courtesy of TESLA, INC.
|
- Loosely install 21 mm bolts at front of HV battery hand tight
NOTE:
2x bolts, 21 mm, 115 N.m, Install new bolts, Torque at later step
 Courtesy of TESLA, INC. Courtesy of TESLA, INC.
|
- Loosely install eight outer center bolts hand tight
NOTE:
8x patch bolts, E12, 38 N.m, Install new patch bolts, Torque at later step
 Courtesy of TESLA, INC. Courtesy of TESLA, INC.
|
- Torque rocker HV battery bolts on both sides
NOTE:
16x patch bolts, 13 mm, 55 N.m
 Courtesy of TESLA, INC. Courtesy of TESLA, INC.
|
 Courtesy of TESLA, INC. Courtesy of TESLA, INC.
|
- Torque remaining HV battery bolts
NOTE:
8x patch bolts, E12, 38 N.m, 2x bolts, 21 mm, 115 N.m, 4x patch bolts, 13 mm, 30 N.m
 Courtesy of TESLA, INC. Courtesy of TESLA, INC.
|
 Courtesy of TESLA, INC. Courtesy of TESLA, INC.
|
 Courtesy of TESLA, INC. Courtesy of TESLA, INC.
|
- Raise vehicle and remove battery table
NOTE:
Recommend assistance
 Courtesy of TESLA, INC. Courtesy of TESLA, INC.
|
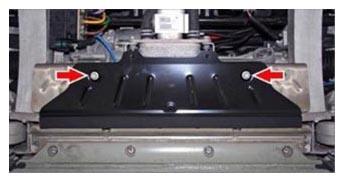
- Install front lower bash plate extrusion
NOTE:
2x patch bolts, T30, 16 N.m
 Courtesy of TESLA, INC. Courtesy of TESLA, INC.
|
- Install ski side covers onto RH side of HV battery
NOTE:
14x clips, 3x covers
 Courtesy of TESLA, INC. Courtesy of TESLA, INC.
|
- Install ski side covers onto LH side of HV battery
NOTE:
14x clips, 3x covers
 Courtesy of TESLA, INC. Courtesy of TESLA, INC.
|
- Lower vehicle partially and set lift onto locks
NOTE:
Raise lift off locks, then hold lock release lever to keep locks free while vehicle is lowered, Set vehicle to comfortable working height
 Courtesy of TESLA, INC. Courtesy of TESLA, INC.
|
 Courtesy of TESLA, INC. Courtesy of TESLA, INC.
|
- Install LH front wheel
NOTE:
5x nuts, 21 mm, 175 N.m, Start lug nuts by hand before using power tool
 Courtesy of TESLA, INC. Courtesy of TESLA, INC.
|
- Install RH front wheel
NOTE:
5x nuts, 21 mm, 175 N.m, Start lug nuts by hand before using power tool
 Courtesy of TESLA, INC. Courtesy of TESLA, INC.
|
- Lower vehicle until tires are touching the ground
NOTE:
Raise lift off locks, then hold lock release lever to keep locks free while vehicle is lowered
 Courtesy of TESLA, INC. Courtesy of TESLA, INC.
|
 Courtesy of TESLA, INC. Courtesy of TESLA, INC.
|
 Courtesy of TESLA, INC. Courtesy of TESLA, INC.
|
- Torque LH front wheel
NOTE:
5x nuts, 21 mm, 175 N.m
 Courtesy of TESLA, INC. Courtesy of TESLA, INC.
|
- Torque RH front wheel
NOTE:
5x nuts, 21 mm, 175 N.m
 Courtesy of TESLA, INC. Courtesy of TESLA, INC.
|
- Install RH front lug nut covers
NOTE:
5x covers
 Courtesy of TESLA, INC. Courtesy of TESLA, INC.
|
- Install LH front lug nut covers
NOTE:
5x covers
 Courtesy of TESLA, INC. Courtesy of TESLA, INC.
|
- Connect First Responder Loop and 12V negative terminal
NOTE:
1x connector, 1x nut, 10 mm, 5 N.m
 Courtesy of TESLA, INC. Courtesy of TESLA, INC.
|
- Install underhood storage unit
NOTE:
Install harness and grommet
 Courtesy of TESLA, INC. Courtesy of TESLA, INC.
|
- Install bolts and clips securing underhood storage unit
NOTE:
2x bolts, 10 mm, 7 N.m, 2x push clips
 Courtesy of TESLA, INC. Courtesy of TESLA, INC.
|
- Install underhood storage carpet and reconnect light and release switch connectors
NOTE:
2x connectors, Secure edges of carpet underneath underhood storage unit seal
 Courtesy of TESLA, INC. Courtesy of TESLA, INC.
|
- Install HEPA filter outlet duct
 Courtesy of TESLA, INC. Courtesy of TESLA, INC.
|
 Courtesy of TESLA, INC. Courtesy of TESLA, INC.
|
- Install HEPA filter inlet duct
NOTE:
2x tabs, One on each side
 Courtesy of TESLA, INC. Courtesy of TESLA, INC.
|
 Courtesy of TESLA, INC. Courtesy of TESLA, INC.
|
- Install clips securing HEPA filter inlet duct to cowl panel
NOTE:
3x push clips
 Courtesy of TESLA, INC. Courtesy of TESLA, INC.
|
- Secure drainage hoses to HEPA filter inlet duct
NOTE:
2x hoses
 Courtesy of TESLA, INC. Courtesy of TESLA, INC.
|
 Courtesy of TESLA, INC. Courtesy of TESLA, INC.
|
- Install RH underhood apron
NOTE:
9x clips
 Courtesy of TESLA, INC. Courtesy of TESLA, INC.
|
 Courtesy of TESLA, INC. Courtesy of TESLA, INC.
|
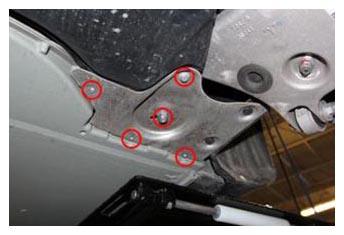
- Install LH underhood apron
NOTE:
9x clips
 Courtesy of TESLA, INC. Courtesy of TESLA, INC.
|
 Courtesy of TESLA, INC. Courtesy of TESLA, INC.
|
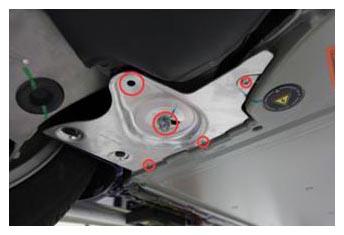
- Install rear underhood apron
NOTE:
8x clips
 Courtesy of TESLA, INC. Courtesy of TESLA, INC.
|
 Courtesy of TESLA, INC. Courtesy of TESLA, INC.
|
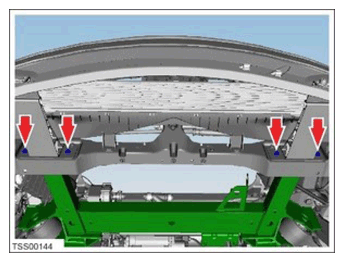
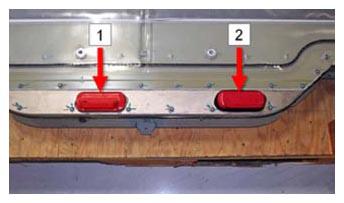
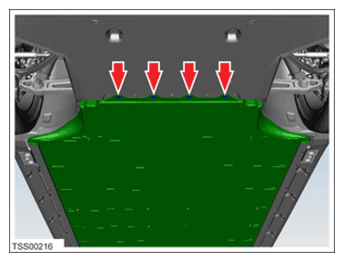
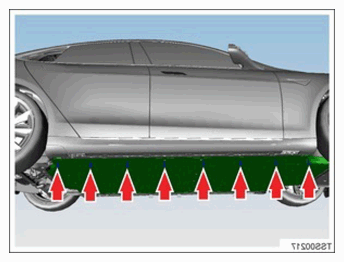
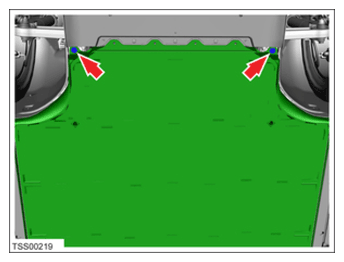
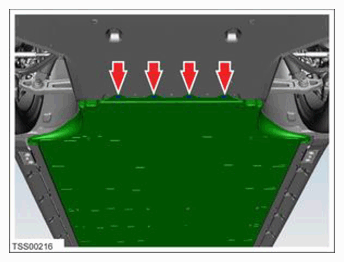
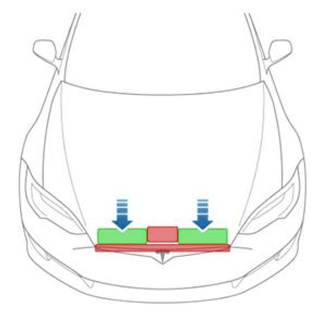
- Close hood
NOTE:
Press firmly in green highlighted areas (see image), Damage may result from pressure elsewhere on hood
 Courtesy of TESLA, INC. Courtesy of TESLA, INC.
|
- Lower vehicle and remove from lift
NOTE:
Raise lift off locks, then hold lock release lever to keep locks free while vehicle is lowered, Remove air suspension from "Jack Mode" if equipped
 Courtesy of TESLA, INC. Courtesy of TESLA, INC.
|
 Courtesy of TESLA, INC. Courtesy of TESLA, INC.
|
 Courtesy of TESLA, INC. Courtesy of TESLA, INC.
|
- Remove steering holder from vehicle
 Courtesy of TESLA, INC. Courtesy of TESLA, INC.
|
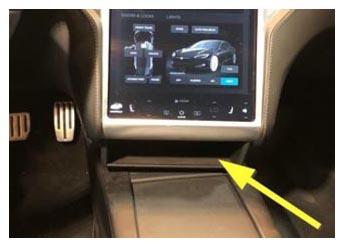
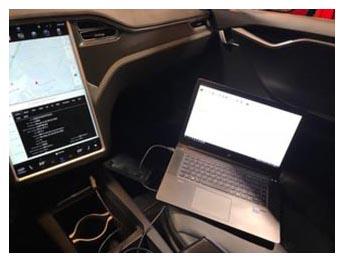
- Remove cubby under MCU and connect laptop to vehicle with a tethered Ethernet connection via Toolbox 2
NOTE:
2x clips, 1x connector, Drive rail must be ON, Toolbox 2 program must be in current service default.
 Courtesy of TESLA, INC. Courtesy of TESLA, INC.
|
 Courtesy of TESLA, INC. Courtesy of TESLA, INC.
|
 Courtesy of TESLA, INC. Courtesy of TESLA, INC.
|
- Perform firmware update
NOTE:
Per current FRT (00020007) 0.3 hrs. Install full firmware package. If firmware gets stuck, perform a hard 12V reset and reinstall firmware again.
 Courtesy of TESLA, INC. Courtesy of TESLA, INC.
|
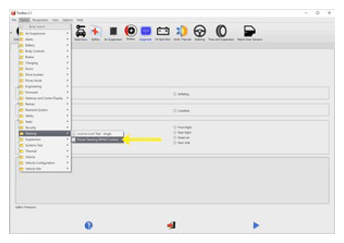
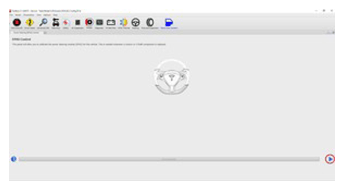
- Use the Toolbox Power Steering (EPAS) Control panel to reflash the steering rack
NOTE:
Panels > Steering > Power Steering (EPAS) Control and Select the play button to run the toolbox routine, This is only intended for Gen 1 racks, panel does not apply for Gen 2 or 3
 Courtesy of TESLA, INC. Courtesy of TESLA, INC.
|
 Courtesy of TESLA, INC. Courtesy of TESLA, INC.
|
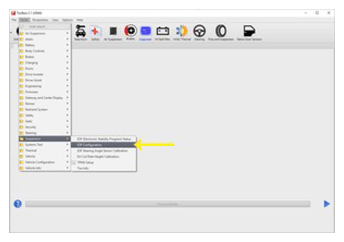
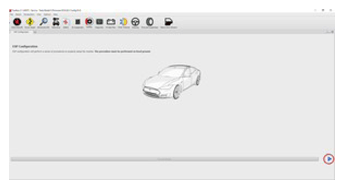
- Use the Toolbox ESP Configuration panel to calibrate the steering rack
NOTE:
Panels > Suspension > ESP Configuration and Select the play button to run the toolbox routine
 Courtesy of TESLA, INC. Courtesy of TESLA, INC.
|
 Courtesy of TESLA, INC. Courtesy of TESLA, INC.
|
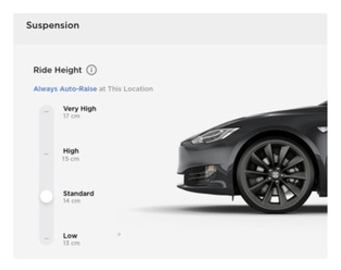
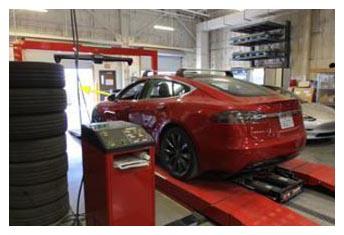
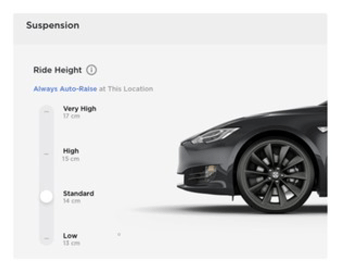
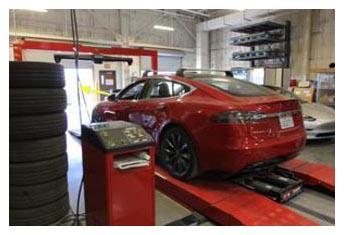
- Position vehicle onto 4-post lift
NOTE:
Set ride height to standard, Position wheel chocks to keep vehicle from rolling
 Courtesy of TESLA, INC. Courtesy of TESLA, INC.
|
 Courtesy of TESLA, INC. Courtesy of TESLA, INC.
|
- Position vehicle onto 4-post lift
NOTE:
Set ride height to standard
 Courtesy of TESLA, INC. Courtesy of TESLA, INC.
|
 Courtesy of TESLA, INC. Courtesy of TESLA, INC.
|
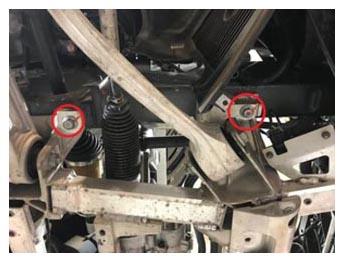
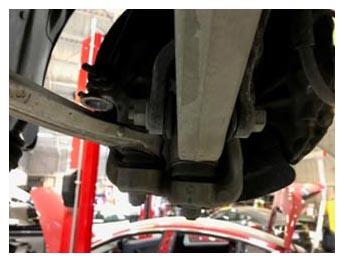
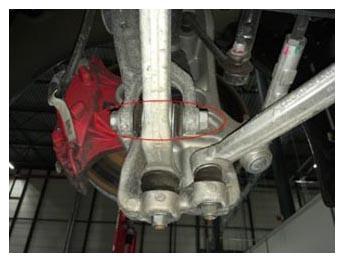
- Torque LH air spring module nut and bolt to LH aft link
NOTE:
1x bolt, 21 mm, 1x nut, 22 mm, 140 N.m
 Courtesy of TESLA, INC. Courtesy of TESLA, INC.
|
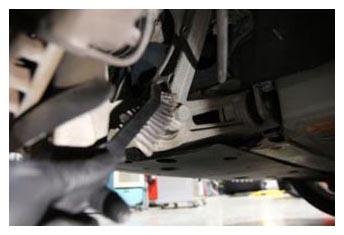
- Remove existing paint mark from LH air spring module bolt
NOTE:
Clean the area thoroughly so the new marking is not confused with the previous marking
 Courtesy of TESLA, INC. Courtesy of TESLA, INC.
|
- Mark LH air spring module bolt to show component has been torqued
NOTE:
Use a high visibility paint pen when marking components
 Courtesy of TESLA, INC. Courtesy of TESLA, INC.
|
- Torque RH air spring module nut and bolt to RH aft link
NOTE:
1x bolt, 21 mm, 1x nut, 22 mm, 140 N.m
 Courtesy of TESLA, INC. Courtesy of TESLA, INC.
|
- Remove the existing paint mark from RH air spring module
NOTE:
Clean the area thoroughly so the new marking is not confused with the previous marking
 Courtesy of TESLA, INC. Courtesy of TESLA, INC.
|
- Mark the RH air spring module bolt to show the component has been torqued
NOTE:
Use a high visibility paint pen when marking components
 Courtesy of TESLA, INC. Courtesy of TESLA, INC.
|
- Refer to the Alignment Requirement tables to determine if an alignment check (AC) or full adjustment (FA) is necessary. See Alignment Requirement - Suspension
.
- Perform test drive
NOTE:
Per current FRT 00040100 (0.3)