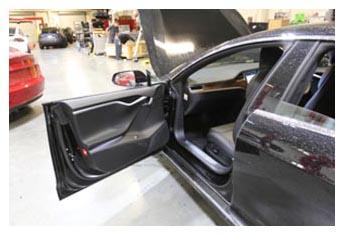
- Open LH front door
 Courtesy of TESLA, INC. Courtesy of TESLA, INC.
|
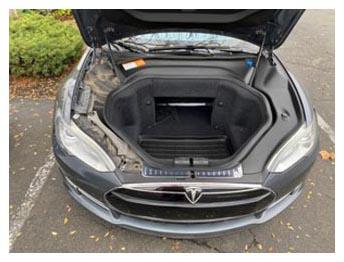
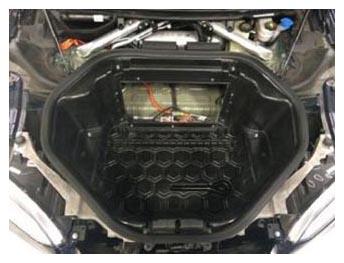
- Open hood
NOTE:
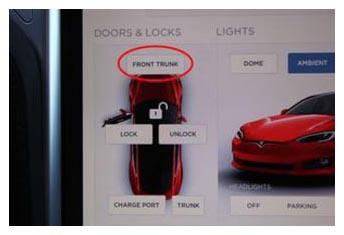
Using MCU touchscreen > Controls > Frunk Trunk
 Courtesy of TESLA, INC. Courtesy of TESLA, INC.
|
 Courtesy of TESLA, INC. Courtesy of TESLA, INC.
|
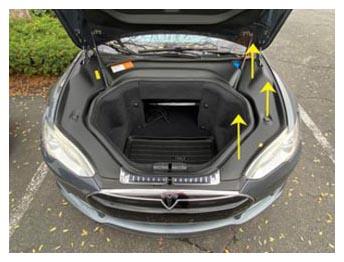
- Remove RH underhood apron
 Courtesy of TESLA, INC. Courtesy of TESLA, INC.
|
 Courtesy of TESLA, INC. Courtesy of TESLA, INC.
|
- Remove LH underhood apron
 Courtesy of TESLA, INC. Courtesy of TESLA, INC.
|
 Courtesy of TESLA, INC. Courtesy of TESLA, INC.
|
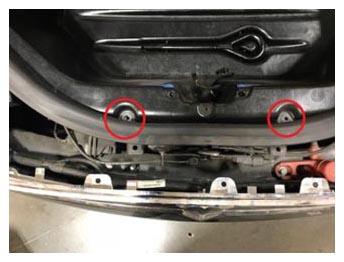
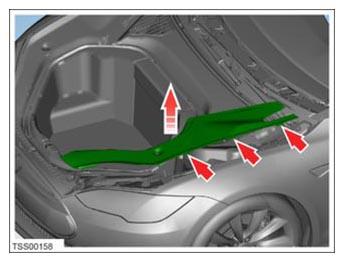
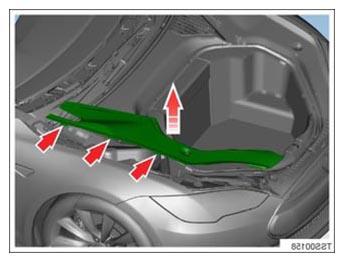
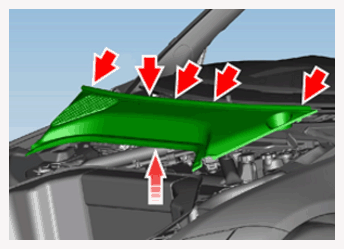
- Remove rear underhood apron
 Courtesy of TESLA, INC. Courtesy of TESLA, INC.
|
 Courtesy of TESLA, INC. Courtesy of TESLA, INC.
|
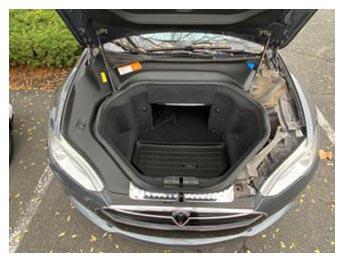
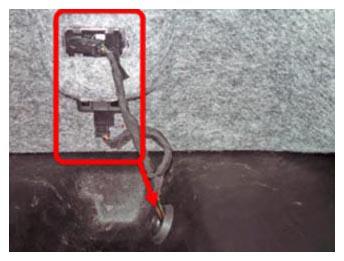
- Release the front part of the frunk carpet to gain access and disconnect the frunk light and release switch
NOTE:
2x connectors
 Courtesy of TESLA, INC. Courtesy of TESLA, INC.
|
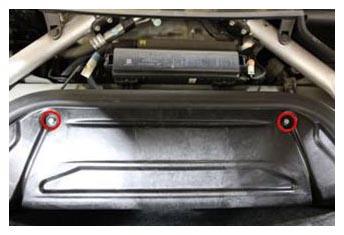
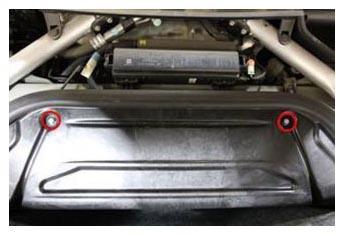
- Remove nuts and bolts securing underhood storage unit
NOTE:
2x nuts, 8 mm, 4 N.m, 2x bolts, 13 mm, 8 N.m
 Courtesy of TESLA, INC. Courtesy of TESLA, INC.
|
 Courtesy of TESLA, INC. Courtesy of TESLA, INC.
|
- Push wiring harness grommet through underhood storage unit and remove
NOTE:
1x rubber grommet
 Courtesy of TESLA, INC. Courtesy of TESLA, INC.
|
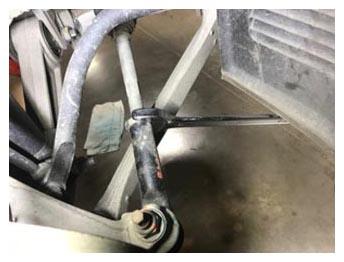
- Unclip coolant hose from RH subframe brace
NOTE:
1 fir tree clip
 Courtesy of TESLA, INC. Courtesy of TESLA, INC.
|
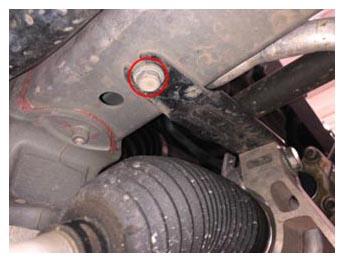
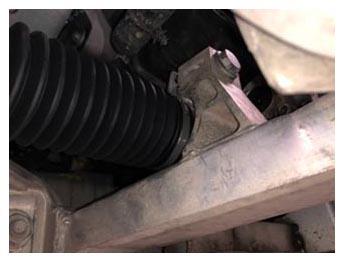
- Remove the upper fastener from the RH subframe brace
NOTE:
1x bolt, 13 mm, 26 N.m
 Courtesy of TESLA, INC. Courtesy of TESLA, INC.
|
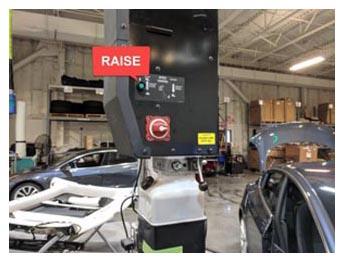
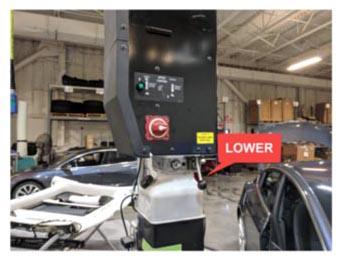
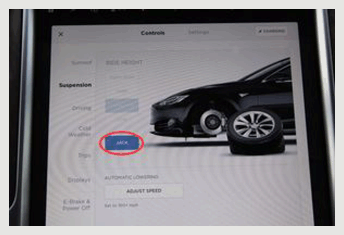
- Raise and support vehicle
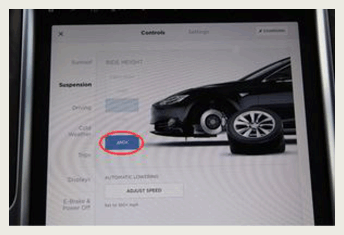
NOTE:
Set air suspension to "Jack Mode" if equipped
 Courtesy of TESLA, INC. Courtesy of TESLA, INC.
|
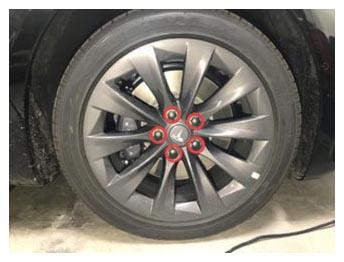
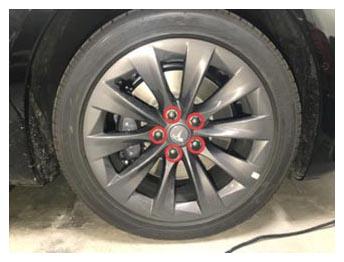
- Remove lug nut covers from RH front wheel
NOTE:
5x covers
 Courtesy of TESLA, INC. Courtesy of TESLA, INC.
|
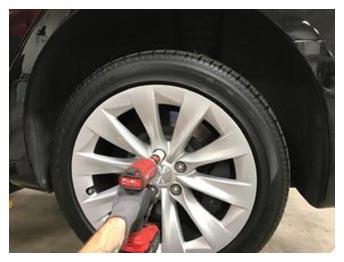
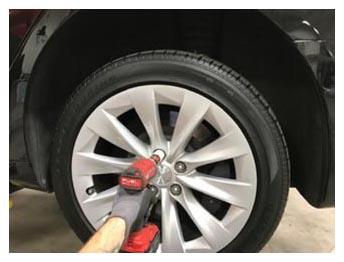
- Loosen RH front wheel
NOTE:
5x nuts, 21 mm, 175 N.m
 Courtesy of TESLA, INC. Courtesy of TESLA, INC.
|
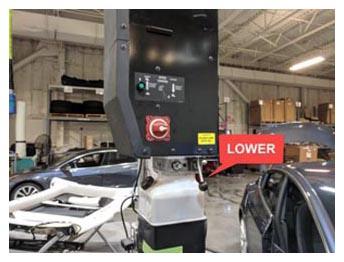
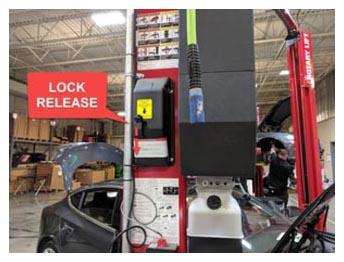
- Raise vehicle partially and lower onto locks
NOTE:
Set vehicle to comfortable working height, Make sure there's an audible click of the locks on both sides before lowering, otherwise vehicle may tilt to the side
 Courtesy of TESLA, INC. Courtesy of TESLA, INC.
|
 Courtesy of TESLA, INC. Courtesy of TESLA, INC.
|
- Remove RH front wheel
NOTE:
5x nuts, 21 mm, 175 N.m
 Courtesy of TESLA, INC. Courtesy of TESLA, INC.
|
 Courtesy of TESLA, INC. Courtesy of TESLA, INC.
|
- Raise vehicle fully and lower lift onto locks
NOTE:
Set vehicle to comfortable working height, Make sure there's an audible click of the locks on both sides before lowering, otherwise vehicle may tilt to the side
 Courtesy of TESLA, INC. Courtesy of TESLA, INC.
|
 Courtesy of TESLA, INC. Courtesy of TESLA, INC.
|
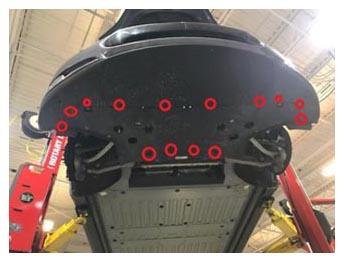
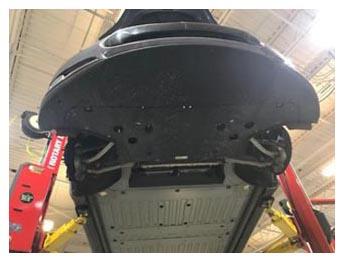
- Remove clips securing front aero shield to vehicle
NOTE:
14x push clips
 Courtesy of TESLA, INC. Courtesy of TESLA, INC.
|
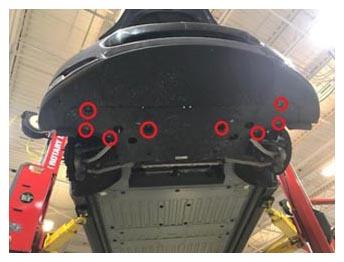
- Remove bolts securing front aero shield to vehicle
NOTE:
6x bolts, 10 mm, 3 N.m, 2x bolts, T40, 4 N.m
 Courtesy of TESLA, INC. Courtesy of TESLA, INC.
|
- Remove front aero shield from vehicle
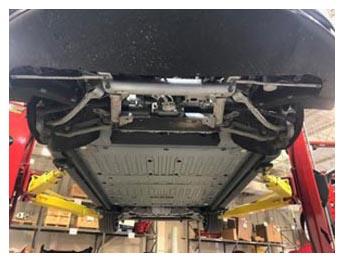 Courtesy of TESLA, INC. Courtesy of TESLA, INC.
|
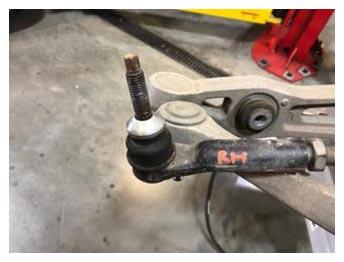
- Loosen the RH tie rod end jam nut
NOTE:
1x nut, 27 mm, 70 N.m
 Courtesy of TESLA, INC. Courtesy of TESLA, INC.
|
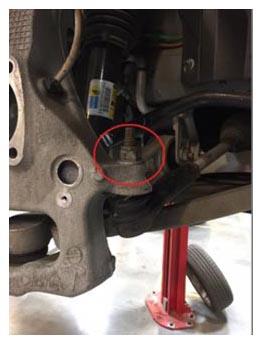
- Remove the lower fastener from the RH subframe brace and remove brace from vehicle
NOTE:
1x bolt, 13 mm, 26 N.m
 Courtesy of TESLA, INC. Courtesy of TESLA, INC.
|
- Lower vehicle partially and set lift onto locks
NOTE:
Raise lift off locks, then hold lock release lever to keep locks free while vehicle is lowered, Set vehicle to comfortable working height
 Courtesy of TESLA, INC. Courtesy of TESLA, INC.
|
 Courtesy of TESLA, INC. Courtesy of TESLA, INC.
|
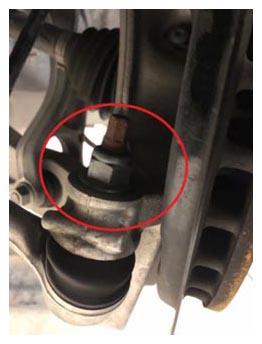
- Remove the nut that secures the tie rod end to the RH knuckle
NOTE:
1x nut, 21 mm, 103 N.m, Prevent ball joint damage from spinning by holding the ball joint pin with counter force to the nut, Discard after removal
 Courtesy of TESLA, INC. Courtesy of TESLA, INC.
|
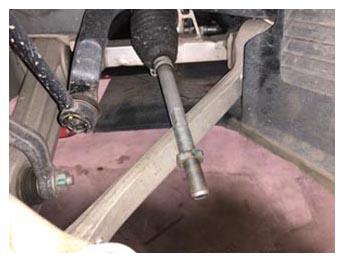
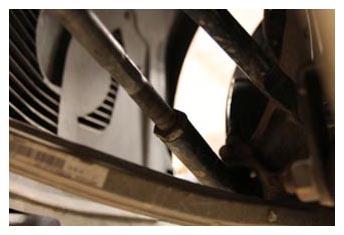
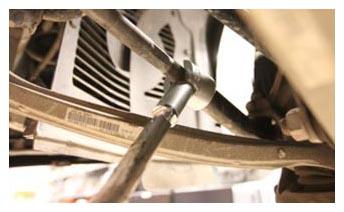
- Loosen RH outer tie rod and remove from steering rack
NOTE:
Count the number of turns and remember for install, If needed you can use a paint pen to mark the location of the outer tie rod relative to the steering rack threads
 Courtesy of TESLA, INC. Courtesy of TESLA, INC.
|
 Courtesy of TESLA, INC. Courtesy of TESLA, INC.
|
- Remove RH jam nut from inner tie rod
 Courtesy of TESLA, INC. Courtesy of TESLA, INC.
|
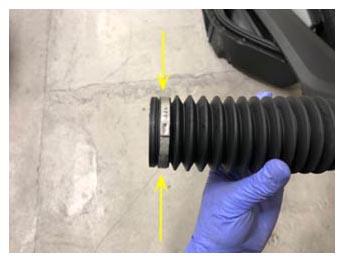
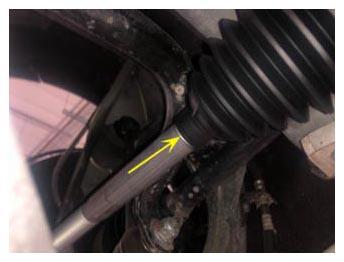
- Remove RH inner tie rod outer bellows clamp
NOTE:
Note clamp orientation for installation
 Courtesy of TESLA, INC. Courtesy of TESLA, INC.
|
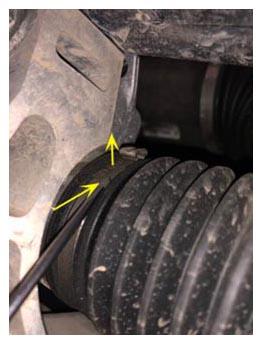
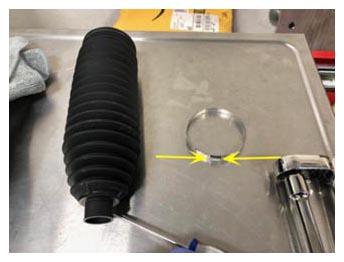
- Remove RH inner tie rod inner bellows clamp
NOTE:
Use the flat head screwdriver to pop the clamp off the retaining tab
 Courtesy of TESLA, INC. Courtesy of TESLA, INC.
|
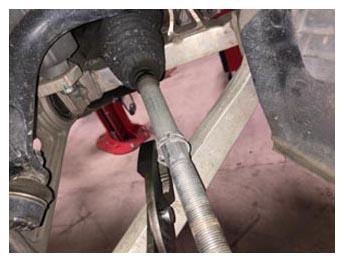
- Remove the RH inner tie rod bellows
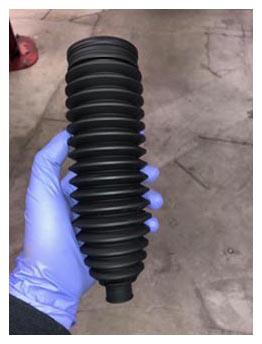 Courtesy of TESLA, INC. Courtesy of TESLA, INC.
|
- Raise vehicle fully and lower lift onto locks
NOTE:
Set vehicle to comfortable working height, Make sure there's an audible click of the locks on both sides before lowering, otherwise vehicle may tilt to the side
 Courtesy of TESLA, INC. Courtesy of TESLA, INC.
|
 Courtesy of TESLA, INC. Courtesy of TESLA, INC.
|
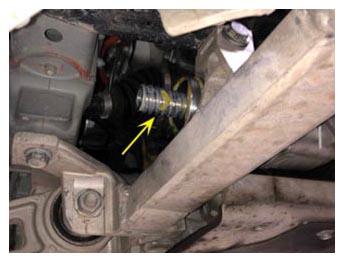
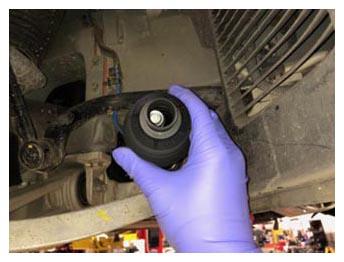
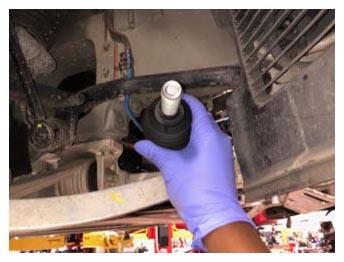
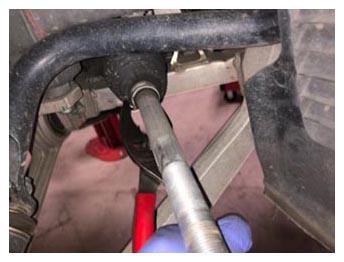
- Inspect RH steering gear output shaft
NOTE:
The grease on the steering gear rack bar shall not contain dirt. If there is dirt in the grease, there is a risk that the ball nut bearing assembly is damaged already. Discontinue this procedure and replace the rack.
 Courtesy of TESLA, INC. Courtesy of TESLA, INC.
|
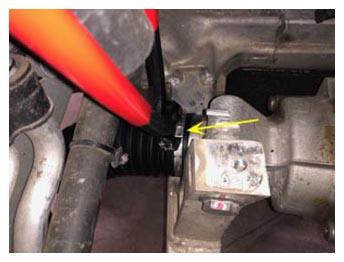
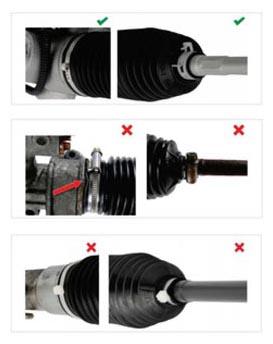
- Install the inner band clip on the RH tie rod bellows
NOTE:
Do not clamp at this time
 Courtesy of TESLA, INC. Courtesy of TESLA, INC.
|
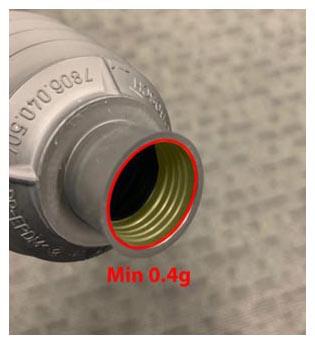
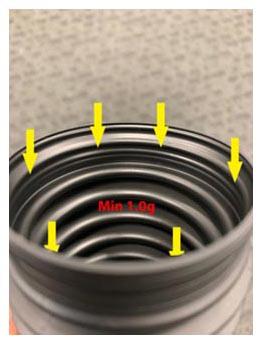
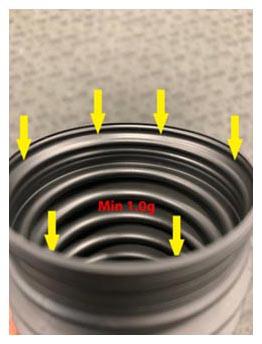
- Use Renolit JP 1619 to grease the bellows before installation
NOTE:
Renolit JP 1619 is supplied with the tie rod kit
 Courtesy of TESLA, INC. Courtesy of TESLA, INC.
|
 Courtesy of TESLA, INC. Courtesy of TESLA, INC.
|
 Courtesy of TESLA, INC. Courtesy of TESLA, INC.
|
 Courtesy of TESLA, INC. Courtesy of TESLA, INC.
|
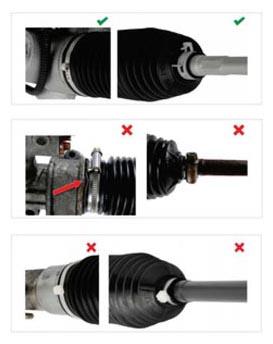
- Install the bellows on to the RH inner tie rod
 Courtesy of TESLA, INC. Courtesy of TESLA, INC.
|
 Courtesy of TESLA, INC. Courtesy of TESLA, INC.
|
 Courtesy of TESLA, INC. Courtesy of TESLA, INC.
|
 Courtesy of TESLA, INC. Courtesy of TESLA, INC.
|
- Lower vehicle until tires are touching the ground
NOTE:
Raise lift off locks, then hold lock release lever to keep locks free while vehicle is lowered
 Courtesy of TESLA, INC. Courtesy of TESLA, INC.
|
 Courtesy of TESLA, INC. Courtesy of TESLA, INC.
|
 Courtesy of TESLA, INC. Courtesy of TESLA, INC.
|
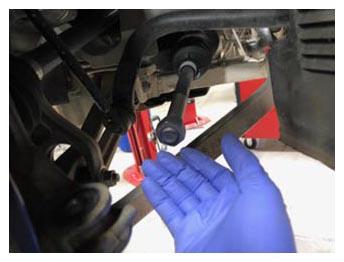
- Secure the RH inner tie rod band clip by clamping the clip ear
NOTE:
The tie rod band clip can be secured from the frunk area. If required, rotate the band to properly access the ear clip
 Courtesy of TESLA, INC. Courtesy of TESLA, INC.
|
 Courtesy of TESLA, INC. Courtesy of TESLA, INC.
|
 Courtesy of TESLA, INC. Courtesy of TESLA, INC.
|
- Loosely install subframe RH subframe brace with upper bolt
NOTE:
1x bolt, 13 mm, 26 N.m, Do not torque the fastener at this time
 Courtesy of TESLA, INC. Courtesy of TESLA, INC.
|
- Raise vehicle fully and lower onto locks
NOTE:
Set vehicle to comfortable working height, Make sure there's an audible click of the locks on both sides before lowering, otherwise vehicle may tilt to the side, Ensure the vehicle is stable by rocking the vehicle on the lift immediately after the tires have left the ground, Always lower the lift arms onto the locks after raising the vehicle
 Courtesy of TESLA, INC. Courtesy of TESLA, INC.
|
 Courtesy of TESLA, INC. Courtesy of TESLA, INC.
|
- Install subframe RH subframe brace lower mounting bolt
NOTE:
1x bolt, 13 mm, 26 N.m
 Courtesy of TESLA, INC. Courtesy of TESLA, INC.
|
- Install front aero shield onto vehicle
 Courtesy of TESLA, INC. Courtesy of TESLA, INC.
|
- Install bolts securing front aero shield to vehicle
NOTE:
6x bolts, 10 mm, 3 N.m, 2x bolts, T40, 4 N.m
 Courtesy of TESLA, INC. Courtesy of TESLA, INC.
|
- Install clips securing front aero shield to vehicle
NOTE:
14x push clips
 Courtesy of TESLA, INC. Courtesy of TESLA, INC.
|
- Lower vehicle partially and set lift onto locks
NOTE:
Raise lift off locks, then hold lock release lever to keep locks free while vehicle is lowered, Set vehicle to comfortable working height
 Courtesy of TESLA, INC. Courtesy of TESLA, INC.
|
 Courtesy of TESLA, INC. Courtesy of TESLA, INC.
|
- Install outer hose clip on RH inner tie rod bellows
NOTE:
Install in original orientation
 Courtesy of TESLA, INC. Courtesy of TESLA, INC.
|
 Courtesy of TESLA, INC. Courtesy of TESLA, INC.
|
- Install RH jam nut onto inner tie rod
NOTE:
1x nut
 Courtesy of TESLA, INC. Courtesy of TESLA, INC.
|
- Install RH tie rod end and snug the jam nut
NOTE:
Remember how many turns to put back on
 Courtesy of TESLA, INC. Courtesy of TESLA, INC.
|
- Install nut securing RH front tie rod end to RH front knuckle
NOTE:
1x nyloc nut, 21 mm, 103 N.m, Install new nut
 Courtesy of TESLA, INC. Courtesy of TESLA, INC.
|
- Torque RH tie rod end jam nut
NOTE:
1x nut, 70 N.m, Set Tohnichi torque wrench to 80 N.m with adapter
 Courtesy of TESLA, INC. Courtesy of TESLA, INC.
|
 Courtesy of TESLA, INC. Courtesy of TESLA, INC.
|
- Install RH front wheel
NOTE:
5x nuts, 21 mm, 175 N.m, Start lug nuts by hand before using power tool
 Courtesy of TESLA, INC. Courtesy of TESLA, INC.
|
 Courtesy of TESLA, INC. Courtesy of TESLA, INC.
|
- Lower vehicle until tires are touching the ground
NOTE:
Raise lift off locks, then hold lock release lever to keep locks free while vehicle is lowered
 Courtesy of TESLA, INC. Courtesy of TESLA, INC.
|
 Courtesy of TESLA, INC. Courtesy of TESLA, INC.
|
 Courtesy of TESLA, INC. Courtesy of TESLA, INC.
|
- Torque RH front wheel
NOTE:
5x nuts, 21 mm, 175 N.m
 Courtesy of TESLA, INC. Courtesy of TESLA, INC.
|
- Install RH front lug nut covers
NOTE:
5x covers
 Courtesy of TESLA, INC. Courtesy of TESLA, INC.
|
- Tighten RH upper subframe brace fastener
NOTE:
1x bolt, 13 mm, 26 N.m
 Courtesy of TESLA, INC. Courtesy of TESLA, INC.
|
- Clip coolant hose to RH subframe brace
NOTE:
1x fir tree clip
 Courtesy of TESLA, INC. Courtesy of TESLA, INC.
|
- Push wiring harness through underhood storage unit and seat grommet
NOTE:
1x rubber grommet
 Courtesy of TESLA, INC. Courtesy of TESLA, INC.
|
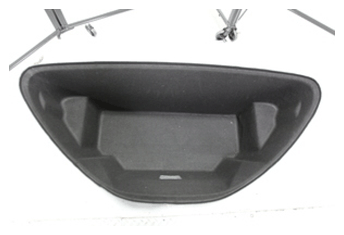
- Install underhood storage unit
NOTE:
Secure hood release cable around RH side, Make sure hood release and light connectors are accessible
 Courtesy of TESLA, INC. Courtesy of TESLA, INC.
|
- Install bolts securing underhood storage unit
NOTE:
2x nuts, 8 mm, 4 N.m, 2x bolts, 13 mm, 8 N.m
 Courtesy of TESLA, INC. Courtesy of TESLA, INC.
|
 Courtesy of TESLA, INC. Courtesy of TESLA, INC.
|
- Connect light and release switch connectors and install underhood storage carpet
NOTE:
2x connectors, Secure edges of carpet underneath underhood storage unit seal
 Courtesy of TESLA, INC. Courtesy of TESLA, INC.
|
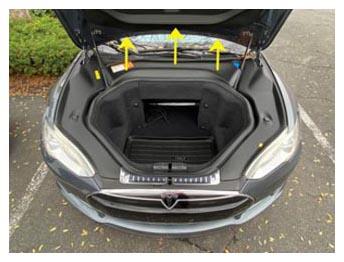
- Install LH underhood apron
 Courtesy of TESLA, INC. Courtesy of TESLA, INC.
|
 Courtesy of TESLA, INC. Courtesy of TESLA, INC.
|
- Install RH underhood apron
 Courtesy of TESLA, INC. Courtesy of TESLA, INC.
|
 Courtesy of TESLA, INC. Courtesy of TESLA, INC.
|
- Install underhood apron
 Courtesy of TESLA, INC. Courtesy of TESLA, INC.
|
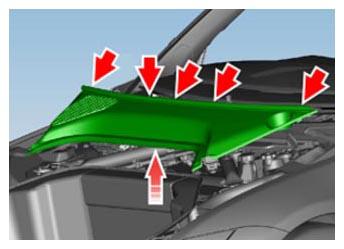
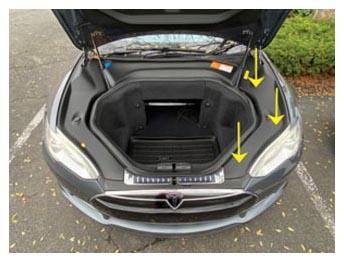
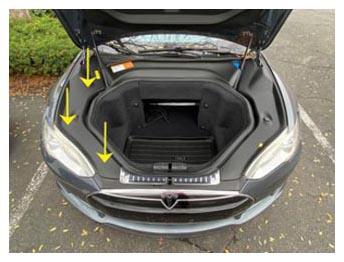
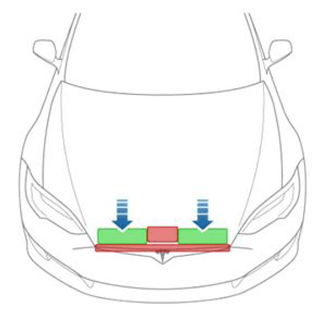
- Close hood
NOTE:
Press firmly in green highlighted areas (see image), Damage may result from pressure elsewhere on hood
 Courtesy of TESLA, INC. Courtesy of TESLA, INC.
|
- Remove vehicle from lift
NOTE:
Lower rack arms fully and remove them from under vehicle, Remove air suspension from "Jack Mode"
 Courtesy of TESLA, INC. Courtesy of TESLA, INC.
|
- Close the LH front door.
- Refer to the Alignment Requirement tables to determine whether an EPAS alignment check (EC) or four wheel alignment check (AC) is necessary. If performed, add the alignment check/adjust as a separate activity. See Alignment Requirement - Suspension
.