- Position the vehicle on a lift, but do not raise it at this time.
- Remove the 12V battery bracket beam 12V Battery Bracket Beam (Remove And Replace)
.
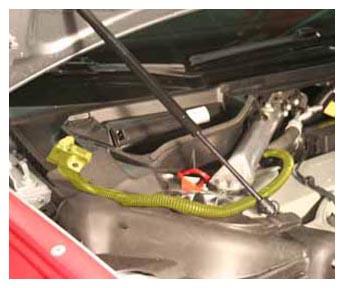
- Release the 2 fir tree clips that secure the 12V positive harness to the front crossmember.
 Courtesy of TESLA, INC. Courtesy of TESLA, INC.
|
- Move the 12V positive harness to the RH side of the vehicle to keep it out of the working area.
 Courtesy of TESLA, INC. Courtesy of TESLA, INC.
|
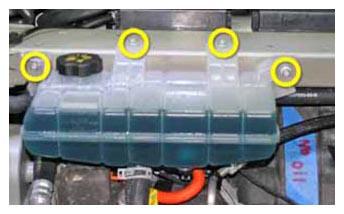
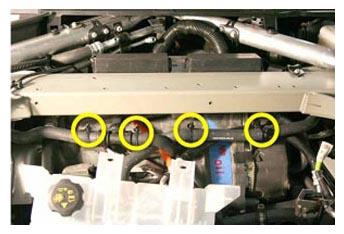
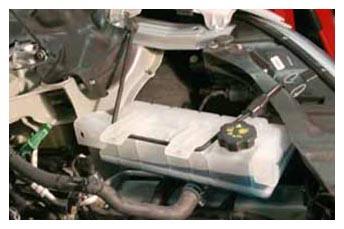
- Release the 4 bolts that secure the coolant reservoir to the front crossmember (torque 6 N.m). Do not remove the reservoir at this time.
 Courtesy of TESLA, INC. Courtesy of TESLA, INC.
|
CAUTION:
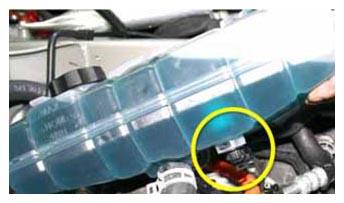
At this point in the procedure, there are still 2 coolant hoses and 1 harness attached to the reservoir.
- Carefully lift up the coolant reservoir and disconnect the coolant level sensor harness.
 Courtesy of TESLA, INC. Courtesy of TESLA, INC.
|
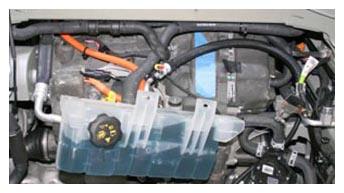
- Ensure that the cap on the reservoir is properly secured, then pull the reservoir forward into the underhood area.
NOTE:
The reservoir hose is routed behind the drive unit hose. Note the routing of the hoses and ensure that they are routed correctly during reinstallation.
 Courtesy of TESLA, INC. Courtesy of TESLA, INC.
|
- Gently pull down on the 2 coolant hoses to release the clips (x4) that secure them to the front crossmember.
 Courtesy of TESLA, INC. Courtesy of TESLA, INC.
|
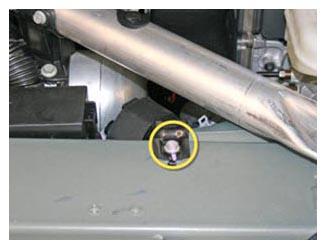
- Release the clip that secures the coolant reservoir hose to the A/C line.
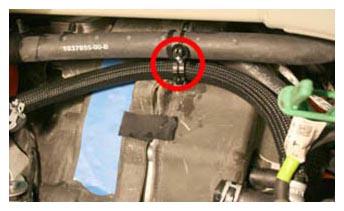 Courtesy of TESLA, INC. Courtesy of TESLA, INC.
|
- On the LH side of the 3-way fitting, clamp the coolant hose that leads to the differential housing. Remove the hose from the front drive unit and plug the nipple.
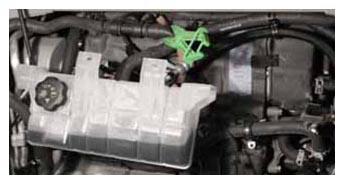 Courtesy of TESLA, INC. Courtesy of TESLA, INC.
|
 Courtesy of TESLA, INC. Courtesy of TESLA, INC.
|
- Move the coolant reservoir to the LH side of the vehicle and secure it out of the working area.
CAUTION:
The reservoir is still secured to 2 coolant hoses.
 Courtesy of TESLA, INC. Courtesy of TESLA, INC.
|
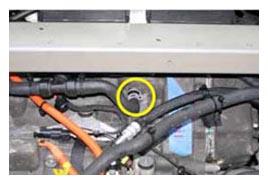
- Resecure the coolant hose to the front drive unit, but do not engage the locking ring at this time.
- Release the 2 bolts that secure each fuse box to the front crossmember (torque 5 N.m). Move both fuse boxes behind the front crossmember.
- Release the bolt that secures the bracket for coolant pump 3 (torque 6.5 N.m). Move the bracket behind the front crossmember.
 Courtesy of TESLA, INC. Courtesy of TESLA, INC.
|
- Position the support jack on top of the front crossmember and secure the 2 screws to the front crossmember.
NOTE:
The support jack mounts to the bolt holes on top of the front crossmember that secured the coolant reservoir.
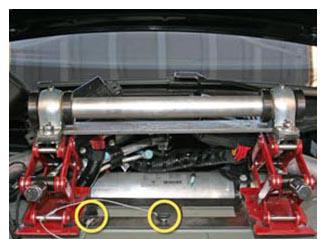 Courtesy of TESLA, INC. Courtesy of TESLA, INC.
|
- Fully lower both mounts of the support jack.
NOTE:
Work from the underhood area while an assistant works from the LH wheelwell.
- Position the LH strap:
- Slide the strap between the LH motor mount and the front drive unit.
 Courtesy of TESLA, INC. Courtesy of TESLA, INC.
|
- Have the assistant slide the strap inward, as close to the differential housing as possible.
CAUTION:
Ensure that there are no coolant hoses between the strap and the front drive unit.
- Reach behind the front crossmember and pull the strap up and over the top of the support jack.
- Secure the two ends of the strap with the carabiner.
- Slide the strap so that the carabiner is approximately 6 in (152 mm) above the front crossmember.
- Raise both sides of the support jack alternately until the strap is fully taut.
CAUTION:
Even though only one strap is used in this procedure, it is important to raise both sides of the support jack.
CAUTION:
Ensure that the strap is completely taut before continuing.
- Raise the vehicle and remove the front LH wheel.
- Release the plastic rivets that secure the rear of the upper front arch liner, then pull the arch liner rearward.
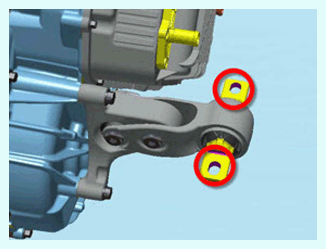
- Release the 2 bolts and washers that secure the LH side motor mount to the body (torque 65 N.m).
NOTE:
Ensure that the 2 bolts that secure the LH mount to the body each have a washer.
 Courtesy of TESLA, INC. Courtesy of TESLA, INC.
|
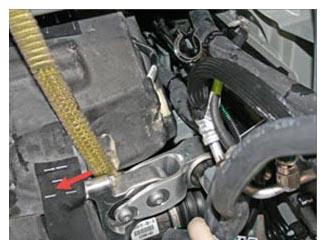
- Remove and discard the 3 bolts that secure the motor to the LH motor mount (torque 38 N.m):
 Courtesy of TESLA, INC. Courtesy of TESLA, INC.
|
- Raise the vehicle to access the LH wheelwell.
- Use a deep socket to release the rear bolt.
- Lower the vehicle.
- Working from the underhood area, release the front 2 bolts.
- Remove the LH motor mount from the vehicle.