Piston And Connecting Rod
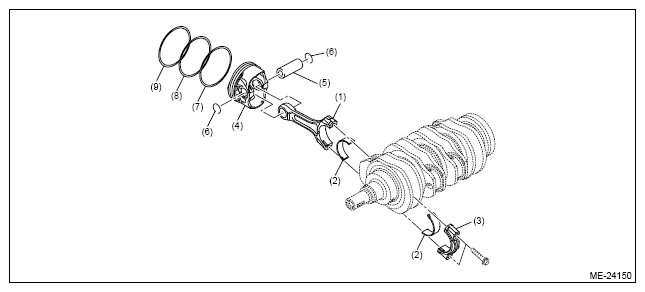 Courtesy of SUBARU OF AMERICA, INC.
|
| (1) |
CONNECTING ROD |
| (2) |
Connecting rod bearing |
| (3) |
Connecting rod cap |
| (4) |
PISTON |
| (5) |
Piston pin |
| (6) |
Circlip |
| (7) |
Oil ring |
| (8) |
Second ring |
| (9) |
Top ring |
 Courtesy of SUBARU OF AMERICA, INC.
|
| (1) |
CONNECTING ROD |
| (2) |
Connecting rod bearing (connecting rod side) |
| (3) |
Connecting rod bearing (connecting rod cap side) |
| (4) |
Connecting rod cap |
| (5) |
PISTON |
| (6) |
Piston pin |
| (7) |
Circlip |
| (8) |
Oil ring |
| (9) |
Second ring |
| (10) |
Top ring |
NOTE:
To prevent confusion of various parts, mark each part.
- Remove the connecting rod bearing from connecting rod and connecting rod cap.
- Remove the piston rings from the piston.
NOTE:
Arrange the piston rings in order so that they can be installed in their original positions without confusion.
- Remove the compression rings in the order of top ring and second ring, using piston ring expander.
- Remove the oil rings in the order of upper rail, lower rail and expander by hand.
NOTE:
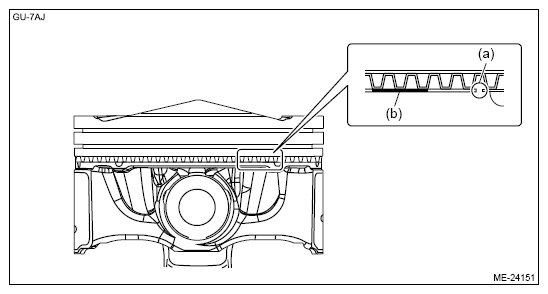
Upper/lower direction of the lower rail is specified. When reusing the lower rail, place a mark (b) before removal with a marker at the position shown in the figure toward the ring gap (a) (2.0 L model)
 Courtesy of SUBARU OF AMERICA, INC.
|
- Remove the connecting rod from piston. (2.0 L model)
CAUTION:
Do not perform the steps by any other procedures than shown below. The oil ring groove of piston may be deformed.
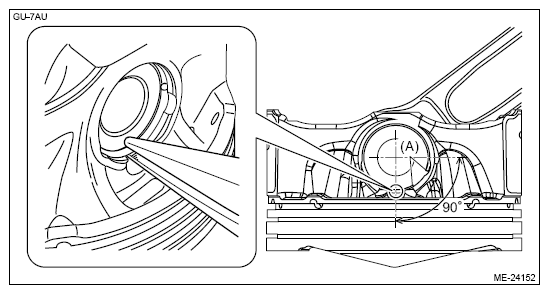
- Using long-nose pliers or similar, pinch the circlip, and rotate the circlip so that its end part (A) comes to the position shown in the figure.
CAUTION:
When rotating the circlip, use special care not to damage the piston.
 Courtesy of SUBARU OF AMERICA, INC.
|
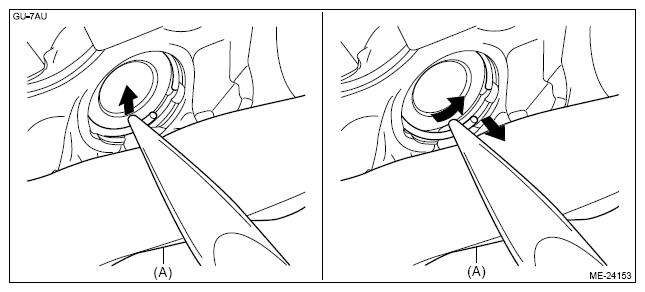
- Set a metal board (A) with approx. 1 mm (0.0394 in) in thickness that is wrapped with a waste cloth onto the piston.
NOTE:
This procedure is required to protect the piston.
- Using long-nose pliers or similar, pinch the circlip, lift and then pull it out while twisting (while rotating towards the circlip end side).
CAUTION:
When removing the circlip, use special care not to damage the piston.
 Courtesy of SUBARU OF AMERICA, INC.
|
- Remove the piston pin from piston, and remove the connecting rod from piston.
- Remove the circlip on other end from the piston using the same procedure as steps 1 - 3.
- Remove the connecting rod from piston. (2.5 L model)
- Remove the circlip on one end from the piston using a flat tip screwdriver.
NOTE:
Be careful not damage the piston and piston pin, by wrapping the tip of flat tip screwdriver with tape.
- Remove the piston pin from piston, and remove the connecting rod from piston.
- Remove the circlip on other end from the piston using the same procedure as step (1).