- Install the connecting rod bearing to the connecting rod and connecting rod cap.
- Install a new circlip on one side of the piston using a flat tip screwdriver.
NOTE:
- Be careful not damage the piston, by wrapping the tip of flat tip screwdriver with tape
.
- Install the circlip so that its end part (a) does not match the circlip groove cutout portion (b)
.
- 2.0 L model
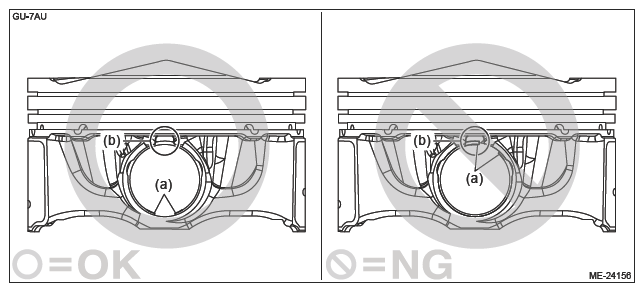 Courtesy of SUBARU OF AMERICA, INC. Courtesy of SUBARU OF AMERICA, INC.
|
- 2.5 L model
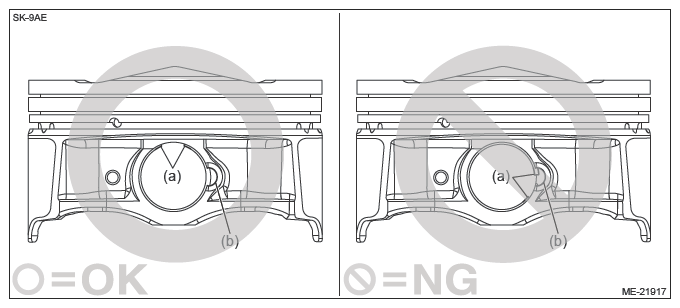 Courtesy of SUBARU OF AMERICA, INC. Courtesy of SUBARU OF AMERICA, INC.
|
- Make sure the circlip is firmly inserted into the circlip groove
.
- Set the piston to the connecting rod.
NOTE:
Align the front mark of piston and the connecting rod direction correctly as shown in the figure.
NOTE:
- 2.0 L model
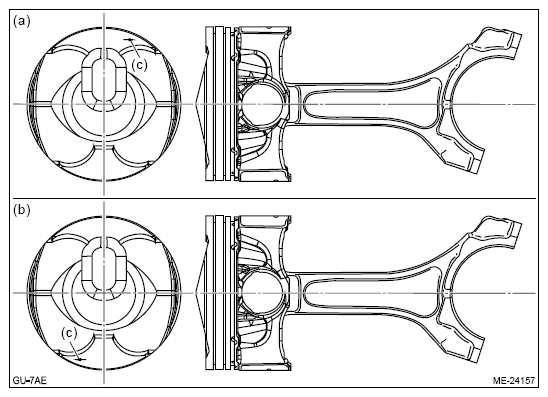 Courtesy of SUBARU OF AMERICA, INC. Courtesy of SUBARU OF AMERICA, INC.
|
| (a) |
RH side (#1 and #3) |
| (b) |
LH side (#2 and #4) |
| (c) |
Front mark |
- 2.5 L model
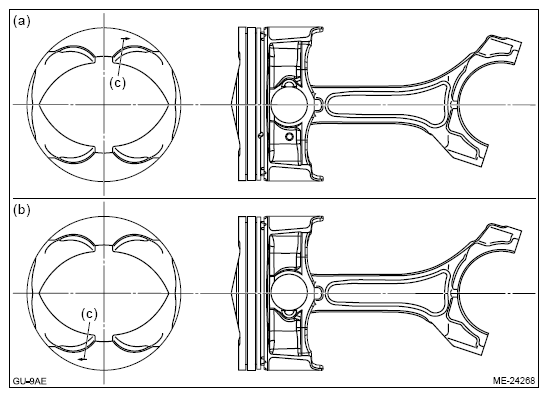 Courtesy of SUBARU OF AMERICA, INC. Courtesy of SUBARU OF AMERICA, INC.
|
| (a) |
RH side (#1 and #3) |
| (b) |
LH side (#2 and #4) |
| (c) |
Front mark |
- Apply engine oil to the piston pin, and attach the piston pin.
- Install a new circlip on the piston using a flat tip screwdriver.
NOTE:
- Be careful not damage the piston and piston pin, by wrapping the tip of flat tip screwdriver with tape
.
- Install the circlip so that its end part (a) does not match the circlip groove cutout portion (b)
.
- 2.0 L model
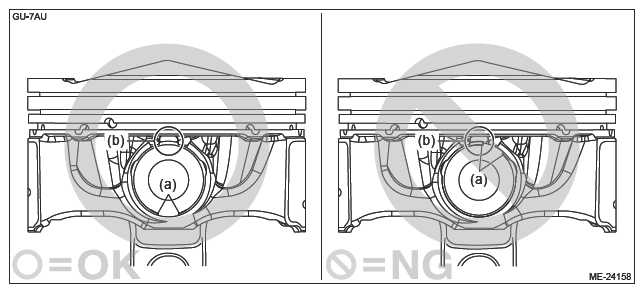 Courtesy of SUBARU OF AMERICA, INC. Courtesy of SUBARU OF AMERICA, INC.
|
- 2.5 L model
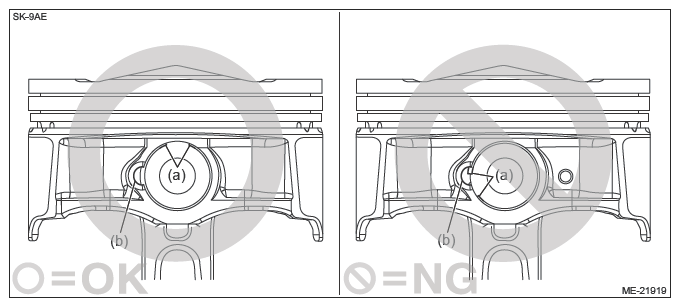 Courtesy of SUBARU OF AMERICA, INC. Courtesy of SUBARU OF AMERICA, INC.
|
- Make sure the circlip is firmly inserted into the circlip groove
.
- Install the oil rings to the piston in the order of expander, lower rail and upper rail by hand. (2.0 L model)
NOTE:
Oil ring consists of the upper rail, expander and lower rail.
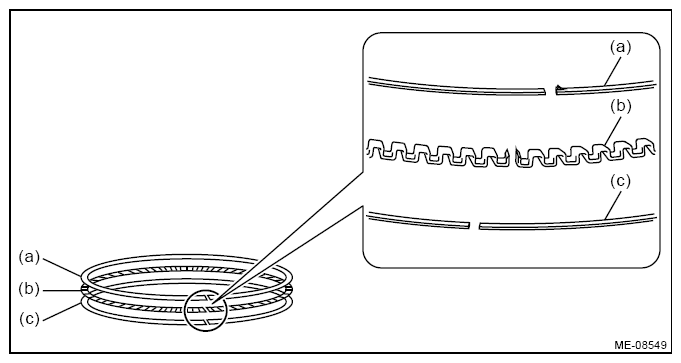 Courtesy of SUBARU OF AMERICA, INC. Courtesy of SUBARU OF AMERICA, INC.
|
| (a) |
Upper rail |
| (b) |
Expander |
| (c) |
Lower rail |
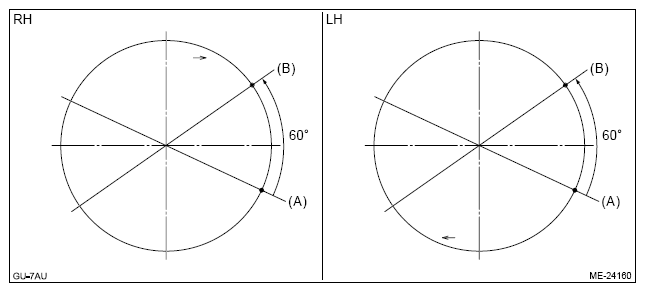
- Set the ring gap of the expander to the position (A).
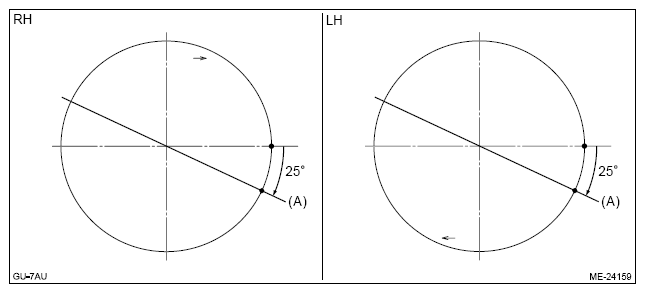 Courtesy of SUBARU OF AMERICA, INC. Courtesy of SUBARU OF AMERICA, INC.
|
- Set the ring gap of the lower rail at position (B), located 60° counterclockwise from the position (A) in the figure.
NOTE:
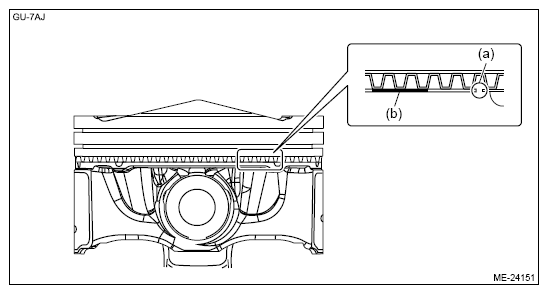
Upper/lower direction of the lower rail is specified. When setting the lower rail, set it so that the marking (b) is located on the position shown in the figure toward the ring gap (a).
 Courtesy of SUBARU OF AMERICA, INC. Courtesy of SUBARU OF AMERICA, INC.
|
 Courtesy of SUBARU OF AMERICA, INC. Courtesy of SUBARU OF AMERICA, INC.
|
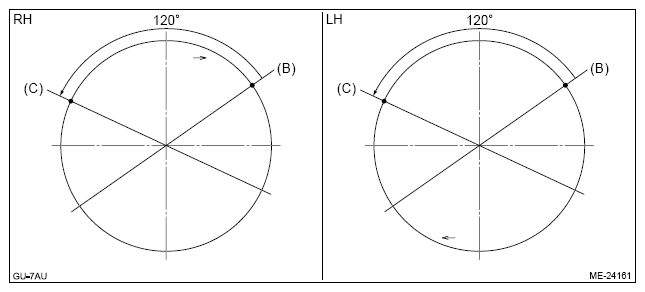
- Set the ring gap of the upper rail at position (C), located 120° counterclockwise from the position (B) in the figure.
 Courtesy of SUBARU OF AMERICA, INC. Courtesy of SUBARU OF AMERICA, INC.
|
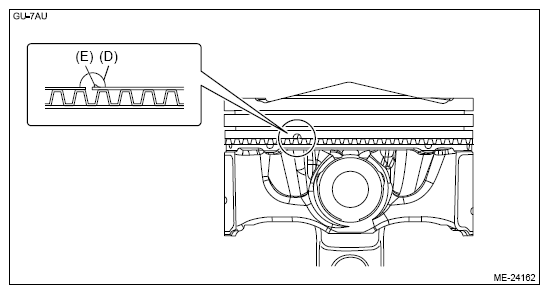
- Align the upper rail spin stopper (E) to the side hole (D) on the piston.
 Courtesy of SUBARU OF AMERICA, INC. Courtesy of SUBARU OF AMERICA, INC.
|
- Install the compression rings to the piston in the order of second ring and top ring, using piston ring expander. (2.0 L model)
- Set the ring gap of the second ring to the position (A) in the figure.
NOTE:
The ring mark (2HR) on the second ring should face the piston crown.
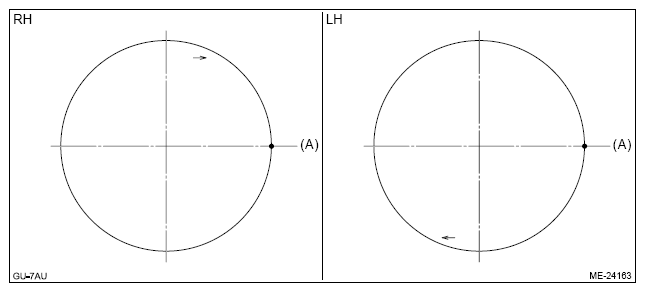 Courtesy of SUBARU OF AMERICA, INC. Courtesy of SUBARU OF AMERICA, INC.
|
- Set the ring gap of top ring at (B) in the figure on the 180° opposite direction of (A).
NOTE:
The ring mark (1HR) of the top ring should face the piston crown.
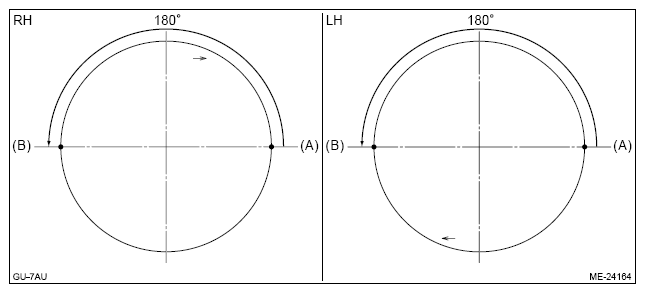 Courtesy of SUBARU OF AMERICA, INC. Courtesy of SUBARU OF AMERICA, INC.
|
- Check again that the piston rings are installed correctly. (2.0 L model)
NOTE:
Also check that the ring gaps is not positioned within the range of piston skirt extended line.
- Install the oil rings to the piston in the order of expander, lower rail and upper rail by hand. (2.5 L model)
NOTE:
Oil ring consists of the upper rail, expander and lower rail.
Courtesy of SUBARU OF AMERICA, INC.
|
| (a) |
Upper rail |
| (b) |
Expander |
| (c) |
Lower rail |
- Set the ring gap of the expander to the position (A).
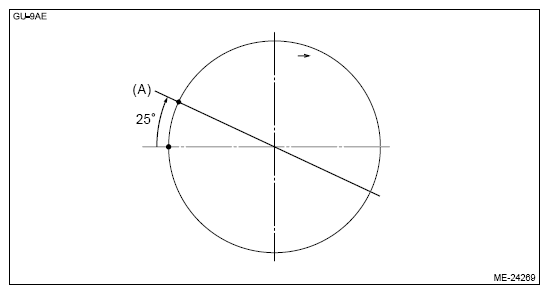 Courtesy of SUBARU OF AMERICA, INC. Courtesy of SUBARU OF AMERICA, INC.
|
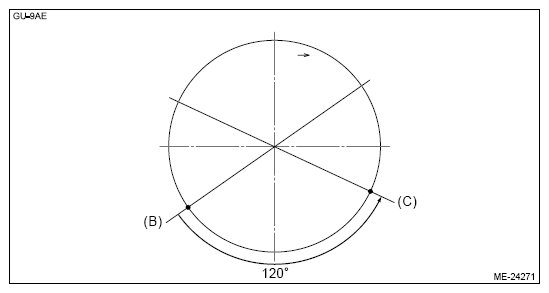
- Set the ring gap of the lower rail at position (B), located 60° counterclockwise from the position (A) in the figure.
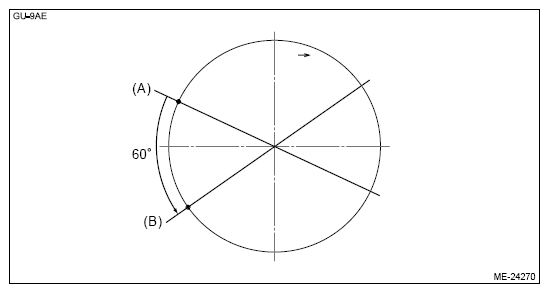 Courtesy of SUBARU OF AMERICA, INC. Courtesy of SUBARU OF AMERICA, INC.
|
- Set the ring gap of the upper rail at position (C), located 120° counterclockwise from the position (B) in the figure.
 Courtesy of SUBARU OF AMERICA, INC. Courtesy of SUBARU OF AMERICA, INC.
|
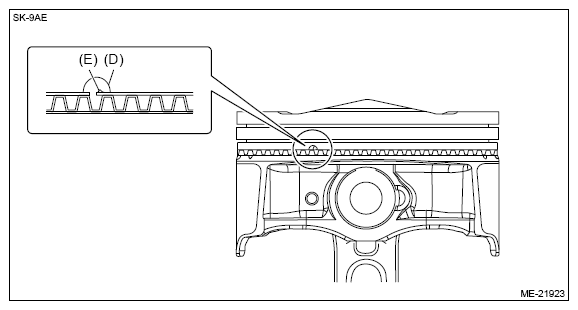
- Align the upper rail spin stopper (E) to the side hole (D) on the piston.
 Courtesy of SUBARU OF AMERICA, INC. Courtesy of SUBARU OF AMERICA, INC.
|
- Install the compression rings to the piston in the order of second ring and top ring, using piston ring expander. (2.5 L model)
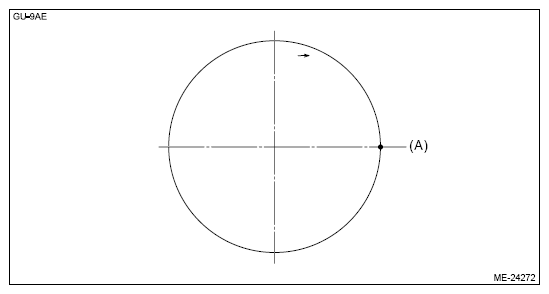
- Set the ring gap of the second ring to the position (A) in the figure.
NOTE:
The ring mark (2RE) on the second ring should face the piston crown.
 Courtesy of SUBARU OF AMERICA, INC. Courtesy of SUBARU OF AMERICA, INC.
|
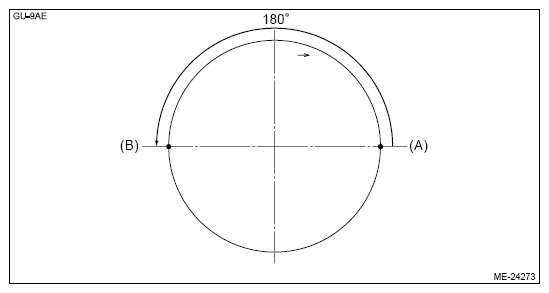
- Set the ring gap of top ring at (B) in the figure on the 180° opposite direction of (A).
NOTE:
The ring mark (1RE) of the top ring should face the piston crown.
 Courtesy of SUBARU OF AMERICA, INC. Courtesy of SUBARU OF AMERICA, INC.
|
- Check again that the piston rings are installed correctly. (2.5 L model)
NOTE:
Also check that the ring gaps is not positioned within the range of piston skirt extended line.