Power Steering Gear: Reassembly
- Lubricate pinion gear, rack teeth, bearings and dust cover seal with lithium grease. Lubricate all hydraulic parts with power steering fluid.
- Install lower pinion bearing (enclosed side of bearing facing downward) and lock ring (with chamfer on lock ring facing outward). Using Remover/Installer Sleeve (90 06 407
), install upper pinion bushing and hydraulic seal into pinion housing of gear housing.
- Install rack inner hydraulic seal onto rack. Use a thin plastic sheath, or metal foil to cover rack teeth to protect sealing lip of seal.
- Install rack into housing. Install inner hydraulic seal into housing using rack piston as a press. Do not use more than 500 lbs. (226.8 kg) of force.
- Install bushing in housing (smaller bore facing in). Install washer against bushing. Install new "O" ring on outer hydraulic seal support. Install old seal (if not damaged).
- Slide sealing ring support carefully onto rack to avoid damaging sealing lip. Using Sleeve (83 90 148
), press sealing ring support into housing. Center rack.
- Rotate rack so that rack teeth will mesh with pinion gear teeth when it is installed. Hold pinion gear (with spool valve), so that groove in end of shaft points toward the left (9 o'clock position), when pinion teeth engage rack teeth.
- Insert pinion. Pinion should rotate so that groove in end of pinion points toward front (12 o'clock position), with rack centered. Install pinion lock nut. Tighten lock nut. Install cover.
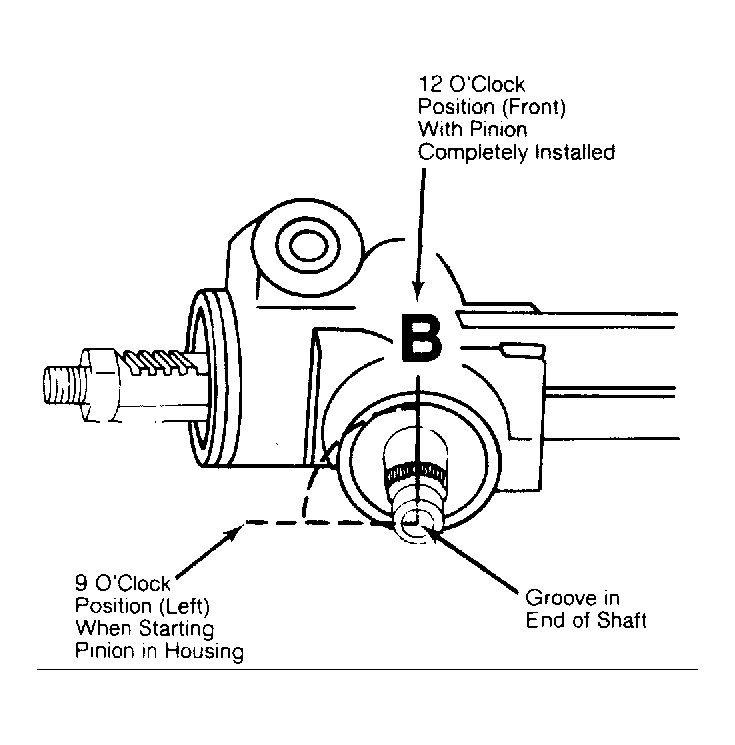 Courtesy of SAAB-SCANIA OF AMERICA, INC.
- Install washer, needle bearing, sealing ring, dust cover, and lock ring onto top of pinion gear (spool valve). Protect seal lips with tape or plastic sleeve over splines of pinion.
- Install bearing piston, spring and adjusting nut in gear housing. Tighten adjusting nut until bearing piston firmly contacts rack. Back off adjusting nut 30-50 degrees. Install and tighten lock nut.
- Install plastic sleeves (end stops) and inner ball joints, with tie rods, to rack ends. Hold rack in soft-jawed vise. Tighten ball joints. Lock inner ball joints by tapping tab on ball joint into rack. DO NOT use pinion as support when loosening or tightening ball joints.
- Install lock ring for sealing ring support in end of gear housing. Turn pinion until inner ball joint presses against sealing ring support.
- Press in support and, at the same time, install sealing ring in groove with a thin screwdriver. Install rubber boots, breathing tube and hydraulic lines.