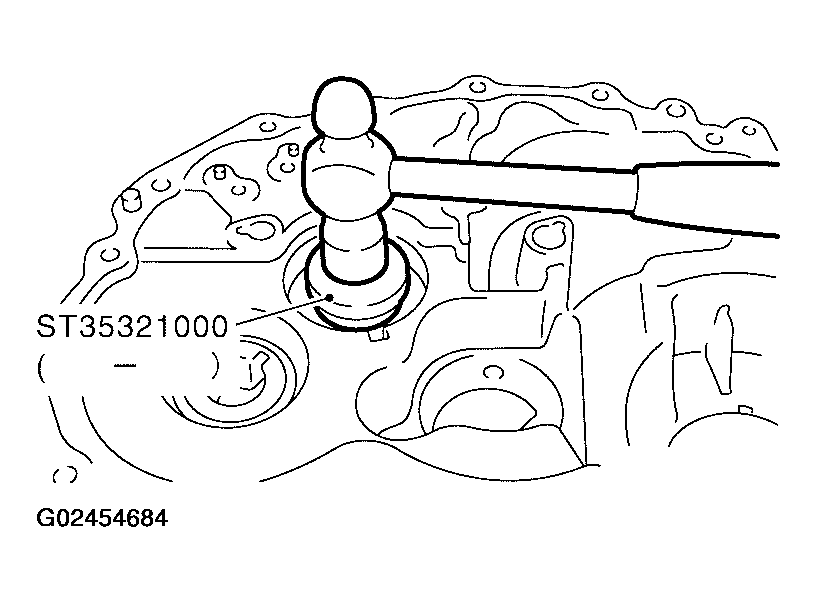
- Install a new input shaft oil seal from the clutch housing end of the side, to the depth of 1.8 - 2.8 mm (0.071 - 0.110 in) using Tool (drift) as shown.
CAUTION:
Oil seals are not reusable.
 Courtesy of NISSAN MOTOR CO., U.S.A.
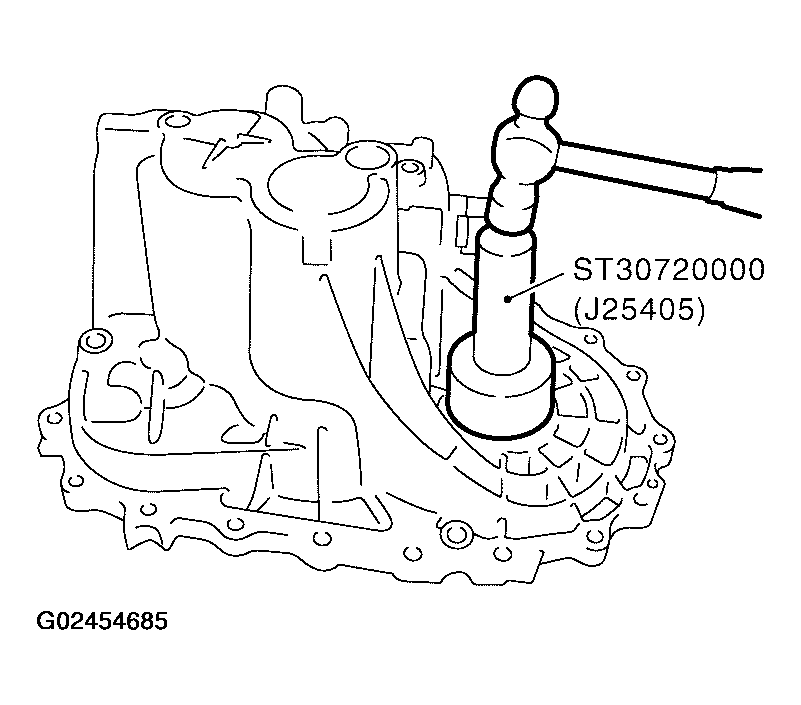
- Install a new differential oil seal using Tool (drift) as shown.
CAUTION:
Oil seals are not reusable.
 Courtesy of NISSAN MOTOR CO., U.S.A.
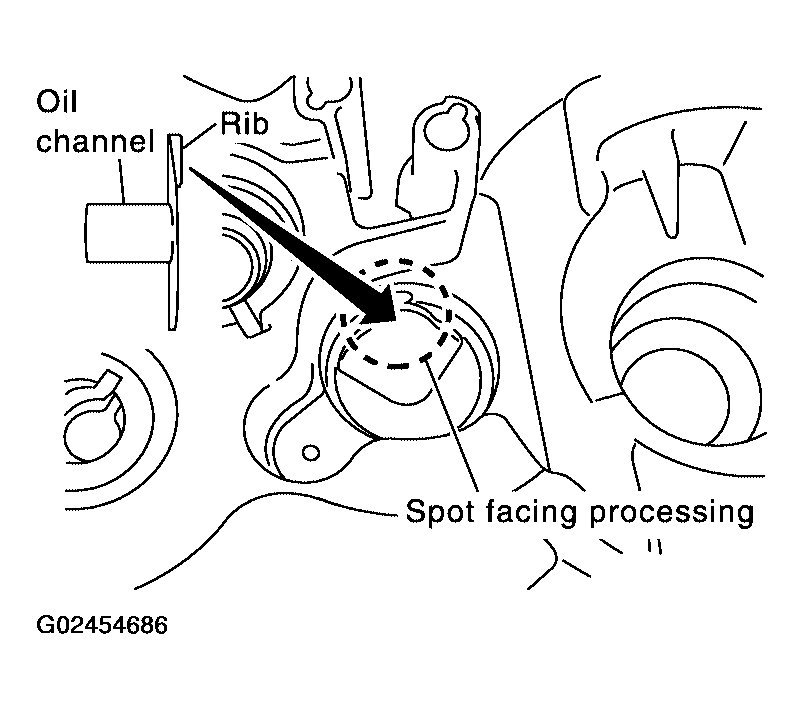
- Install the oil channel on the mainshaft side as shown.
CAUTION:
Position the oil channel with the orientation as shown, for installation.
 Courtesy of NISSAN MOTOR CO., U.S.A.
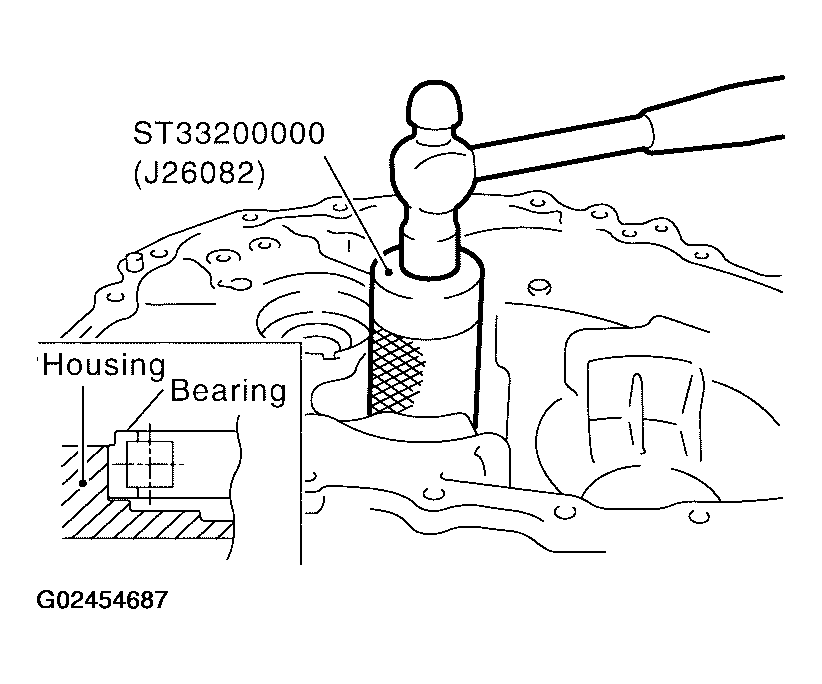
- Install the mainshaft front bearing using Tool (drift) as shown.
CAUTION:
Position the mainshaft front bearing with the orientation as shown, for installation
 Courtesy of NISSAN MOTOR CO., U.S.A.
- Install the mainshaft front bearing retainer.
CAUTION:
Install the bearing retainer with the punched surface facing up.
- Bearing retainer bolt: 6.27 - 8.33 N.m (0.64 - 0.84 kg-m, 56 - 73 in-lb)
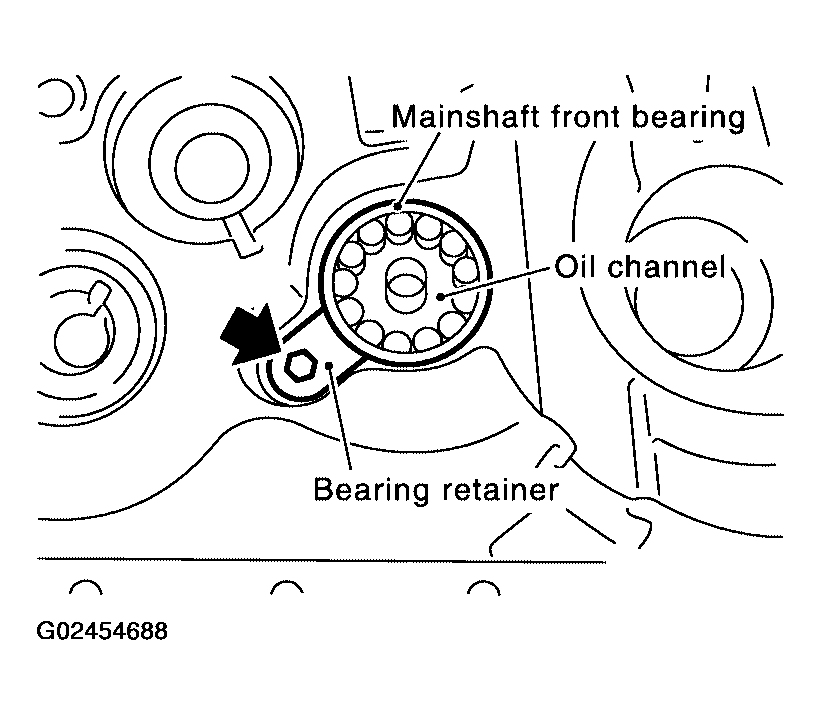 Courtesy of NISSAN MOTOR CO., U.S.A.
- Install the differential side bearing outer race using Tool as shown.
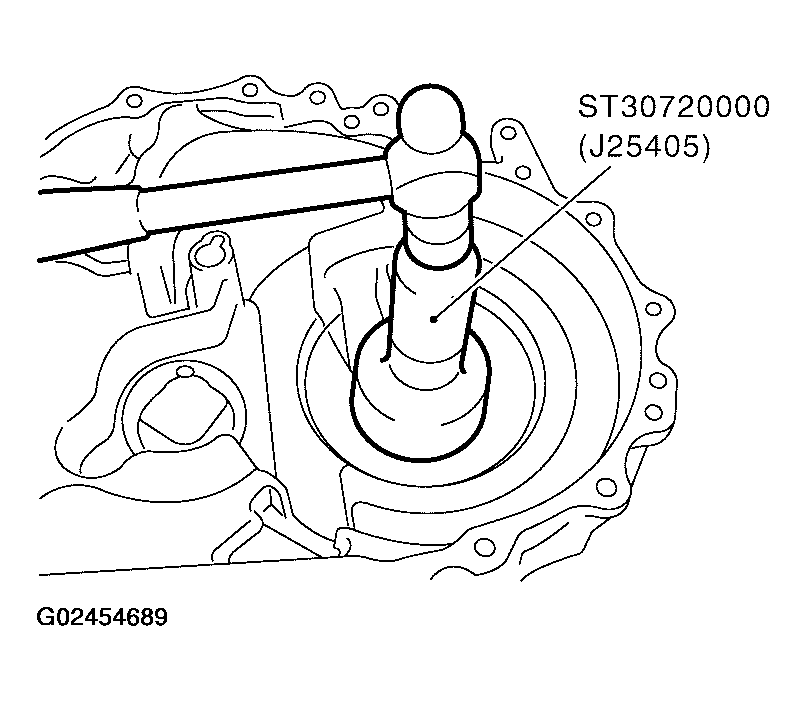 Courtesy of NISSAN MOTOR CO., U.S.A.
- Install the final drive assembly into the clutch housing.
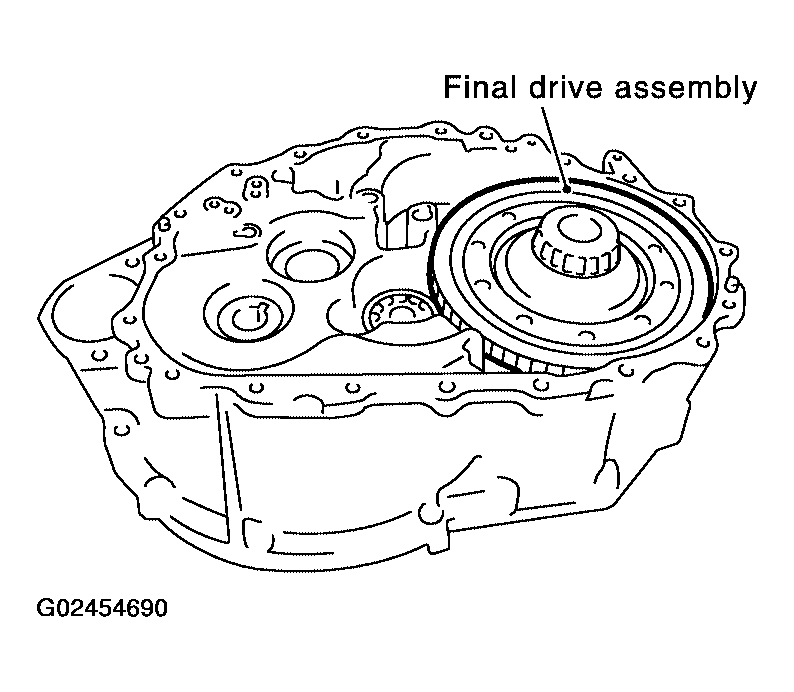 Courtesy of NISSAN MOTOR CO., U.S.A.
- Install the input shaft assembly, mainshaft assembly, and reverse idler gear assembly into the clutch housing.
CAUTION:
Do not damage the input shaft oil seal.
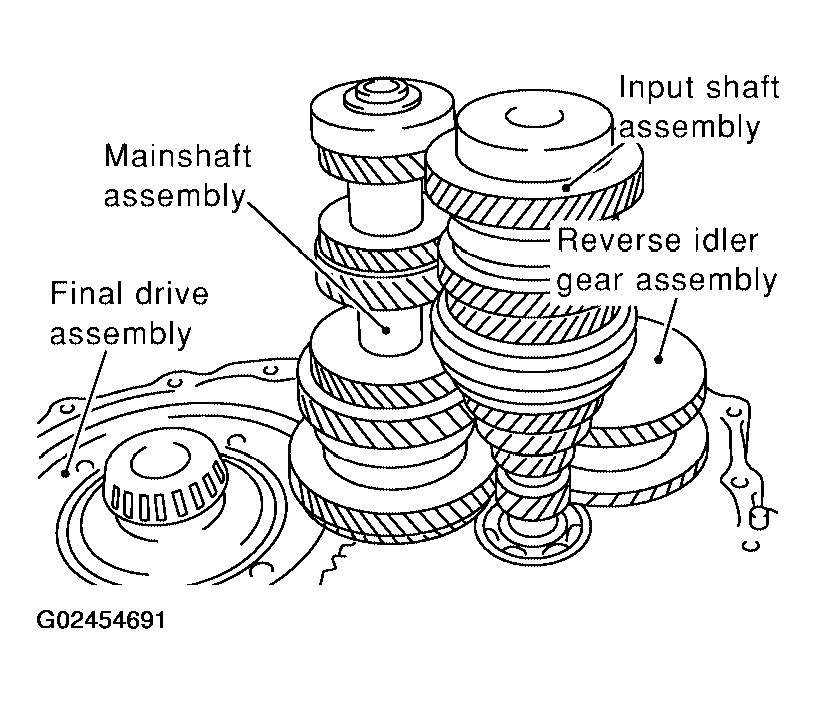 Courtesy of NISSAN MOTOR CO., U.S.A.
- Install the 1st-2nd fork rod bracket onto the 1st-2nd fork rod, and then install a new retaining pin as shown.
CAUTION:
Retaining pins are not reusable.
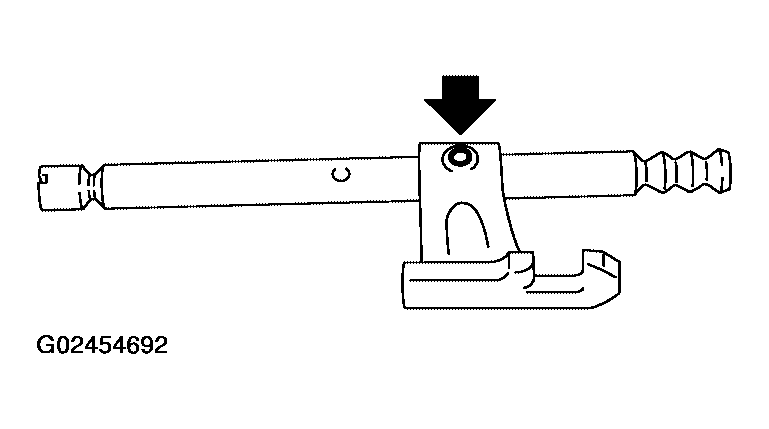 Courtesy of NISSAN MOTOR CO., U.S.A.
- Install the 1st-2nd fork rod and the 1st-2nd shift fork, and then install a new retaining pin.
CAUTION:
Retaining pins are not reusable.
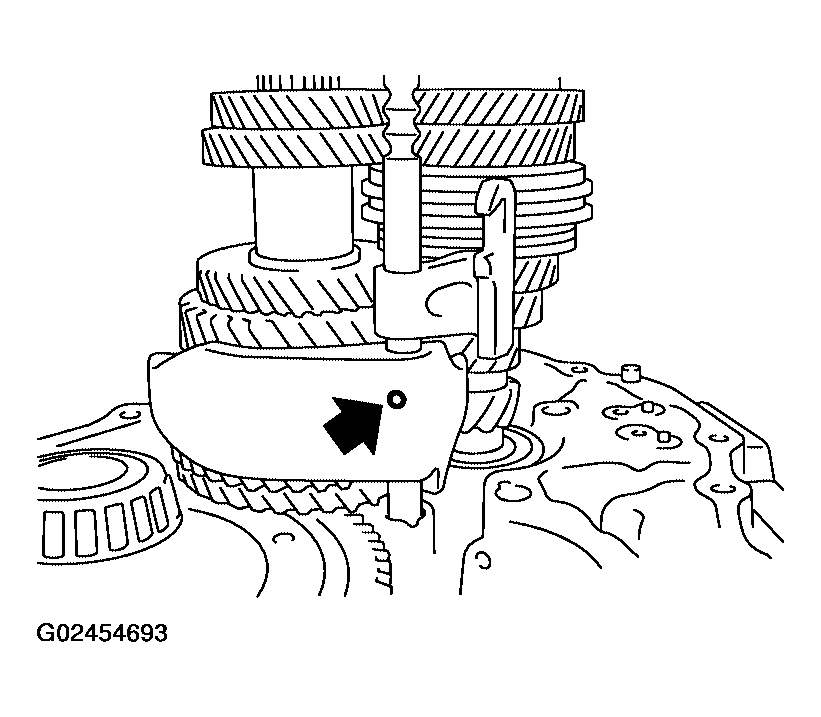 Courtesy of NISSAN MOTOR CO., U.S.A.
- Install the shift check sleeve.
- Install the 3rd-4th bracket, 3rd-4th shift fork, and 3rd-4th fork rod with the interlock pin.
- Install the new stopper rings onto the 3rd-4th shift fork.
CAUTION:
Stopper rings are not reusable.
- Install a new retaining pin onto the 3rd-4th bracket.
CAUTION:
Retaining pins are not reusable.
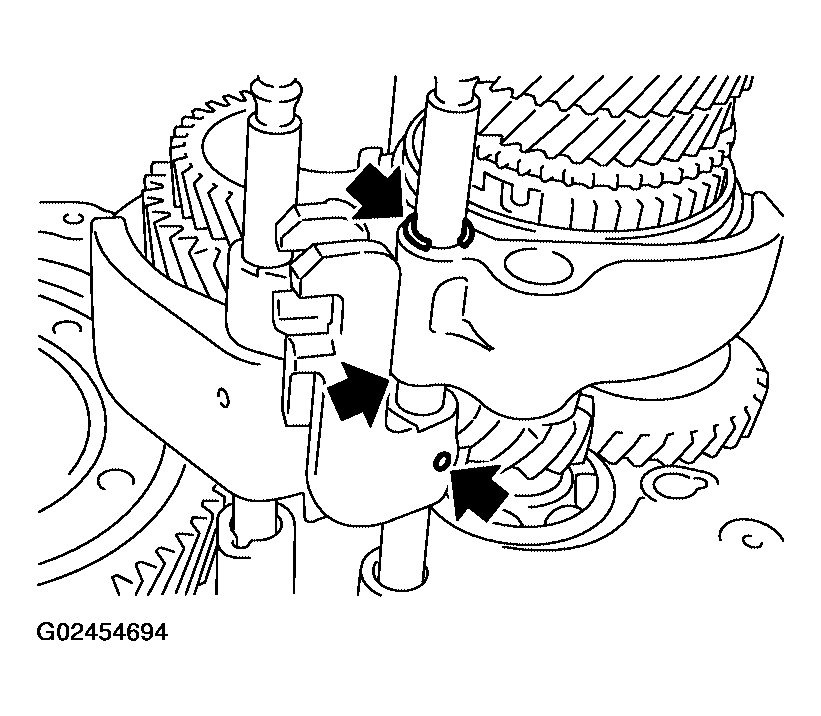 Courtesy of NISSAN MOTOR CO., U.S.A.
- Install the 2 check balls.
- Install the 5th-6th bracket, 5th-6th shift fork, and 5th-6th fork rod.
- Install new stopper rings onto the 5th-6th bracket with interlock pin.
CAUTION:
Stopper rings are not reusable.
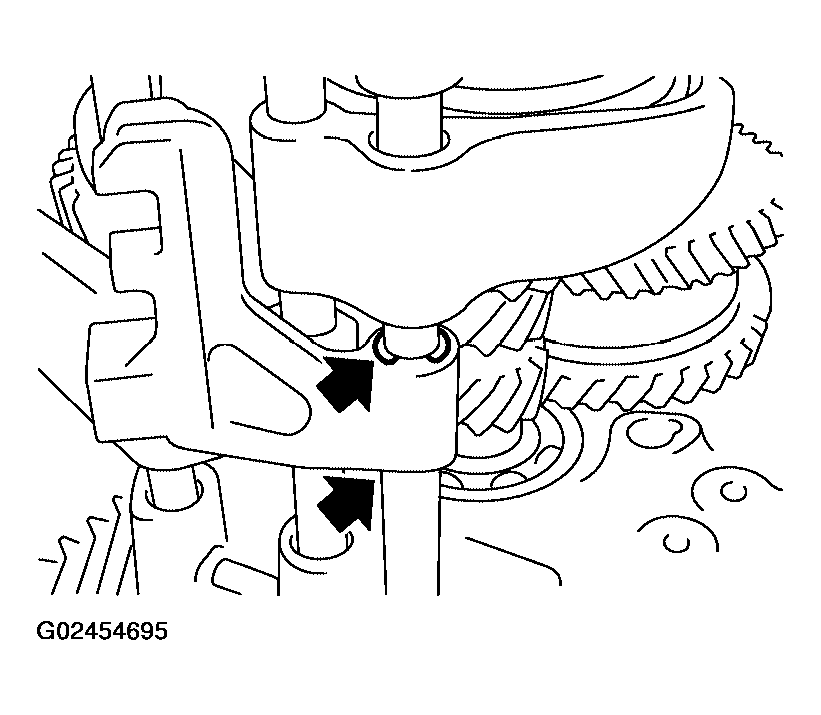 Courtesy of NISSAN MOTOR CO., U.S.A.
- Install a new retaining pin onto the 5th-6th shift fork.
CAUTION:
Retaining pins are not reusable.
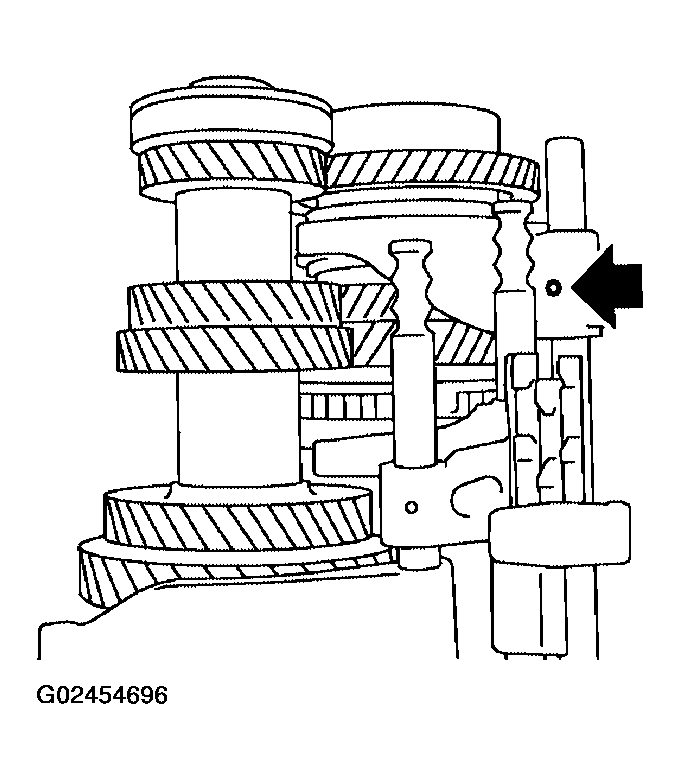 Courtesy of NISSAN MOTOR CO., U.S.A.
- Install the two check balls.
- Install the check ball, 5th-6th shift check sleeve, 5th-6th check spring, and 5th-6th check ball plug. Discard the check ball plug.
CAUTION:
- Do not reuse the check ball plug.
- Do not drop the check ball.
- Install the reverse bracket fork rod and reverse lever bracket.
- Install a new retaining pin onto the reverse bracket.
CAUTION:
Retaining pins are not reusable.
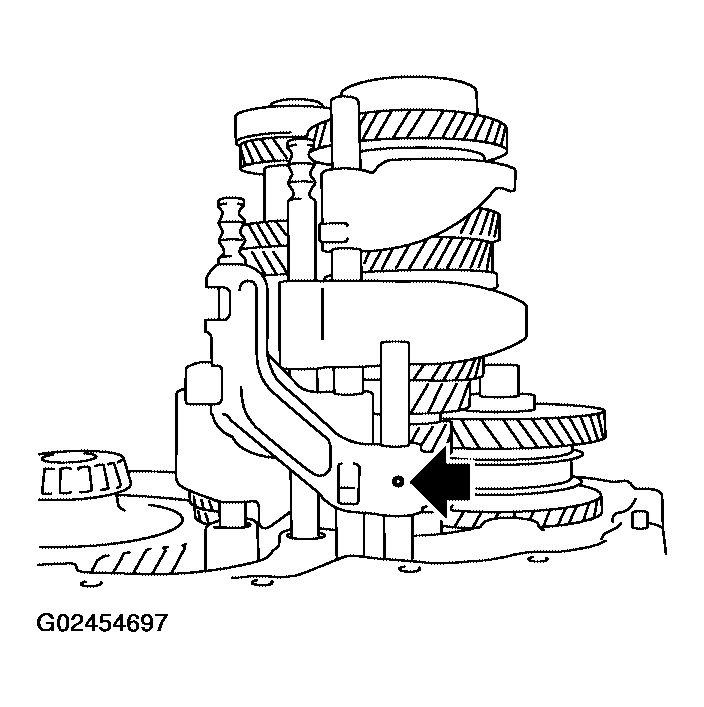 Courtesy of NISSAN MOTOR CO., U.S.A.
- Install the reverse shift fork and reverse fork rod.
- Install the reverse lever assembly using the following steps:
- Install the shifter cap onto the reverse lever assembly cam, and then install them onto the reverse shift fork.
CAUTION:
Do not drop the shifter cap.
- While lifting the reverse shift fork, align the cam with the reverse bracket.
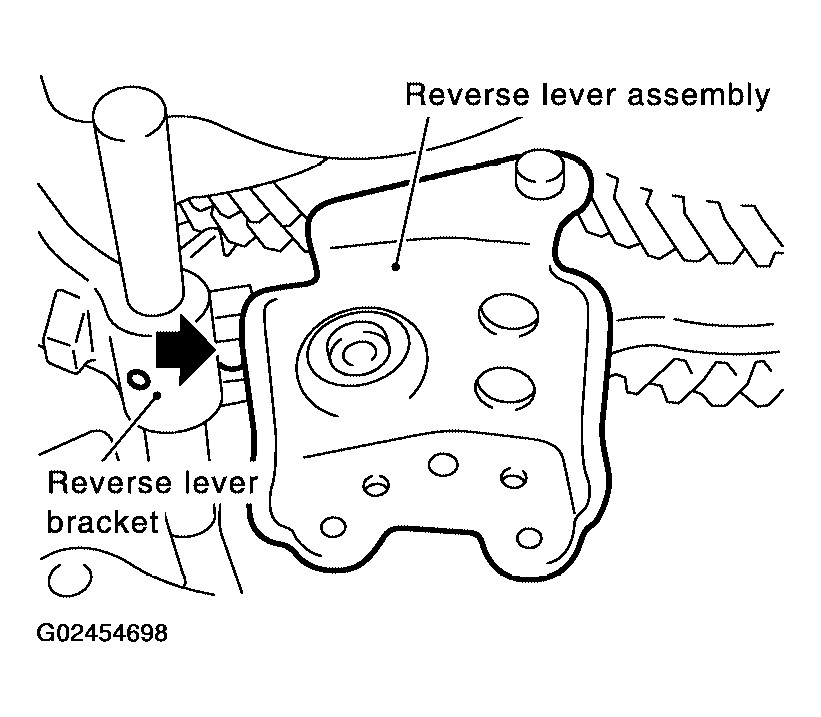 Courtesy of NISSAN MOTOR CO., U.S.A.
- Tighten the bracket bolts to specification, and install the reverse lever assembly.
- Bracket bolts: 11.8 - 15.6 N.m (1.2 - 1.5 kg-m, 9 - 11 ft-lb)
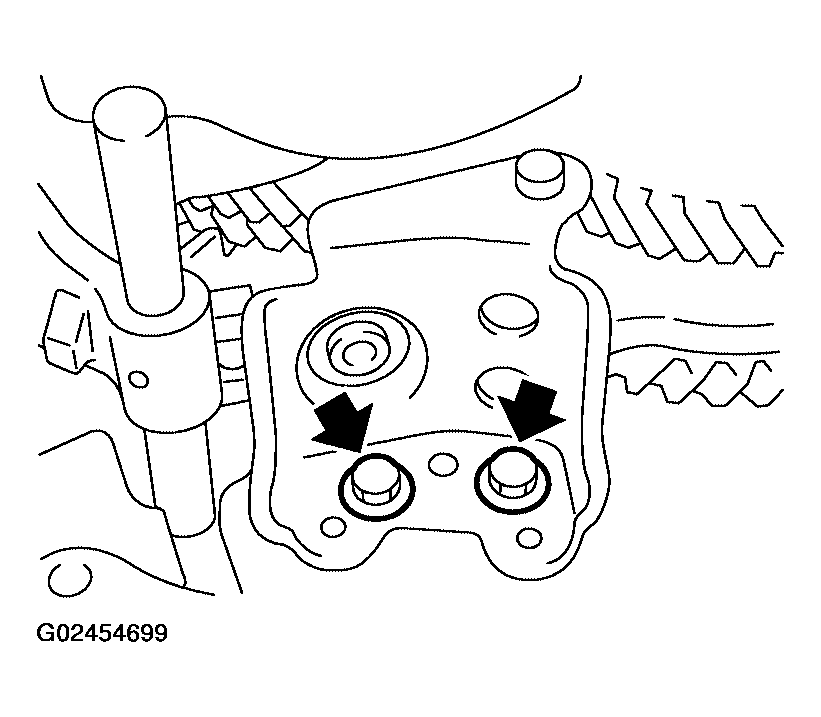 Courtesy of NISSAN MOTOR CO., U.S.A.
- Install the check ball, reverse shift check sleeve, reverse check spring, and reverse check ball plug.
CAUTION:
- Do not reuse the check ball plug.
- Do not drop the check ball.
- Install the magnet onto the clutch housing.
- Install the selected input shaft adjusting shim onto the input shaft.
- Install the baffle plate and oil gutter.
- Install the transaxle case using the following steps:
- Install the selected mainshaft rear bearing adjusting shim into the transaxle case.
- Temporarily install the snap ring of the mainshaft rear bearing into the transaxle case.
CAUTION:
Do not reuse the snap ring.
- Apply sealant to the mating surfaces of the transaxle case and clutch housing as shown. Use Genuine Anaerobic Liquid Gasket or equivalent. Refer to RECOMMENDED CHEMICAL PRODUCTS AND SEALANTS
.
CAUTION:
Remove any old sealant adhering to the mounting surfaces. Also remove any moisture, oil, or foreign material adhering to the sealant application and mounting surfaces.
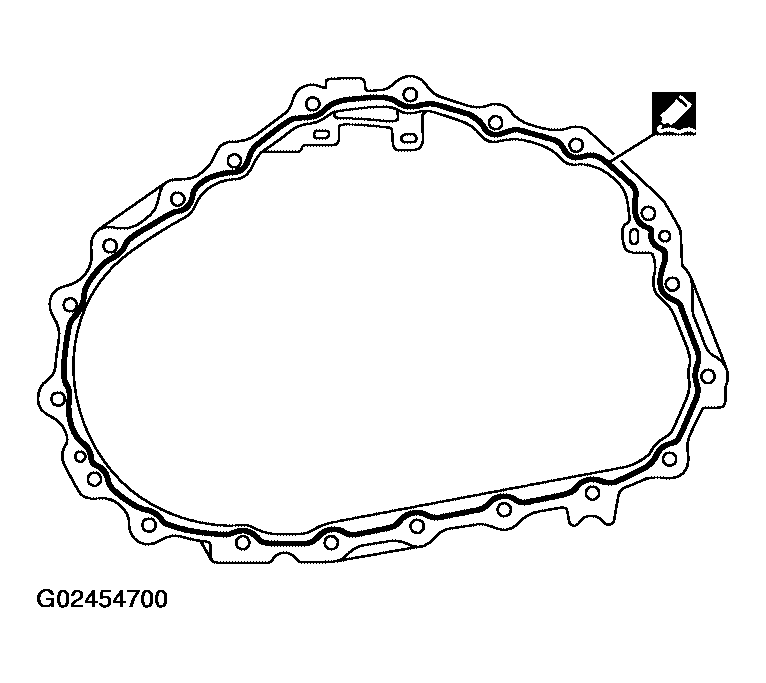 Courtesy of NISSAN MOTOR CO., U.S.A.
- Using a snap ring of the mainshaft rear bearing temporarily, install the transaxle case over the clutch housing as shown.
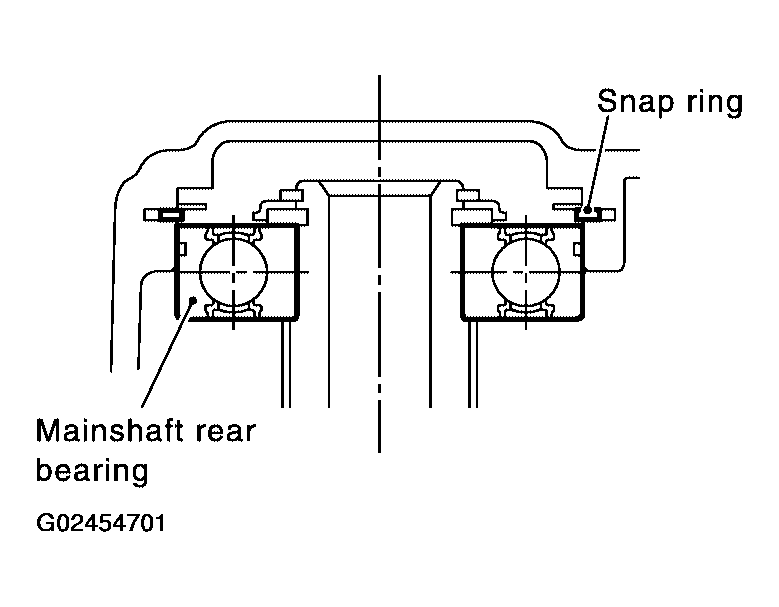 Courtesy of NISSAN MOTOR CO., U.S.A.
- Through the bore plug mounting hole, with the snap ring stretched, lift up the mainshaft assembly from the control assembly mounting hole.
- Securely install the snap ring onto the mainshaft rear bearing as shown.
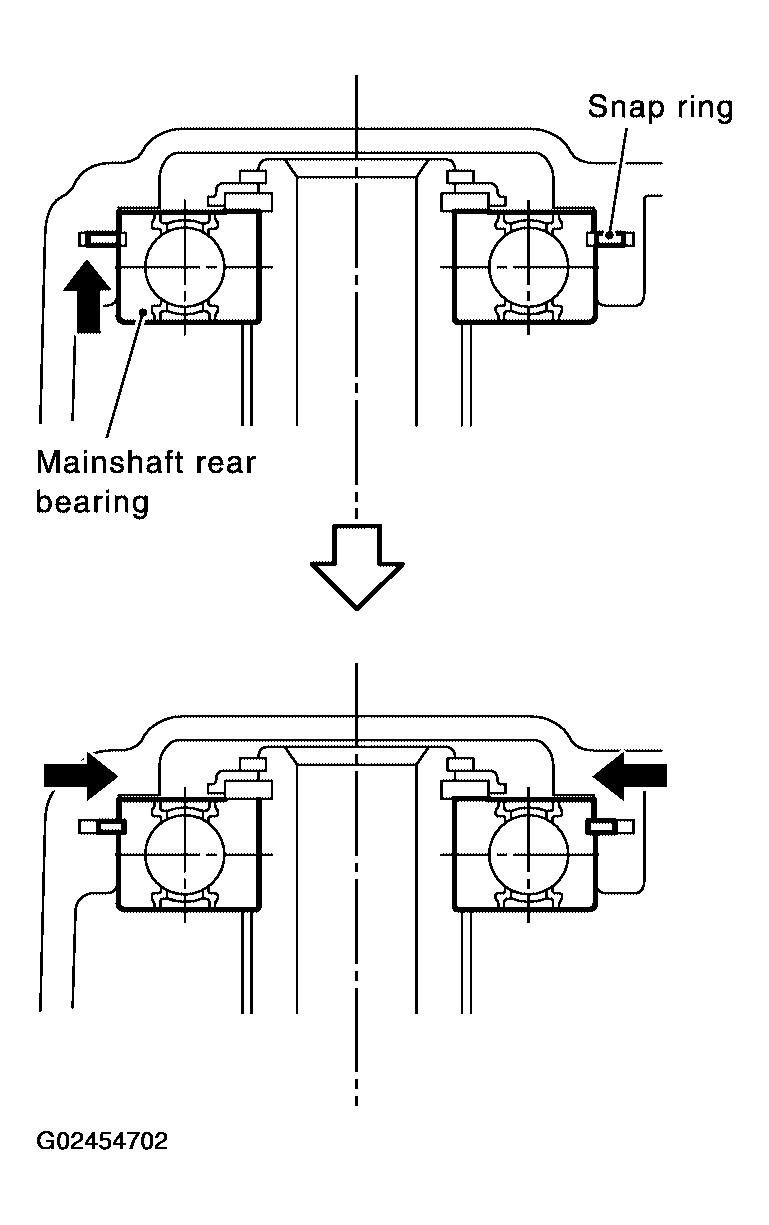 Courtesy of NISSAN MOTOR CO., U.S.A.
- Tighten the "A" bolts (gold) and new "B" bolts (black) to specification.
- "A" Bolt: 50.0 - 53.9 N.m (5.1 - 5.4 kg-m, 37 - 39 ft-lb)
- "B" Bolt: 63.0 - 66.9 N.m (6.5 - 6.8 kg-m, 47 - 49 ft-lb)
CAUTION:
Always replace the "B" bolts as they are self-sealing bolts.
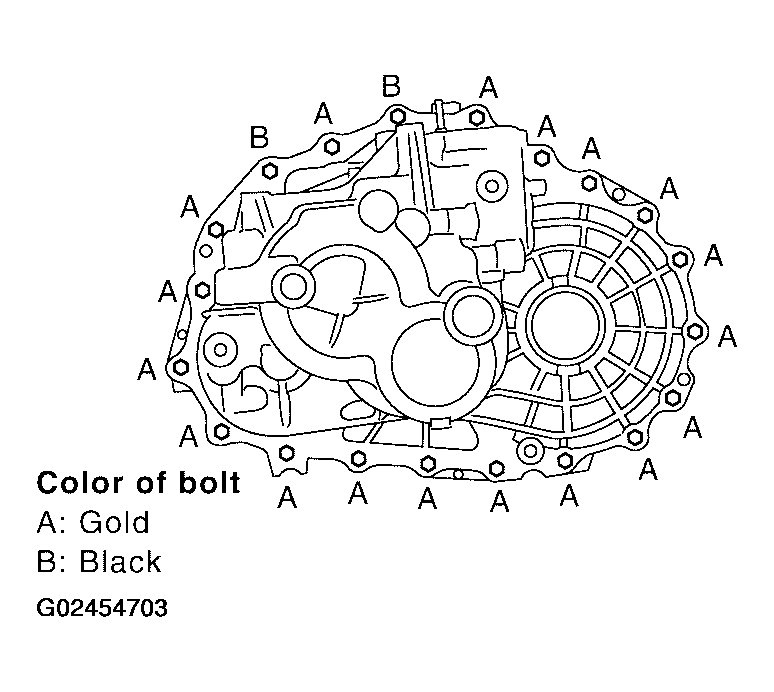 Courtesy of NISSAN MOTOR CO., U.S.A.
- Install the control assembly using new O-rings.
CAUTION:
Do not reuse the O-ring.
- Install a new shift check and a new stopper bolt.
CAUTION:
Shift check and stopper bolt are not reusable.
- Install a new bore plug using Tool (drift) as shown.
CAUTION:
Bore plugs are not reusable.
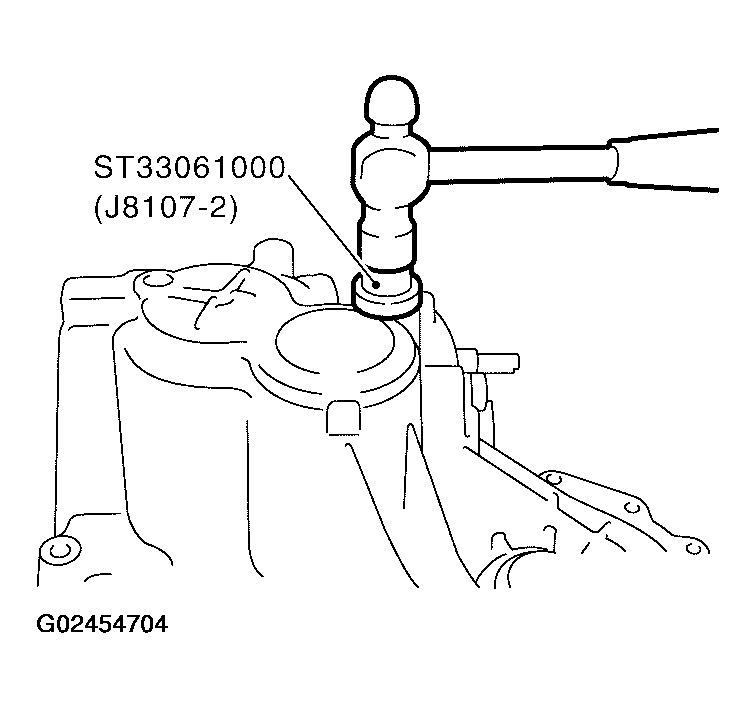 Courtesy of NISSAN MOTOR CO., U.S.A.
- Install the new welch plug using Tool (drift).
CAUTION:
Do not reuse the welch plug
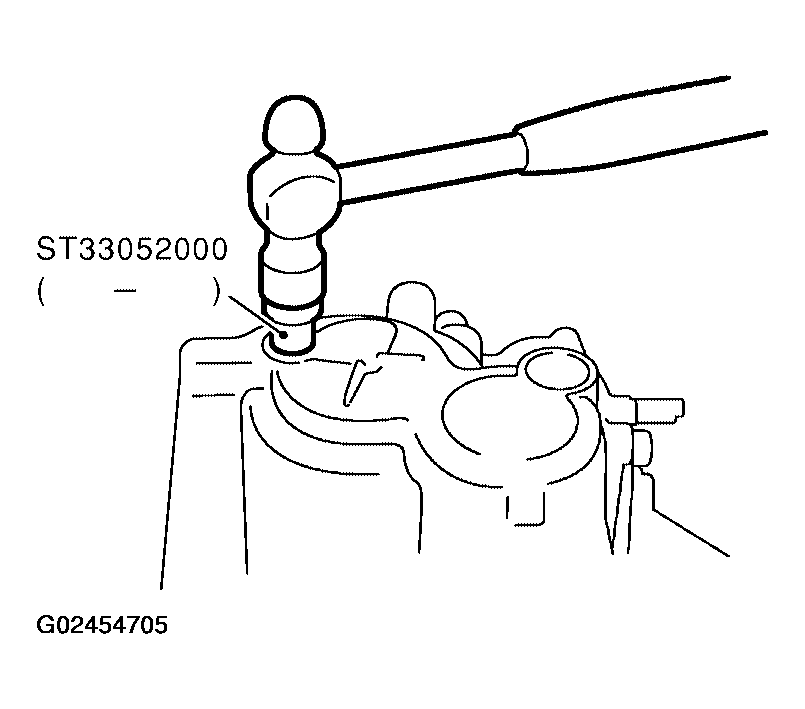 Courtesy of NISSAN MOTOR CO., U.S.A.
- Install the 2 check balls, 2 check springs, and 2 new check ball plugs.
CAUTION:
Check ball plugs are not reusable.
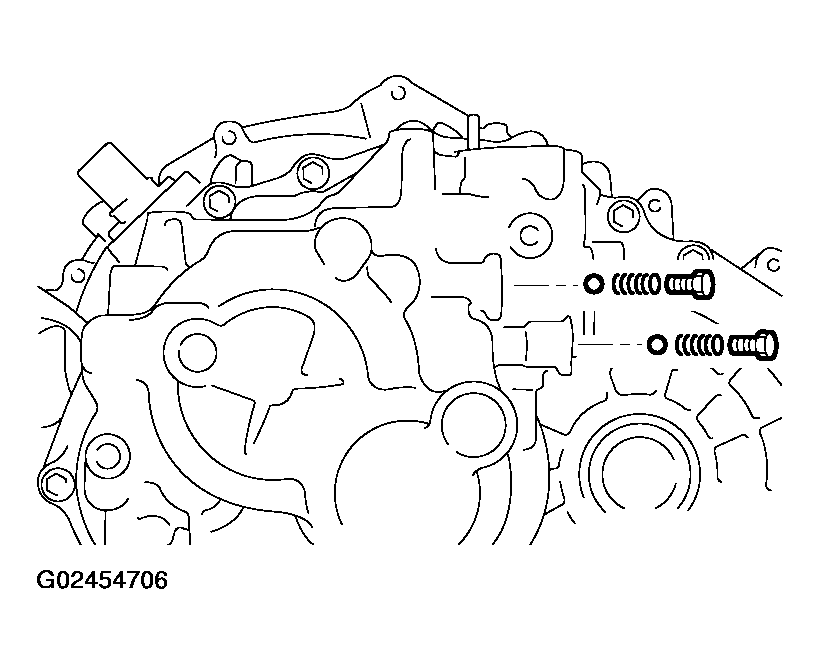 Courtesy of NISSAN MOTOR CO., U.S.A.
- Apply sealant to the threads of the neutral switch and reverse lamp switch. Then install them into the transaxle case. Refer to
CASE AND HOUSING COMPONENTS . Use Genuine Anaerobic Liquid Gasket or equivalent. Refer to RECOMMENDED CHEMICAL PRODUCTS AND SEALANTS
.
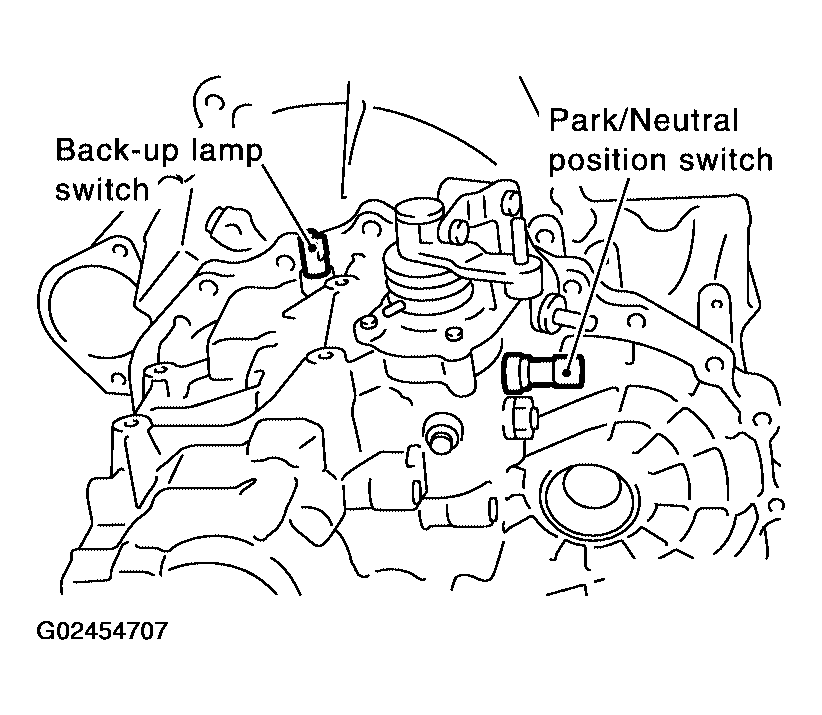 Courtesy of NISSAN MOTOR CO., U.S.A.
- Install new gaskets onto the drain plug and filler plug, and then install them into the transaxle case.