- Using compressed air, clean out the coolant and oil passages in the cylinder block, the cylinder bore and the crankcase to remove any foreign material.
CAUTION:
Use approved safety glasses to protect your eyes.
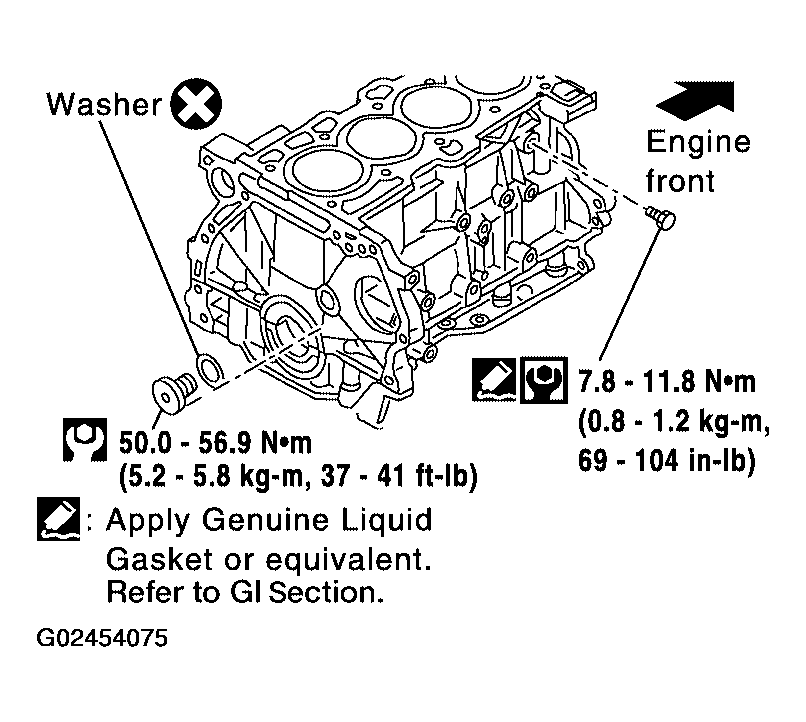
- Apply Silicone RTV Sealant to the drain plugs. Install the drain plugs on the cylinder block.
 Courtesy of NISSAN MOTOR CO., U.S.A.
- Install the main bearings and the thrust bearings.
- Remove dust, dirt, and oil from the bearing mating surfaces of the cylinder block and lower cylinder block.
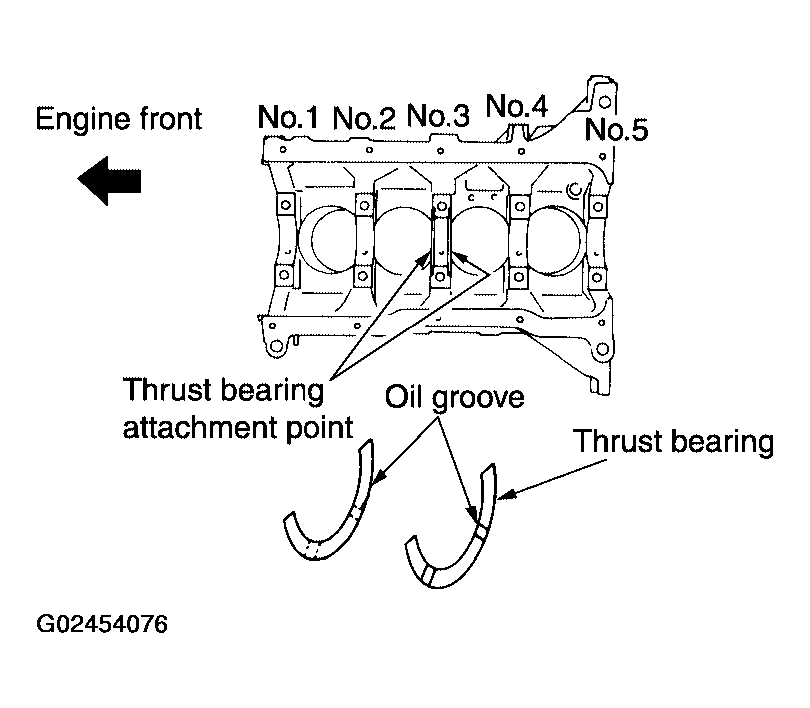
- Install the thrust bearings to both sides of the No. 3 main bearing journal on the cylinder block.
- Install the thrust bearings with the oil groove facing the crankshaft arm (outside).
 Courtesy of NISSAN MOTOR CO., U.S.A.
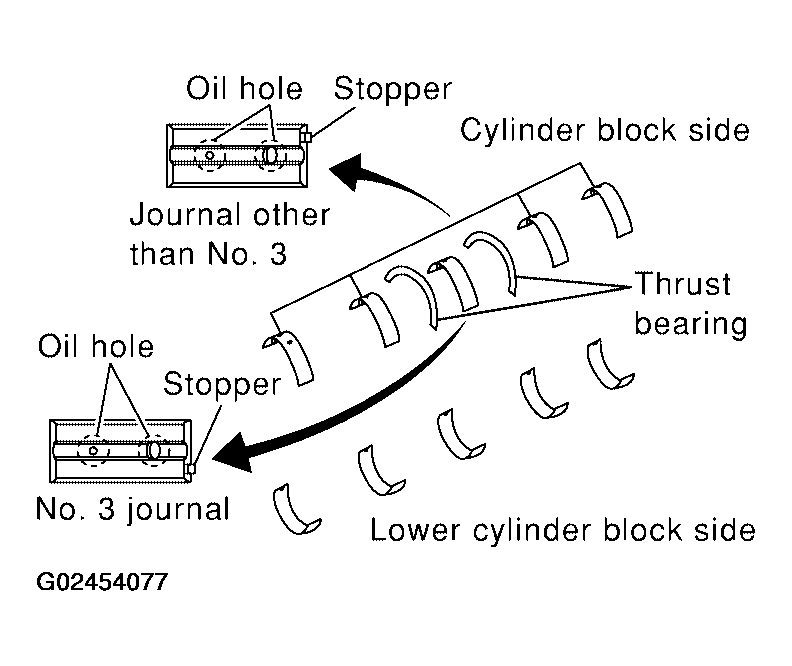
- Install the main bearings paying attention to their position and direction.
- The main bearing with an oil hole and groove goes on the cylinder block. The one without them goes on the lower cylinder block.
- Only the main bearing (on the cylinder block) for No. 3 journal has different specifications.
- Before installing the bearings, apply engine oil to the bearing friction surface (inside). Do not apply oil to the back surface, but thoroughly clean it.
 Courtesy of NISSAN MOTOR CO., U.S.A.
- When installing, align the bearing stopper to the notch.
- Make sure that the oil holes on the cylinder block and those on the corresponding bearing are aligned.
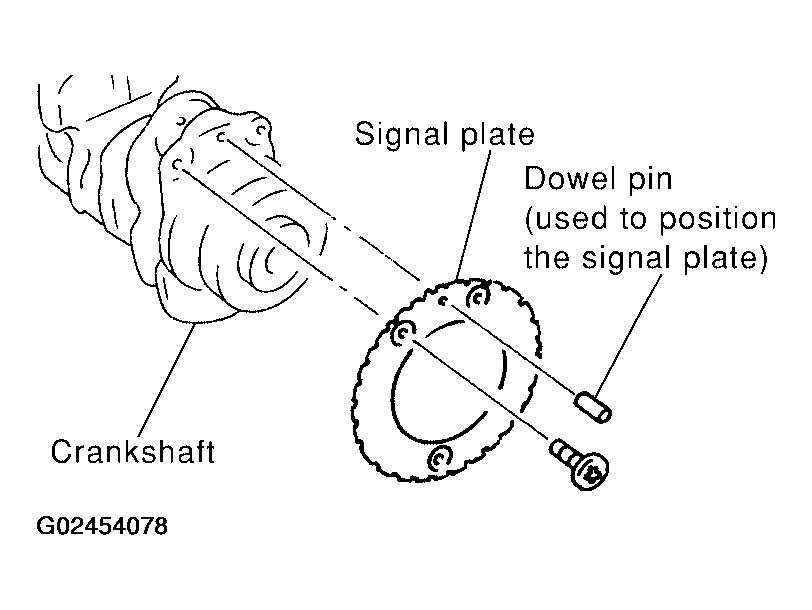
- Install the signal plate to the crankshaft.
- Position the crankshaft and signal plate using a positioning dowel pin, and tighten the signal plate bolts to specification.
- Signal plate bolts: 12 - 14 N.m (1.22 - 1.43 kg-m, 9 - 10 ft-lb)
- Remove the dowel pin.
CAUTION:
Be sure to remove dowel pin before installing the crankshaft.
 Courtesy of NISSAN MOTOR CO., U.S.A.
NOTE:
Dowel pins for the crankshaft and signal plate are supplied as a set for each.
- Install the crankshaft onto the cylinder block.
- While turning the crankshaft by hand, check that it turns smoothly.
- Apply Silicone RTV Sealant to positions shown and install the lower cylinder block.
NOTE:
Cylinder block and lower cylinder block are machined together. Neither of them can be replaced separately.
CAUTION:
After the Silicone RTV Sealant is applied, the lower cylinder block installation must be finished within 5 minutes.
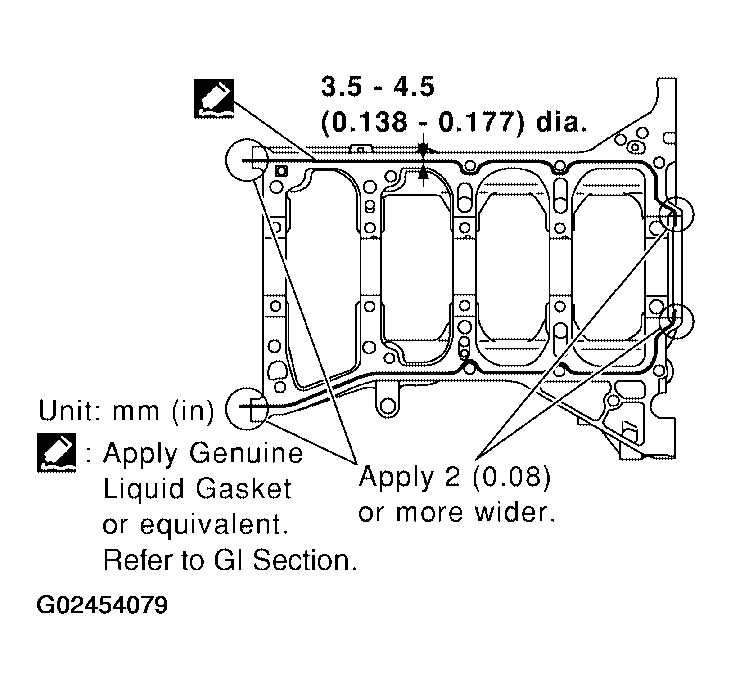 Courtesy of NISSAN MOTOR CO., U.S.A.
- Tighten lower cylinder block bolts in three steps in the order shown.
NOTE:
Apply new engine oil to threads and seat surfaces of the mounting bolts.
- Lower cylinder block bolts
- Step 1 (bolts 11 - 22): 22.6 - 27.5 N.m (2.3 - 2.8 kg-m, 17 - 20 ft-lb)
- Step 2 (bolts 1 - 10): 36.3 - 42.1 N.m (3.7 - 4.3 kg-m, 27 - 31 ft-lb)
- Step 3 (bolts 1 - 10): 60° - 65° (target: 60°)
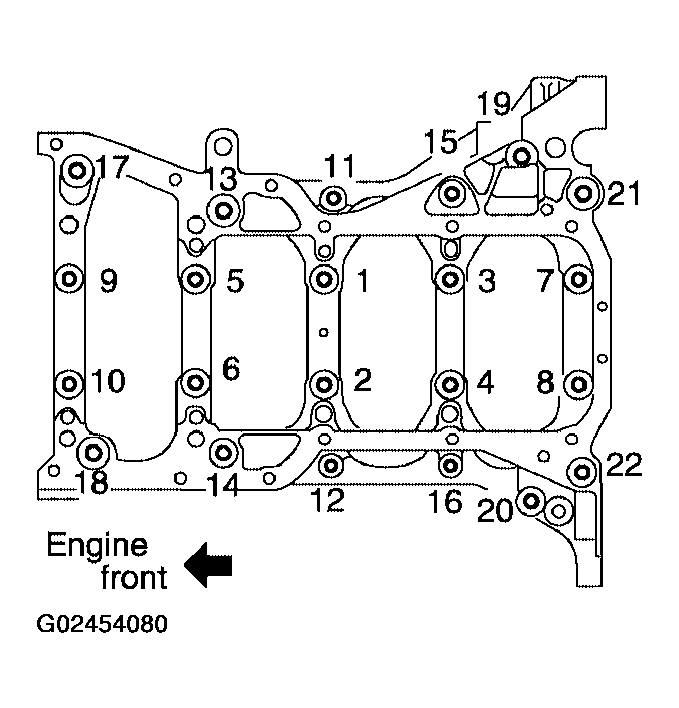 Courtesy of NISSAN MOTOR CO., U.S.A.
CAUTION:
Use an angle wrench (special service tool) or protractor to check tightening angle. Do not tighten by visual inspection.
- Wipe off completely any protruding Silicone RTV Sealant on the exterior of engine.
- Check crankshaft side clearance. Refer to CRANKSHAFT SIDE CLEARANCE .
- After installing the mounting bolts, make sure that the crankshaft can be rotated smoothly by hand.
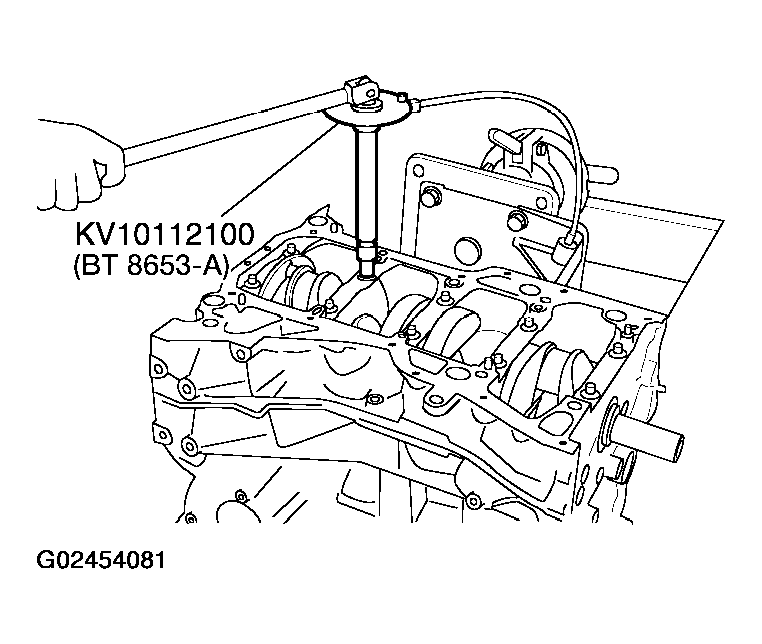 Courtesy of NISSAN MOTOR CO., U.S.A.
- Apply new engine oil to new oil seal and install it using a suitable tool.
- Install new oil seal in the direction shown.
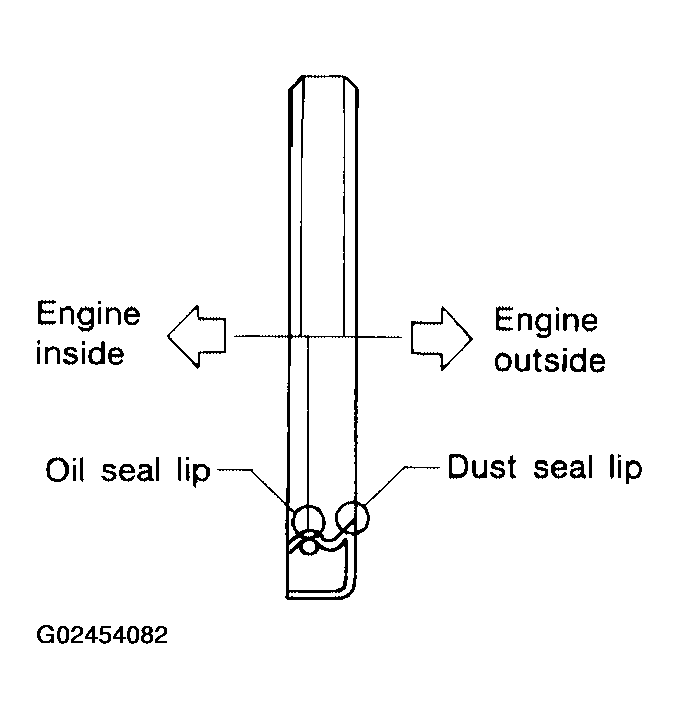 Courtesy of NISSAN MOTOR CO., U.S.A.
- Install rear oil seal using a suitable drift.
CAUTION:
- Do not touch grease applied onto oil seal lip.
- Be careful not to damage crankshaft and/or cylinder block.
- Press fit oil seal straight to avoid causing burrs or tilting.
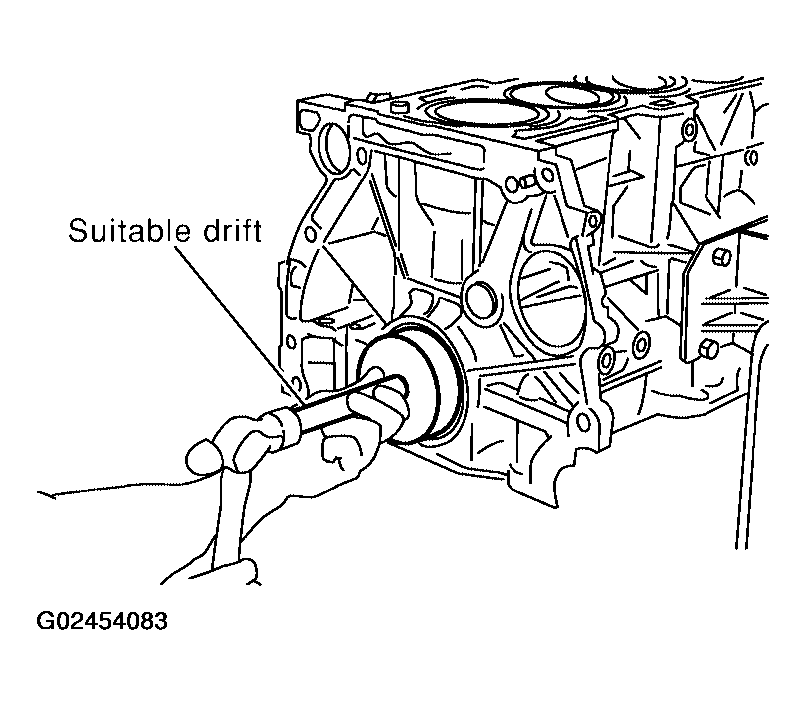 Courtesy of NISSAN MOTOR CO., U.S.A.
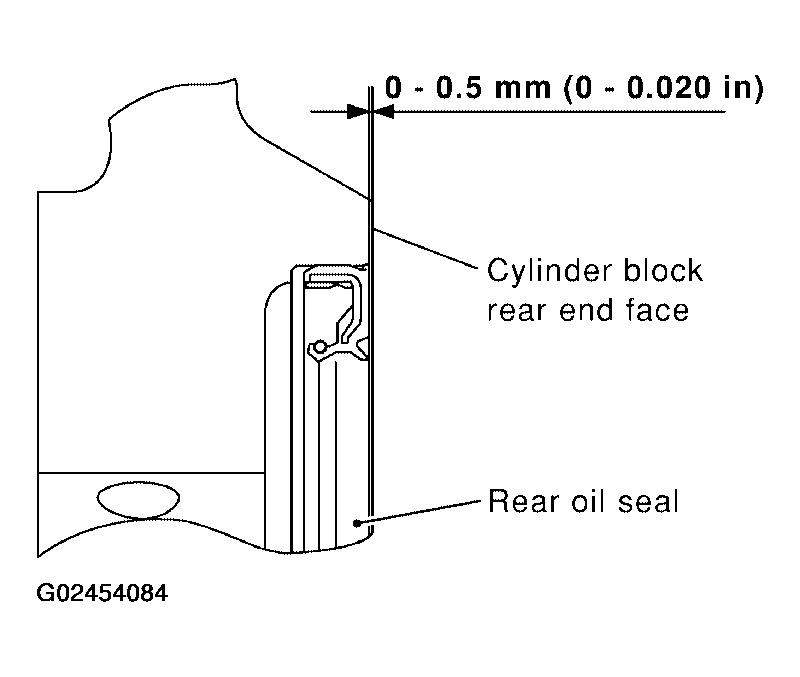 Courtesy of NISSAN MOTOR CO., U.S.A.
- Install the piston to the connecting rod. Assemble the components in their original positions.
- Using a snap ring pliers, install the snap ring into the grooves of the piston's rear side.
- Insert the piston pin snap ring fully into groove.
- Install the piston to the connecting rod.
- Using a heat gun, heat the piston [approximately 60° - 70°C (140° - 158°F)] until the piston pin can be pushed in by hand without excessive force. From the front to the rear, insert the piston pin into the piston and the connecting rod.
- Assemble so that the front mark on the piston crown and the oil holes and the cylinder No. on the connecting rod are positioned as shown in the figure.
- Install the piston pin snap ring into the front of the piston.
- Check that the connecting rod moves smoothly.
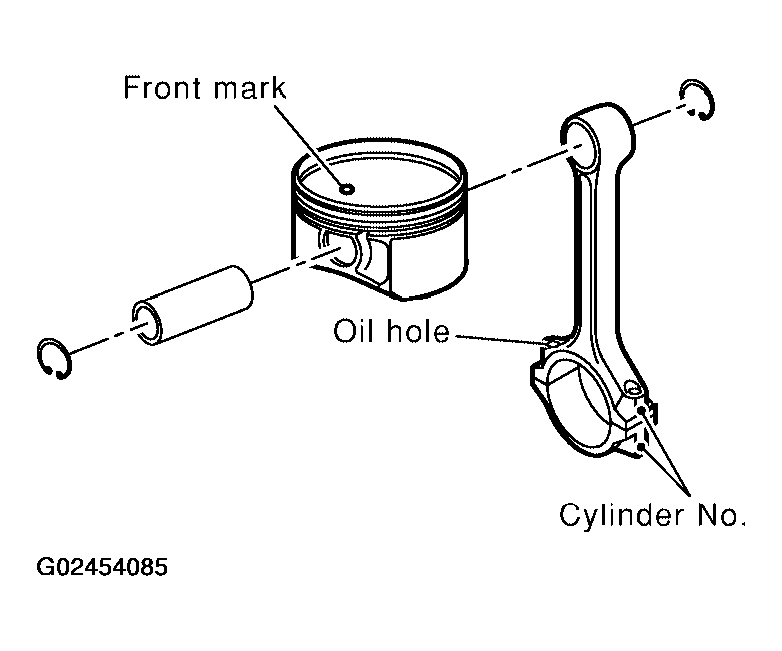 Courtesy of NISSAN MOTOR CO., U.S.A.
- Using a piston ring expander, install the piston rings. Assemble the components in their original positions.
CAUTION:
Be careful not to damage the piston.
- Position each ring with the gap as shown in the figure, referencing the piston front mark as the starting point.
- Install the top ring and the second ring with the stamped surface facing upward.
- Stamped mark: A (top ring)
- 2A (second ring)
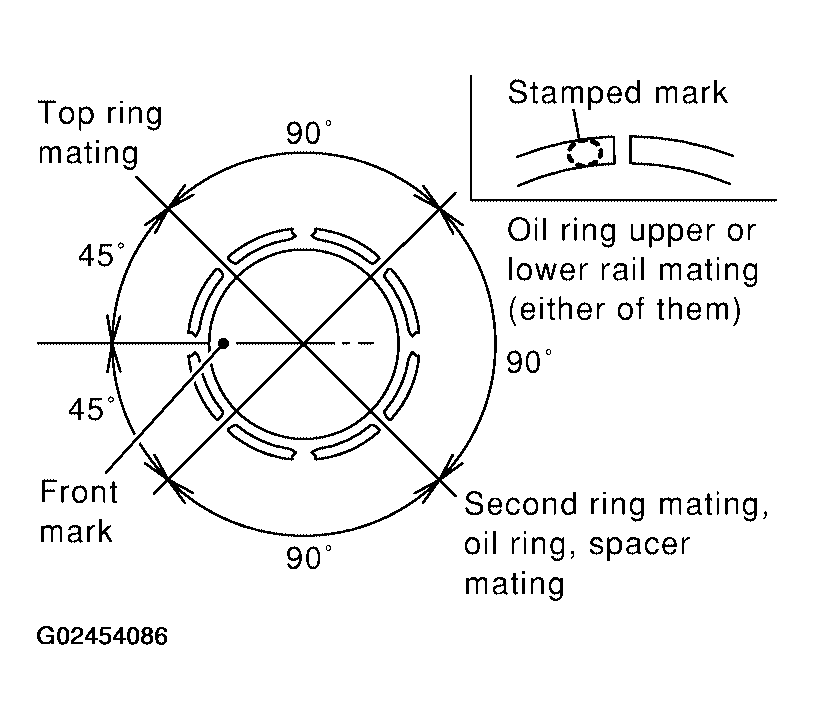 Courtesy of NISSAN MOTOR CO., U.S.A.
- Install the connecting rod bearings to the connecting rod and the connecting rod cap. Assemble the components in their original positions.
- When installing the connecting rod bearings, apply engine oil to the bearing friction surface (inside). Do not apply oil to the back surface, but thoroughly clean the back.
- When installing, align the connecting rod bearing stopper protrusion with the notch of the connecting rod to install.
- Check the oil holes on the connecting rod and those on the corresponding bearing are aligned.
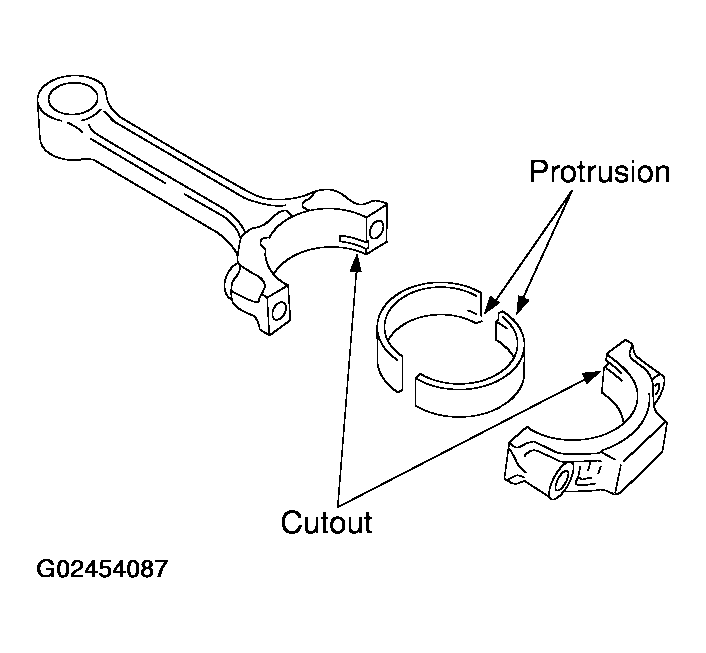 Courtesy of NISSAN MOTOR CO., U.S.A.
- Install the piston and connecting rod assembly to the crankshaft. Assemble the components in their original positions.
- Rotate the crankshaft so the pin corresponding to the connecting rod to be installed is at the bottom dead center position.
- Apply engine oil sufficiently to the cylinder bore, piston, and crankshaft pin.
- Match the cylinder position number with the cylinder No. on the connecting rod for installation.
- Install the piston with the front mark on the piston crown facing the front of the engine using Tool.
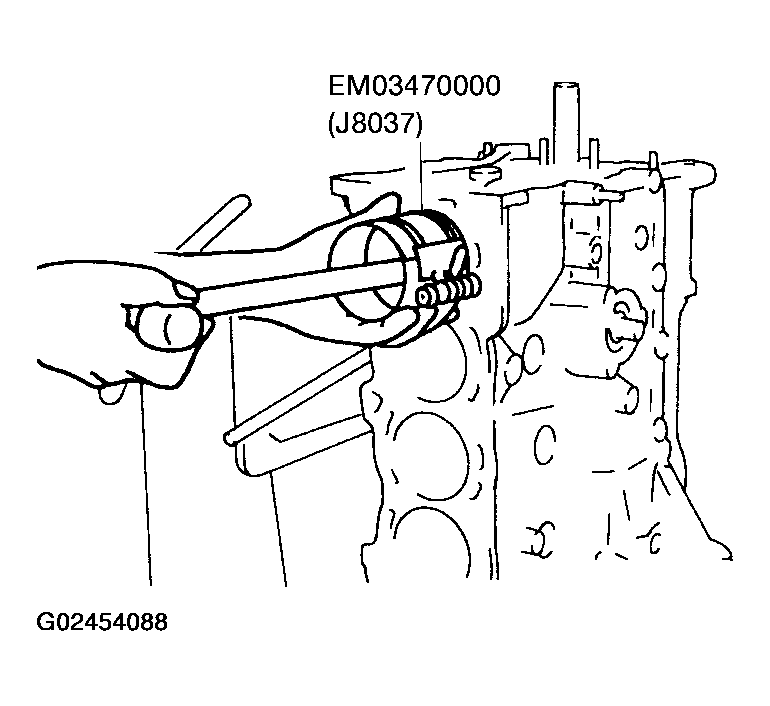 Courtesy of NISSAN MOTOR CO., U.S.A.
CAUTION:
Be careful not to damage the crankshaft pin, resulting from an interference of the connecting rod big end.
- Install the connecting rod caps. Assemble the components in their original positions.
- Match the stamped cylinder number marks on the connecting rod with those on the cap to install.
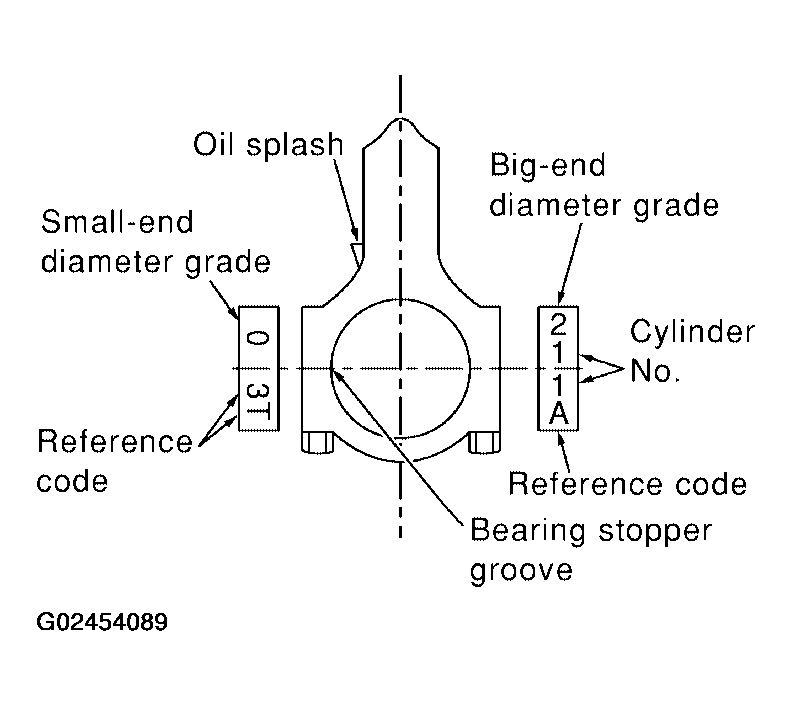 Courtesy of NISSAN MOTOR CO., U.S.A.
- Tighten the connecting rod bolts using Tool in four steps as follows:
- Apply engine oil to the threads and seats of the connecting rod bolts.
CAUTION:
Always use either an angle wrench or protractor. Avoid tightening based on visual check alone.
- Step 1: 18.6 - 20.6 N.m (1.9 - 2.1 kg-m, 14 - 15 ft-lb)
- Step 2: 85° - 95° (target 90° degrees)
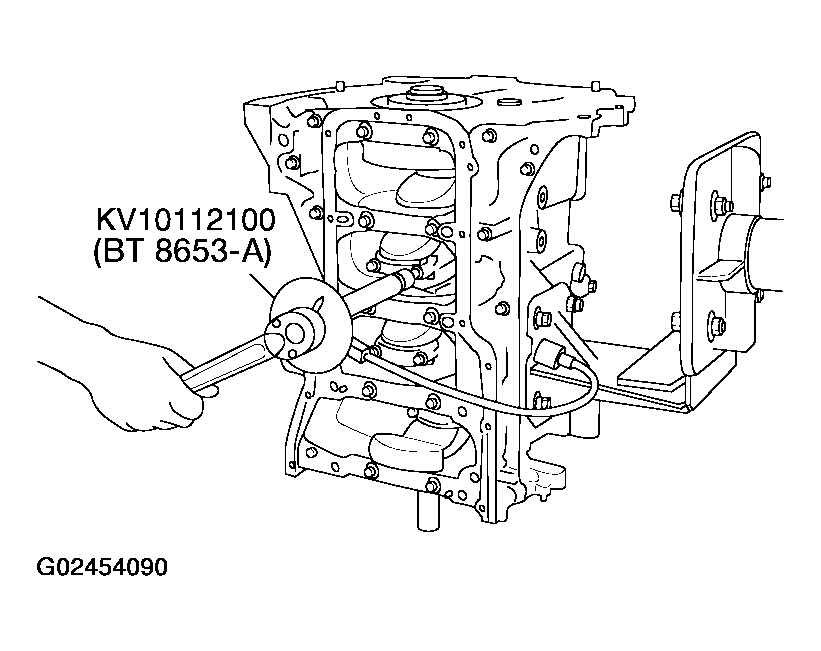 Courtesy of NISSAN MOTOR CO., U.S.A.
- Check the connecting rod side clearance. Refer to
CONNECTING ROD SIDE CLEARANCE .
- After tightening the bolts, make sure that the crankshaft rotates smoothly.
- Install flywheel (M/T Models), or drive plate (A/T Models).
- Install drive plate, reinforcement plate and pilot converter as shown in figure.
- Using a drift with 33 mm (1.30 in) diameter, push pilot converter into the end of the crankshaft.
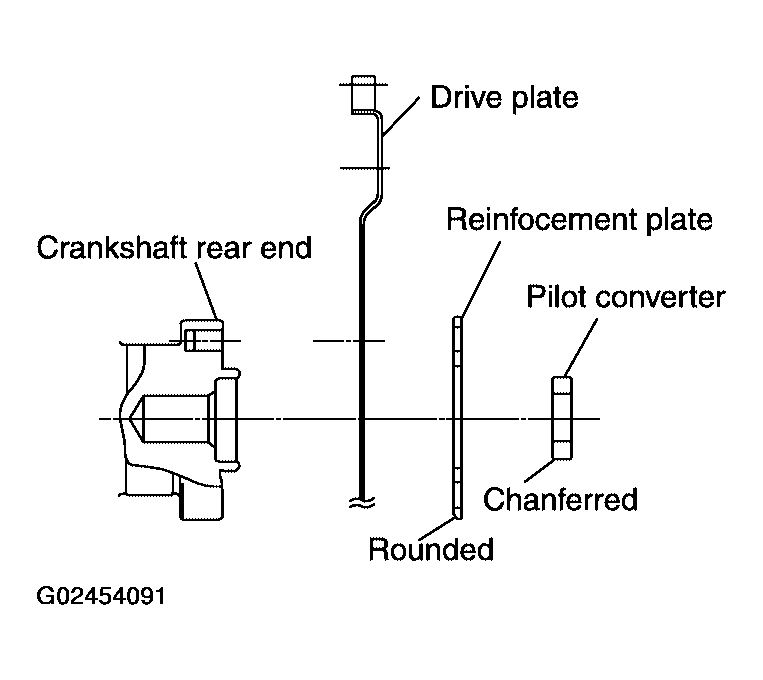 Courtesy of NISSAN MOTOR CO., U.S.A.
- Install the cylinder block heater.
- Cylinder block heater: 69 - 78 N.m (7.0 - 8.0 kg-m, 51 - 57 ft-lb)
- Install the knock sensor.
- Make sure that there is no foreign material on the cylinder block mating surface and the back surface of the knock sensor.
- Install the knock sensor with the connector facing lower left by 45° as shown.
- Do not tighten the knock sensor bolt while holding the connector.
- Make sure that the knock sensor does not interfere with other components.
- Knock sensor bolt: 15.7 - 26.5 N.m (1.6 - 2.7 kg-m, 12 - 19 ft-lb)
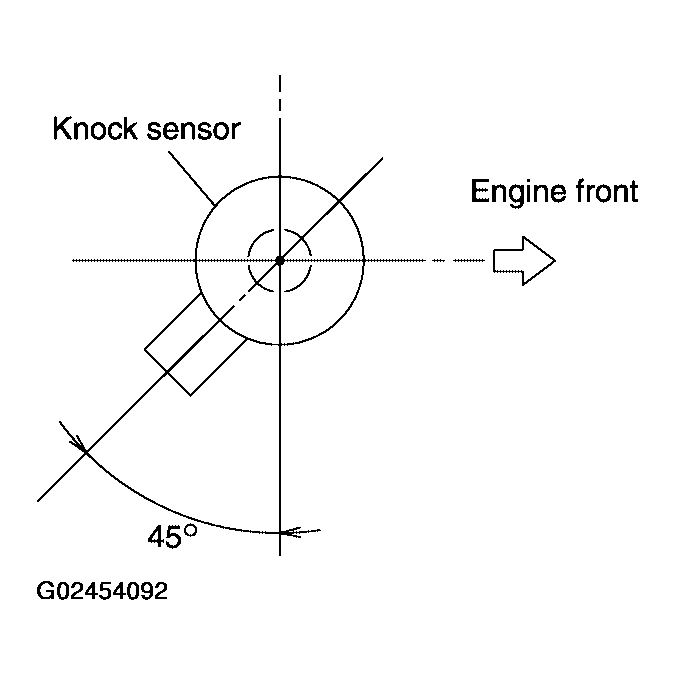 Courtesy of NISSAN MOTOR CO., U.S.A.
CAUTION:
If the knock sensor is dropped, replace it with new one.
- Install the crankshaft position sensor (POS).
- Crankshaft position: 5.4 - 7.3 N.m (0.55 - 0.75 kg-m, sensor bolt 48 - 65 in-lb)
- Installation of remaining components is in reverse order of removal.