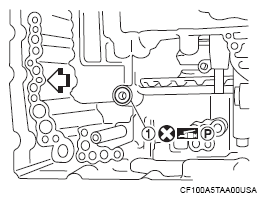
- Install the lip seal (1) to the transaxle case.
 Courtesy of MITSUBISHI MOTOR SALES OF AMERICA. Courtesy of MITSUBISHI MOTOR SALES OF AMERICA.
|
CAUTION:
- Never reuse lip seal.
- Apply petroleum jelly to lip seal.
 |
: Vehicle front |
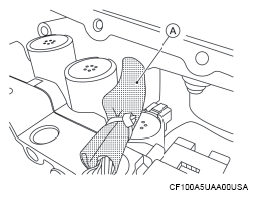
- Install the control valve to the transaxle case.
 Courtesy of MITSUBISHI MOTOR SALES OF AMERICA. Courtesy of MITSUBISHI MOTOR SALES OF AMERICA.
|
CAUTION:
- Never drop the control valve, ratio control valve and manual shaft.
- Ensure the harness (A) is correctly routed and does not get pinched.
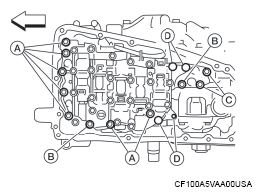
- Secure the control valve using bolts (A), (B) and (C).
 Courtesy of MITSUBISHI MOTOR SALES OF AMERICA. Courtesy of MITSUBISHI MOTOR SALES OF AMERICA.
|
CAUTION:
Ensure the harness is correctly routed and does not get pinched.
NOTE:
Leave bolt holes (D) blank at this step.
| Bolt |
Bolt length mm (in) |
Number of bolt |
| (A) |
54 (2.13) |
7 |
| (B) |
44 (1.73) |
2 |
| (C) |
25 (0.98) |
2 |
|
: Vehicle front |
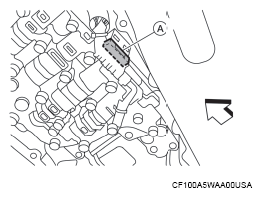
- Connect the control valve harness connector (A).
 Courtesy of MITSUBISHI MOTOR SALES OF AMERICA. Courtesy of MITSUBISHI MOTOR SALES OF AMERICA.
|
|
: Vehicle front |
CAUTION:
Securely insert the harness connector until it clicks and locks.
- Install the CVT fluid temperature sensor bracket to the valve body with bolt (A).
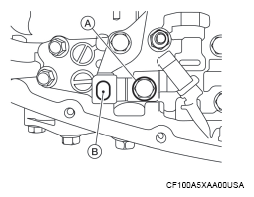 Courtesy of MITSUBISHI MOTOR SALES OF AMERICA. Courtesy of MITSUBISHI MOTOR SALES OF AMERICA.
|
NOTE:
Leave bolt hole (B) blank as it will be used to secure the oil strainer at a later step.
| Bolt |
Bolt length mm (in) |
Number of bolt |
| (A) |
54 (2.13) |
1 |
- Install new O-ring to oil strainer assembly.
CAUTION:
- Never reuse O-ring.
- Apply CVT fluid to O-ring.
NOTE:
New oil strainer come with a new O-ring already installed.
- Install new oil strainer with bolts (A).
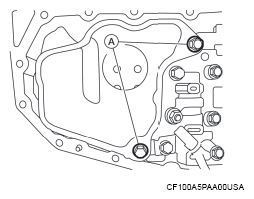 Courtesy of MITSUBISHI MOTOR SALES OF AMERICA. Courtesy of MITSUBISHI MOTOR SALES OF AMERICA.
|
| Bolt |
Bolt length mm (in) |
Number of bolt |
| (A) |
54 (2.13) |
2 |
- Install the manual plate (1) using the steps below:
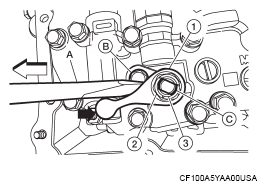 Courtesy of MITSUBISHI MOTOR SALES OF AMERICA. Courtesy of MITSUBISHI MOTOR SALES OF AMERICA.
|
CAUTION:
Using suitable tool, be sure to hold the manual plate in a fixed position. Be sure not to damage control valve while using suitable tool.
|
: Vehicle front |
- Install the magnets into the oil pan in their original location.
CAUTION:
Completely clean the iron powder from the magnet area of oil pan and the magnet.
- Install the oil pan to the transaxle case with the following procedure.
- Install the oil pan gasket to the oil pan.
CAUTION:
- Completely wipe out any moisture, oil, and old gasket from the oil pan gasket surface and bolt hole of oil pan and transaxle case.
- Never reuse oil pan gasket.
- Install the oil pan assembly to the transaxle case, and then temporarily tighten the oil pan bolts.
- Tighten the oil pan bolts in the order shown to the specified torque.
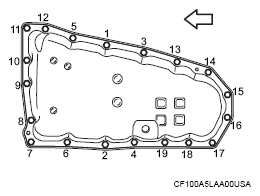 Courtesy of MITSUBISHI MOTOR SALES OF AMERICA.
|
: Vehicle front |
- Tighten the oil pan bolts again clockwise from (1) shown to the specified torque.
- Install drain plug gasket to drain plug.
CAUTION:
Never reuse drain plug gasket.
- Install drain plug to oil pan.
- Install new QR code sticker (1) on shift actuator (2).
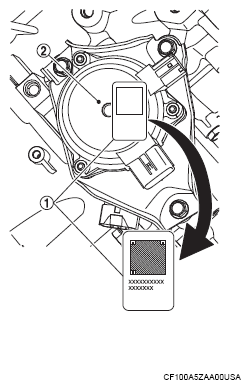 Courtesy of MITSUBISHI MOTOR SALES OF AMERICA. Courtesy of MITSUBISHI MOTOR SALES OF AMERICA.
|
NOTE:
If sticker is not included with parts, contact Powertrain Call Center to report.
- Flush the CVT fluid cooler and lines.
- Connect battery negative terminal. Refer to EXPLODED VIEW
.
- Fill the transaxle assembly with CVT fluid. Refer to REFILLING .
- Perform "ADDITIONAL SERVICE WHEN REPLACING CONTROL VALVE." Refer to DESCRIPTION .
) of the manual valve.
CAUTION: Install the end of the manual plate into the cutout of the manual valve.