Clutch Assembly: Installation
- Replace release bearing and/or pilot bearing as necessary. Clean sealant from flywheel attaching bolt threads. Replace bolts if sealant cannot be removed. Coat bolt threads with Stud/Bearing Mount Sealer (EOAZ-19554-B), and install flywheel. Tighten bolts in a diagonal sequence to specification. See TORQUE SPECIFICATIONS
.
- Position clutch disc onto flywheel with damper springs facing away from flywheel. Hold clutch disc in place with Clutch Aligner (T87C-7137-A). Position pressure plate over clutch disc. See Fig 1
.
- If reusing original pressure plate, align marks made during removal. Install pressure plate retaining bolts. Tighten bolts alternately to specification. See TORQUE SPECIFICATIONS
. Remove clutch aligner. Place transaxle on transmission jack.
- Lightly coat input shaft splines with Clutch Grease (C1AZ-19590-B). Install transaxle, taking care to align input shaft through the clutch disc spline. Align clutch housing onto engine guide bushings.
CAUTION:
Transaxle aluminum alloy construction requires precise tightening of mounting bolts. Torque specifications must be strictly adhered to. See TORQUE SPECIFICATIONS
.
- Install transaxle lower attaching bolts and tighten to specification. Using transaxle jack, raise transaxle to correct height. Tighten engine bracket bar hook. Install front engine mount and bracket and tighten to specification. Install starter and lower mounting bolts. On non-turbo, install slave cylinder. Slide extension bar onto transaxle bracket.
- Connect control rod to transaxle. Install crossmember bolts to specification in sequence, and install crossmember. See Figure
. Install support braces. On all models, install exhaust hanger. On turbo, install intermediate shaft and support bearing assembly.
- Install new circlips onto each axle shaft, with gap at top of clip groove. Slide axle shafts into transaxle differential. After circlip snaps into place, pull outward on hubs to verify axle shafts are retained by circlip. Install front suspension components, wire harness, splash shields, and front wheels.
- Connect neutral and back-up light switch and ground wire. Fill transaxle with Mercon ATF transmission fluid. Install and adjust clutch cable or slave cylinder line bracket. Lower vehicle. Remove engine support bar. Connect speedometer cable to transaxle.
- Install battery and/or connect battery cable. Install air cleaner. Adjust pedal free play. See CLUTCH PEDAL FREE PLAY
under ADJUSTMENTS. Recheck transaxle fluid level.
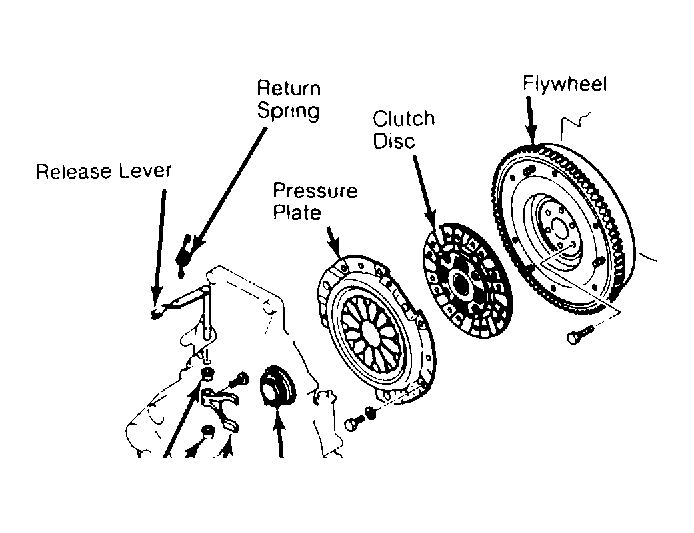 Courtesy of FORD MOTOR CO.