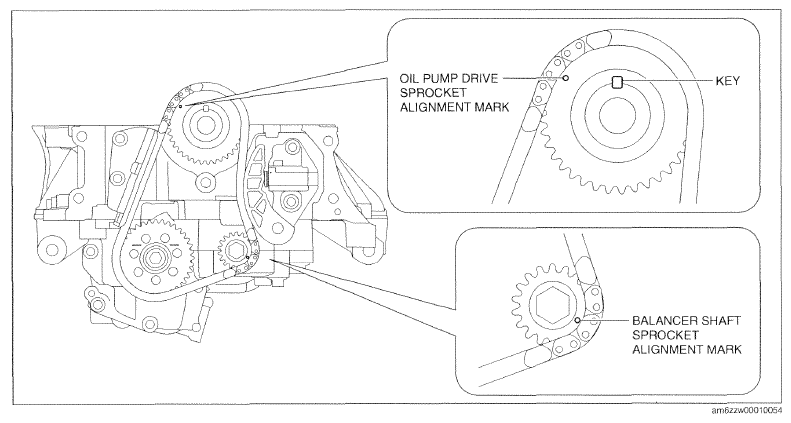
Oil Pump Chain Removal Note
- Verify that the balancer shaft sprocket alignment mark and key are aligned to the positions shown in the figure.
 Courtesy of MAZDA MOTORS CORP.
NOTE:
- If they are not in the positions shown in the figure, rotate the crankshaft to set cylinder No. 1 to top dead center (TDC).
- Slightly loosen the balancer shaft sprocket installation bolt using the following procedure:
NOTE:
- At this stage, only loosen the installation bolt, do not remove it. Remove the bolt after removing the oil pump chain tensioner.
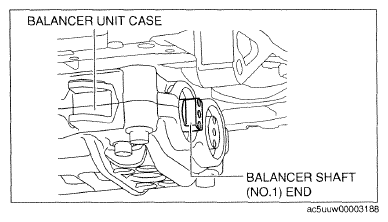
- The balancer unit is constructed such that the end of the balancer shaft (No. 1) protrudes from the balancer unit case. The balancer shaft (No. 1) can be locked against rotation by holding the end using a wrench.
 Courtesy of MAZDA MOTORS CORP.
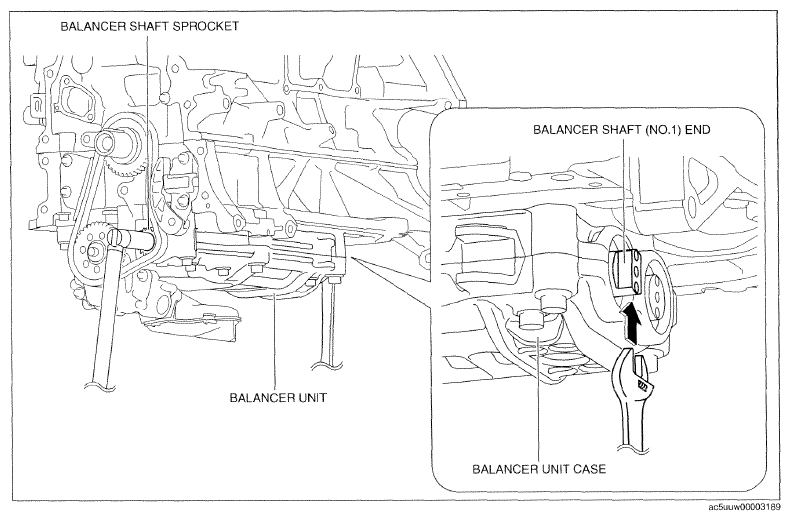
- Lock the balancer shaft (No. 1) against rotation as shown in the figure.
CAUTION:
- To prevent damage to the balancer unit, protect the end of the balancer shaft (No. 1) with a rag.
 Courtesy of MAZDA MOTORS CORP.
- Slightly loosen the balancer shaft sprocket installation bolt.
- Slightly loosen the oil pump driven sprocket installation bolt using the following procedure:
NOTE:
- At this stage, only loosen the installation bolt, do not remove it. Remove the bolt after removing the oil pump chain tensioner.
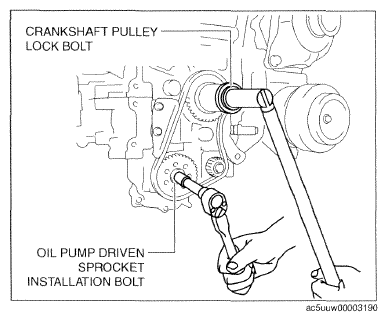
- Temporarily assemble the crankshaft pulley lock bolt, and lock the oil pump against rotation as shown in the figure.
 Courtesy of MAZDA MOTORS CORP.
- Slightly loosen the oil pump driven sprocket installation bolt.
- Remove the temporarily assembled crankshaft pulley lock bolt.
- Set a cloth wrapped flathead screwdriver in the gap between the oil pump drive sprocket and the oil pump chain as shown in the figure.
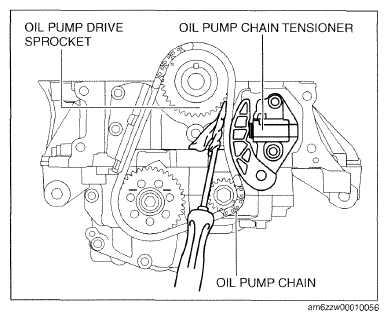 Courtesy of MAZDA MOTORS CORP.
- Move the screwdriver in the direction of the arrow and press the oil pump chain, and then press on the plunger of the oil pump chain tensioner.
 Courtesy of MAZDA MOTORS CORP.
- Insert a wire with an approx. diameter of 1.4 mm {0.055 in} or a paper clip into the body hole of the oil pump chain tensioner with the plunger pressed.
 Courtesy of MAZDA MOTORS CORP.
NOTE:
- The wire or paper clip secures the plunger, and the tension can be released.
- Remove the oil pump chain tensioner.
- Remove the oil pump chain and balancer shaft sprocket as a single unit.
- Remove the oil pump driven sprocket.