Oil Pump Chain Installation Note
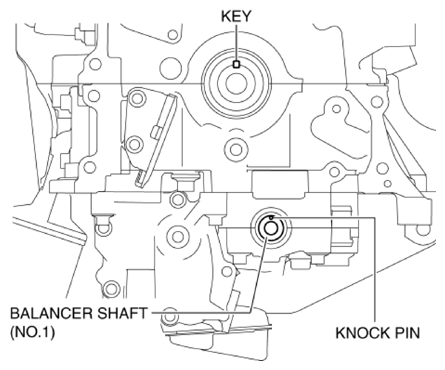
- Verify that the key and knock pin are aligned to the positions shown in the figure.
 Courtesy of MAZDA MOTORS CORP.
- If they are not in the positions shown in the figure, rotate the crankshaft and balancer shaft (No. 1) to set cylinder No. 1 to top dead center (TDC).
- Temporarily assemble the oil pump driven sprocket.
- Temporarily tighten the oil pump driven sprocket installation bolt.
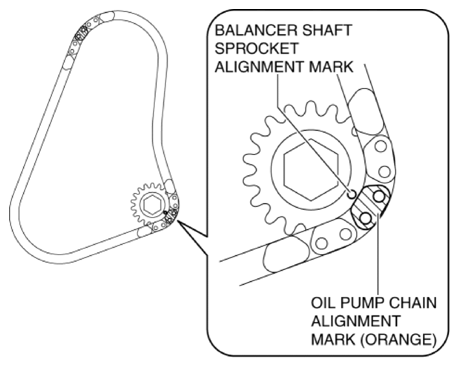
- Align the oil pump chain alignment mark with the balancer shaft sprocket alignment mark.
 Courtesy of MAZDA MOTORS CORP.
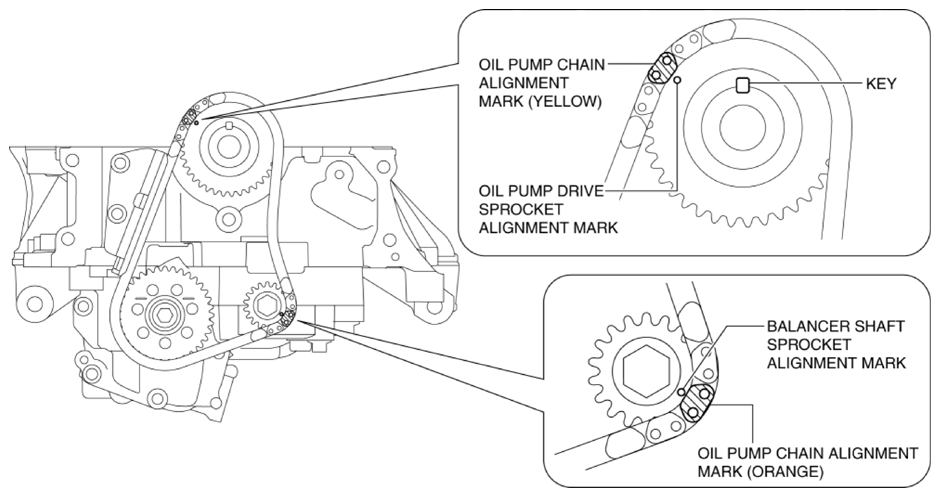
- Install the oil pump chain and balancer shaft sprocket as a single unit while aligning the alignment marks on each sprocket and oil pump chain as shown in the figure.
 Courtesy of MAZDA MOTORS CORP.
- Temporarily tighten the balancer shaft sprocket installation bolt.
- Install the oil pump chain tensioner.
CAUTION:
- At this stage, do not remove the wire or paper clip installed to the oil pump chain tensioner.
- Tighten the oil pump driven sprocket and balancer shaft sprocket installation bolts using the following procedure:
- Temporarily assemble the crankshaft sprocket, crankshaft pulley and crankshaft pulley lock bolt.
CAUTION:
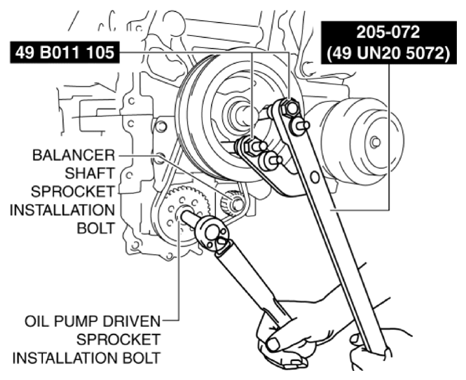
- To prevent damage to the crankshaft pulley, protect the crankshaft pulley with a clean cloth so that the bar part (205-072) of the SST does not contact the crankshaft pulley.
- Install the SST
as shown in the figure and lock the oil pump and balancer unit against rotation.
 Courtesy of MAZDA MOTORS CORP.
- Tighten the oil pump driven sprocket installation bolt.
- 20-30 N.m {2.1-3.0 kgf.m, 15-22 ft.lbf}
- Tighten the balancer shaft sprocket installation bolt.
- 38-46 N.m {3.9-4.6 kgf.m, 29-33 ft.lbf}
- Remove the SSTs
.
- Remove the temporarily assembled crankshaft sprocket, crankshaft pulley and crankshaft pulley lock bolt.
- Remove the wire or paper clip installed to the oil pump chain tensioner and apply tension to the oil pump chain.
- If a new oil pump chain tensioner is used, remove the installed stopper.