Mirror Base Installation
- Cut away all of the original sealant using a razor.
WARNING:
- Using a razor with bare hands can cause injury. Always wear gloves when using a razor.
- Clean and degrease the ceramic coating on the glass and the base.
CAUTION:
- Keep the area free of dirt and grease, and do not touch the surface. Otherwise, the primer may not properly bond to the surface of the glass.
- Apply primer to the bonding area of the glass and the base.
- Use only glass primer on the glass, and body primer on the base. Allow the primer to dry for approx. 30 min
.
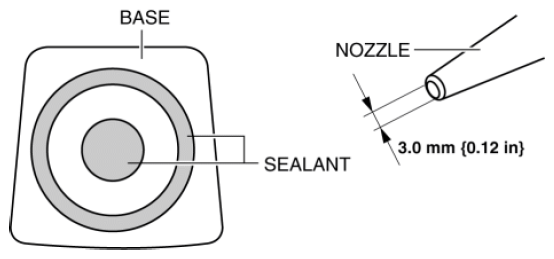
- Apply 3.0 mm {0.12 in}
layer of sealant to the base.
 Courtesy of MAZDA MOTORS CORP.
- Center the base in the ceramic coating and press it onto the glass.
 Courtesy of MAZDA MOTORS CORP.
- Use isopropyl alcohol to remove any excess repair sealant. Hardening time of sealant
| Temperature |
Surface hardening time |
Time required until car can be put into service |
| 5 °C {41 °F} |
Approx. 1.5 h |
Approx. 12 h |
| 20 °C {68 ° F} |
Approx. 1 h |
Approx. 4 h |
| 35 °C {95 ° F} |
Approx. 10 min |
Approx. 2 h |
- Install the rearview mirror. (without auto-dimming mirror) (Refer to REARVIEW MIRROR REMOVAL/INSTALLATION .)
- Install the auto-dimming mirror. (with auto-dimming mirror) (Refer to AUTO-DIMMING MIRROR REMOVAL/INSTALLATION .)
- Install the cover (with forward sensing camera) (Refer to FORWARD SENSING CAMERA (FSC) REMOVAL/INSTALLATION
.)
- Connect the negative battery cable. (Refer to NEGATIVE BATTERY CABLE DISCONNECTION/CONNECTION [SKYACTIV-G 2.0, SKYACTIV-G 2.5]
.)