Windshield Wiper Motor And Link Removal/Installation: Notes
- Disconnect the negative battery cable. (See
NEGATIVE BATTERY CABLE DISCONNECTION/CONNECTION [SKYACTIV-G 2.0, SKYACTIV-G 2.5]
.)
- Remove the windshield wiper arm and blade. (See
WINDSHIELD WIPER ARM AND BLADE REMOVAL/INSTALLATION .)
- Remove the cowl grille. (See
COWL GRILLE REMOVAL/INSTALLATION
.)
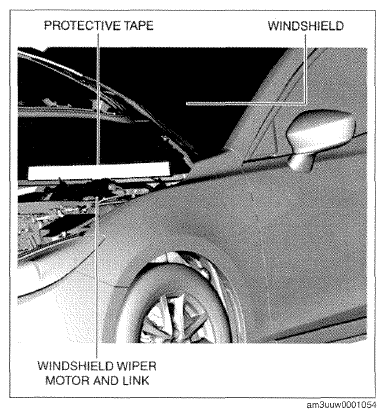
- Apply protective tape to the area where the windshield end interferes with the windshield wiper motor and link as shown in the figure.
CAUTION:
- Always apply protective tape to the windshield end. If the windshield wiper motor and link contacts the windshield, it could damage the windshield.
 Courtesy of MAZDA MOTORS CORP.
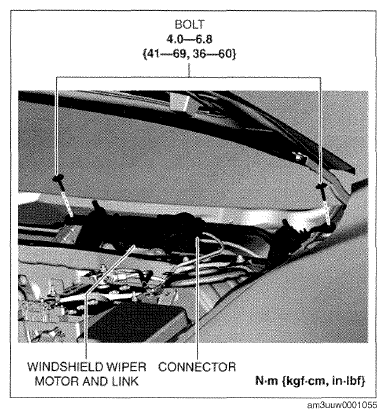
- Disconnect the connector.
- Remove the bolts.
 Courtesy of MAZDA MOTORS CORP.
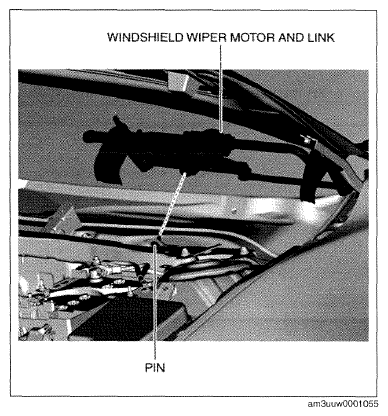
- Pull the windshield wiper motor and link out from the pin and remove it.
 Courtesy of MAZDA MOTORS CORP.
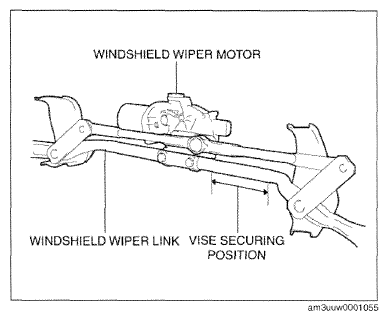
- Secure the position of the windshield wiper link shown in the figure in a vise.
CAUTION:
- If the vise is tightened with excessive force, it could deform or damage the windshield wiper link. When securing the windshield wiper link in the vise, be careful not to deform or damage the windshield wiper link.
- Protect the windshield wiper link by placing a rag in the vise when securing it in the vise. Otherwise, it could damage the area where the vise is secured.
 Courtesy of MAZDA MOTORS CORP.
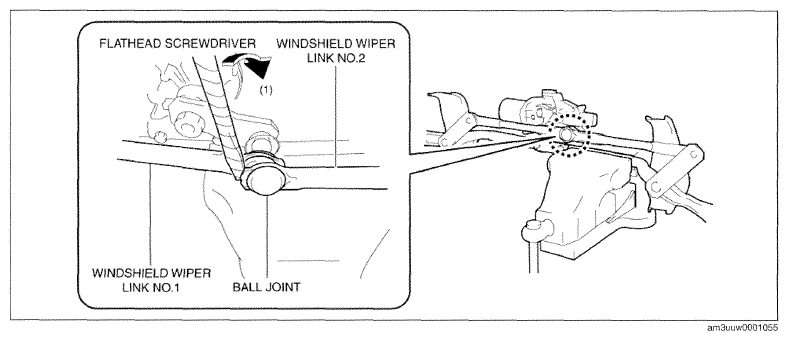
- Insert a tape-wrapped flathead screwdriver into the gap between windshield wiper links No. 1 and 2.
 Courtesy of MAZDA MOTORS CORP.
- Move the flathead screwdriver in the direction of arrow (1) shown in the figure and remove the windshield wiper motor and the ball joint for windshield wiper link No. 2. (See
BALL JOINT ASSEMBLY NOTE .)
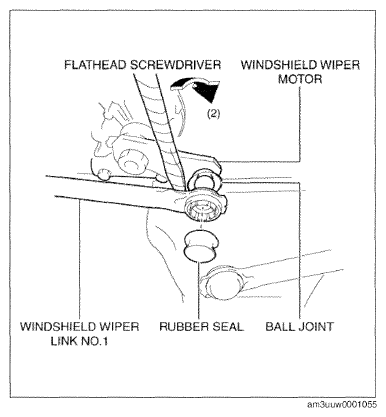
- Remove the rubber seal.
- Insert a flathead screwdriver into the gap between the windshield wiper motor and windshield wiper link No. 1.
- Move the flathead screwdriver in the direction of arrow (2) shown in the figure and remove the windshield wiper motor and the ball joint for windshield wiper link No. 1. (See
BALL JOINT ASSEMBLY NOTE .)
 Courtesy of MAZDA MOTORS CORP.
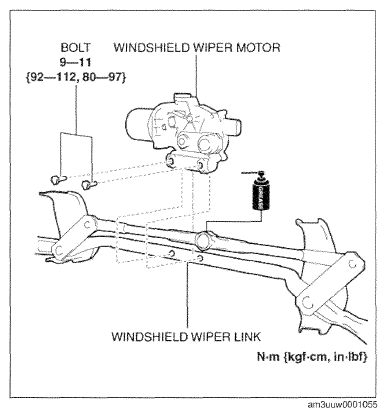
- Remove the bolts.
- Remove the windshield wiper motor from the windshield wiper link.
- Install in the reverse order of removal.
 Courtesy of MAZDA MOTORS CORP.