Diagnostic Procedure
- Verify Related Repair Information Availability -
Check service bulletins for repair information related to this DTC. If repair information is available, perform diagnosis and repair as necessary. After repair, go to step 19. If repair information is not available, go to next step.
- Determine If No DTC Detected Or Some DTC Detected -
Connect scan tool to DLC-2. See Figure. Clear DTCs from PCM memory. Start engine and let idle until normal operating temperature is reached. Monitor for DTCs. If DTC P1624 is present, go to step 10. If DTC P1624 is not present, go to next step.
- Inspect Immobilizer Unit Connector For Poor Connection -
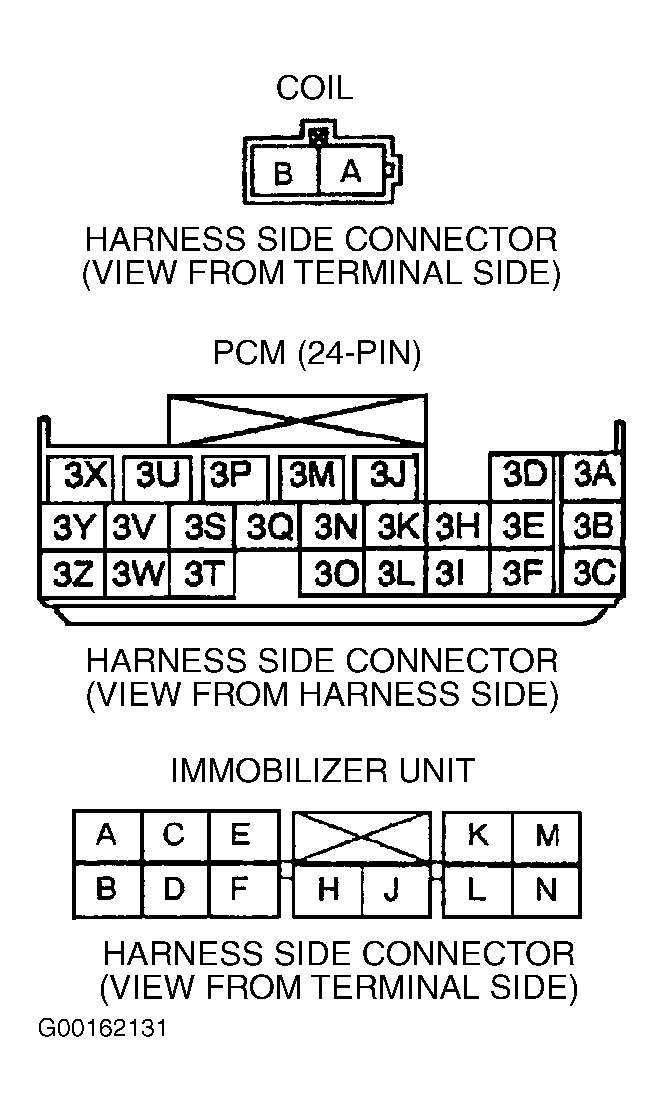
Turn ignition off. Disconnect immobilizer unit 12-pin harness connector. See Fig 1. Check for poor connection at immobilizer unit 12-pin harness connector terminals due to damaged, pulled-out pins, corrosion, etc. If connector terminals are okay, go to next step. If connector terminals are found faulty, repair or replace as necessary. After repair, go to step 19.
- Inspect GND Circuit Of Immobilizer Unit For Open -
Check continuity between ground and immobilizer unit 12-pin harness connector terminal "C" (Black wire). If continuity is present, go to next step. If continuity is not present, repair open circuit in Black wire between immobilizer unit 12-pin harness connector terminal "C" and body ground joint connectors (JC-01 and JC-02). See appropriate WIRING DIAGRAM under ENGINE PERFORMANCE in SYSTEM WIRING DIAGRAMS. After repair, go to step 19.
- Inspect Coil Terminal -
Disconnect coil 2-pin harness connector. See Fig 1. Check for poor connection at coil connector terminals due to damaged, pulled-out pins, corrosion, etc. If connector terminals are okay, go to next step. If connector terminals are found faulty, repair or replace as necessary. After repair, go to step 19.
- Inspect Coil For Short Circuit -
Check continuity between ground and coil connector terminal "A". If continuity is not present, go to next step. If continuity is present, replace coil. After repair, go to step 19.
- Inspect Coil Circuit For Short -
Reconnect coil 2-pin harness connector. Check continuity between ground and immobilizer unit 12-pin harness connector terminal "F" (Yellow/Green wire). If continuity is not present, go to next step. If continuity is present, repair short circuit to ground in Yellow/Green wire between coil harness connector terminal "A" and immobilizer 12-pin harness connector terminal "F". After repair, go to step 19.
- Inspect PCM Connector For Poor Connection -
Disconnect PCM 24-pin harness connector. See Fig 1. Check for poor connection at PCM 24-pin harness connector terminals due to damaged, pulled-out pins, corrosion, etc. If connector terminals are okay, go to next step. If connector terminals are found faulty, repair or replace as necessary. After repair, go to step 19.
- Inspect Communication Line For Open Circuit -
Check continuity between immobilizer unit 12-pin harness connector terminal "A" and PCM 24-pin harness connector terminal "3S" (Red/Black wire). If continuity is present, go to step 19. If continuity is not present, repair open circuit in Red/Black wire between immobilizer unit 12-pin harness connector terminal "A" and PCM 24-pin harness connector terminal "3S". See appropriate WIRING DIAGRAM under ENGINE PERFORMANCE in SYSTEM WIRING DIAGRAMS. After repair, go to step 19.
- Classify Malfunction By Other Detected DTCs -
If DTC P1602 has not been detected with DTC P1624, go to next step. If DTC P1602 and P1624 has been detected, go to step 14.
- Inspect Coil Connector For Poor Connection -
Turn ignition off. Disconnect coil 2-pin harness connector. See Fig 1. Check for poor connection at coil connector terminals due to damaged, pulled-out pins, corrosion, etc. If connector terminals are okay, go to next step. If connector terminals are found faulty, repair or replace as necessary. After repair, go to step 19.
- Inspect Coil For Open Circuit -
Check continuity between coil connector terminals. If continuity is present, go to next step. If continuity is not present, replace coil. After repair, go to step 19.
- Inspect Coil Circuit For Open Circuit -
Reconnect coil 2-pin harness connector and disconnect immobilizer unit 12-pin harness connector. See Fig 1. Check continuity between immobilizer unit 12-pin harness connector terminal "D" (Yellow/Red wire) and terminal "F" (Yellow/Green wire). If continuity is present, go to step 19. If continuity is not present, repair open circuit in Yellow/Red or Yellow/Green wire between coil harness connector and immobilizer unit 12-pin harness connector. After repair, go to step 19.
- Determine If Malfunction By Another Detected DTC -
Check for immobilizer unit DTC 03 (ID number is not input into immobilizer unit after cranking engine.). If immobilizer unit DTC 03 is not present, go to next step. If immobilizer DTC 03 is present, check key being used. Key has no transponder. Replace with registered key. After repair, go to step 19.
- Determine If Malfunction By Another Detected DTC -
Check for immobilizer unit DTC 01 (ID number unregistered in immobilizer unit is input after engine cranking.). If immobilizer unit DTC 01 is not present, go to next step. If immobilizer DTC 01 is present, check key being used. Key may not be programmed to immobilizer system. Reprogram key or use another programed key. For key reprogramming, see appropriate IMMOBILIZER SYSTEMS article in ACCESSORIES & EQUIPMENT. After key is reprogrammed, go to next step.
- Inspect Poor Connection Of Immobilizer Unit Connector -
Turn ignition off. Disconnect immobilizer unit 12-pin harness connector. See Fig 1. Check for poor connection at immobilizer unit connector terminals due to damaged, pulled-out pins, corrosion, etc. If connector terminals are okay, go to next step. If connector terminals are found faulty, repair or replace as necessary. After repair, go to step 19.
- Inspect Immobilizer Unit Power Circuit For Open Circuit -
Turn ignition on, engine off. Measure voltage between ground and immobilizer unit 12-pin harness connector terminal "J" (Blue/Red wire). If battery voltage is present, go to next step. If battery voltage is not present, repair open circuit in Blue/Red wire between immobilizer unit 12-pin harness connector terminal "J" and under-dash fuse block. See appropriate WIRING DIAGRAM under ENGINE PERFORMANCE in SYSTEM WIRING DIAGRAMS. After repair, go to step 19.
- Inspect Communication Line For Short Harness -
Turn ignition off. Check continuity between ground and immobilizer unit 12-pin harness connector terminal "A" (Red/Black wire). If continuity is not present, go to next step. If continuity is present, repair short circuit to ground in Red/Black wire between immobilizer unit 12-pin harness connector terminal "A" and PCM 24-pin harness connector terminal "3S". After repair, go to next step.
- Verify Troubleshooting Of DTC P1602 Completed -
Return vehicle to original condition. Using scan tool, clear DTCs from PCM memory. See CLEARING DIAGNOSTIC TROUBLE CODES under SELF-DIAGNOSTIC SYSTEM. Start engine and let idle until normal operating temperature is reached. Monitor for DTCs. If same DTC is not present, go to next step. If same DTC P1602 is present, replace PCM. For PCM removal and installation, see POWERTRAIN CONTROL MODULE
under COMPUTERIZED ENGINE CONTROLS in REMOVAL, OVERHAUL & INSTALLATION article. After repair, go to next step.
- Verify After Repair Procedure -
Using scan tool, perform After Repair Procedure. See AFTER REPAIR PROCEDURE . If no other DTCs are present, testing is complete. If any other DTC is present, go to applicable test and repair.
 Courtesy of MAZDA MOTORS CORP.