Test B: No Communication With Lighting Control Module
- Turn ignition switch to LOCK position. Connect New Generation Star (NGS) tester to Data Link Connector (DLC). Turn ignition switch to RUN position. Using NGS tester, monitor LCM PID IGN_LC. If UNABLE TO PERFORM TEST/FUNCTION, MODULE NOT RESPONDING:LCM CHECK IGNITION STATUS/VERIFY or CABLE REQUIREMENTS CHECK CABLE CONNECTIONS? is not displayed, go to next step. If UNABLE TO PERFORM TEST/FUNCTION, MODULE NOT RESPONDING:LCM CHECK IGNITION STATUS/VERIFY or CABLE REQUIREMENTS CHECK CABLE CONNECTIONS? is displayed, go to step 8
.
- Monitor LCM PID IGN_LC on NGS tester while turning ignition switch to all positions except START. If OFF is not displayed in all positions, go to next step. If OFF is displayed in all positions, go to step 5
.
- Turn ignition switch to RUN position. Measure voltage at output side of fuse No. 14 (7.5-amp) in instrument panel fuse box. If battery voltage does not exist, go to next step. If battery voltage exists, repair open in Red/Yellow wire between fuse No. 14 and LCM.
- Remove and inspect fuse No. 14. If fuse is okay, repair open in White/Yellow wire between fuse No. 14 and ignition switch. If fuse is blown, repair short to ground in power distribution circuit (Red/Yellow wire) as necessary. See appropriate wiring diagram in POWER DISTRIBUTION article in WIRING DIAGRAMS.
- Turn ignition switch to RUN position. Measure voltage at output side of fuse No. 18. If battery voltage exists, go to next step. If battery voltage does not exist, go to step 7
.
- Turn ignition switch to LOCK position. Disconnect LCM harness connector C220. Turn ignition switch to RUN position. Measure voltage at terminal No. 6 (Dark Blue/Light Green wire) at LCM harness connector C220. See Fig 1
. If battery voltage exists, replace LCM. If battery voltage does not exist, repair open in Dark Blue/Light Green wire between fuse No. 18 and LCM.
- Remove and inspect fuse No. 18 (7.5-amp) from instrument panel fuse box. If fuse is okay, repair open in Dark Blue/Light Green wire between fuse No. 18 and LCM. If fuse is blown, repair short to ground in power distribution circuit (Dark Blue/Light Green) wire as necessary. See appropriate wiring diagram in POWER DISTRIBUTION article in WIRING DIAGRAMS.
- Measure voltage at output side of fuse No. 31 (7.5-amp) in instrument panel fuse box. If battery voltage does not exist, go to next step. If battery voltage exists, go to step 12
.
- Remove and inspect fuse No. 31. If fuse is blown, go to next step. If fuse is okay, repair open in Dark Blue/Orange wire between instrument panel fuse box and battery junction box. See appropriate wiring diagram in POWER DISTRIBUTION article in WIRING DIAGRAMS.
- Turn ignition switch to LOCK position. Disconnect headlight switch harness connector and LCM harness connector C221. Measure resistance between ground and terminal No. 25 (Orange/White wire) at LCM harness connector C221. See Fig 2
. If resistance is greater than 10 k/ohms, go to next step. If resistance is 10 k/ohms or less, repair short to ground in Orange/White wire between LCM and fuse No. 31, or between headlight switch and fuse No. 31.
- Connect headlight switch harness connector. Measure resistance between ground and terminal No. 25 (Orange/White wire) at LCM harness connector C221. If resistance is greater than 10 k/ohms, go to next step. If resistance is 10 k/ohms or less, replace headlight switch.
- Disconnect LCM harness connector C221 (if not disconnected). Install fuse No. 31. Measure voltage at terminal No. 25 (Orange/White wire) at LCM harness connector C221. See Fig 2
. If battery voltage exists, go to next step. If battery voltage does not exist, repair open in Orange/White wire between fuse No. 31 and LCM.
- Disconnect LCM harness connector C222. Measure resistance between ground and terminal No. 23 (Pink/Orange wire) at LCM harness connector C221. Measure resistance between ground and terminal No. 13 (Pink/Orange wire) at LCM harness connector C222. See Fig 3
. If either resistance reading is greater than 5 ohms, repair open in appropriate Pink/Orange wire between LCM and ground. If both resistance readings are 5 ohms or less, repair communication concern. See MODULE COMMUNICATIONS NETWORK - TOWN CAR article.
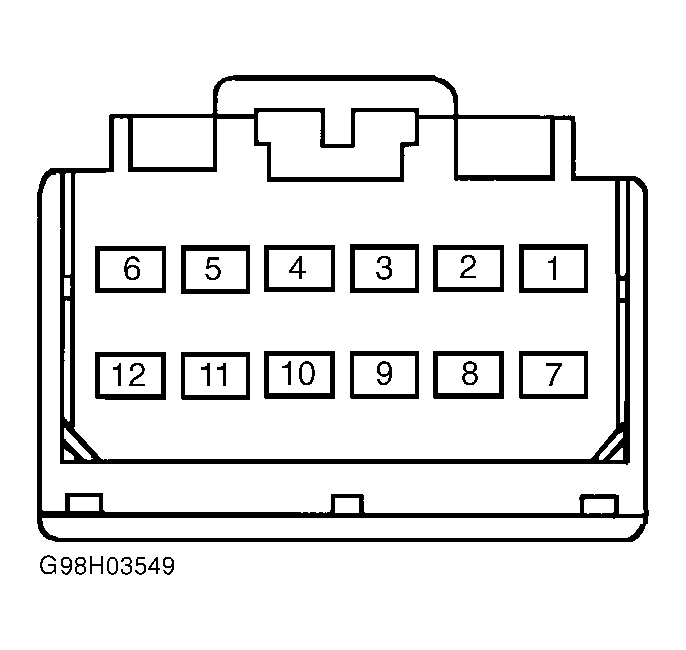 Courtesy of FORD MOTOR CO.
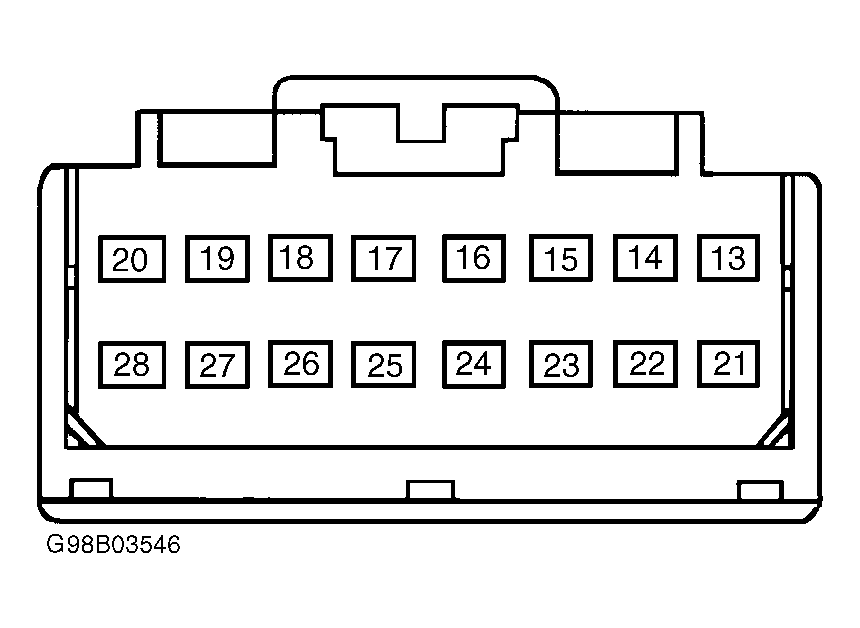 Courtesy of FORD MOTOR CO.
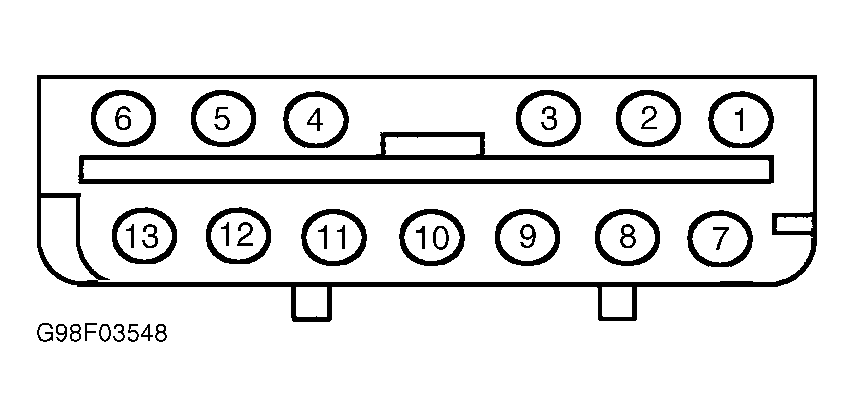 Courtesy of FORD MOTOR CO.