Exhaust Manifold: Removal
- REMOVE ENGINE ROOM SIDE COVER LH
(See
REMOVAL
)
- REMOVE ENGINE ROOM SIDE COVER RH
(See
REMOVAL
)
- REMOVE UPPER RADIATOR SUPPORT SEAL
(See
REMOVAL
)
- REMOVE FRONT FENDER SPLASH SHIELD SUB-ASSEMBLY LH
(See
REMOVAL
)
- REMOVE FRONT FENDER SPLASH SHIELD SUB-ASSEMBLY RH
(See
REMOVAL
)
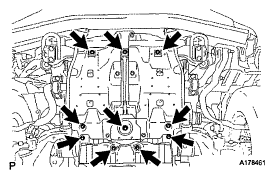
- REMOVE NO. 1 ENGINE UNDER COVER SUB-ASSEMBLY
- Remove the 10 bolts and No. 1 engine under cover.
 Courtesy of © TOYOTA, LICENSE AGREEMENT TMS1002
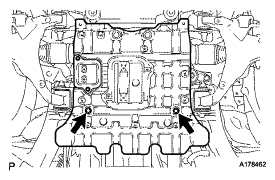
- REMOVE NO. 2 ENGINE UNDER COVER
- Remove the 2 bolts and No. 2 engine under cover.
 Courtesy of © TOYOTA, LICENSE AGREEMENT TMS1002
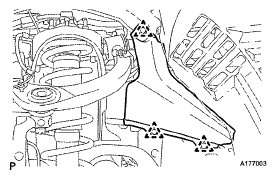
- REMOVE FRONT FENDER APRON SEAL FRONT RH
- Using a clip remover, remove the 3 clips and fender apron seal.
 Courtesy of © TOYOTA, LICENSE AGREEMENT TMS1002
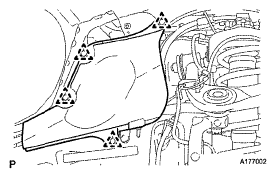
- REMOVE FRONT FENDER APRON SEAL REAR RH
- Using a clip remover, remove the 4 clips and fender apron seal.
 Courtesy of © TOYOTA, LICENSE AGREEMENT TMS1002
- REMOVE FRONT FENDER APRON SEAL FRONT LH
- Using a clip remover, remove the 4 clips and fender apron seal.
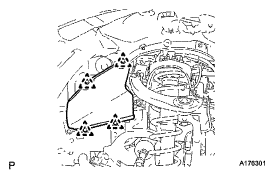 Courtesy of © TOYOTA, LICENSE AGREEMENT TMS1002
- REMOVE FRONT FENDER APRON SEAL REAR LH
- Using a clip remover, remove the 4 clips and fender apron seal.
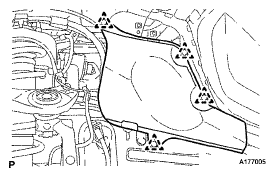 Courtesy of © TOYOTA, LICENSE AGREEMENT TMS1002
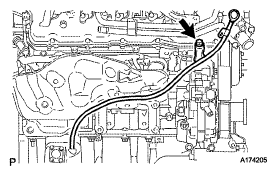
- REMOVE ENGINE OIL LEVEL DIPSTICK GUIDE
- Remove the dipstick.
- Remove the bolt and dipstick guide.
- Remove the O-ring from the dipstick guide.
- REMOVE TAILPIPE ASSEMBLY
(See REMOVAL
)
- REMOVE CENTER EXHAUST PIPE ASSEMBLY
(See REMOVAL
)
 Courtesy of © TOYOTA, LICENSE AGREEMENT TMS1002
- REMOVE FRONT NO. 2 EXHAUST PIPE ASSEMBLY
(See REMOVAL
)
- REMOVE FRONT EXHAUST PIPE ASSEMBLY
(See REMOVAL
)
- REMOVE PROPELLER SHAFT HEAT INSULATOR
- Remove the 2 bolts and heat insulator.
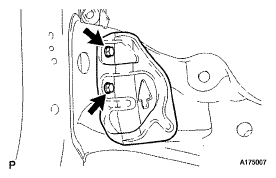 Courtesy of © TOYOTA, LICENSE AGREEMENT TMS1002
- REMOVE NO. 2 MANIFOLD STAY
- Remove the 2 bolts and manifold stay.
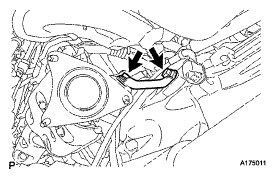 Courtesy of © TOYOTA, LICENSE AGREEMENT TMS1002
- REMOVE NO. 2 EXHAUST MANIFOLD HEAT INSULATOR
- Remove the 3 bolts and heat insulator.
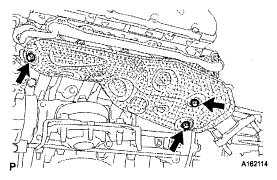 Courtesy of © TOYOTA, LICENSE AGREEMENT TMS1002
- REMOVE EXHAUST MANIFOLD SUB-ASSEMBLY LH
- Remove the 10 nuts, exhaust manifold and 2 gaskets.
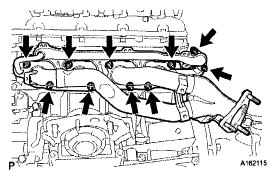 Courtesy of © TOYOTA, LICENSE AGREEMENT TMS1002
- REMOVE NO. 1 MANIFOLD STAY
- Remove the 2 bolts and manifold stay.
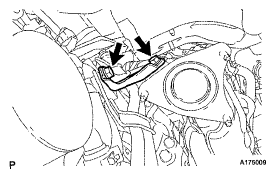 Courtesy of © TOYOTA, LICENSE AGREEMENT TMS1002
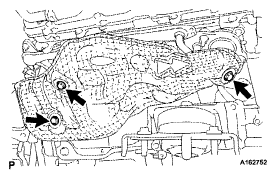
- REMOVE NO. 1 EXHAUST MANIFOLD HEAT INSULATOR
- Remove the 3 bolts and heat insulator.
 Courtesy of © TOYOTA, LICENSE AGREEMENT TMS1002
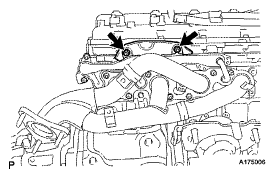
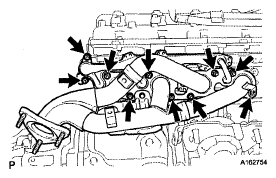
- REMOVE EXHAUST MANIFOLD SUB-ASSEMBLY RH
- Remove the 2 nuts and insulator from the exhaust manifold.
 Courtesy of © TOYOTA, LICENSE AGREEMENT TMS1002
- Remove the 10 nuts, exhaust manifold and 2 gaskets.
 Courtesy of © TOYOTA, LICENSE AGREEMENT TMS1002