Radio Receiver: Removal
- REMOVE LUGGAGE COMPARTMENT MAT SUB-ASSEMBLY
(See
REMOVAL
)
- REMOVE BATTERY SERVICE HOLE COVER LH
(See
REMOVAL
)
- DISCONNECT CABLE FROM NEGATIVE BATTERY TERMINAL
NOTE:
- After the power switch is turned OFF, the HDD navigation system requires approximately 6 minutes to record various types of memory and settings. As a result, after turning the power switch OFF, wait 6 minutes or more before disconnecting the cable from the negative (-) battery terminal.
- When disconnecting the cable some systems need to be initialized after the cable is reconnected (see
INITIALIZATION
).
- REMOVE INSTRUMENT PANEL FINISH PANEL END LH
(See
REMOVAL
)
- REMOVE INSTRUMENT PANEL FINISH PANEL END RH
(See
REMOVAL
)
- REMOVE SHIFT LEVER KNOB SUB-ASSEMBLY
(See
REMOVAL
)
- REMOVE NO. 3 BOX PANEL
(See
REMOVAL
)
- REMOVE REAR UPPER CONSOLE PANEL
(See
REMOVAL
)
- REMOVE UPPER CONSOLE PANEL SUB-ASSEMBLY
(See
REMOVAL
)
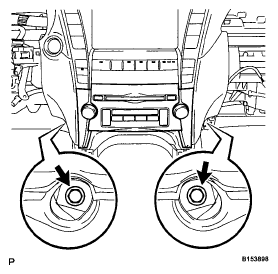
- REMOVE RADIO RECEIVER ASSEMBLY WITH BRACKET
- Remove the 2 bolts
 Courtesy of © TOYOTA, LICENSE AGREEMENT TMS1002
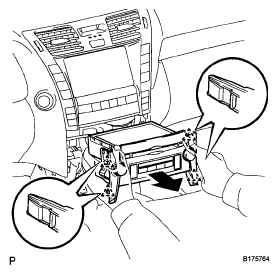
- Pull the radio receiver to detach the 4 clips on the backside of the radio receiver
- Disconnect the connectors and remove the radio receiver
 Courtesy of © TOYOTA, LICENSE AGREEMENT TMS1002
- REMOVE INSTRUMENT CLUSTER FINISH PANEL ASSEMBLY
- Detach the 5 clips and remove the panel
 Courtesy of © TOYOTA, LICENSE AGREEMENT TMS1002
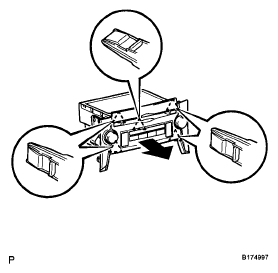
- REMOVE NO. 2 RADIO BRACKET
- Remove the 4 bolts and bracket
 Courtesy of © TOYOTA, LICENSE AGREEMENT TMS1002
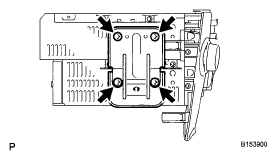
- REMOVE NO. 1 RADIO BRACKET
- Remove the 4 bolts and bracket