Shift Lever: Removal
- DISCONNECT CABLE FROM NEGATIVE BATTERY TERMINAL
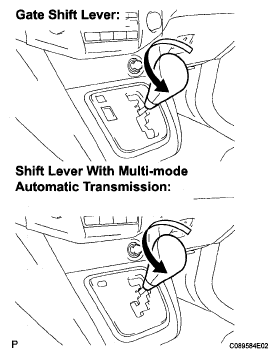
- REMOVE SHIFT LEVER KNOB SUB-ASSEMBLY
- Turn the shift lever knob sub-assembly in the direction indicated by the arrow and remove it.
- REMOVE CONSOLE PANEL UPPER FRONT
(See
REMOVAL
)
- REMOVE INSTRUMENT PANEL FINISH PANEL LOWER
(See
REMOVAL
)
- REMOVE FRONT DOOR SCUFF PLATE LH
(See
REMOVAL
)
- REMOVE FRONT DOOR SCUFF PLATE RH
(See
REMOVAL
)
 Courtesy of © TOYOTA, LICENSE AGREEMENT TMS1002
- REMOVE COWL SIDE TRIM SUB-ASSEMBLY RH
(See
REMOVAL
)
- REMOVE COWL SIDE TRIM SUB-ASSEMBLY LH
(See
REMOVAL
)
- REMOVE INSTRUMENT PANEL FINISH PANEL SUB-ASSEMBLY LOWER
(See
REMOVAL
)
- REMOVE INSTRUMENT PANEL UNDER COVER SUB-ASSEMBLY NO. 2
(See
REMOVAL
)
- REMOVE GLOVE COMPARTMENT DOOR ASSEMBLY
(See
REMOVAL
)
- REMOVE FLOOR CARPET COVER CENTER LH
(See
REMOVAL
)
- REMOVE FLOOR CARPET COVER CENTER RH
(See
REMOVAL
)
- REMOVE INSTRUMENT PANEL FINISH PANEL LOWER CENTER
(See
REMOVAL
)
- DISCONNECT TRANSMISSION CONTROL CABLE ASSEMBLY
- Using a screwdriver, disconnect the cable end from the shift lever assembly.
- Turn the socket of the transmission control cable assembly counterclockwise and remove the stopper cap.
- Disconnect the transmission control cable assembly from the shift lever assembly.
 Courtesy of © TOYOTA, LICENSE AGREEMENT TMS1002
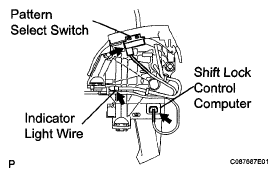
- REMOVE SHIFT LEVER ASSEMBLY
- Disconnect the pattern select switch connector, the shift rock control computer connector, and the indicator light wire connector.
 Courtesy of © TOYOTA, LICENSE AGREEMENT TMS1002
- Remove the 4 nuts and disconnect the shift lever assembly from the vehicle.
 Courtesy of © TOYOTA, LICENSE AGREEMENT TMS1002