Radio Receiver: Removal
- REMOVE SHIFT LEVER KNOB SUB-ASSEMBLY
(See
REMOVAL
)
- REMOVE UPPER CONSOLE PANEL ASSEMBLY WITH FRONT ASH RECEPTACLE
(See
REMOVAL
)
- REMOVE INSTRUMENT PANEL FINISH PANEL END LH
(See
REMOVAL
)
- REMOVE INSTRUMENT PANEL FINISH PANEL END RH
(See
REMOVAL
)
- REMOVE NO. 2 INSTRUMENT PANEL REGISTER ASSEMBLY
(See
REMOVAL
)
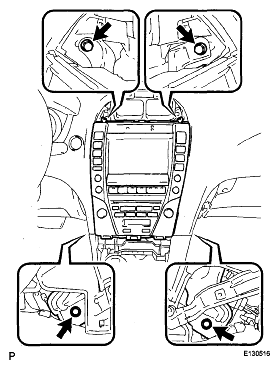
- REMOVE INTEGRATION CONTROL PANEL WITH RADIO RECEIVER ASSEMBLY (w/o Navigation System)
- Remove the 4 bolts.
- Pull the integration control panel with radio receiver assembly toward the rear of the vehicle and disengage the 2 clips.
- Disconnect each connector and remove the integration control panel with radio receiver assembly.
 Courtesy of © TOYOTA, LICENSE AGREEMENT TMS1002
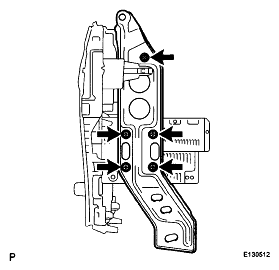
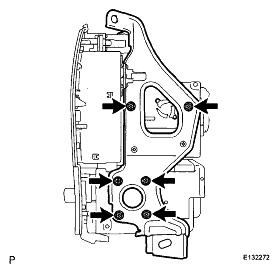
- REMOVE NO. 1 RADIO BRACKET (w/o Navigation System)
- Remove the 4 bolts, screw, and No. 1 radio bracket.
 Courtesy of © TOYOTA, LICENSE AGREEMENT TMS1002
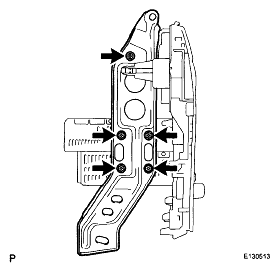
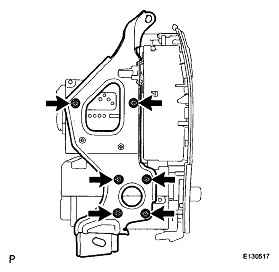
- REMOVE NO. 2 RADIO BRACKET (w/o Navigation System)
- Remove the 4 bolts, screw, and No. 2 radio bracket.
 Courtesy of © TOYOTA, LICENSE AGREEMENT TMS1002
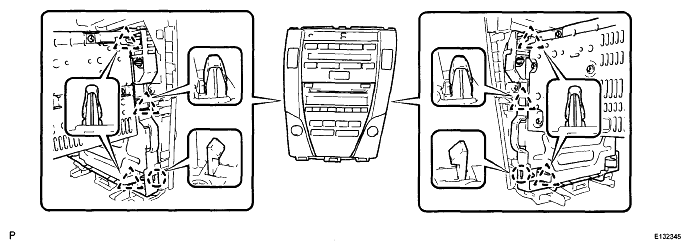
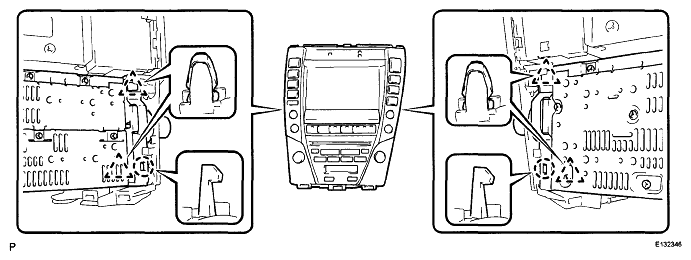
- REMOVE RADIO RECEIVER ASSEMBLY (w/o Navigation System)
- Disengage the 2 claws and 6 clips.
 Courtesy of © TOYOTA, LICENSE AGREEMENT TMS1002
- Remove the radio receiver assembly.
- REMOVE MULTI-DISPLAY WITH RADIO RECEIVER ASSEMBLY (w/ Navigation System)
- Remove the 4 bolts.
- Pull the multi-display with radio receiver assembly toward the rear of the vehicle and disengage the 2 clips.
- Disconnect each connector and remove the multi-display with radio receiver assembly.
 Courtesy of © TOYOTA, LICENSE AGREEMENT TMS1002
- REMOVE NO. 1 RADIO BRACKET (w/ Navigation System)
- Remove the 6 bolts and No. 1 radio bracket.
 Courtesy of © TOYOTA, LICENSE AGREEMENT TMS1002
- REMOVE NO. 2 RADIO BRACKET (w/ Navigation System)
- Remove the 6 bolts and No. 2 radio bracket.
 Courtesy of © TOYOTA, LICENSE AGREEMENT TMS1002
- REMOVE RADIO RECEIVER ASSEMBLY (w/ Navigation System)
- Disengage the 2 claws and 4 clips.
 Courtesy of © TOYOTA, LICENSE AGREEMENT TMS1002
- Remove the radio receiver assembly.