Diagnosis & Repair (Using OBD-II Scan Tool)
- Check valve timing. See appropriate article in ENGINES. Repair as necessary. If valve timing is okay, go to next step.
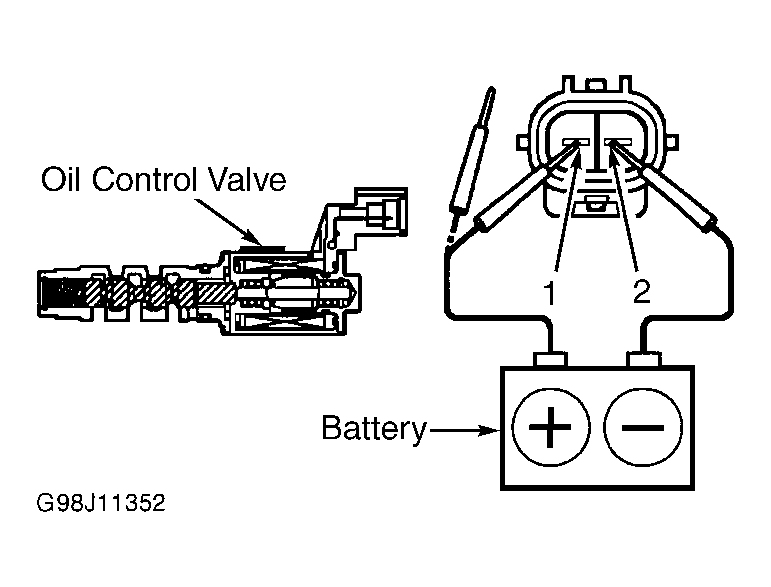
- Start and run engine. Allow engine to reach normal operating temperature. Disconnect OCV connector. Connect fused jumper wires between positive battery terminal and OCV connector terminal No. 1, and negative battery terminal and OCV connector terminal No. 2. See Fig 2. If engine speed does not change with OCV disconnected and changes (rough idle or stalls) with fused jumper wires connected, go to next step. If results are not as specified, go to step 4.
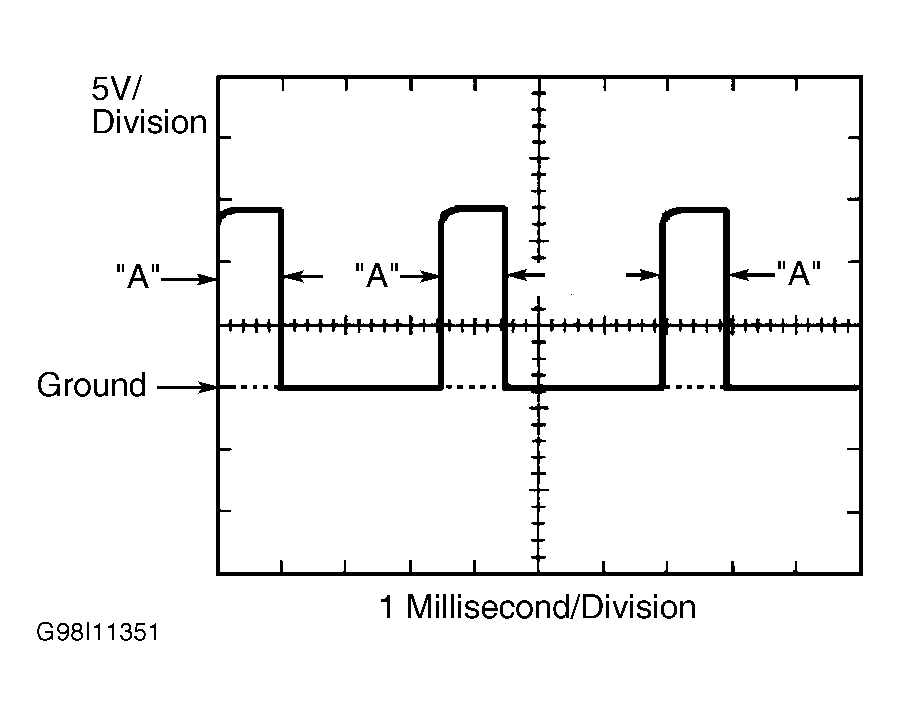
- Access ECM under front of carpet on passenger side of vehicle. Backprobe ECM E15 connector. Start engine. Using oscilloscope, check waveform pattern between ECM E15 connector terminals No. 17 (Yellow/Black wire) and No. 18 (White/Red wire). See Figure. Slowly increase engine speed. Waveform frequency "A" should lengthen as engine speed increases. See Fig 1. If readings are not as specified, replace ECM and retest. If readings are as specified, VVT system is functioning properly at this time. DTC may have been set because of a foreign object that was temporarily caught in the engine oil system but after a short time system returned to normal. If readings are not as specified, replace ECM and retest.
- Remove timing belt cover and timing belt. See appropriate article in ENGINES. Remove OCV. Place a shop towel under OCV cylinder head opening. Rotate VVT pulley from left to right about 30 degrees 2-3 times. Oil should drain from OCV cylinder head opening. If oil does not drain from opening, replace VVT pulley/gear assembly and go to next step. If oil drains from head opening, go to next step.
- With OCV removed, connect fused jumper wires between positive battery terminal and OCV connector terminal No. 1, and negative battery terminal and OCV connector terminal No. 2. See Fig 2. OCV plunger should move away from connector. Remove fused jumper wires. OCV plunger should move back in direction of connector. If OCV plunger does not move as specified, replace OCV and go to next step. If OCV plunger moves as specified, go to next step.
- Check for blockage in OCV. Check oil check valve and oil pipe located under OCV. Repair as necessary. If components are okay, go to next step.
- Clear DTCs. See
CLEARING DIAGNOSTIC TROUBLE CODES under SELF-DIAGNOSTIC SYSTEM in SELF-DIAGNOSTICS - INTRODUCTION article. Duplicate driving conditions under which DTC P1349 was set. Retrieve DTCs. See
RETRIEVING DIAGNOSTIC TROUBLE CODES under SELF-DIAGNOSTIC SYSTEM in SELF-DIAGNOSTICS - INTRODUCTION article. If DTC P1349 is displayed, replace ECM and retest. If DTC P1349 is not displayed, VVT system is functioning properly at this time. DTC may have been set because of a foreign object that was temporarily caught in the engine oil system, but after a short time system returned to normal.
 Courtesy of © TOYOTA, LICENSE AGREEMENT TMS1002
 Courtesy of © TOYOTA, LICENSE AGREEMENT TMS1002