Diagnosis & Repair (Using Lexus Scan Tool)
- Connect Lexus scan tool to DLC No. 3. See Figure. Start and warm engine to normal operating temperature. Read EGR gas temperature. Temperature should be 41-302°F (5-150°C) (not immediately after driving). If temperature is as specified, go to step 7). If temperature is not as specified, go to next step.
- Disconnect EGR temperature sensor harness connector. Connector is located underneath throttle body. Connect fused jumper wire between harness connector terminals. EGR gas temperature displayed should be 318.7°F (159.3°C). If temperature displayed is not as specified, go to next step. If temperature displayed is as specified, check sensor connectors and terminals. Repair as necessary. If connectors are okay, replace sensor and retest system.
- Remove fused jumper wire. Turn ignition off. Access ECM behind glove box. Backprobing, connect fused jumper wire between ECM E8 harness connector terminals No. 13 (Gray/Yellow wire) and No. 18 (Brown wire). See Figure. Turn ignition on. EGR gas temperature displayed should be 318.7°F (159.3°C).
- If temperature displayed is not as specified, replace ECM and retest system. If temperature displayed is as specified, repair open in circuit(s) between ECM E8 connector and EGR temperature sensor.
- Disconnect ECM E8 connector. Turn ignition on. EGR gas temperature displayed should be 37.6°F (3.1°C).
- If temperature displayed is not as specified, replace ECM and retest system. If temperature displayed is as specified, repair short in circuit(s) between ECM E8 connector and EGR temperature sensor.
- Check vacuum hoses. Repair as necessary. If all hoses are okay, go to next step.
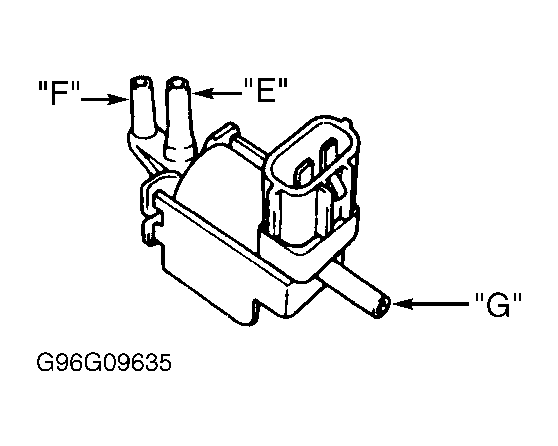
- Using scan tool, select ACTIVE TEST mode. Using scan tool, turn EGR VSV valve on. EGR VSV is located near air intake chamber assembly. Apply compressed air to port "E". Air should flow from port "F". See Fig 1. Using scan tool, turn EGR VSV valve off. Apply compressed air to port "E". Air should flow from port "G". If valve operates correctly, go to step 12). If valve does not operate correctly, go to next step.
- Remove EGR VSV. Using ohmmeter, measure resistance between valve terminals. Resistance should be 27-33 ohms at 68°F (20°C). Measure resistance between each terminal and body of valve. Resistance should be infinite. If resistance is as specified, go to next step. If resistance is not as specified, replace EGR VSV.
- Apply compressed air to port "E" of EGR VSV. Air should flow from port "G". Using fused jumper wires, apply battery voltage and ground to EGR VSV terminals. Again, apply compressed air to port "E". Air should flow from port "F". Replace EGR VSV as necessary.
- If valve meets all specifications, check for an open in wiring harness and connectors between engine compartment junction block and ECM E7 connector. See appropriate wiring diagram in SYSTEM WIRING DIAGRAMS
article. Repair as necessary.
- Disconnect vacuum hose from EGR valve. Start engine. Apply vacuum to EGR valve. If engine runs rough or stalls, go to next step. If engine does not stall or run rough, check EGR valve intake and exhaust passages. If passages are clean, replace EGR valve and retest system.
- Check EGR Vacuum Control Valve (VCV). See SYSTEM/COMPONENT TESTS
article. Replace VCV as necessary. If VCV is okay, replace ECM and retest system.
 Courtesy of © TOYOTA, LICENSE AGREEMENT TMS1002