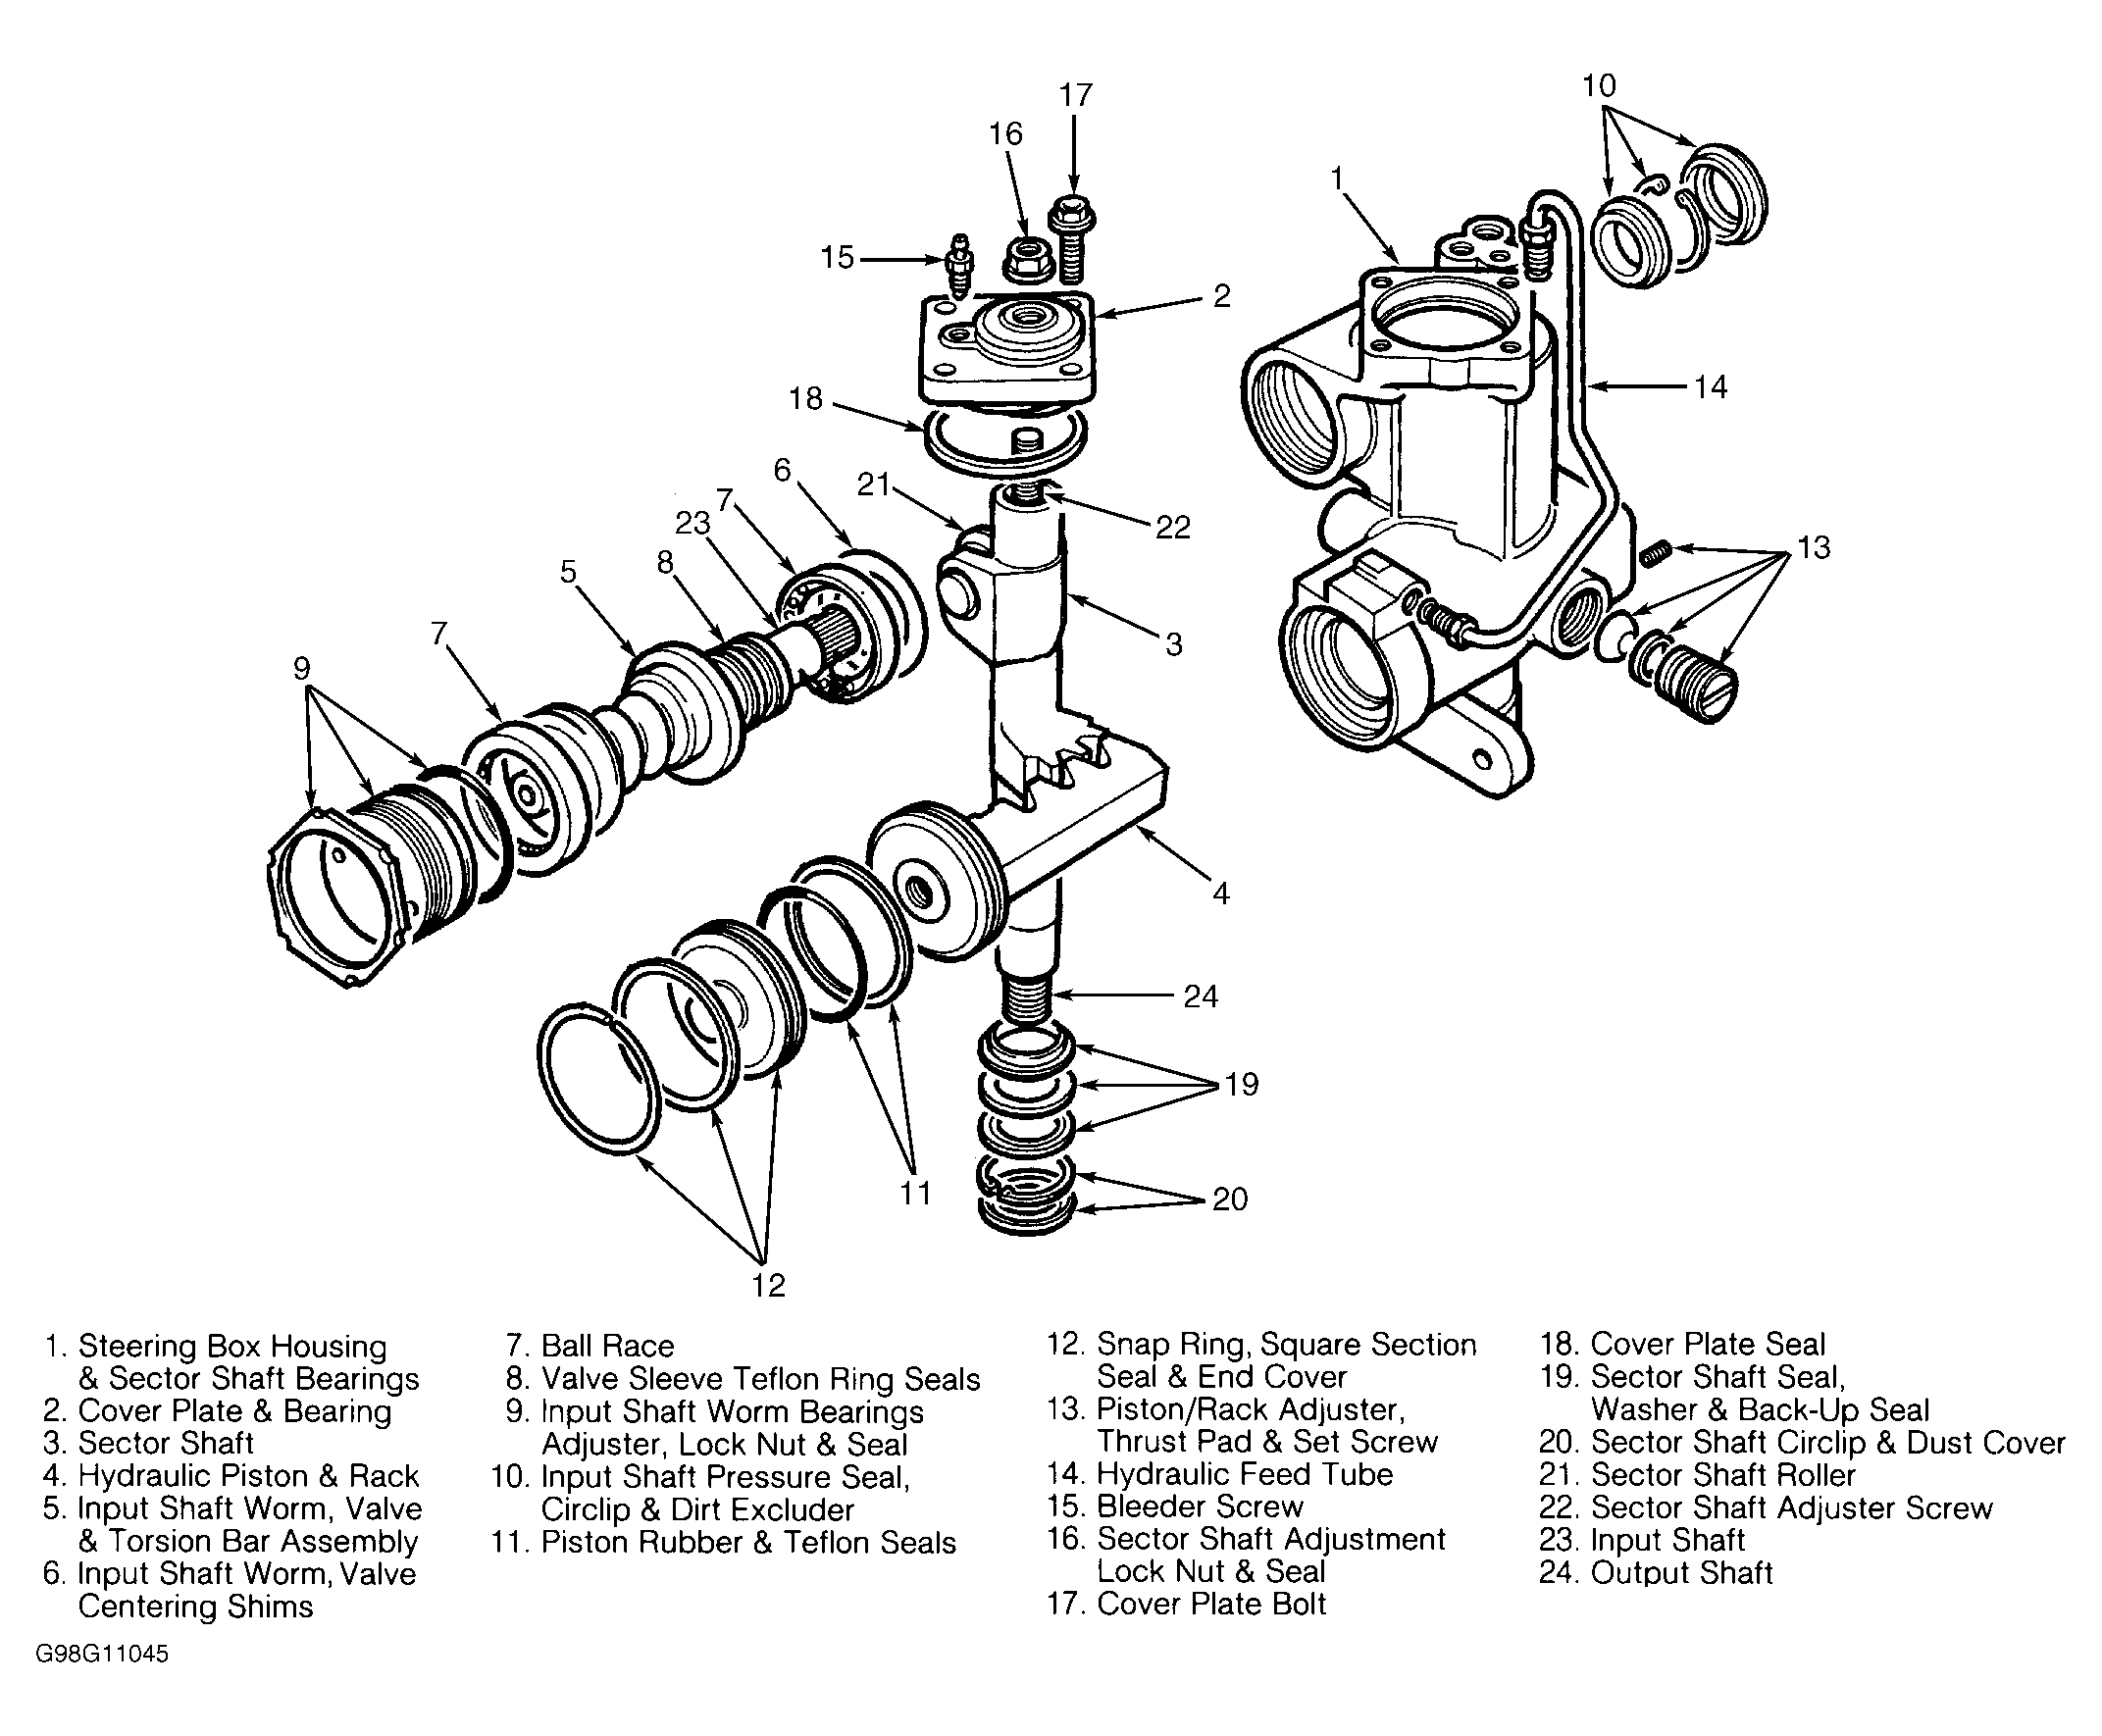
Power Steering Box: Reassembly
- Install sector shaft oil seal (lip side first) and extrusion washer. Install dust seal (lip side last) and circlip.
- Using petroleum jelly to help installation, install original shims and inner bearing cap onto input shaft worm, valve and torsion bar assembly. If original shims are not available, thickness of replacement shims should be 0.030" (0.76 mm).
- Install in order: inner cage and bearings, valve and worm assembly, outer cage and bearings, outer bearing cup, and NEW worm adjuster sealing ring. Lubricate input shaft torsion bar and install input shaft worm, valve and torsion bar assembly into steering box. Use care to not damage input shaft pressure seal. Loosely install input shaft worm bearings adjuster and lock nut into steering box.
- Using Worm Adjusting Wrench (LRT-57-006), tighten worm bearings adjuster until end play is almost eliminated. Using an INCH-lb. torque wrench and Spline Socket (LRT-57-025), rotate input shaft worm, valve and torsion bar assembly and ensure bearing cages are seated correctly.
- Continue to tighten worm bearings adjuster until input shaft turning torque is 4.9 INCH lbs. (0.56 N.m). Back off worm bearings adjuster 1/4 turn. Tighten worm bearings adjuster again, until input shaft turning torque is 1.8-3.0 INCH lbs. (0.20-0.34 N.m). Using worm adjusting wrench and Lock Nut Wrench (LRT-57-028), tighten lock nut to 74 ft. lbs. (100 N.m). Ensure input shaft turning torque is correct.
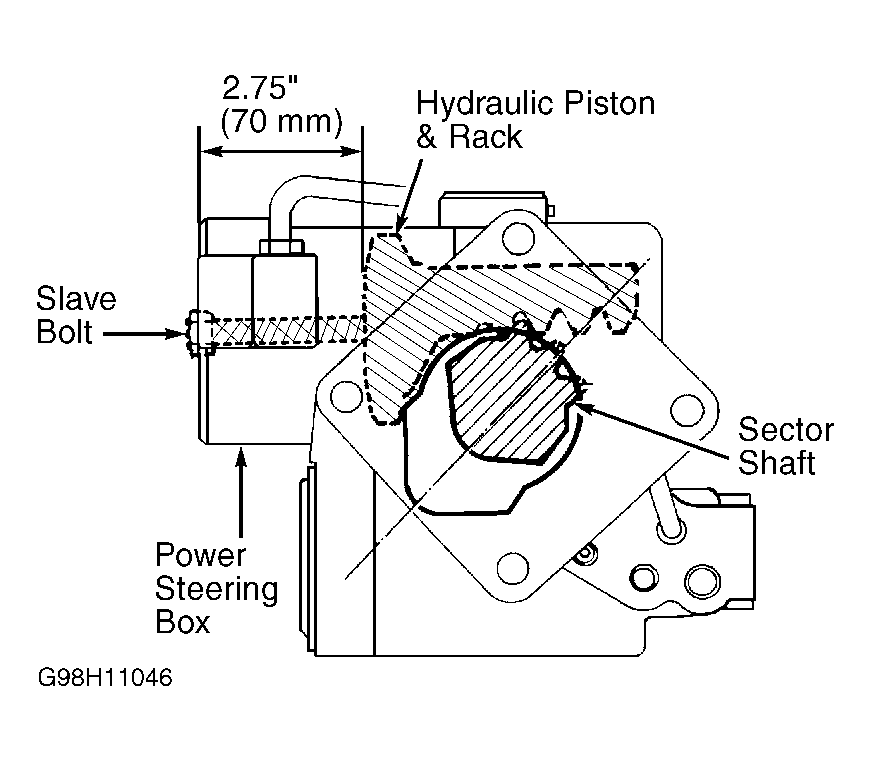
- Using a slave bolt installed into piston, insert piston and rack into steering box until piston is 2.75" (70 mm) from outer edge of bore. See Fig 2. Install Sector Shaft Seal Saver (LRT-57-021), onto sector shaft. Align sector shaft roller with cut out in steering box. Install sector shaft while rotating input shaft to allow sector shaft roller to engage worm. See Fig 2. Remove seal saver when sector shaft is in position.
- Install rack adjuster and thrust pad until pad touches rack and back off 1/2 turn. Loosely install NEW nylon pad and adjuster set screw. Install NEW cover plate seal and install cover plate. Ensure cover plate is fully installed onto sector shaft adjuster screw. If necessary, back off adjuster screw and tap cover plate into position.
- Before tightening cover plate bolts, ensure sector shaft roller is free to move in valve worm. If necessary, loosen adjuster screw approximately 2 turns clockwise. When sector shaft roller moves freely, tighten cover plate bolts to specification. See TORQUE SPECIFICATIONS .
- Remove slave bolt from piston. Install NEW square section seal to end cover. Press end cover into steering box housing until it clears snap ring groove. Install snap ring into groove with one end 7/16" (12 mm) from extraction hole.
- Install pitman arm to sector shaft and tighten nut until there is no looseness between shaft and pitman arm. Rotate sector shaft to full right lock position and then back 2 full turns to center steering box. Check for steering box backlash by holding input shaft and moving pitman arm back and forth. If backlash exists, continue moving pitman arm while slowly turning sector shaft adjuster screw clockwise. When backlash is almost gone, install a NEW sector shaft adjuster sealing lock nut and tighten.
- Rotate sector shaft to full right lock position and then back 2 full turns to center steering box (straight-ahead position). Using an INCH-lb. torque wrench and Spline Socket (LRT-57-025), rotate input shaft in both directions, 1 1/4 turns from center. Tighten sector shaft adjuster screw until input shaft turning torque across center is 3.0 INCH lbs. (0.34 N.m). Tighten sector shaft adjuster lock nut to 44 ft. lbs. (60 N.m).
- Using an INCH-lb. torque wrench and spline socket, rotate input shaft in both directions, 1 1/4 turns from center. Adjust rack adjuster until input shaft turning torque is 5.0-6.0 INCH lbs. (0.56-0.68 N.m). Ensure input shaft turning torque does not exceed 12 INCH lbs. (1.36 N.m). Tighten rack adjuster set screw to 48 INCH lbs. (5.42 N.m).
- Turn steering box input shaft fully counterclockwise. Using an INCH-lb. torque wrench and spline socket, rotate input shaft from lock-to-lock. Ensure turning torque value from lock-to-lock increases from least torque value at lock position to greatest torque value at center position (steering straight ahead) and then decreases to least torque value at opposite lock position. Input shaft turning torque should be the same on each side of center position. If turning torque is as specified, go to step 15). If turning torque is not as specified, record position of greatest torque value and go to next step.
- If position of turning torque values are not as specified, input shaft worm/valve centering shims must be removed or added. If turning torque value is greater before center position, add centering shims. If turning torque value is greater after center position, remove centering shims. Shims are available in 0.001, 0.003, 0.004 and 0.008" (0.03, 0.07, 0.12 and 0.24 mm) sizes. An adjustment of 0.003 (0.07 mm) will move location of torque valve 1/4 turn. When changing shims, use care to not damage shaft seals.
- Using Seal Saver (LRT-57-016) and Seal Installer (LRT-57-026) install input shaft seal. Install input shaft seal (lip side first) into steering box housing 0.19-0.20" (4.8-5.1 mm) from edge. Install circlip. Coat inside lip of dirt excluder with grease. Using Installer (LRT-57-025), install dirt excluder until shoulder of excluder is 0.16-0.18" (4.0-4.5 mm) from edge of steering box housing.
- Remove pitman arm. Coat inside lip of dirt excluder with grease. Install dirt excluder until outer lip of seal is flush with steering box housing. Center steering box, align alignment marks on pitman arm and steering box. Using a NEW lock washer, install pitman arm. Tighten pitman arm nut to specification and fold lock washer tab over nut. See TORQUE SPECIFICATIONS .
 Courtesy of LAND ROVER NORTH AMERICA, INC.
 Courtesy of LAND ROVER NORTH AMERICA, INC.