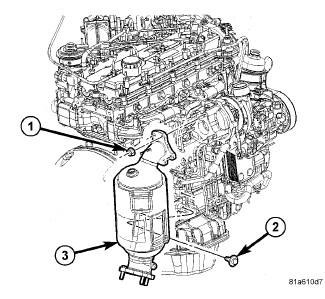
CONVERTER, Catalytic: Installation: 2.8L
 Courtesy of CHRYSLER LLC
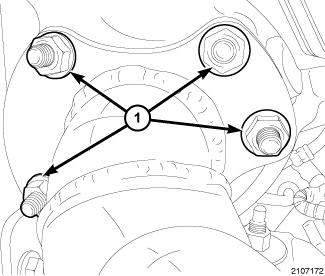
| 1 - NUT |
| 2 - MOUNTING BOLT |
| 3 - CATALYTIC CONVERTER |
- Position the front catalytic converter assembly (3) onto the turbocharger.
- Install the catalytic converter to turbocharger flange nuts (1). Do not tighten at this time.
- Install the two catalytic converter mounting bolts (2). Do not tighten at this time.
- Install the DPF. Refer to FILTER, Diesel Particulate, Installation .
- Install the exhaust pipe. Refer to PIPE, Exhaust, Installation .
- Position the exhaust pipe for proper clearance with the frame and underbody parts. A minimum clearance of 25.4 mm (1.0 in.) is required.
- Tighten the catalytic converter mounting bolts (2) to 16 N.m (12 ft. lbs.).
 Courtesy of CHRYSLER LLC
- Tighten the catalytic converter to turbocharger flange nuts (1) and catalytic converter mounting bolts to 27 N.m (19 ft. lbs.) torque.
- Tighten the muffler to catalytic converter flange retaining nuts to 28 N.m (21 ft. lbs.).
 Courtesy of CHRYSLER LLC
- Partially lower vehicle.
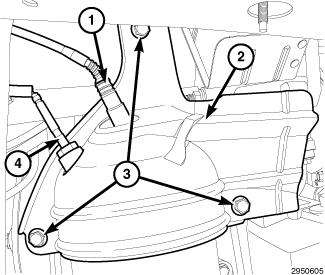
- Install the catalytic converter heat shield (2). Tighten the bolts (3) to 45 N.m (33 ft. lbs.)
- Install the O2 sensor. Tighten the sensor (1) to 27 N.m (20 ft. lbs.)
- Install the temperature sensor. Tighten the sensor (4) to 27 N.m (20 ft. lbs.)
- Install the front right wheelhouse splash shield. Refer to SHIELD, Splash, Front Wheelhouse, Installation
- Lower the vehicle.
- Start the vehicle and inspect for exhaust leaks. Repair any exhaust leaks as necessary.
- Check the exhaust system for contact with the body panels. Make adjustments, if necessary.