Door Module Testing
- Disconnect negative battery cable. Remove front door trim panel. See DOOR TRIM PANEL under REMOVAL & INSTALLATION. Verify door module connectors are properly connected. Repair as necessary and recheck system operation. If connectors are properly connected, go to next step.
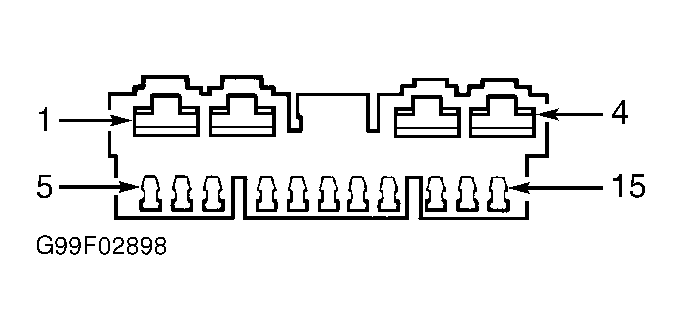
- Disconnect door module 15-pin connector. Using a DVOM, check for continuity between ground and terminal No. 4 (Black wire) at door module 15-pin wiring harness connector. See Fig 1. If continuity exists, go to next step. If continuity does not exist, repair open ground circuit.
- Connect negative battery cable. Using a DVOM, measure voltage between ground and terminal No. 1 (Tan/Light Blue wire) at door module 15-pin wiring harness connector. If battery voltage is present, go to next step (inoperative front window), or go to step 7 (inoperative rear window). If battery voltage is not present, repair open in Tan/Light Blue wire to PDC.
- Disconnect negative battery cable. Disconnect inoperative power window motor connector. Using a DVOM, check for continuity between ground and terminals No. 13 (Light Brown wire on driver's side; Brown wire on passenger's side) and 15 (White wire on driver's side; Violet wire on passenger's side) at door module 15-pin wiring harness connector. Continuity should not exist at either terminal. If continuity does not exist, go to next step. If continuity exists, repair short to ground in appropriate wire.
- Check for continuity on circuits between door module connector and window motor connector. See WIRING DIAGRAMS . If continuity does not exist, repair open circuit as necessary. If continuity exists, go to next step.
- Reconnect door module connector. Disconnect window motor connector. Connect negative battery cable. Turn ignition on. Connect a DVOM between window motor wiring harness connector terminals. Battery voltage should be present with power window switch in up or down position. No voltage should be present with switch in neutral (off) position. If voltage is not as specified, replace door module. If voltage is as specified, door module test is complete. Go to POWER WINDOW MOTOR .
- Disconnect negative battery cable. Remove rear door power window switch. See POWER WINDOW SWITCH under REMOVAL & INSTALLATION. Check rear door power window switch continuity. See POWER WINDOW SWITCH . Replace switch as necessary. If switch is okay, go to next step.
- Reconnect rear door power window switch connector. Disconnect inoperative power window motor connector. Check for continuity between ground and terminal No. 3 (Dark Blue wire on driver's side or Gray wire on passenger's side) and terminal No. 2 (Red/White wire on driver's side or Dark Green wire on passenger's side) at door module 15-pin wiring harness connector. If continuity does not exist, go to next step. If continuity exists, repair short to ground in appropriate circuit.
- Check for continuity on circuits between door module connector and power window motor connector of inoperative window. See WIRING DIAGRAMS . If continuity does not exist, repair open circuit. If continuity exists, go to next step.
- Reconnect door module connector. Connect negative battery cable. Turn ignition on. Measure voltage between ground and each terminal of power window motor wiring harness connector. With power window switch in neutral position (off), battery voltage should be present at each terminal. Also, each terminal should have battery voltage in one other switch position, either up or down. If voltage is not as specified, replace door module. If voltage is as specified, go to POWER WINDOW MOTOR for testing.
 Courtesy of CHRYSLER