Piston & Rod Assembly
- Mark cylinder number on piston. Cylinder number is marked on connecting rod and bearing cap. See Fig 1
. To separate piston and connecting rod, remove snap ring from piston.
- Heat piston in oil to 140-158°F (60-70°C). Press piston pin out of connecting rod. Measure rod bend and twist. If bend and twist are not within specification, replace rod. See CONNECTING RODS
under ENGINE SPECIFICATIONS.
- Measure piston pin diameter. See PISTONS, PINS & RINGS
under ENGINE SPECIFICATIONS. Determine piston fit (clearance between pin and piston). Determine rod fit (clearance between pin and rod bushing). If piston fit or rod fit is not within specification, replace components as necessary.
- To reassemble, install NEW snap ring in piston, with chamfered edge of ring (if equipped) facing away from piston. Reheat piston. Press pin through piston and rod, ensuring rod is correctly oriented to piston (note relationship between oil hole in rod and front mark on top of piston). See Fig 1
. Ensure rod is centered on pin.
- Install remaining NEW snap ring. Ensure rod swings freely. Install piston and rod assembly, with front mark on top of piston toward front of engine. When installing rod bearing cap, ensure numbers on rod and cap are on same side.
- Tighten connecting rod bearing caps evenly to specification. See TORQUE SPECIFICATIONS
. Measure connecting rod side play. If side play is not within specification, replace connecting rod and/or crankshaft. See CONNECTING RODS
under ENGINE SPECIFICATIONS.
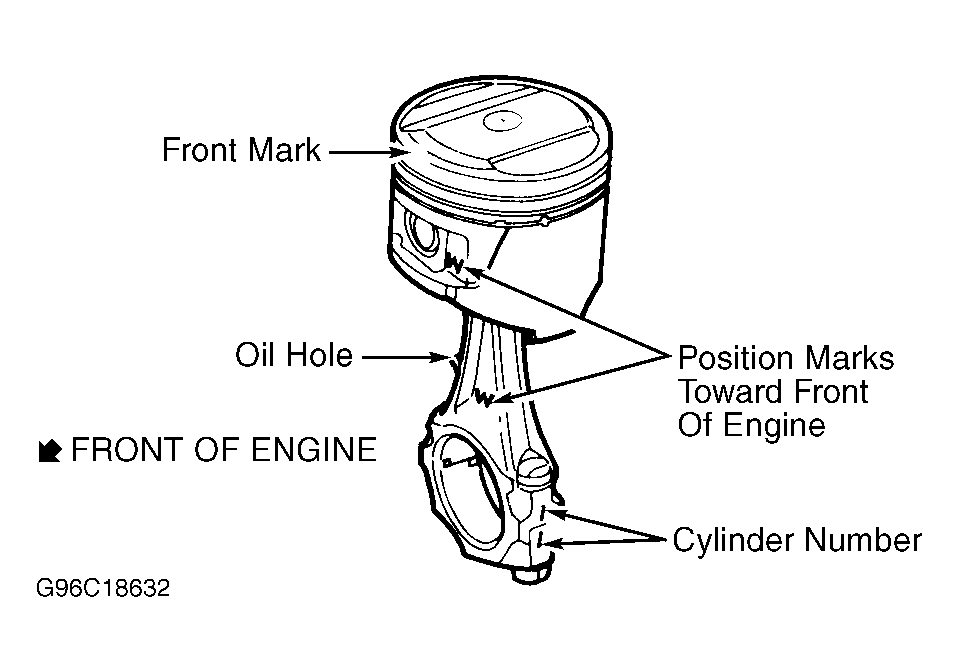 Courtesy of NISSAN MOTOR CO., U.S.A.