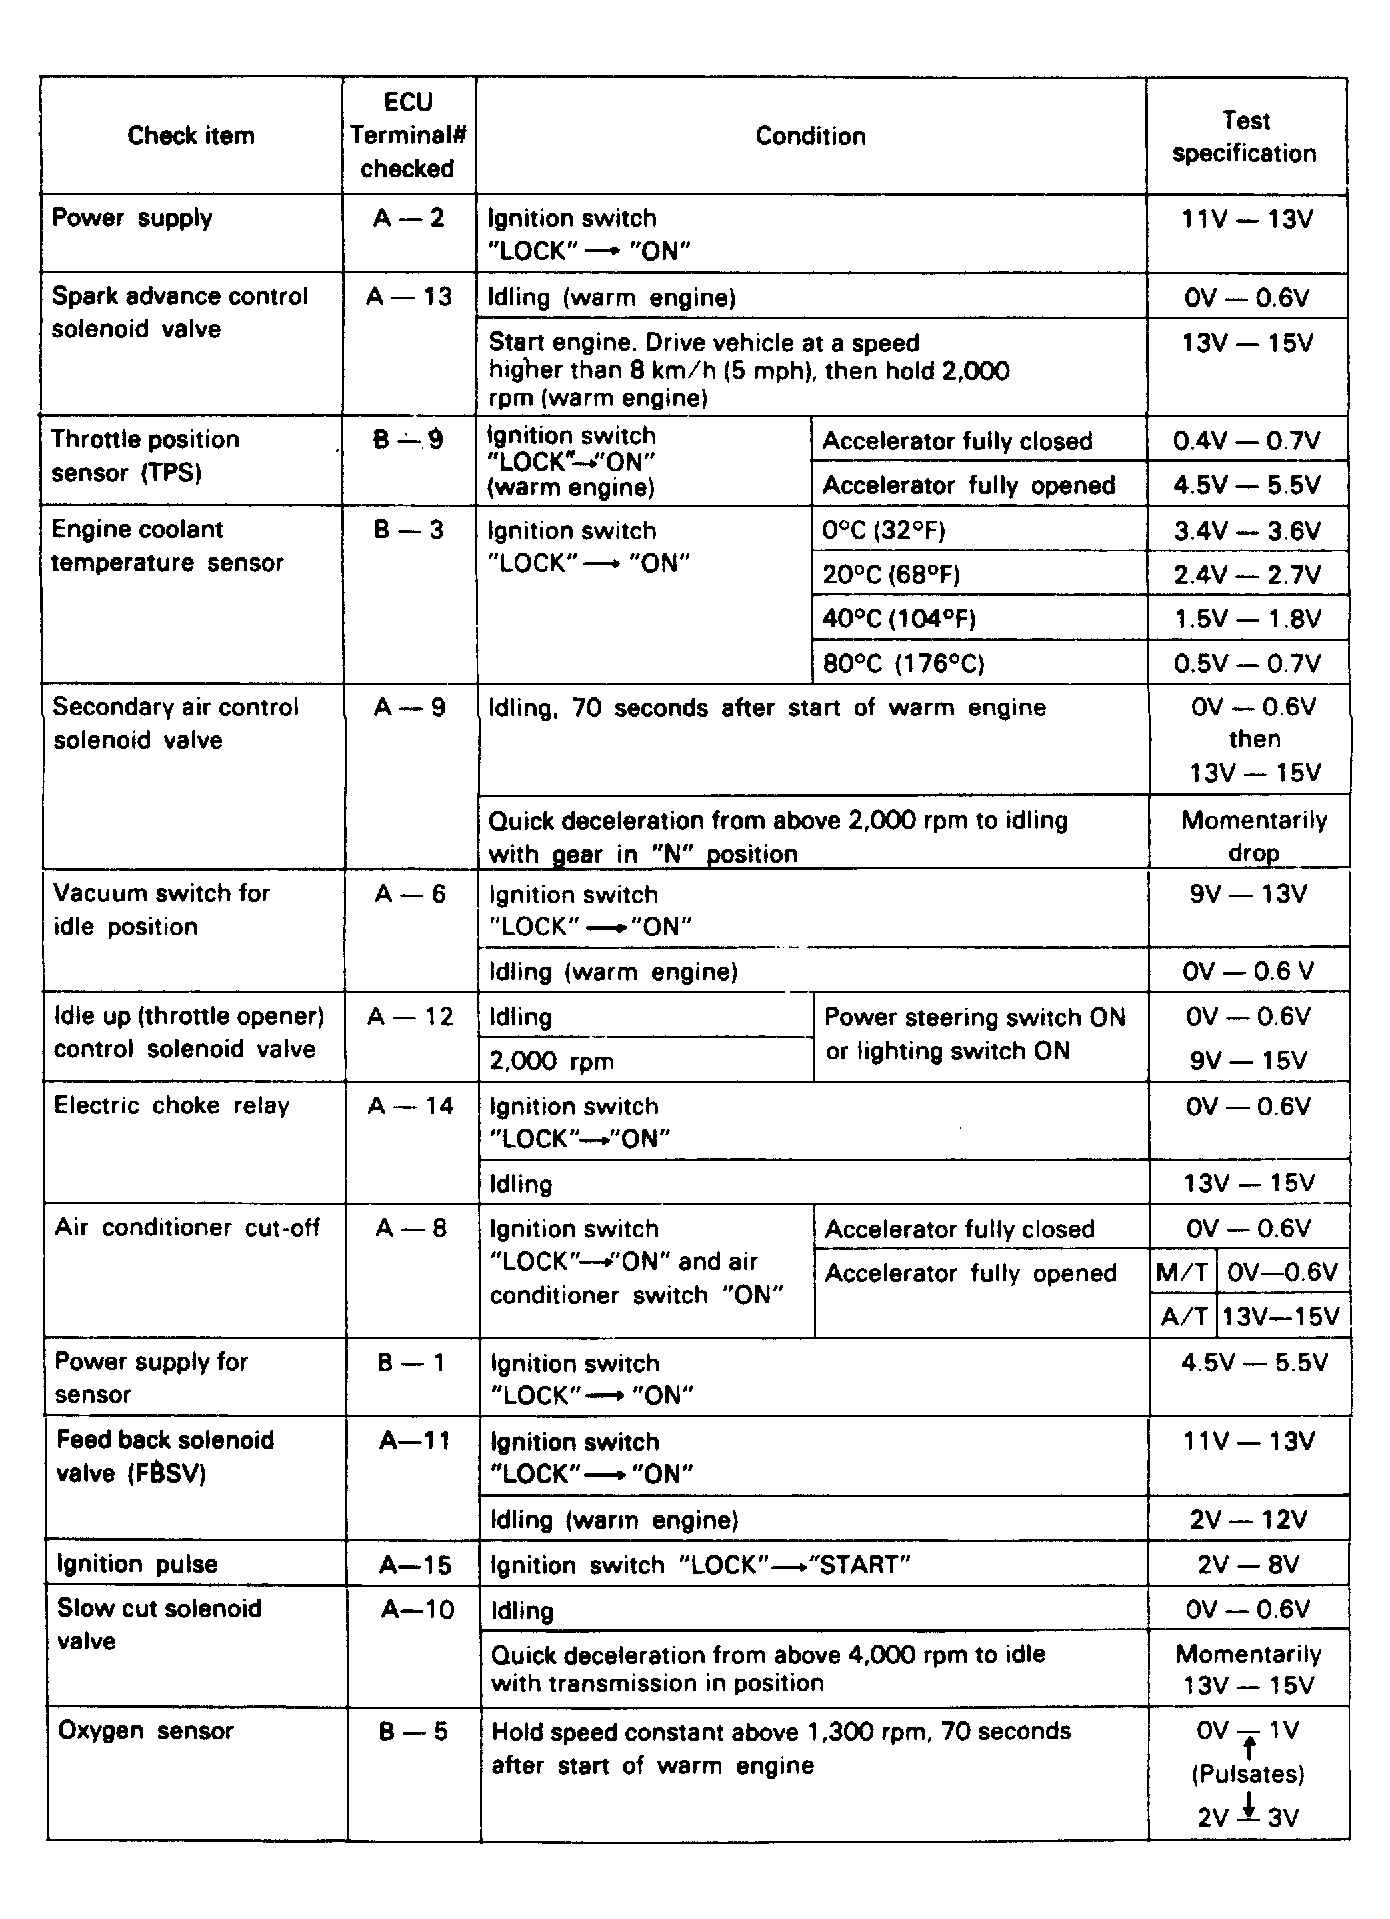
Pin Voltage Specifications
NOTE:
When testing pin voltages, it is recommended that a DVOM with high input impedance be used in order to ensure accurate voltage readings.
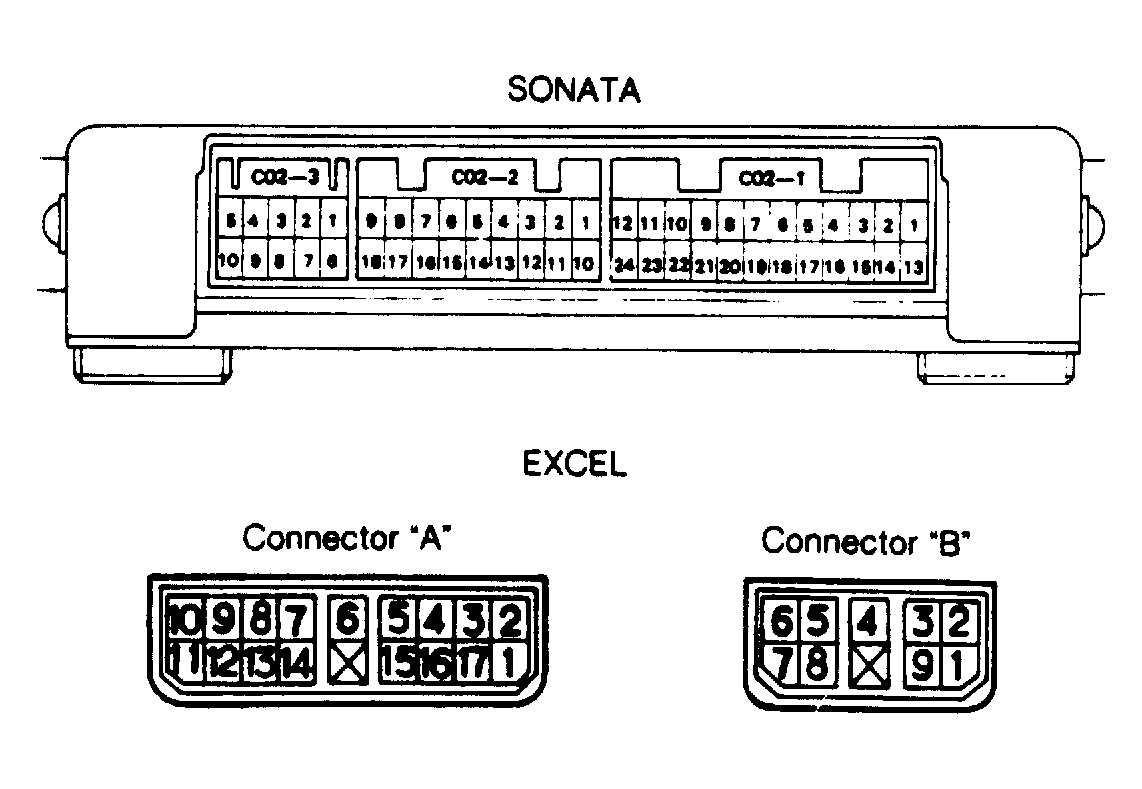
- ECU circuits are checked at the ECU connector with ignition on and engine running. Test each terminal between indicated terminal No. and body ground. See Fig 1
and Fig 2
. Use wire color (if available) to help identify terminal. To test pin voltage, carefully backprobe terminal at harness side of ECU connector.
- If specified voltage reading is not found, test and repair or replace circuit or affected component. Retest circuit to verify repair has been made. All tests are with ECU harness connected unless noted.
 Courtesy of HYUNDAI MOTOR COMPANY
 Courtesy of HYUNDAI MOTOR COMPANY
 SONATA PIN VOLTAGES & CIRCUIT IDENTIFICATION
| Pin No. |
Circuit/Wire Color |
Volts |
| CO2-3 |
| 1 |
Ground/Black |
0 |
| 2 |
Power/Red |
11-14 |
| 3 |
Back-Up Power/White-Blue |
11-14 |
| 4 |
Inhibitor Switch/Yellow-Red |
0-.6 |
| 5 |
Not Used |
N/A |
| 6 |
Ground/Black |
0 |
| 7 |
Power/Red |
11-14 |
| 8 |
Ignition Power/Black-Red |
8-10 |
| 9 |
Fuel Pump Control/White-Black |
11-15 |
| 10 |
Not Used |
N/A |
| CO2-2 |
| 1 |
Injector #1/Yellow |
12-14 |
| 2 |
Injector #2/Yellow-Black |
12-14 |
| 3 |
EGR Control (Ca.)/Brw-Wht |
|
| 4 |
Power Transistor/Wht-Bl |
0.3-0.8 |
| 5 |
Not Used |
N/A |
| 6 |
Fuel Pump Relay/Wht-Red |
0-0.6 |
| 7 |
Not Used |
N/A |
| 8 |
Idle Speed Control/Bl-Wht |
|
| 9 |
Idle Speed Control/Bl-Yel |
|
| 10 |
Injector #3/Lht Gr |
12-14 |
| 11 |
Inj #4/Lgt Green-Wht |
12-14 |
| 12 |
Purge Solenoid/Brown |
11-15 |
| 13 |
Not Used |
N/A |
| 14 |
Emis Indicator Lgt/Bl-Yel |
0-0.6 |
| 15 |
A/C Relay/Black-Green |
|
| 16 |
Not Used |
N/A |
| 17 |
Not Used |
N/A |
| 18 |
Not Used |
N/A |
| CO2-1 |
| 1 |
Self-Diag/Lgh Green-Blk |
|
| 2 |
Self-Diag/Black-Red |
|
| 3 |
Not Used |
N/A |
| 4 |
Oxygen Sensor/White |
0.2-0.9 |
| 5 |
Power Steering Swt/Blk-Yel |
11-15 |
| 6 |
Idle Swt/Yellow-Green |
|
| 7 |
A/C Switch/Black-White |
|
| 8 |
Intake Air Temp. Sensor/Green-Brw |
2.5-2.7 |
| 9 |
Not Used |
N/A |
| 10 |
Airflow Sensor/Green-White |
2.7-3.2 |
| 11 |
Not Used |
N/A |
| 12 |
Ign Timing Adj./Lgh Gr-Red |
|
| 13 |
Sensor Reference Pwr/Gr-Yel |
5 |
| 14 |
Sensor Ground/Black |
0 |
| 15 |
EGR Temp Sensor/Yel-Blk |
1.5-4.2 |
| 16 |
Baro Pressure Sensor/Brw |
0.8-4.0 |
| 17 |
Motor Pos Sensor/Lgt Gr |
0.5-1.3 |
| 18 |
Vehicle Speed Sensor/Yel-Wht |
0-3.0 |
| 19 |
Throttle Pos. Sensor/Lgt Gr-Yel |
0.4-0.5 |
| 20 |
Coolant Temp Sensor/Yel-Red |
0.5-0.7 |
| 21 |
Crank Angle Sensor/Green |
1.8-2.5 |
| 22 |
Top Dead Center (TDC) Sensor/Yel |
0.2-1.2 |
| 23 |
Sensor Ref Pwr/Gr-Yel |
5 |
| 24 |
Sensor Gr/Blk |
0 |