A/T Clutch Pressure Control Solenoid Valve C Replacement
- Remove the engine cover and the air intake duct.
- Disconnect the A/T clutch pressure control solenoid valve C connector.
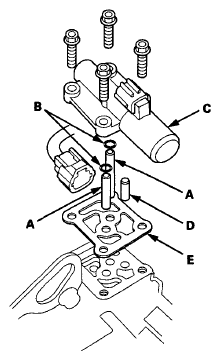
- Remove A/T clutch pressure control solenoid valve C.
 Courtesy of AMERICAN HONDA MOTOR CO., INC.
- Remove the ATF joint pipes (A), the O-rings (B), the ATF pipe (D), and the gasket (E).
- Clean the mounting surfaces and the fluid passages of the solenoid valve body and the transmission housing.
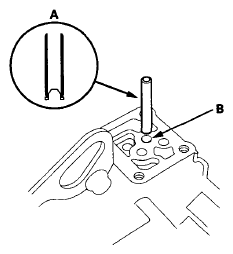
- Install the 8 x 53 mm ATF joint pipe (A) with the filter end into its mounting hole (B).
 Courtesy of AMERICAN HONDA MOTOR CO., INC.
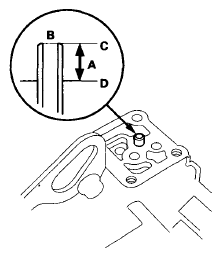
- Check the height (A) of the 8 x 53 mm ATF joint pipe (B) between the top (C) of the pipe and the solenoid valve body mounting surface (D). The height is about 7 mm (0.3 in). If the height is over 7 mm (0.3 in), push the pipe until it bottoms in the accumulator body.
 Courtesy of AMERICAN HONDA MOTOR CO., INC.
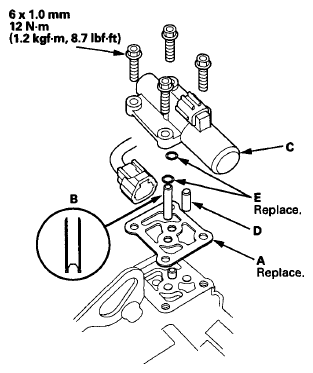
- Install a new gasket (A) on the transmission housing, and install the 8 x 34.5 mm ATF joint pipe (B) with the filter end into the transmission housing and the 8 x 25.2 mm ATF pipe (p).
 Courtesy of AMERICAN HONDA MOTOR CO., INC.
- Install new O-rings (E) over the ATF joint pipes.
- Install A/T clutch pressure control solenoid valve C.
- Check the connector for rust, dirt, or oil, and clean or repair if necessary, then connect the connector securely.
- Install the air intake duct and the engine cover.