Oil Pan Installation
- Remove all of the old liquid gasket from the oil pan mating surfaces, the bolts, and the bolt holes.
- Clean and dry the oil pan mating surfaces.
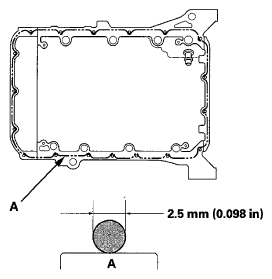
- Apply liquid gasket (P/N 08717-0004, 08718-0003, 08718-0004, or 08718-0009) to the oil pan mating surface of the engine block and to the inside edge of the threaded bolt holes. Install the component within 5 minutes of applying the liquid gasket.
NOTE:
- Apply a 2.5 mm (0.098 in) diameter bead of liquid gasket along the broken line (A).
- If you apply liquid gasket P/N 08718-0012, the component must be installed within 4 minutes.
- If too much time has passed after applying the liquid gasket, remove the old liquid gasket and residue, then reapply the new liquid gasket.
 Courtesy of AMERICAN HONDA MOTOR CO., INC.
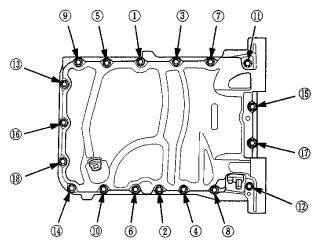
- Install the oil pan on the engine block.
- Tighten the bolts in three steps. In the final step, torque the bolts, in sequence, to 12 N.m (1.2 kgf.m, 9 lbf.ft).
NOTE:
- Wait at least 30 minutes before filling the engine with oil.
- Do not run the engine for at least 3 hours after installing the oil pan.
 Courtesy of AMERICAN HONDA MOTOR CO., INC.
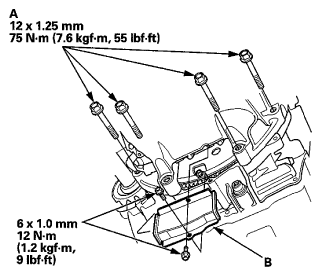
- Tighten the four bolts (A) securing the transmission, then install the torque converter case cover (B).
 Courtesy of AMERICAN HONDA MOTOR CO., INC.
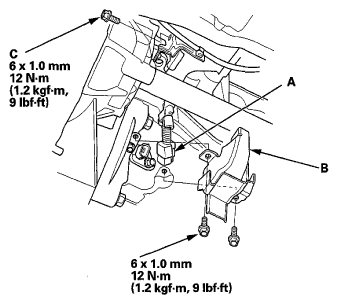
- Connect the CKP sensor connector (A), then install the CKP sensor cover (B) and the bolt (C).
 Courtesy of AMERICAN HONDA MOTOR CO., INC.
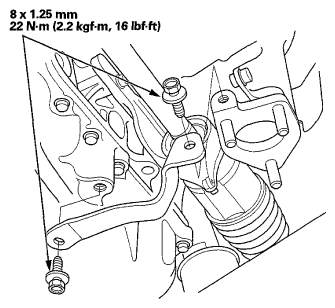
- Install the rear warm up TWC bracket.
 Courtesy of AMERICAN HONDA MOTOR CO., INC.
- If the engine is still in the vehicle, do the following steps.
- Install exhaust pipe A using new gaskets and new self-locking nuts (see step 30 in
ENGINE INSTALLATION
).
- Install the splash shield (see
FRONT SPLASH SHIELD REPLACEMENT
).
- Refill the engine with engine oil (see
ENGINE OIL REPLACEMENT
).