Closer Motor Test
- Remove the sliding door sill trim (see
SLIDING DOOR OPENING
), and the sliding door panel (see
SLIDING DOOR PANEL REMOVAL/INSTALLATION
).
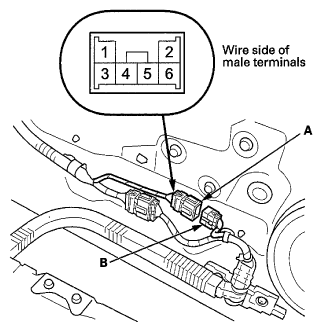
- Disconnect the 6P connector (A) from the CESS articulated harness connector B (6P) (B).
 Courtesy of AMERICAN HONDA MOTOR CO., INC.
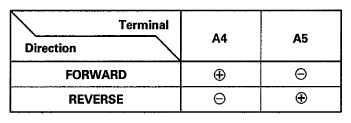
- Test the closer motor by connecting power and ground according to the table.
 Courtesy of AMERICAN HONDA MOTOR CO., INC.
- If the motor does not run or fails to run smoothly, there is no continuity, repair an open or high resistance in the wire(s). If the wire harness is OK, go to step 5.
- Remove the sliding door rear latch (see
SLIDING DOOR REAR LATCH REPLACEMENT
).
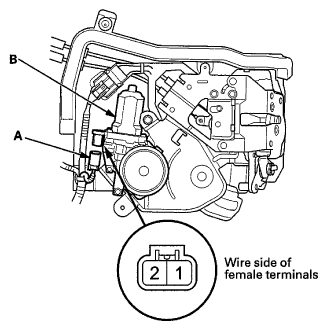
- Disconnect the 2P connector (A) from the closer motor assembly (B).
 Courtesy of AMERICAN HONDA MOTOR CO., INC.
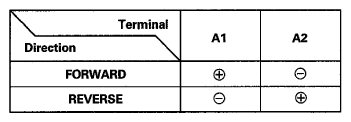
- Test the closer motor by connecting power and ground according to the table.
 Courtesy of AMERICAN HONDA MOTOR CO., INC.
- If the motor does not operate, replace the sliding door rear latch (see
SLIDING DOOR REAR LATCH REPLACEMENT
).
NOTE:
- Quickly disconnect the battery when the motor is running and has reached the limit position.
- After testing, with the sliding door in the fully closed position, momentarily run the motor in the forward rotation direction from the reverse rotation motor limit position.