Oil/Air Separator Removal/Installation
- Raise the vehicle on the lift.
- Remove the splash shield (see
SPLASH SHIELD REPLACEMENT
).
- Remove the thermostat housing (see
THERMOSTAT REPLACEMENT
).
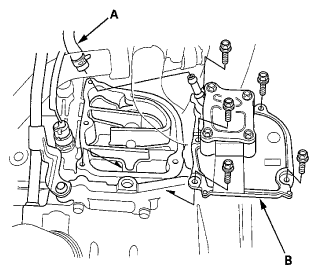
- Remove the PCV hose (A).
 Courtesy of AMERICAN HONDA MOTOR CO., INC.
- Remove the oil/air separator (B).
- Remove all of the old liquid gasket from the oil/air separator mating surfaces, the bolts, and the bolt holes.
- Clean and dry the oil/air separator mating surfaces.
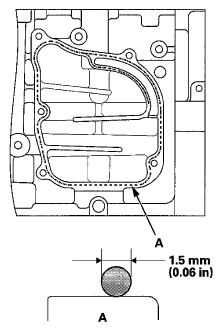
- Apply liquid gasket (P/N 08718-0004) to the engine block mating surface of the oil/air separator and to the inside edge of the bolt holes. Install the component within 5 minutes of applying the liquid gasket.
NOTE:
- Apply a 1.5 mm (0.06 in) diameter bead of liquid gasket along the broken line (A).
- If too much time has passed after applying the liquid gasket, remove the old liquid gasket and residue, then reapply new liquid gasket.
 Courtesy of AMERICAN HONDA MOTOR CO., INC.
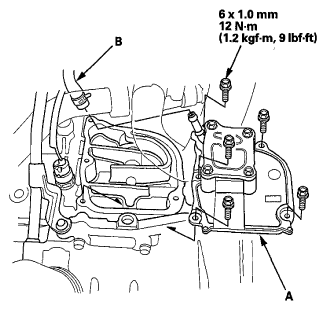
- Install the oil/air separator (A).
NOTE:
- Wait at least 30 minutes before filling the engine with oil.
- Do not run the engine for at least 3 hours after installing the oil/air separator.
 Courtesy of AMERICAN HONDA MOTOR CO., INC.
- Install the PCV hose (B).
- Install the thermostat housing (see
INSTALLATION
).
- Install the splash shield (see
SPLASH SHIELD REPLACEMENT
).
- Lower the vehicle on the lift.