Shift Cable Replacement
- Remove the center console (see
CENTER CONSOLE REMOVAL/INSTALLATION
).
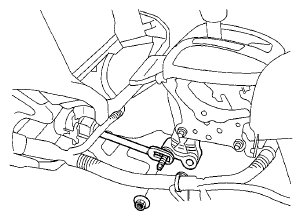
- Move the shift lever to R.
- Remove the nut securing the shift cable end.
 Courtesy of AMERICAN HONDA MOTOR CO., INC.
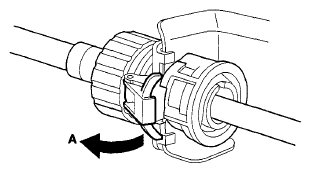
- Unlock the retainer (A).
 Courtesy of AMERICAN HONDA MOTOR CO., INC.
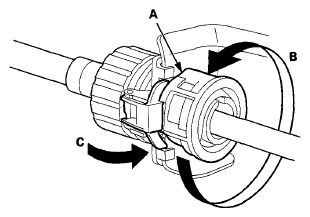
- Rotate the socket holder retainer (A) counterclockwise (B) until it stops, and push the retainer lock (C) into the socket holder retainer to lock the retainer.
 Courtesy of AMERICAN HONDA MOTOR CO., INC.
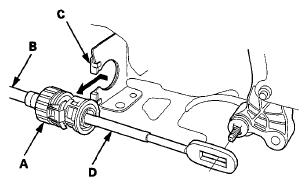
- Slide the socket holder (A) away from the bracket as shown to remove the shift cable (B) from the shift cable bracket (C). Do not remove the shift cable by pulling the shift cable guide (D).
 Courtesy of AMERICAN HONDA MOTOR CO., INC.
- Raise the vehicle on a lift, or apply the parking brake, block both rear wheels, and raise the front of the vehicle. Make sure it is securely supported.
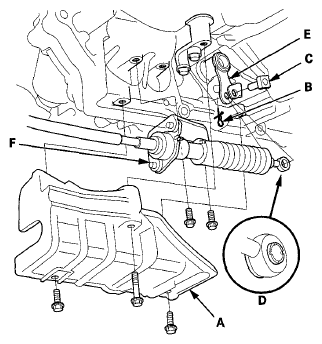
- Vehicles with JHM VINs: Remove the shift cable cover (A).
 Courtesy of AMERICAN HONDA MOTOR CO., INC.
- Vehicles with JHM VINs: Remove the spring clip (B) and the control pin (C), and separate the shift cable end (D) from the selector control lever (E). Remove the two bolts securing the shift cable bracket (F).
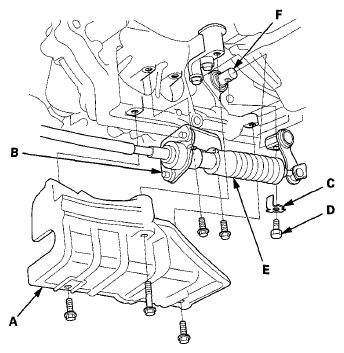
- Vehicles with 1HG VINs: Remove the shift cable cover (A), and remove the two bolts securing the shift cable bracket (B).
 Courtesy of AMERICAN HONDA MOTOR CO., INC.
- Vehicles with 1HG VINs: Pry up the lock tab of the lock washer (C), and remove the lock bolt (D) and the lock washer, then separate the shift cable (E) from the selector control shaft (F).
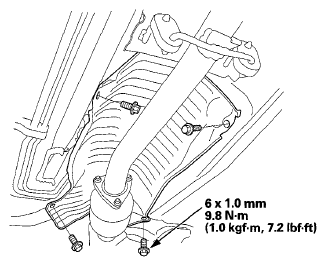
- Remove the heat shield.
 Courtesy of AMERICAN HONDA MOTOR CO., INC.
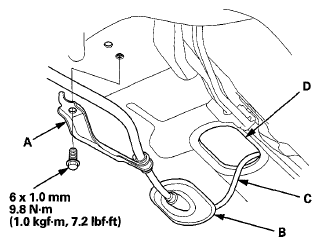
- Remove the bolts securing the shift cable bracket (A).
 Courtesy of AMERICAN HONDA MOTOR CO., INC.
- Remove the shift cable grommet (B), and pull out the shift cable (C).
- Insert a new shift cable through the grommet hole (D), and install the grommet in its hole. Do not bend the shift cable excessively.
- Install the shift cable bracket.
- Install the heat shield.
- Install the shift cable to the transmission.
- For vehicles with JHM VINs, go to step 19.
- For vehicles with 1HG VINs, go to step 22.
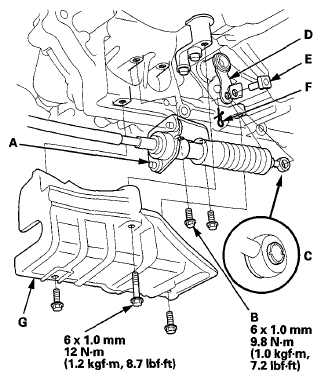
- Vehicles with JHM VINs: Install the shift cable bracket (A) with the two bolts (B).
 Courtesy of AMERICAN HONDA MOTOR CO., INC.
- Vehicles with JHM VINs: Attach the shift cable end (C) to the selector control lever (D), then insert the control pin (E) into the control lever hole through the shift cable end, and secure the control pin with the spring clip (F). Do not bend the shift cable excessively.
- Vehicles with JHM VINs: Install the shift cable cover (G).
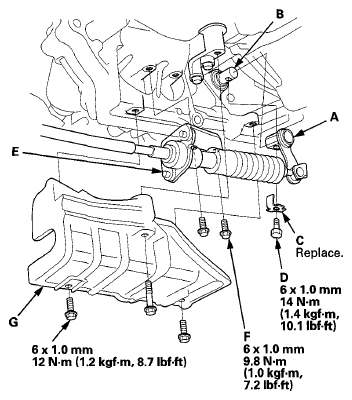
- Vehicles with 1HG VINs: Install the selector control lever (A) over the selector control shaft (B). Secure the control lever with a new lock washer (C) and the lock bolt (D), then bend the lock tab of the lock washer against the bolt head. Do not bend the shift cable excessively.
 Courtesy of AMERICAN HONDA MOTOR CO., INC.
- Vehicles with 1HG VINs: Install the shift cable bracket (E) with the two bolts (F).
- Vehicles with 1HG VINs: Install the shift cable cover (G).
- Install the shift cable on the shift lever, and adjust the shift cable (see SHIFT CABLE ADJUSTMENT
).
- Install the center console (see
CENTER CONSOLE REMOVAL/INSTALLATION
).