Starter Solenoid Test
- Remove the air intake duct (see step 1 on FRONT BULKHEAD COVER REPLACEMENT
).
- Do the battery removal procedure (see BATTERY REMOVAL AND INSTALLATION
).
- Remove the battery base (see step 9 on ENGINE REMOVAL
).
- Remove the harness clamp (A), then disconnect the positive starter cable (B), the motor wire (C), and the S terminal connector (D) from the starter.
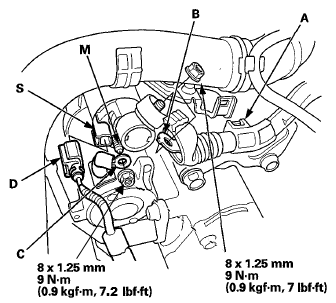 Courtesy of AMERICAN HONDA MOTOR CO., INC.
- Check the hold-in coil for continuity between the S terminal and the armature housing (ground). There should be continuity.
- If there is continuity/go to step 6.
- If there is no continuity, replace the solenoid.
- Check the pull-in coil for continuity between the S terminal and the M terminal. There should be continuity.
- If there is continuity/the solenoid is OK.
- If there is no continuity, replace the solenoid.
- Install the wire and the connector in the reverse order of removal.
- Install the battery base (see step 56 on ENGINE INSTALLATION
).
- Do the battery installation procedure (see BATTERY REMOVAL AND INSTALLATION
).
- Install the air intake duct (see FRONT BULKHEAD COVER REPLACEMENT
).