Oil Pump Overhaul: Installation
- Remove the old oil seal from the oil pump.
- Clean and dry the crankshaft oil seal housing.
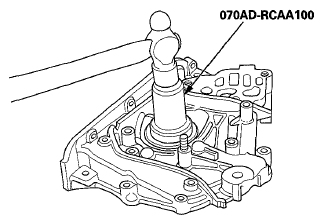
- Using the oil seal driver, 64 mm, drive the new crankshaft oil seal (A) until the oil seal driver bottoms on the pump.
 Courtesy of AMERICAN HONDA MOTOR CO., INC.
- Remove all of the old liquid gasket from the oil pump mating surfaces, the bolts, and the bolt holes.
- Clean and dry the oil pump mating surfaces.
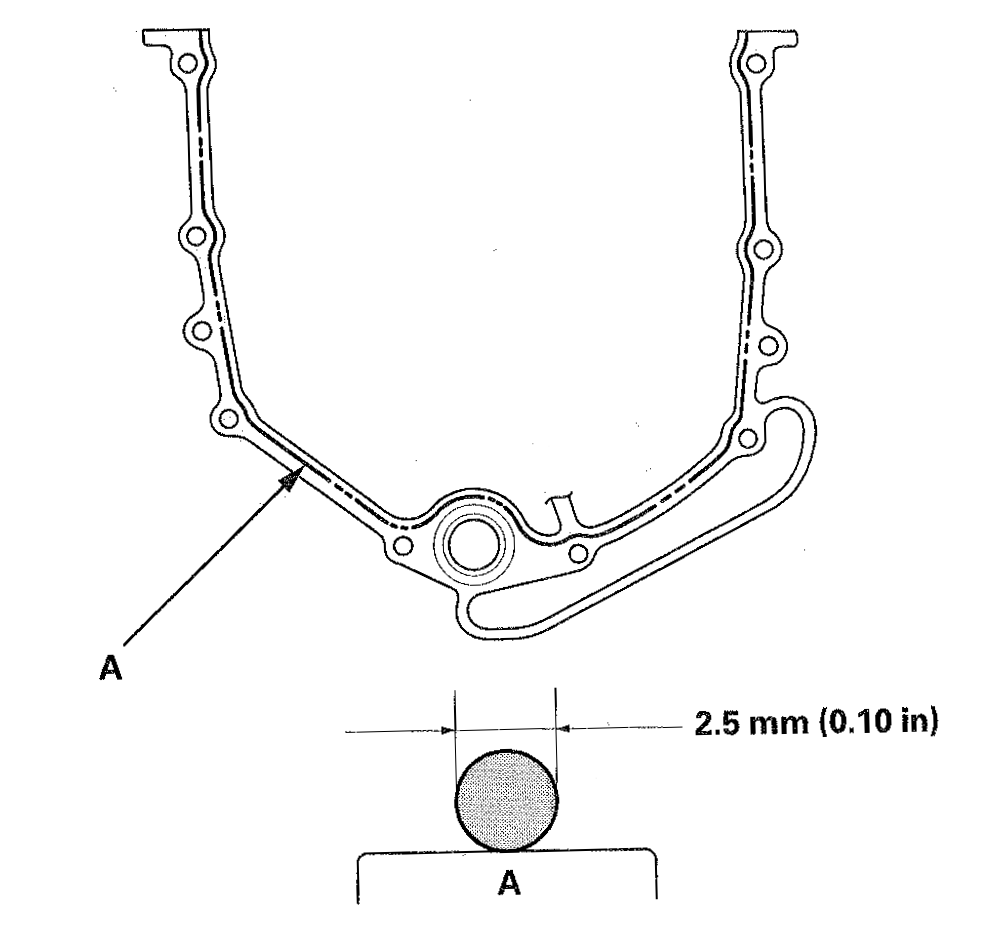
- Apply liquid gasket, P/N 08717-0004,08718-0001, 08718-0003, or 08718-0009, evenly to the engine block mating surface of the oil pump arid to the inside edge of the threaded bolt holes. Install the component within 5 minutes of applying the liquid gasket.
NOTE:
- Apply a 2.5 mm (.10 in) diameter bead of liquid gasket along the broken line (A).
- If you apply liquid gasket P/N 08718-0012, the component must be installed within 4 minutes.
- If too much time has passed after applying the liquid gasket, remove the old liquid gasket and residue, then reapply the new liquid gasket.
 Courtesy of AMERICAN HONDA MOTOR CO., INC.
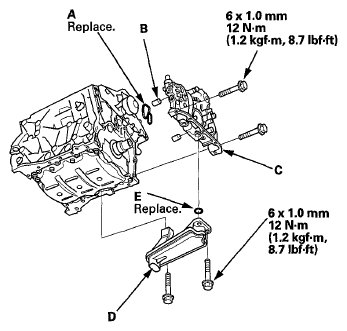
- Apply a light coat of new engine oil to the lip of the crankshaft oil seal, and apply new engine oil to the new O-ring (A).
 Courtesy of AMERICAN HONDA MOTOR CO., INC.
- Install the dowel pins (B), then align the inner rotor with the crankshaft, and install the oil pump (C).
NOTE:
- Wait at least 30 minutes before filling the engine with oil
- Do not run the engine for at least 3 hours after installing the oil pump.
- Clean the excess grease off the crankshaft, and check the seal for distortion.
- Install the oil strainer (D) using a new O-ring (E).
- Install the oil pan (see OIL PAN INSTALLATION
).
- Install the oil filter base/oil filter assembly using a new O-ring (see step 39 on CRANKSHAFT AND PISTON INSTALLATION
).
- Install the timing belt (see TIMING BELT INSTALLATION
).
- Remove the engine support hanger from the vehicle.
- Install the both sides cowl top side lid on the cowl cover.
- Install the power steering (P/S) pump and the P/S line bracket (see step 26 on CYLINDER HEAD INSTALLATION
).
- Install the drive belt (see DRIVE BELT REPLACEMENT
).
- Install the bulkhead cover (see FRONT BULKHEAD COVER REPLACEMENT
).
- Refill the engine with the recommended engine oil (see 7
).