D3 Switch Test
- Remove the dashboard center lower covers (see
DASHBOARD CENTER LOWER COVER REMOVAL/INSTALLATION
).
- Disconnect the D3 switch/park pin switch/A/T gear position indicator panel light connector.
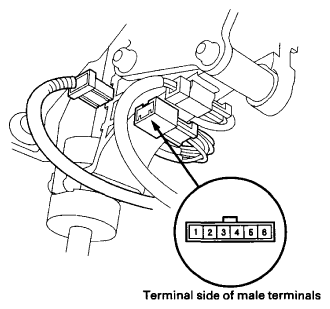 Courtesy of AMERICAN HONDA MOTOR CO., INC.
- Push the D3 switch several times, and check the switch for continuity between D3 switch/park pin switch/A/T gear position indicator panel light connector terminals No. 5 and No. 6. There should be toggled continuity and no continuity between terminals every time the D3 switch is pushed.
- D3 switch test is finished if the test result is OK. If the D3 switch works incorrectly at the D3 switch/park pin switch/A/T gear position indicator panel light connector, test the D3 switch at the D3 switch 2P connector.
- Remove the shift lever (see
SHIFT LEVER REMOVAL ).
- Remove the D3 switch 2P connector from the connector holder, and disconnect it.
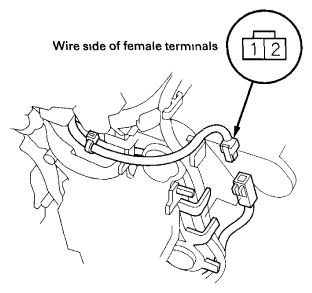 Courtesy of AMERICAN HONDA MOTOR CO., INC.
- Push the D3 switch several times, and check the switch for continuity between D3 switch 2P connector terminals No. 1 and No. 2. There should be toggled continuity and no continuity between terminals every time the D3 switch is pushed.
- Replace the D3 switch (see
D3 SWITCH REPLACEMENT ) if the switch works incorrectly.
- Replace the D3 switch connector harness, the A/T gear position indicator panel light harness, and the park pin switch as a set (see
A/T GEAR POSITION INDICATOR PANEL LIGHT HARNESS REPLACEMENT ) if the switch is OK. The D3 switch connector harness is not available from the A/T gear position indicator panel light harness and the park pin switch.
- Connect the 2P connector, and install it in the holder.
- Install the shift lever (see
SHIFT LEVER INSTALLATION ).
- Install the dashboard center lower covers (see
DASHBOARD CENTER LOWER COVER REMOVAL/INSTALLATION
).