Oil Pan Installation
- Remove all of the old liquid gasket from the oil pan mating surfaces, the bolts, and the bolt holes.
- Clean and dry the oil pan mating surfaces.
- Apply liquid gasket, P/N 08717-0004, 08718-0003, or 08718-0009, evenly to the engine block mating surface of the oil pan, and to the inside edge of the threaded bolt holes. Install the component within 5 minutes of applying the liquid gasket.
NOTE:
- Apply a 3 mm (0.12 in) diameter bead of liquid gasket along the broken line (A).
- If too much time has passed after applying the liquid gasket, remove the old liquid gasket and residue, then reapply new liquid gasket.
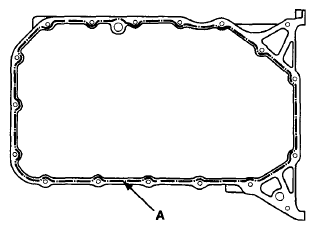 Courtesy of AMERICAN HONDA MOTOR CO., INC.
- Install the oil pan.
- Tighten the bolts in three steps. In the final step, tighten all bolts, in sequence, to 12 N.m (1.2 kgf.m, 8.7 lbf.ft). Wipe off the excess liquid gasket on the each side of crankshaft pulley and the flywheel/drive plate.
NOTE:
- Wait at least 30 minutes before filling the engine with oil.
- Do not run the engine for at least 3 hours after installing the oil pan.
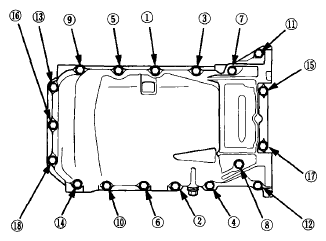 Courtesy of AMERICAN HONDA MOTOR CO., INC.
- Install the torque converter cover (A), and install the two bolts securing the transmission.
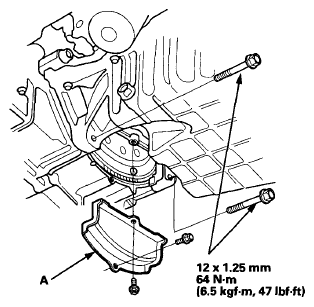 Courtesy of AMERICAN HONDA MOTOR CO., INC.
- Remove the bolts securing the oil pan.
- Install the lower torque rod bracket.
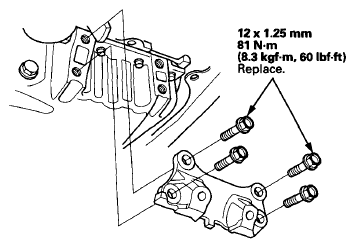 Courtesy of AMERICAN HONDA MOTOR CO., INC.
- If the engine is still in the vehicle, do steps 9 through 31.
- Using the subframe adapter and a jack, raise the subframe up to body.
- Loosely install the new 14 x 1.5 mm bolts.
- Align all reference marks on the front subframe with the body, then tighten the bolts on the front subframe to the specified torque.
- Tighten the new subframe mounting bolts on both side.
- Lower the vehicle on the lift.
- Loosen the upper torque rod mounting bolt.
- Raise the vehicle on the lift.
- Install the lower torque rod, then tighten the new lower torque rod mounting bolts in the numbered sequence shown.
- Lower the vehicle on the lift.
- Tighten the upper torque rod mounting bolt.
- Install the automatic transmission fluid (ATF) filter.
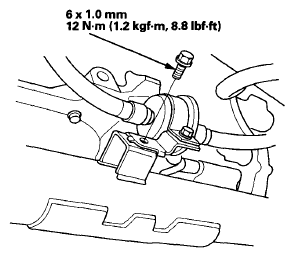 Courtesy of AMERICAN HONDA MOTOR CO., INC.
- Install the bolts securing the left steering gearbox mounting bracket.
- Install the bolts securing the right steering gearbox mounting bracket.
- Install the power steering (P/S) fluid line bracket and secure the hose with the hose clamps.
- 4WD model: Install the propeller shaft (see
PROPELLER SHAFT INSTALLATION
).
- Install a new set ring on the end of each driveshaft, then install the driveshafts (see
FRONT DRIVESHAFT INSTALLATION
). Make sure each ring "clicks" into place in the differential and intermediate shaft.
- Connect the lower arms to the knuckles (see
LOWER ARM REMOVAL/INSTALLATION
).
- Connect the stabilizer links to the stabilizer bar (see
STABILIZER LINK REMOVAL/INSTALLATION
).
- Install the shift cable (see
SHIFT CABLE REPLACEMENT
).
- Install the splash shield (see
FRONT SPLASH SHIELD REPLACEMENT
).
- Install the front wheels.
- Refill the engine with the recommended engine oil (see
ENGINE OIL REPLACEMENT
).
- Check the wheel alignment.