Shift Lever Removal
- Remove the dashboard center lower cover (see DASHBOARD CENTER LOWER COVER REMOVAL/INSTALLATION
) and the dashboard center panel (see DASHBOARD CENTER PANEL REMOVAL/INSTALLATION
).
- Disconnect the D3 switch/park pin switch/A/T gear position indicator panel light harness connector (A) and the shift lock solenoid connector (B).
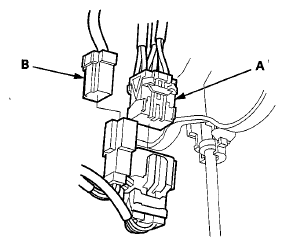 Courtesy of AMERICAN HONDA MOTOR CO., INC.
- Move the shift lever to R.
- Slide the lock tab (A) down on the shift cable end holder (B).
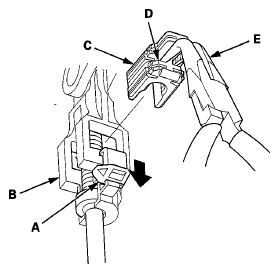 Courtesy of AMERICAN HONDA MOTOR CO., INC.
- Grasp the shift cable lock (C) in the middle (D) using angle-jaw needle-nose pliers (E), and remove it from the shift cable end and the shift cable end holder. Do not pry the shift cable lock using a screwdriver, it may damage the shift cable end holder.
- Separate the shift cable end (A) from the shift cable end holder (B).
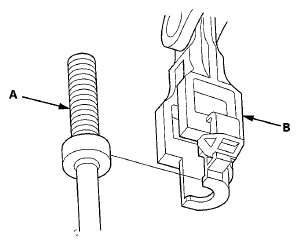 Courtesy of AMERICAN HONDA MOTOR CO., INC.
- Rotate the socket holder (A) on the shift cable (B) a 1/4 turn; the guide tab (C) on the socket holder will be perpendicular to the opening (D) of the socket holder bracket (E). Then slide the socket holder to remove the shift cable from the socket holder bracket. Do not remove the shift cable by twisting the shift cable guide (F).
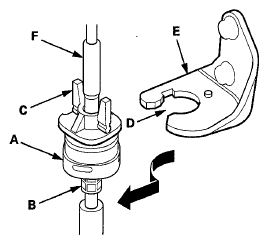 Courtesy of AMERICAN HONDA MOTOR CO., INC.
- Remove the harness clamp (A) and the shift lever assembly.
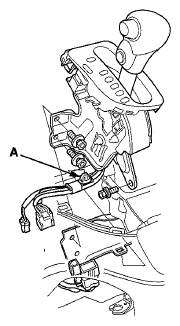 Courtesy of AMERICAN HONDA MOTOR CO., INC.