Transmission Range Switch Test
- Do the battery removal procedure (see BATTERY REMOVAL AND INSTALLATION
).
- Remove the engine cover and the air cleaner assembly.
- Remove the battery base.
- Disconnect the transmission range switch connector.
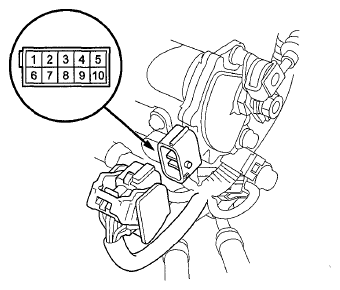 Courtesy of AMERICAN HONDA MOTOR CO., INC.
- Check for continuity between terminals at the switch connector. There should be continuity between the terminals in the following table for each switch position.
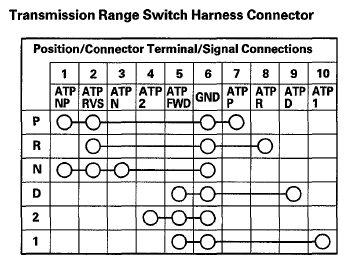 Courtesy of AMERICAN HONDA MOTOR CO., INC.
- Transmission range switch test is finished if the test results are OK. If there is no continuity between any terminals, check that the transmission range switch installation. If the switch installation is OK, replace the switch (see TRANSMISSION RANGE SWITCH REPLACEMENT
).
- Check the connector for rust, dirt, or oil, and clean or repair if necessary, then connect the connector securely.
- Install the battery base.
- Install the air cleaner assembly and the engine cover.
- Do the battery installation procedure (see BATTERY REMOVAL AND INSTALLATION
).