Vacuum Piston Control Solenoid Valve
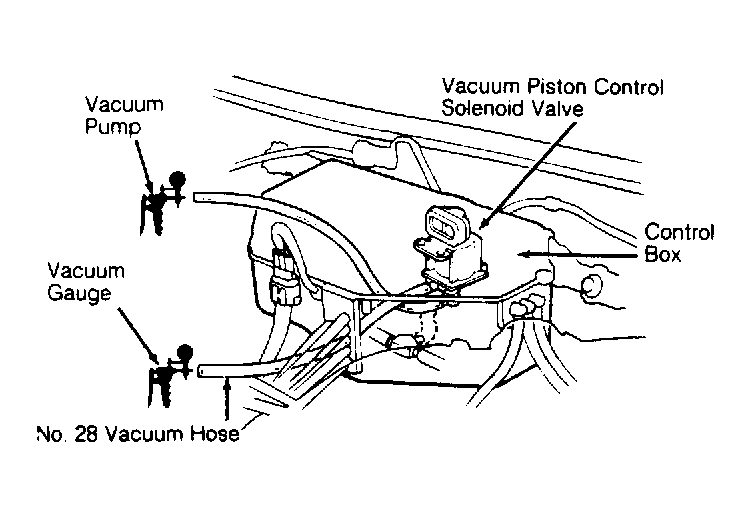
- Detach control box from its mounting and open control box lid. See Figure
for control box location. Disconnect lower vacuum hose of vacuum piston control solenoid valve from 3-way fitting and connect a hand-held vacuum pump. See Fig 1
.
- Disconnect the No. 28 vacuum hose on solenoid valve from hose manifold and connect a vacuum gauge to hose. See Fig 1
. Start engine and warm to normal operating temperature (cooling fan comes on). Apply vacuum. If vacuum is not present on gauge, go to step 4). If vacuum is present on gauge, quickly raise engine speed to 3000 RPM, then close throttle suddenly. If vacuum reading on gauge decreases for a moment, vacuum piston control solenoid valve is okay. If vacuum does not react as specified, go to next step.
- Turn ignition off and disconnect 8-pin connector on control box. Start engine and raise engine speed to 3000 RPM, then close throttle suddenly. Measure voltage between Yellow (positive) wire terminal and Black (negative) wire terminal on harness. If battery voltage does not decrease momentarily, replace solenoid valve. If voltage does decrease momentarily, check CHECK ENGINE warning light and self-diagnosis LED indicator. If okay, substitute a known good ECU and retest. If symptom goes away, replace original ECU.
- Turn ignition off and disconnect 8-pin connector on control box. Start engine. Measure voltage between Yellow (positive) wire terminal and Black (negative) wire terminal on harness. If battery voltage is present, replace solenoid valve. If battery voltage is not present, measure voltage between Yellow (positive) wire terminal and ground. If battery voltage is still not present, go to next step. If battery voltage is now present, repair open or short in Black wire between control box and ground.
- Check CHECK ENGINE warning light and self-diagnosis LED indicator. If okay, inspect for open or short in Yellow wire between control box and ECU terminal A6. See Figure
.
 Courtesy of AMERICAN HONDA MOTOR CO., INC.